> ## Documentation Index
> Fetch the complete documentation index at: https://docs.rootly.com/llms.txt
> Use this file to discover all available pages before exploring further.
# Rootly AI Editor
> Improve your writing across Rootly with Rootly AI text editing — fix spelling and grammar, adjust length, and simplify language.
## Overview
The Rootly AI Editor helps you improve your writing across the Rootly platform with quick, Rootly AI-powered edits. Available in all text fields, the editor makes it easy to clean up spelling and grammar, adjust length, or simplify language — without leaving your workflow.
Whether you're drafting an incident description, writing a customer update, or polishing a retrospective, the Rootly AI Editor provides fast, contextual suggestions you can review and apply instantly.
Use the Rootly AI Editor to clean up writing in seconds — no context switching, no rewriting from scratch.
## Available Editing Actions
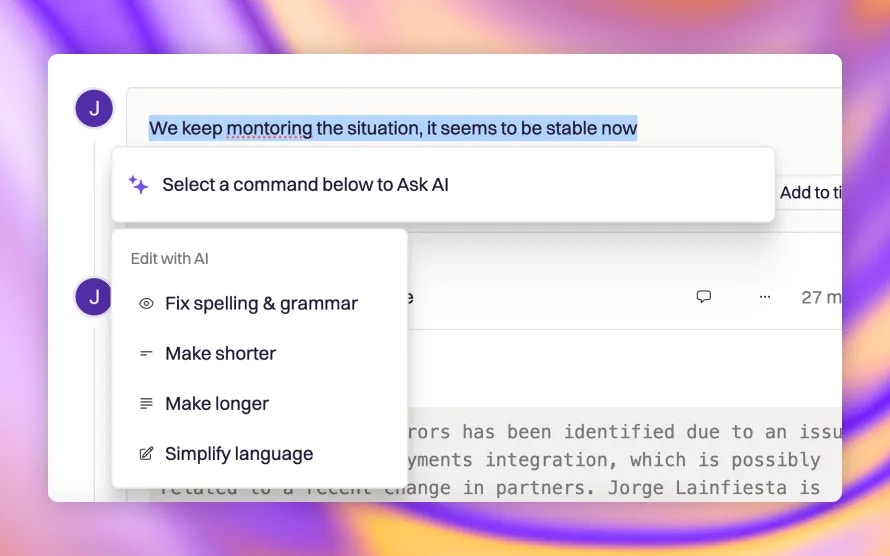
The Rootly AI Editor supports four editing operations:
* **Fix spelling & grammar**\
Corrects spelling mistakes and grammatical errors while preserving your original meaning.
* **Make shorter**\
Condenses text by removing unnecessary words and phrases while keeping the intent intact.
* **Make longer**\
Expands text with additional clarity or detail when more context is needed.
* **Simplify language**\
Rewrites complex or technical language into clearer, more accessible wording.
## How to Use the Rootly AI Editor
1. **Highlight text**\
Select any text in a supported text field.
2. **Open the Rootly AI menu**\
A floating **Ask AI** button appears near your selection.
3. **Choose an action**\
Select one of the available editing options.
4. **Review the result**\
After generation, you can:
* **Accept** the suggestion
* **Try Again** to regenerate
* **Reject** and keep your original text
 ## Where It’s Available
The Rootly AI Editor works in all supported text fields across the platform, including:
* Incident descriptions and summaries
* Communications and status updates
* Retrospectives and postmortems
* Action items and follow-ups
* Custom form fields
* Any other rich text or standard text input
## How It Works
When you select text and choose an editing action, Rootly AI applies the requested transformation and returns a revised version for your review.
All edits are suggestions — you stay in control and decide whether to apply them.
## Configuration
The Rootly AI Editor is available to all customers but must be explicitly enabled.
To enable the editor:
1. Navigate to **Rootly AI**
2. Toggle on **Enable Rootly AI**
3. Ensure the **Ask Rootly AI in Web** toggle is enabled (this includes the Rootly AI Editor)
Only Admins can enable Rootly AI features. Once enabled, no additional configuration is required — the editor is automatically available in supported text fields.
## Troubleshooting
Ensure Rootly AI is enabled and that the **Ask Rootly AI in Web** toggle is on. Verify that you've highlighted text inside a supported text field. The editor only appears when text is actively selected.
After generating a suggestion, click **Accept** to apply the changes. If the result isn't what you expected, try selecting a different portion of text or click **Try Again** to regenerate.
Errors may occur due to timeouts or rate limits. If this happens, wait a moment and try again. If the issue persists, contact Rootly Support.
## Where It’s Available
The Rootly AI Editor works in all supported text fields across the platform, including:
* Incident descriptions and summaries
* Communications and status updates
* Retrospectives and postmortems
* Action items and follow-ups
* Custom form fields
* Any other rich text or standard text input
## How It Works
When you select text and choose an editing action, Rootly AI applies the requested transformation and returns a revised version for your review.
All edits are suggestions — you stay in control and decide whether to apply them.
## Configuration
The Rootly AI Editor is available to all customers but must be explicitly enabled.
To enable the editor:
1. Navigate to **Rootly AI**
2. Toggle on **Enable Rootly AI**
3. Ensure the **Ask Rootly AI in Web** toggle is enabled (this includes the Rootly AI Editor)
Only Admins can enable Rootly AI features. Once enabled, no additional configuration is required — the editor is automatically available in supported text fields.
## Troubleshooting
Ensure Rootly AI is enabled and that the **Ask Rootly AI in Web** toggle is on. Verify that you've highlighted text inside a supported text field. The editor only appears when text is actively selected.
After generating a suggestion, click **Accept** to apply the changes. If the result isn't what you expected, try selecting a different portion of text or click **Try Again** to regenerate.
Errors may occur due to timeouts or rate limits. If this happens, wait a moment and try again. If the issue persists, contact Rootly Support.