> ## Documentation Index
> Fetch the complete documentation index at: https://docs.rootly.com/llms.txt
> Use this file to discover all available pages before exploring further.
# Alert Routing
> Use Alert Routes to determine which teams, services, and escalation policies receive incoming alerts from your monitoring tools based on conditions you define.
### Overview
Alert Routing ensures that alerts from your monitoring and observability systems reach the correct responders quickly and reliably. Rootly provides a unified routing layer that works across all alert sources, enabling consistent on-call workflows.
Rootly supports two routing pathways:
1. **Routing inside your monitoring tool** (Datadog, PagerDuty, Opsgenie, etc.)
2. **Routing inside Rootly** using centralized **Alert Routes**
This guide focuses on routing **inside Rootly**.
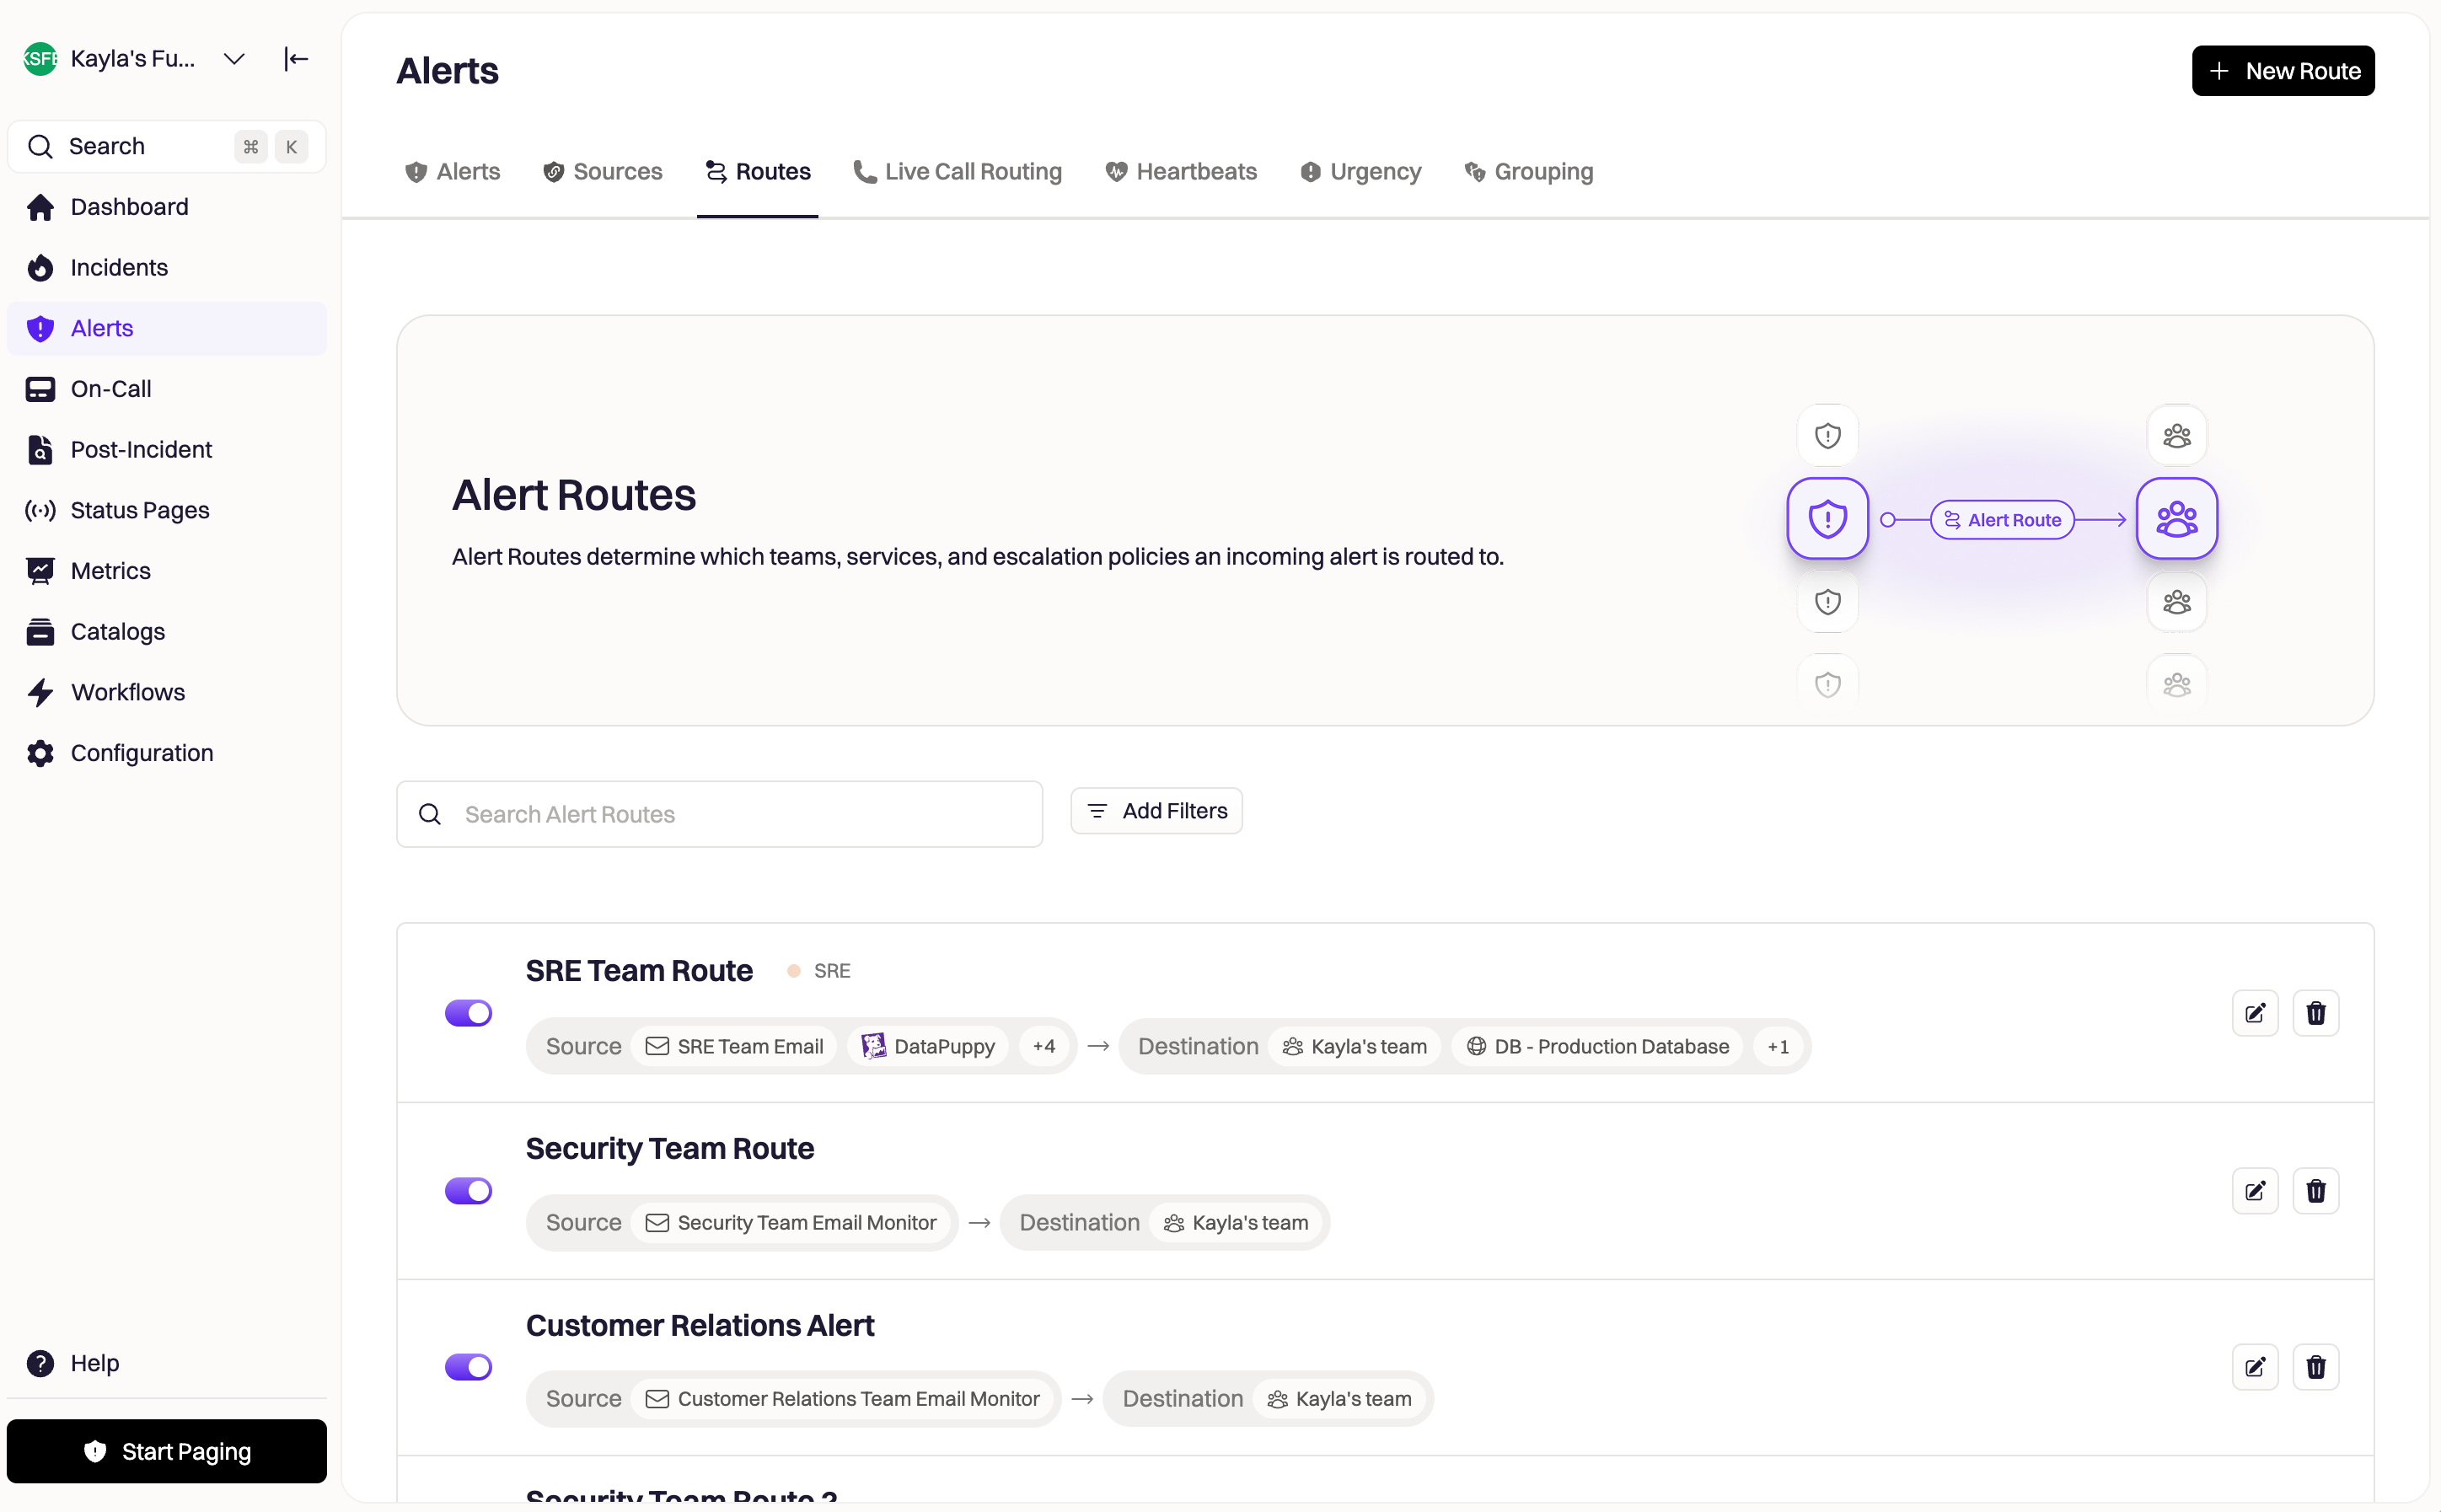 ***
### What Is an Alert Route?
An **Alert Route** defines *when*, *how*, and *to whom* Rootly should send alerts. It supports evaluation against:
* Alert Sources
* Alert Fields (normalized metadata)
* Raw payload values (JSONPath)
* Teams, services, and escalation policies
**Tip:** Alert Routes work best when combined with **Alert Fields**, which let you write stable routing logic even when payload schemas vary across providers.
***
### Creating an Alert Route
Navigate to **Alerts → Routes** and click **New Route**.
Each route requires:
#### Name
A descriptive title that clarifies the route’s purpose.
#### Alert Sources
Select one or more alert sources the route should evaluate.\
Sources can be added or removed at any time.
See all integrations → [Integrations Overview](/integrations/overview)
If your tool doesn't have a dedicated integration, ingest its alerts through the [Generic Webhook Alert Source](/integrations/generic-webhook-alert-source/generic-webhook-alert-source).
#### Owning Team
Controls who can edit the route.
**Permissions:**
* Team Admins may only create routes **for their own team**.
* Teams can only route alerts **from alert sources they own**.
After creating a route, you can begin adding Routing Rules.
***
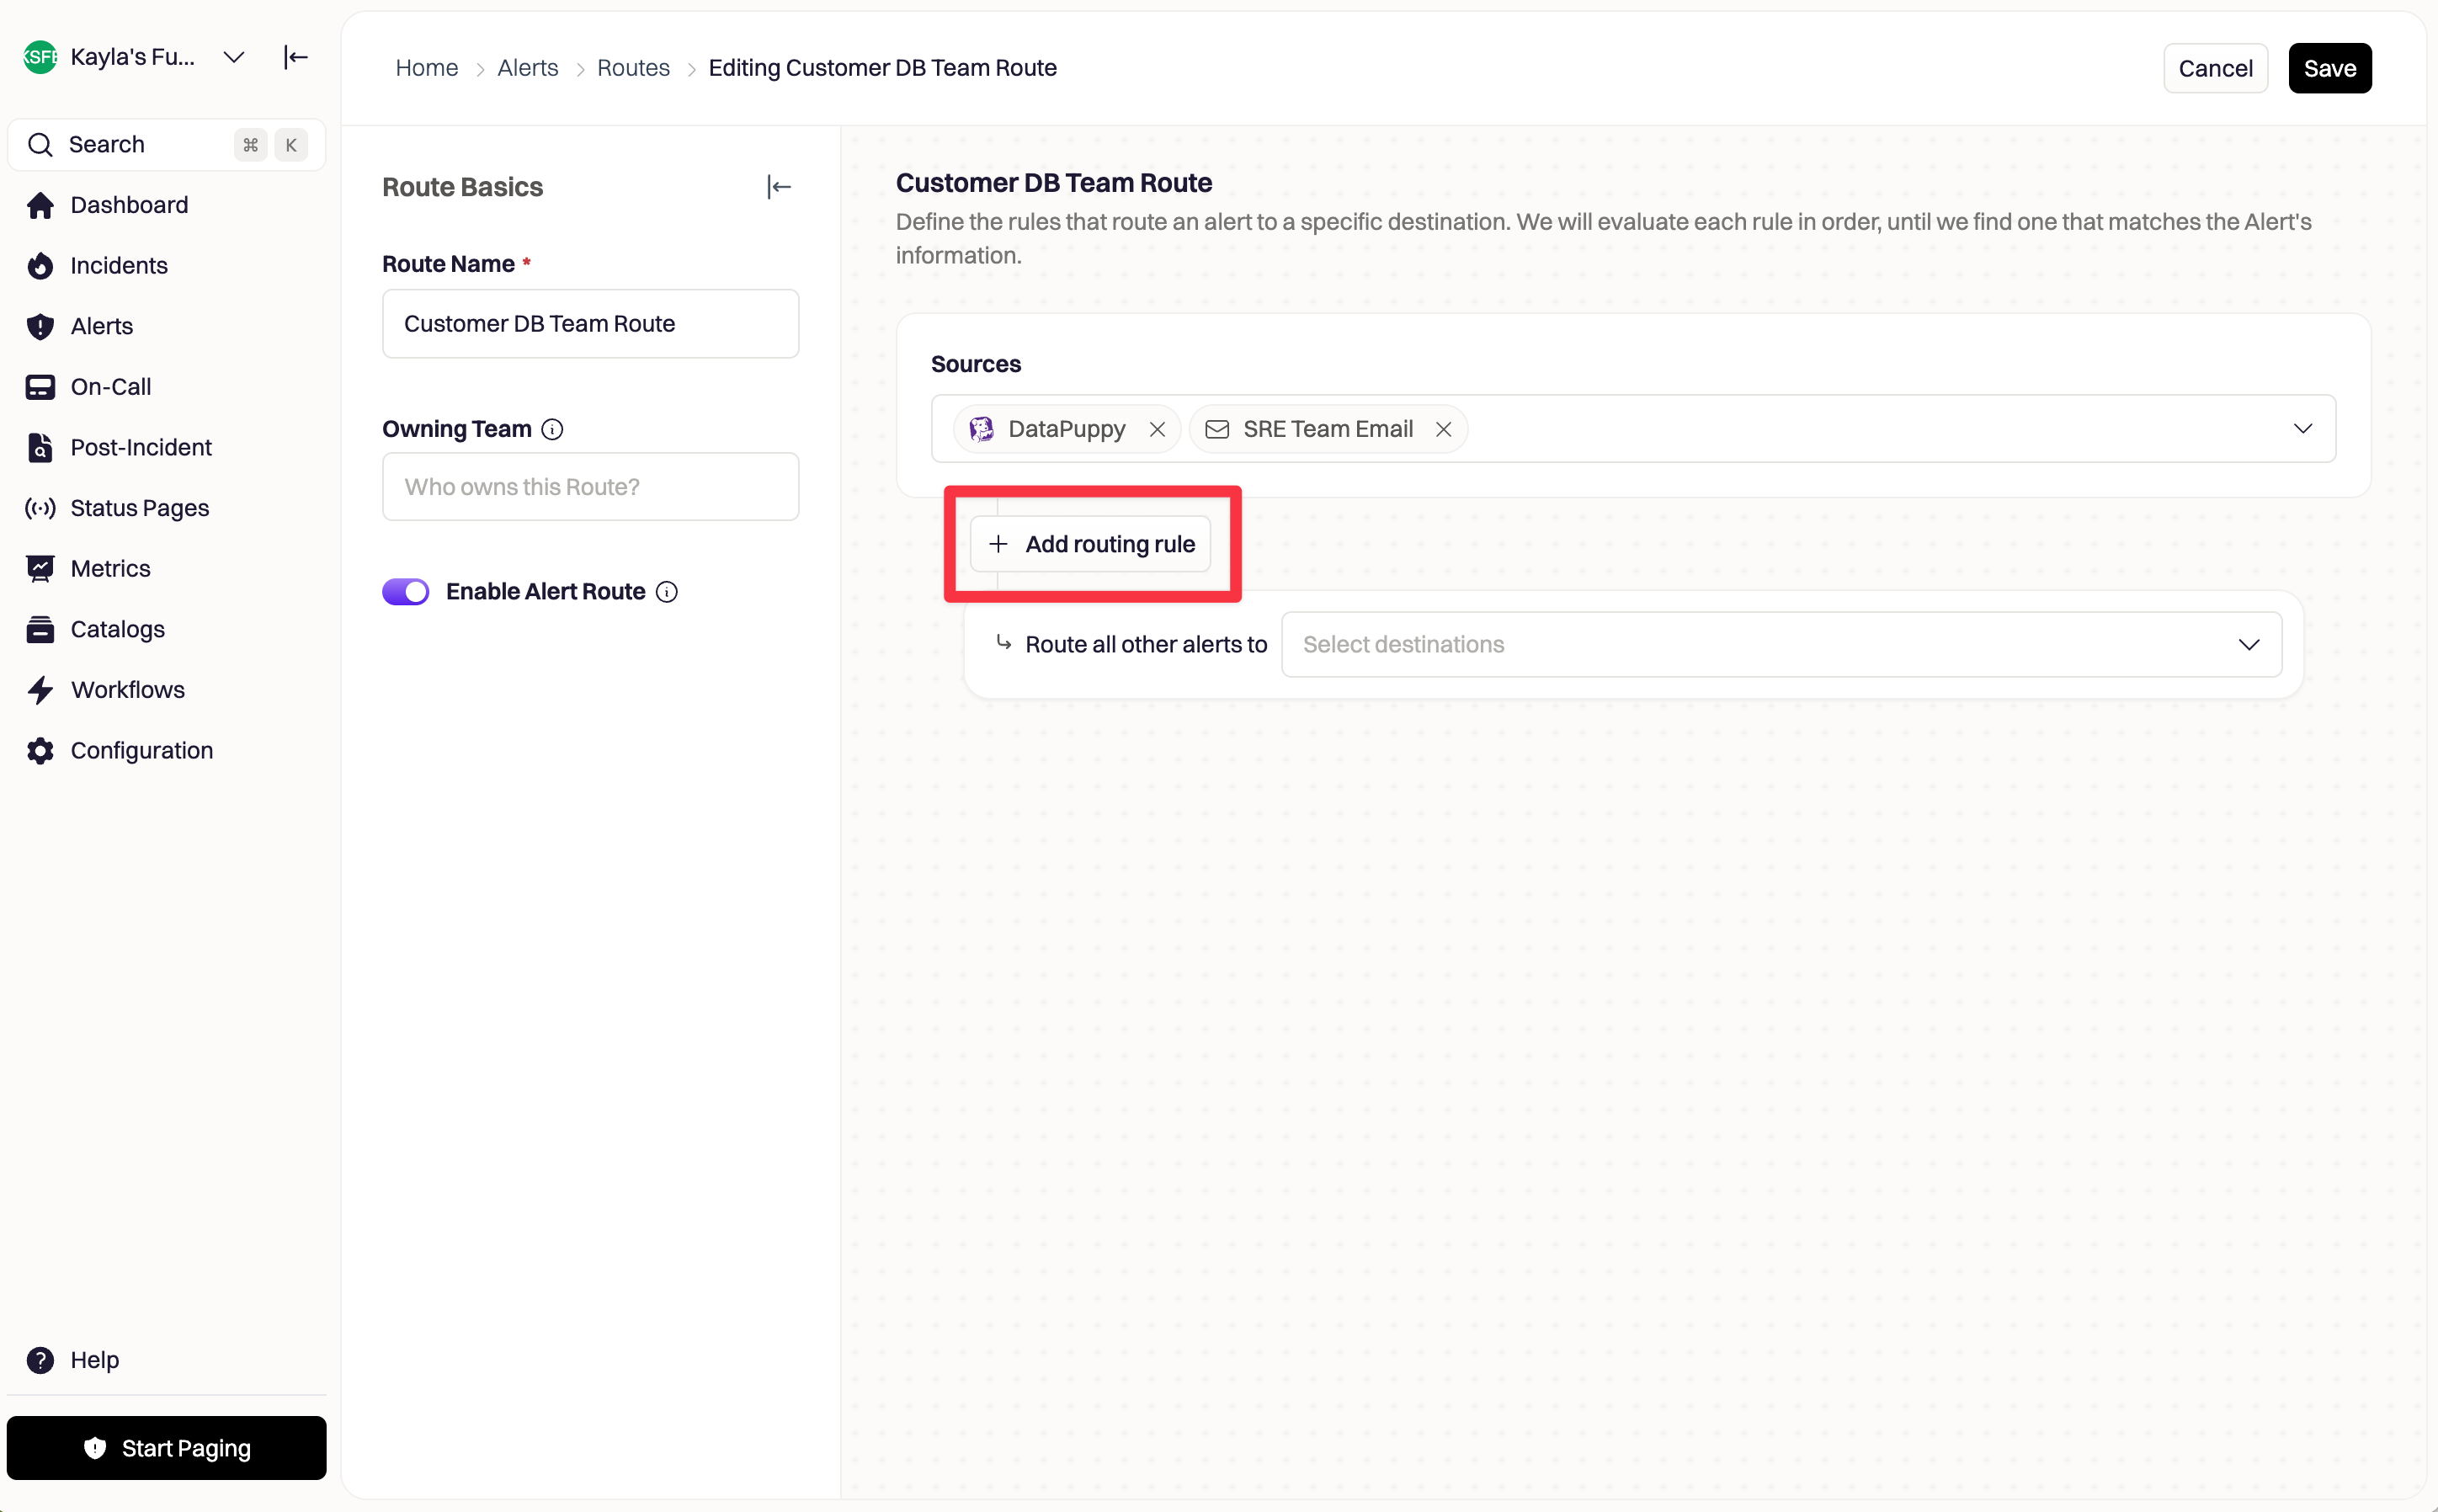
### Configuring Routing Rules
Routing Rules determine *which alerts should page responders* and *where they should go*.
Click **Add routing rule** to create one.
***
### What Is an Alert Route?
An **Alert Route** defines *when*, *how*, and *to whom* Rootly should send alerts. It supports evaluation against:
* Alert Sources
* Alert Fields (normalized metadata)
* Raw payload values (JSONPath)
* Teams, services, and escalation policies
**Tip:** Alert Routes work best when combined with **Alert Fields**, which let you write stable routing logic even when payload schemas vary across providers.
***
### Creating an Alert Route
Navigate to **Alerts → Routes** and click **New Route**.
Each route requires:
#### Name
A descriptive title that clarifies the route’s purpose.
#### Alert Sources
Select one or more alert sources the route should evaluate.\
Sources can be added or removed at any time.
See all integrations → [Integrations Overview](/integrations/overview)
If your tool doesn't have a dedicated integration, ingest its alerts through the [Generic Webhook Alert Source](/integrations/generic-webhook-alert-source/generic-webhook-alert-source).
#### Owning Team
Controls who can edit the route.
**Permissions:**
* Team Admins may only create routes **for their own team**.
* Teams can only route alerts **from alert sources they own**.
After creating a route, you can begin adding Routing Rules.
***
### Configuring Routing Rules
Routing Rules determine *which alerts should page responders* and *where they should go*.
Click **Add routing rule** to create one.
 ***
### Routing Rule Conditions
Conditions define when a rule should trigger.
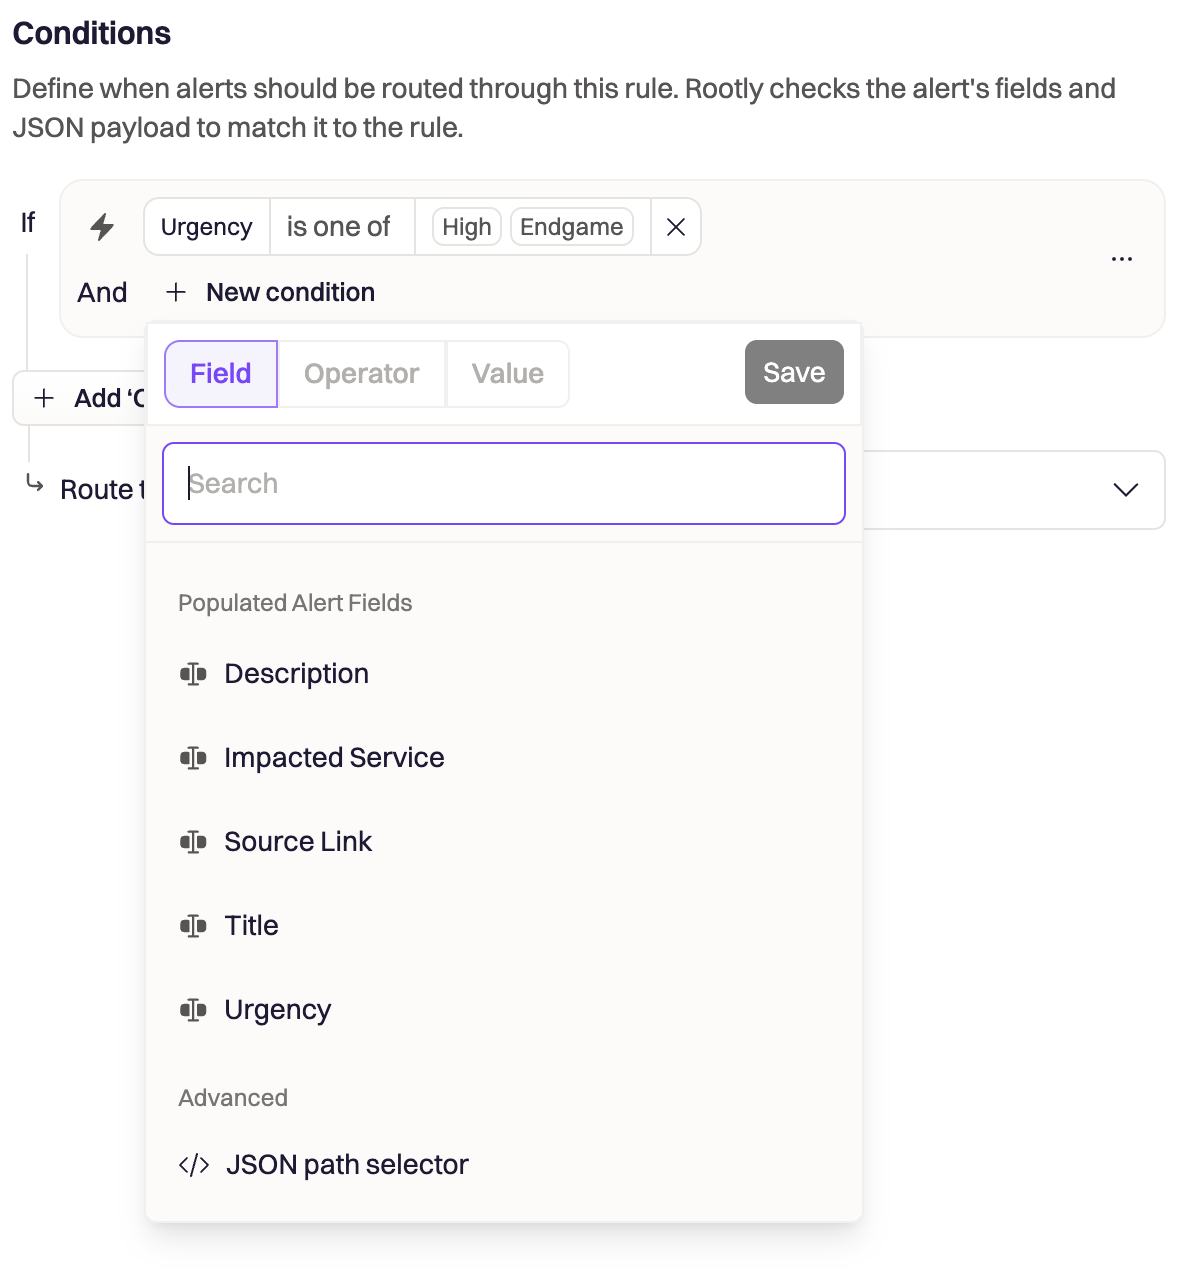
#### Select a Field
You may reference:
* **Alert Fields** (recommended)
* **Payload values via JSONPath**
Alert Fields ensure your routing logic remains stable even if payload structures change.
***
### Routing Rule Conditions
Conditions define when a rule should trigger.
#### Select a Field
You may reference:
* **Alert Fields** (recommended)
* **Payload values via JSONPath**
Alert Fields ensure your routing logic remains stable even if payload structures change.
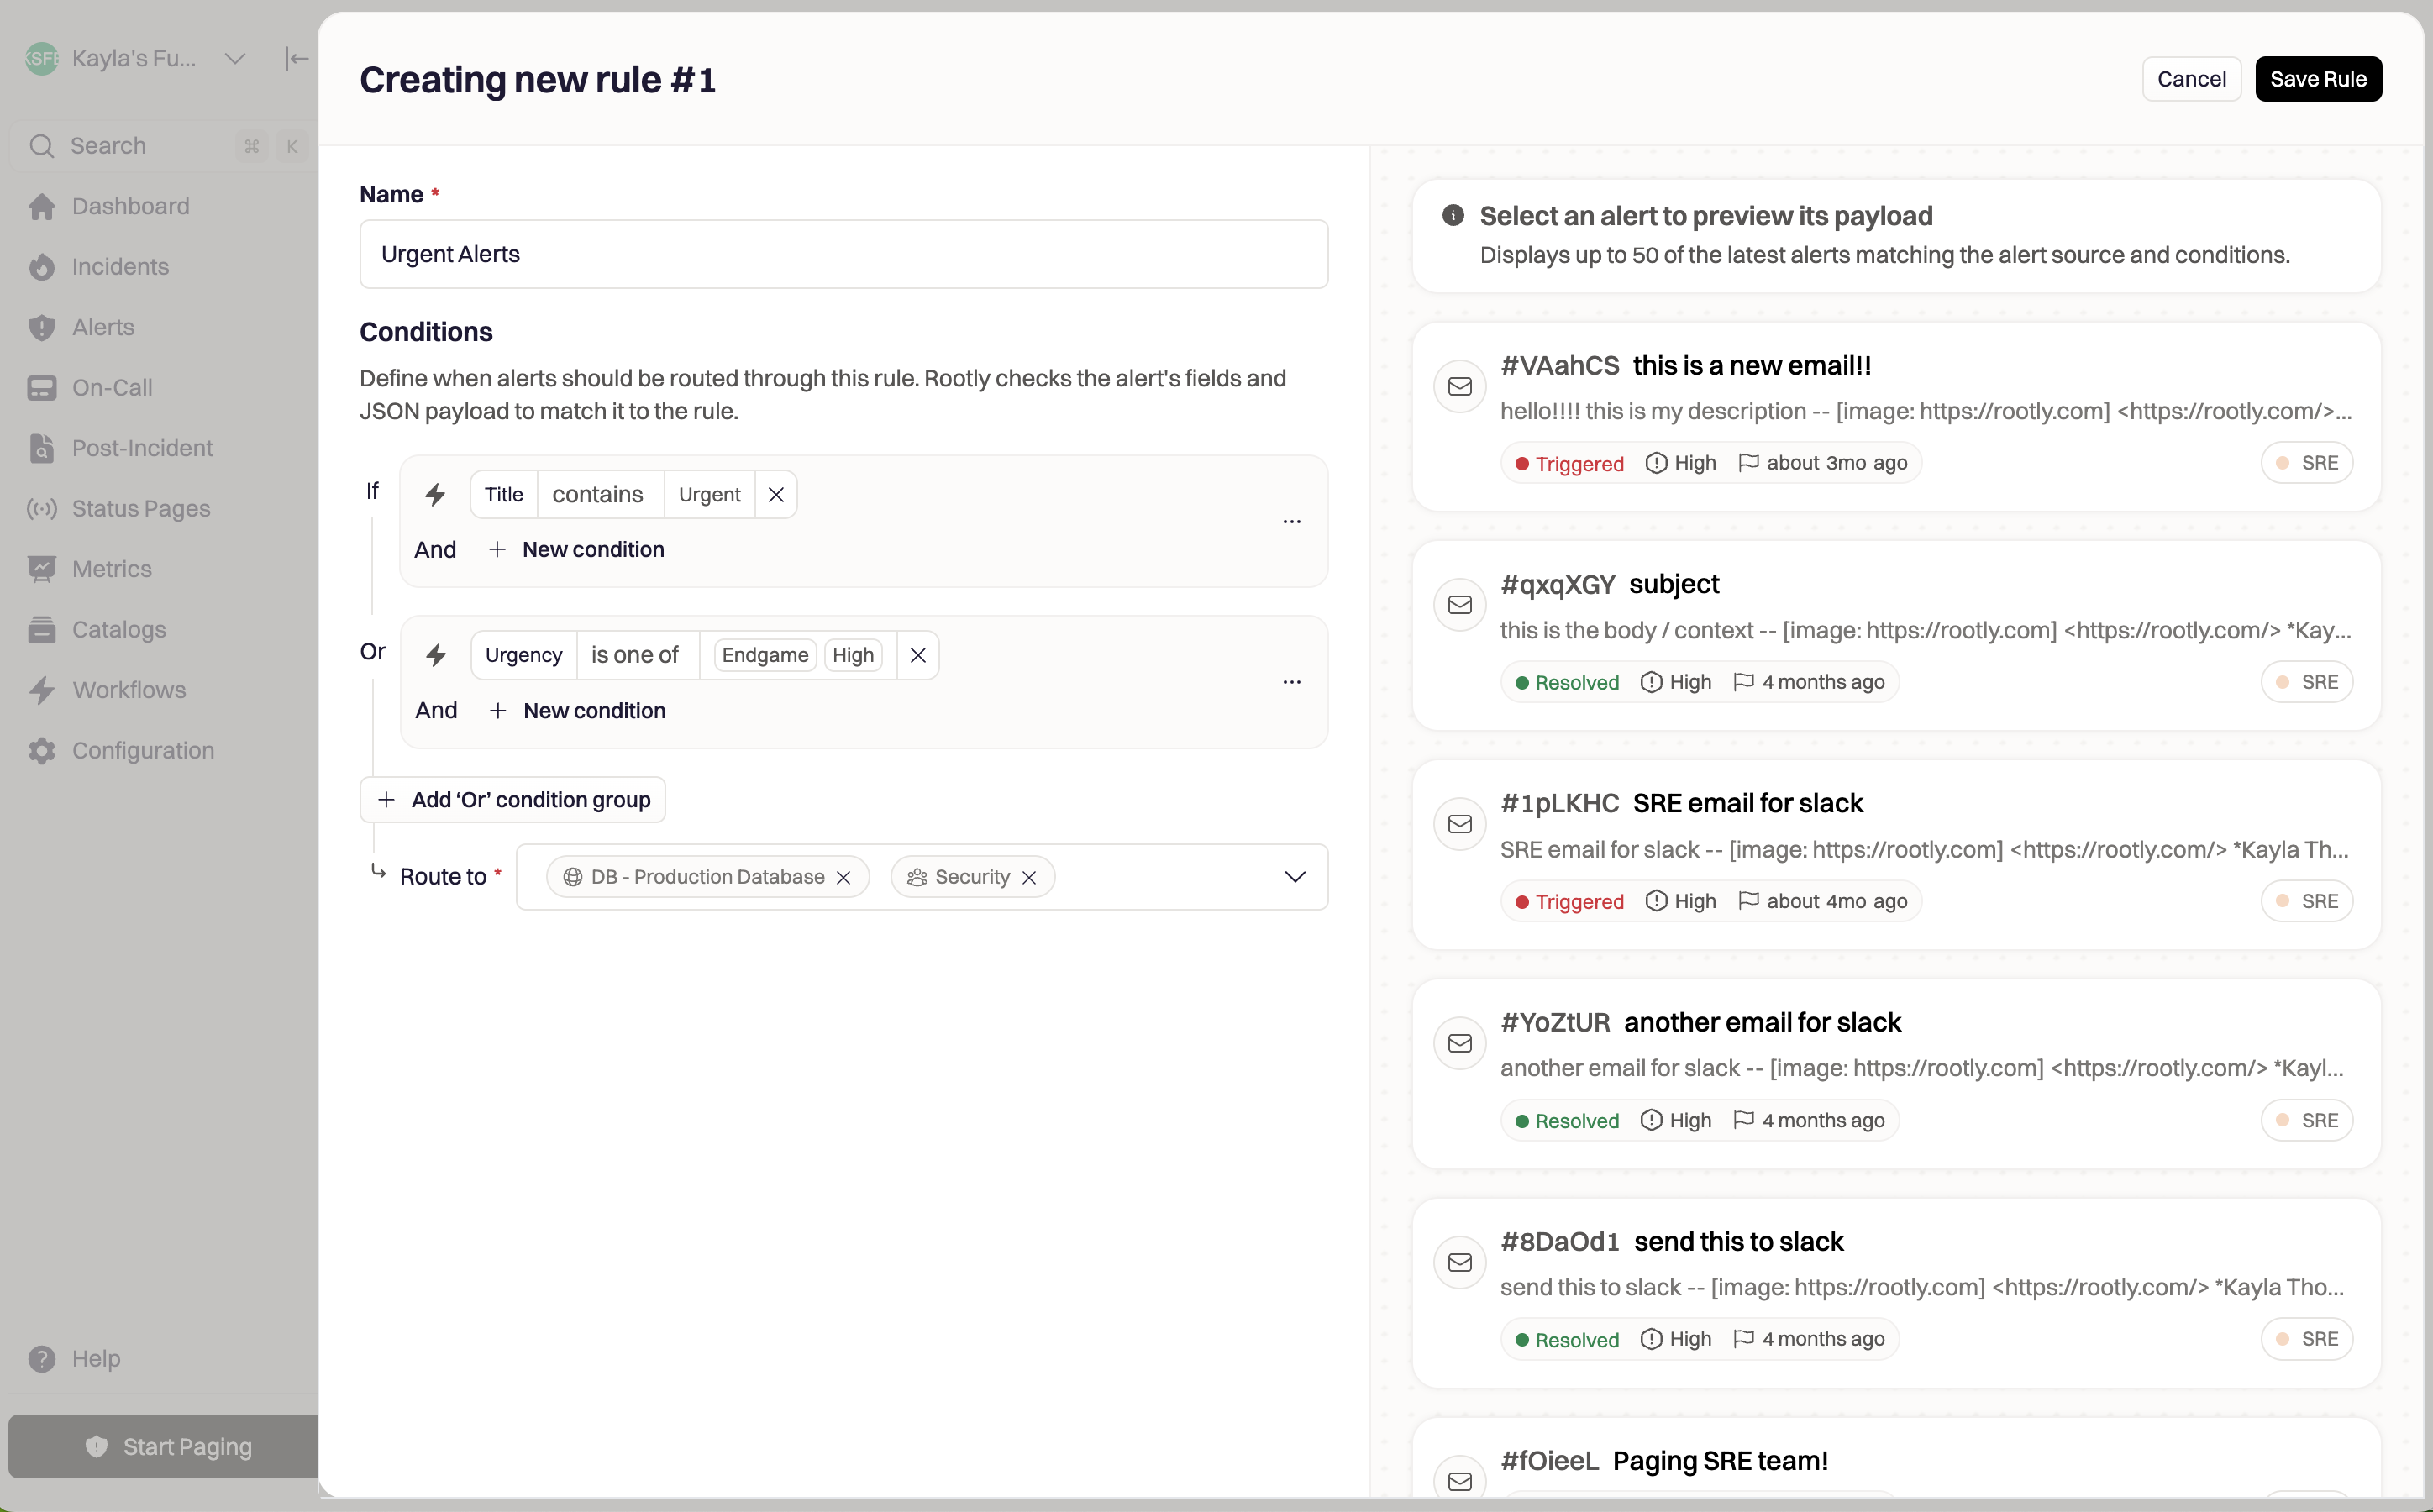
 #### Choose an Operator
Supported operators include:
* *is one of*
* *contains*
* *starts with*
* *matches regex*
* *is empty*
* and more
Use **regex** when values vary across alert providers and need flexible matching.
#### Add Additional Conditions
Use **AND/OR** groups to define complex routing logic.
#### Live Preview
Rootly shows matching historical alerts to validate your logic.
#### Choose an Operator
Supported operators include:
* *is one of*
* *contains*
* *starts with*
* *matches regex*
* *is empty*
* and more
Use **regex** when values vary across alert providers and need flexible matching.
#### Add Additional Conditions
Use **AND/OR** groups to define complex routing logic.
#### Live Preview
Rootly shows matching historical alerts to validate your logic.
 ***
### Routing Rule Destinations
Each rule must specify **who receives the alert**. You may route alerts to:
* **Teams**
* **Services**
* **Escalation Policies**
Routing to a team or service automatically triggers its configured escalation policy.
For easier reporting and maintenance, we recommend routing to **teams** or **services**, not directly to escalation policies.
Rules may include **multiple destinations**, all of which will be paged when the rule fires.
***
### Completing the Alert Route
A route may contain any number of rules.\
Rootly evaluates rules **top-to-bottom**, so ordering matters.
Use the rule menu (**… → Reorder rule**) to adjust order.
***
### How Rootly Routes Alerts
Rootly evaluates alerts in two sequential stages.
#### Stage 1 — Payload-Based Routing
If the alert payload contains a **target ID** (team or service), Rootly immediately routes the alert there without evaluating Alert Routes.
#### Stage 2 — Evaluate Alert Routes
If the alert does not specify a target:
#### Evaluate Routes
Rootly evaluates **every Alert Route associated with the alert’s source**.
#### Evaluate Rules
Within each route, rules are evaluated **from top to bottom**.
* The first matching rule triggers paging
* Rootly stops evaluating additional rules in that route
* Other routes referencing the same source will still run
If no rules match, the alert becomes a **Non-Paging Alert**. Review these in the Alerts dashboard by filtering **Status → Non-Paging**.
***
### Routing Rule Destinations
Each rule must specify **who receives the alert**. You may route alerts to:
* **Teams**
* **Services**
* **Escalation Policies**
Routing to a team or service automatically triggers its configured escalation policy.
For easier reporting and maintenance, we recommend routing to **teams** or **services**, not directly to escalation policies.
Rules may include **multiple destinations**, all of which will be paged when the rule fires.
***
### Completing the Alert Route
A route may contain any number of rules.\
Rootly evaluates rules **top-to-bottom**, so ordering matters.
Use the rule menu (**… → Reorder rule**) to adjust order.
***
### How Rootly Routes Alerts
Rootly evaluates alerts in two sequential stages.
#### Stage 1 — Payload-Based Routing
If the alert payload contains a **target ID** (team or service), Rootly immediately routes the alert there without evaluating Alert Routes.
#### Stage 2 — Evaluate Alert Routes
If the alert does not specify a target:
#### Evaluate Routes
Rootly evaluates **every Alert Route associated with the alert’s source**.
#### Evaluate Rules
Within each route, rules are evaluated **from top to bottom**.
* The first matching rule triggers paging
* Rootly stops evaluating additional rules in that route
* Other routes referencing the same source will still run
If no rules match, the alert becomes a **Non-Paging Alert**. Review these in the Alerts dashboard by filtering **Status → Non-Paging**.
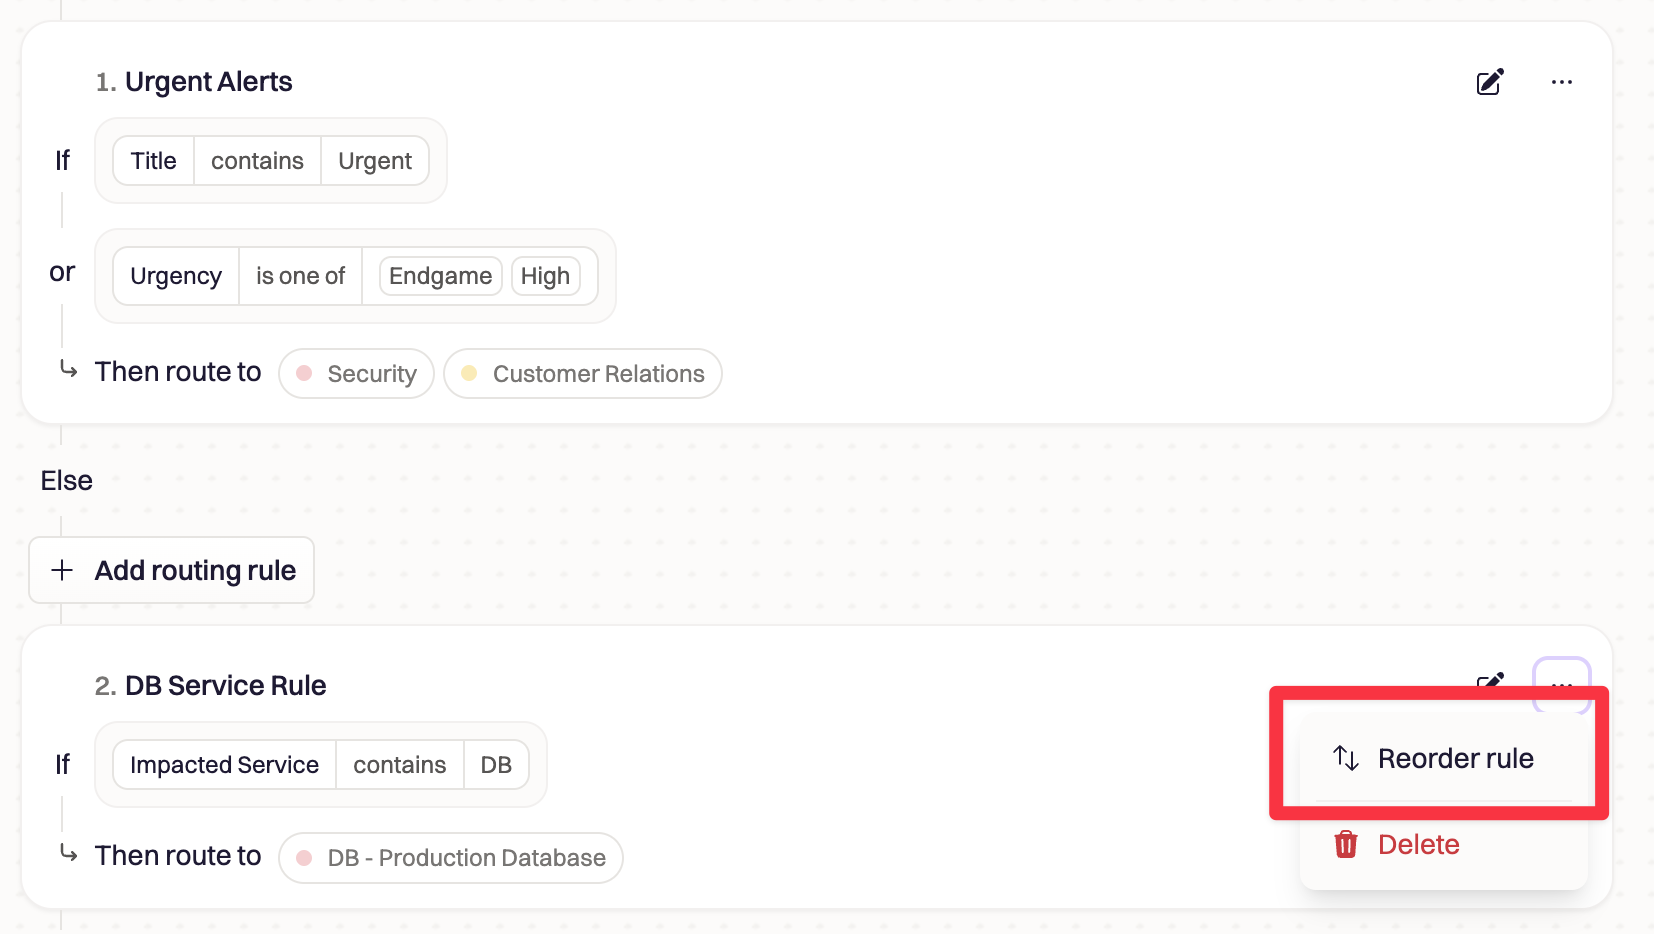 Order rules **most specific → least specific** to avoid unintended matches.
***
### Alert Timeline
Every routed alert includes a timeline event documenting:
* Which **Alert Route** was applied
* Which **Routing Rule** matched
* Which **destinations** were paged
Order rules **most specific → least specific** to avoid unintended matches.
***
### Alert Timeline
Every routed alert includes a timeline event documenting:
* Which **Alert Route** was applied
* Which **Routing Rule** matched
* Which **destinations** were paged
 This ensures responders understand *why* they were paged.
***
### Best Practices
* Prefer **Alert Fields** over JSONPath for stability.
* Start with broad routing categories and refine with specific rules.
* Keep rule names action-oriented and descriptive.
* Regularly check **Non-Paging Alerts** for routing gaps.
* Route to **teams/services**, not escalation policies, for better ownership.
* Combine routes thoughtfully when different teams own different tools.
***
### Troubleshooting
* Ensure the alert source is included in at least one route.
* Verify that at least one rule matches the alert.
* Confirm the alert payload does not contain a `target_id`, which overrides routing.
* Check the rule order; a broader rule may be matching first.
* Validate operators and values used in conditions.
* Ensure Alert Field mappings are extracting values correctly.
* All routes referencing the alert source are evaluated.
* Remove unnecessary alert sources from routes.
* Tighten condition logic.
* Review the alert payload preview (purple pill tokens).
* Confirm your JSONPath reflects the actual alert structure.
* Use Alert Fields whenever possible.
This ensures responders understand *why* they were paged.
***
### Best Practices
* Prefer **Alert Fields** over JSONPath for stability.
* Start with broad routing categories and refine with specific rules.
* Keep rule names action-oriented and descriptive.
* Regularly check **Non-Paging Alerts** for routing gaps.
* Route to **teams/services**, not escalation policies, for better ownership.
* Combine routes thoughtfully when different teams own different tools.
***
### Troubleshooting
* Ensure the alert source is included in at least one route.
* Verify that at least one rule matches the alert.
* Confirm the alert payload does not contain a `target_id`, which overrides routing.
* Check the rule order; a broader rule may be matching first.
* Validate operators and values used in conditions.
* Ensure Alert Field mappings are extracting values correctly.
* All routes referencing the alert source are evaluated.
* Remove unnecessary alert sources from routes.
* Tighten condition logic.
* Review the alert payload preview (purple pill tokens).
* Confirm your JSONPath reflects the actual alert structure.
* Use Alert Fields whenever possible.