> ## Documentation Index
> Fetch the complete documentation index at: https://docs.rootly.com/llms.txt
> Use this file to discover all available pages before exploring further.
# Default Forms
> Configure Rootly's eight built-in forms that guide users through incident creation, updates, resolution, and post-incident processes.
# **Overview**
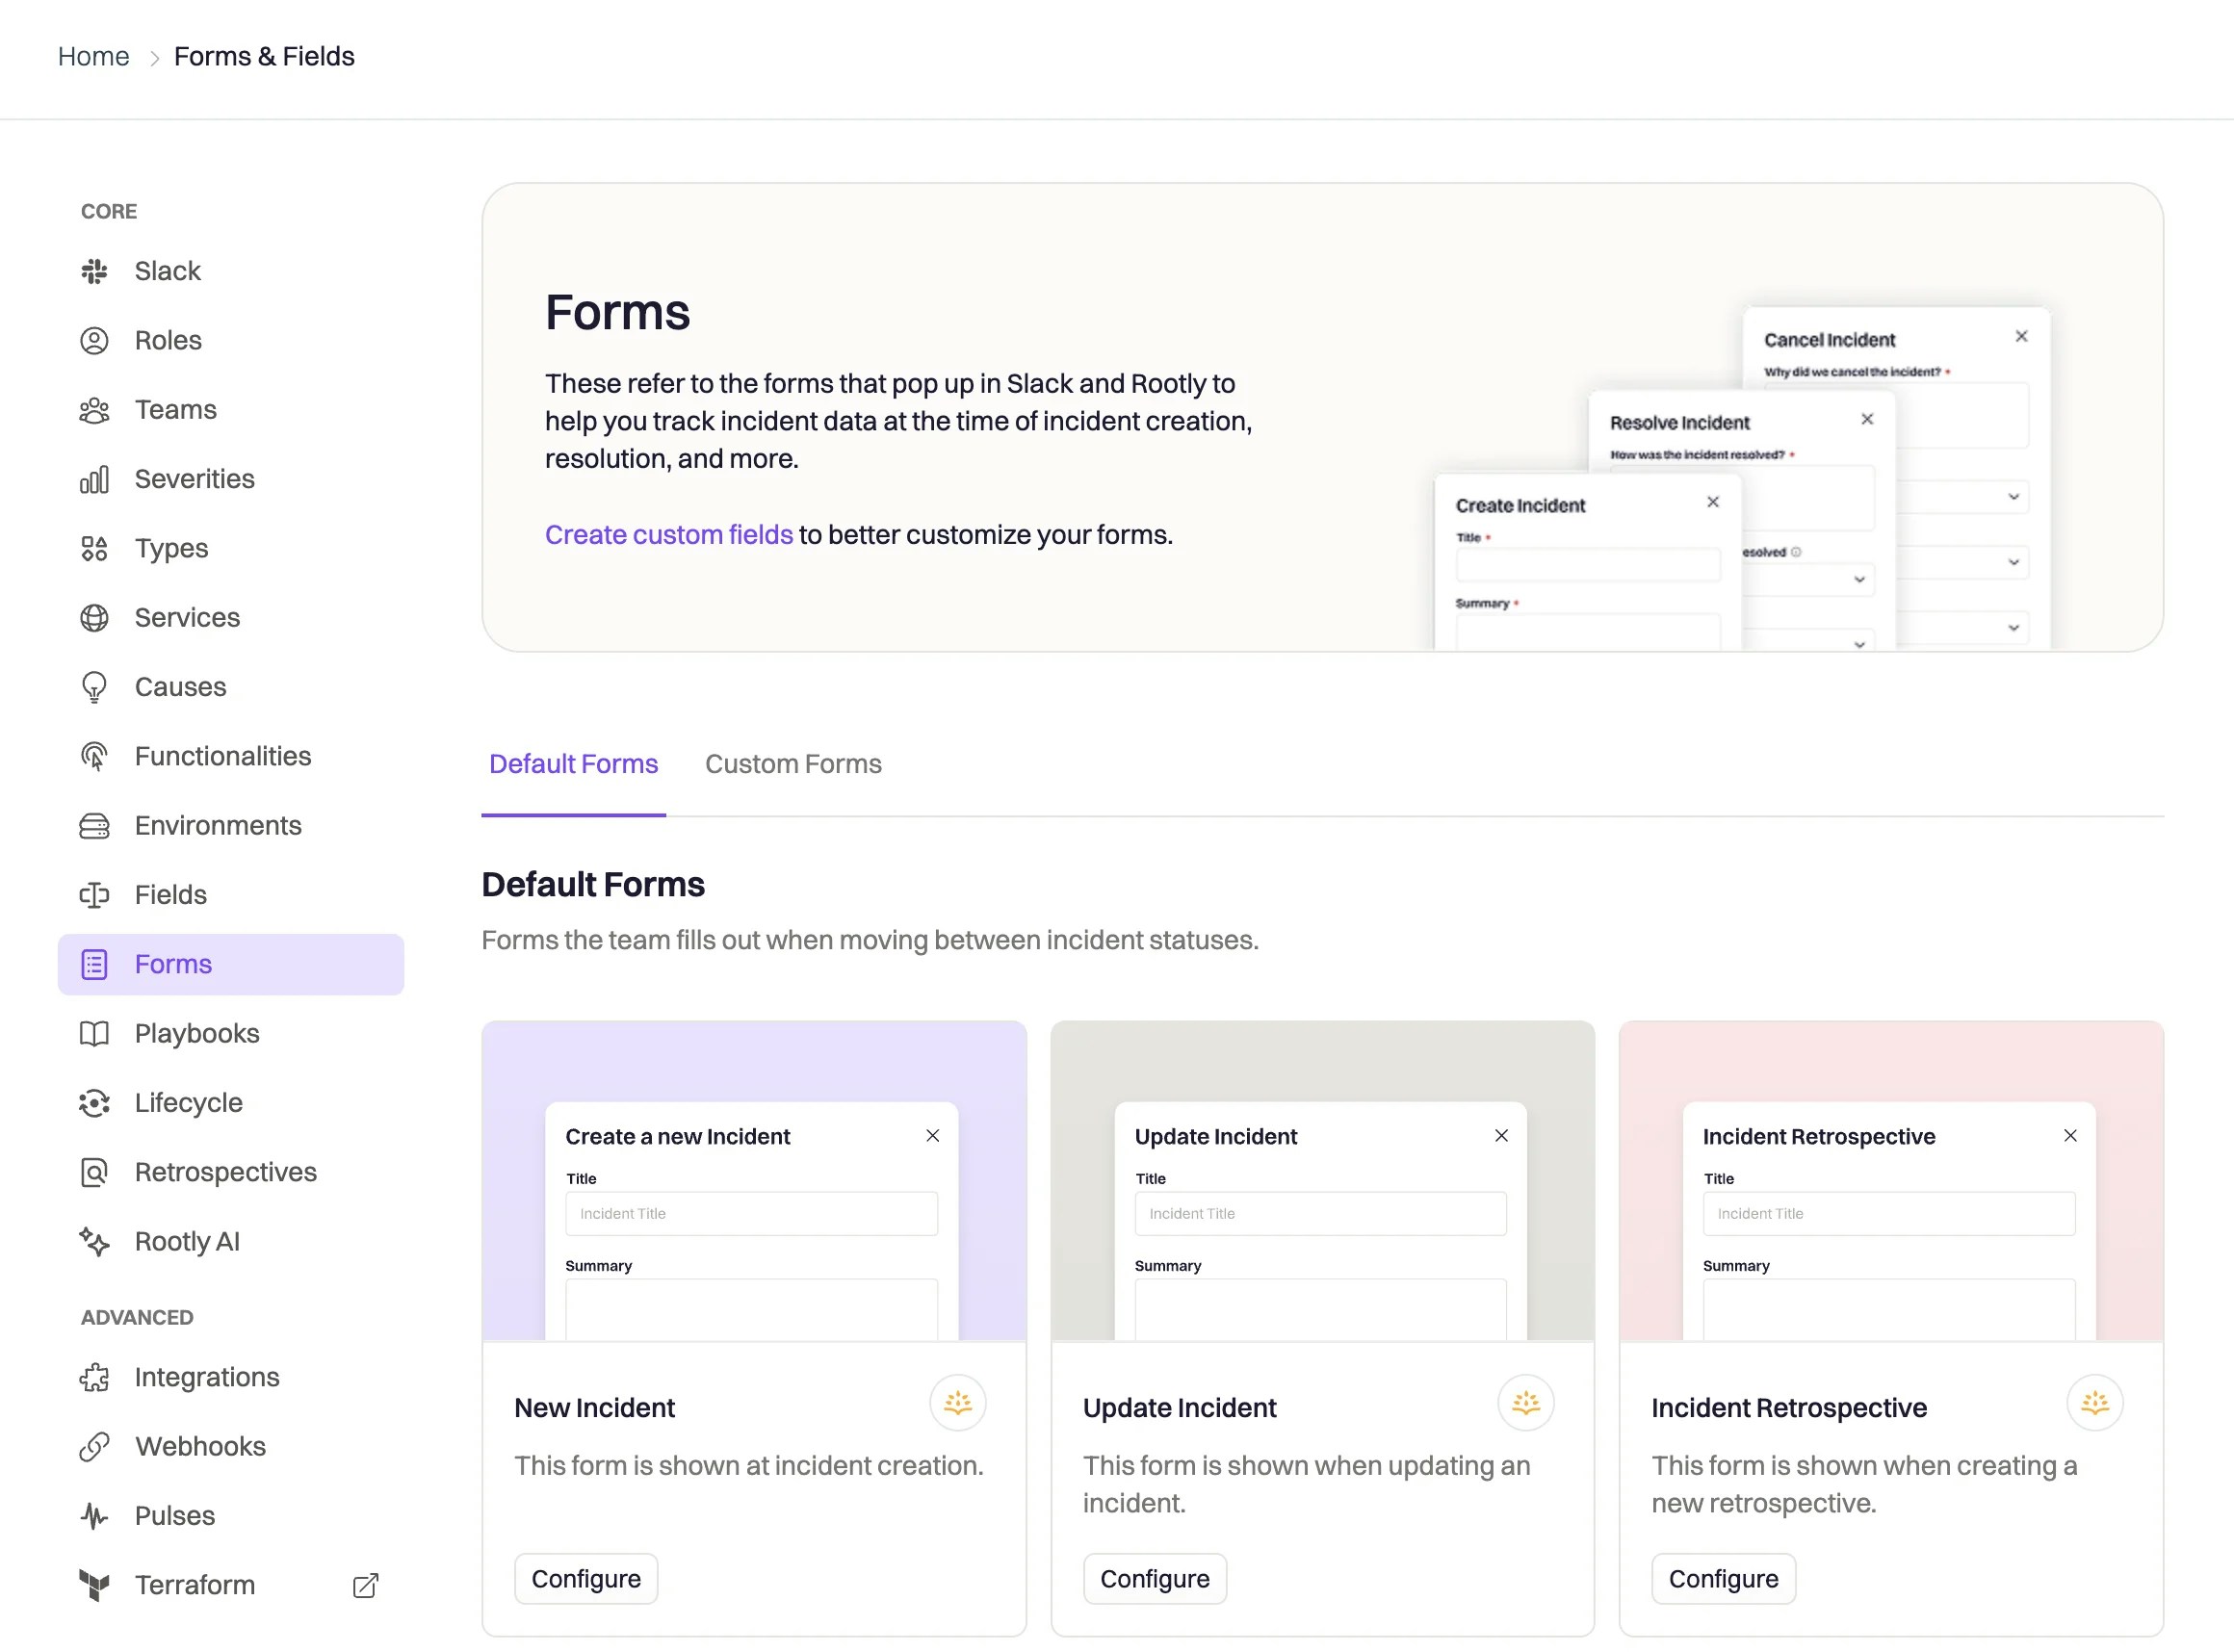
Rootly comes with eight essential, built-in forms that cannot be deleted. The forms each cover a different stage of an incident and scheduled maintenance lifecycle.
You can access the built-in forms by navigating to **Configurations > Forms**.
 # Form Types
The New Incident form is displayed whenever the user first declares an incident on Slack (via `/rootly new` command) or on the Rootly web UI (via `Create Incident` button).
The Update Incident form is displayed whenever the user attempts to update an incident on Slack (via `/rootly update` command or `Update` button) or on the Rootly web UI (via `Edit` button).
The Incident Mitigation form is displayed whenever the user attempts to mitigate an incident on Slack (via `/rootly mitigate` command) or on the Rootly web UI (via `Mitigate` button).
The Incident Resolution form is displayed whenever the user attempts to resolve an incident on Slack (via `/rootly resolve` command) or on the Rootly web UI (via `Resolve` button).
The Incident Cancellation form is displayed whenever the user attempts to cancel an incident on Slack (via `/rootly cancel` command) or on the Rootly web UI (via `Cancel` button).
The Incident Retrospective Form is displayed after the incident is resolved and the user enters the **Gather & Confirm Data** step of the retrospective. This form is only accessible from the Rootly web UI.
The New Maintenance Incident form is displayed whenever the user first declares a scheduled maintenance on Slack (via `/rootly maintenance` command) or on the Rootly web UI (via `Schedule Maintenance` button).
The Update Maintenance Incident form is displayed whenever the user attempts to update a scheduled maintenance on Slack (via `/rootly update` command or Update button) or on the Rootly web UI (via `Edit` button).
You'll notice that the trigger points for scheduled maintenance is exactly the same as for incidents. Rootly will be able to recognize the context and display the appropriate form. For example when `/rootly update` is ran,
* If it was ran **in an incident channel**, then **Update Incident** form will be displayed
* If it was ran in an **maintenance channel**, then the **Update Maintenance Incident** form will be displayed
# Sub-Status Forms
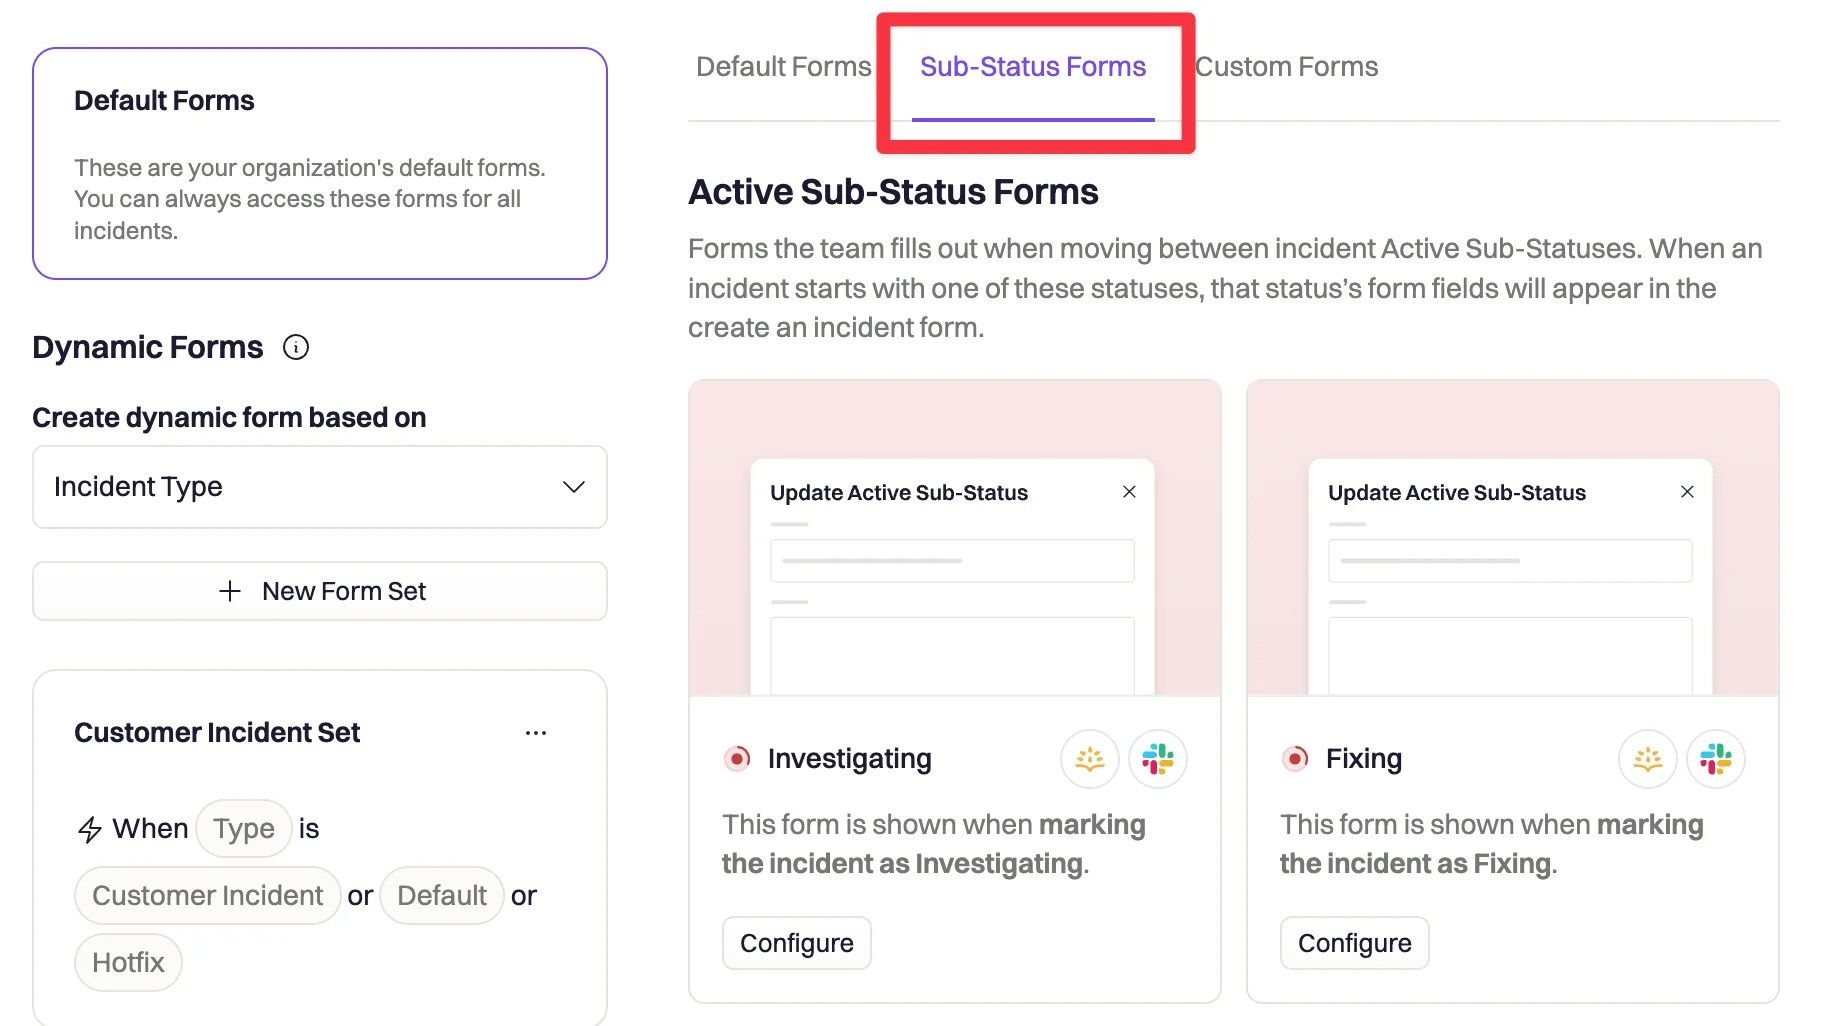
If your Rootly instance has access to **Rootly's Custom Lifecycle feature**, which allows you to customize your incident statuses, Rootly will generate default forms for each of your incident substatuses.
This allows you to fully customize the information your responders provide throughout the incident's lifecycle, attuned to your business processes.
You'll find these forms under the **Sub-Status Forms** tab.
# Form Types
The New Incident form is displayed whenever the user first declares an incident on Slack (via `/rootly new` command) or on the Rootly web UI (via `Create Incident` button).
The Update Incident form is displayed whenever the user attempts to update an incident on Slack (via `/rootly update` command or `Update` button) or on the Rootly web UI (via `Edit` button).
The Incident Mitigation form is displayed whenever the user attempts to mitigate an incident on Slack (via `/rootly mitigate` command) or on the Rootly web UI (via `Mitigate` button).
The Incident Resolution form is displayed whenever the user attempts to resolve an incident on Slack (via `/rootly resolve` command) or on the Rootly web UI (via `Resolve` button).
The Incident Cancellation form is displayed whenever the user attempts to cancel an incident on Slack (via `/rootly cancel` command) or on the Rootly web UI (via `Cancel` button).
The Incident Retrospective Form is displayed after the incident is resolved and the user enters the **Gather & Confirm Data** step of the retrospective. This form is only accessible from the Rootly web UI.
The New Maintenance Incident form is displayed whenever the user first declares a scheduled maintenance on Slack (via `/rootly maintenance` command) or on the Rootly web UI (via `Schedule Maintenance` button).
The Update Maintenance Incident form is displayed whenever the user attempts to update a scheduled maintenance on Slack (via `/rootly update` command or Update button) or on the Rootly web UI (via `Edit` button).
You'll notice that the trigger points for scheduled maintenance is exactly the same as for incidents. Rootly will be able to recognize the context and display the appropriate form. For example when `/rootly update` is ran,
* If it was ran **in an incident channel**, then **Update Incident** form will be displayed
* If it was ran in an **maintenance channel**, then the **Update Maintenance Incident** form will be displayed
# Sub-Status Forms
If your Rootly instance has access to **Rootly's Custom Lifecycle feature**, which allows you to customize your incident statuses, Rootly will generate default forms for each of your incident substatuses.
This allows you to fully customize the information your responders provide throughout the incident's lifecycle, attuned to your business processes.
You'll find these forms under the **Sub-Status Forms** tab.
 Get started with Rootly's custom lifecycle feature by reaching out to your account representative.
# **Edit Form**
To begin editing a form, select the Configure button under the form you'd like to edit.
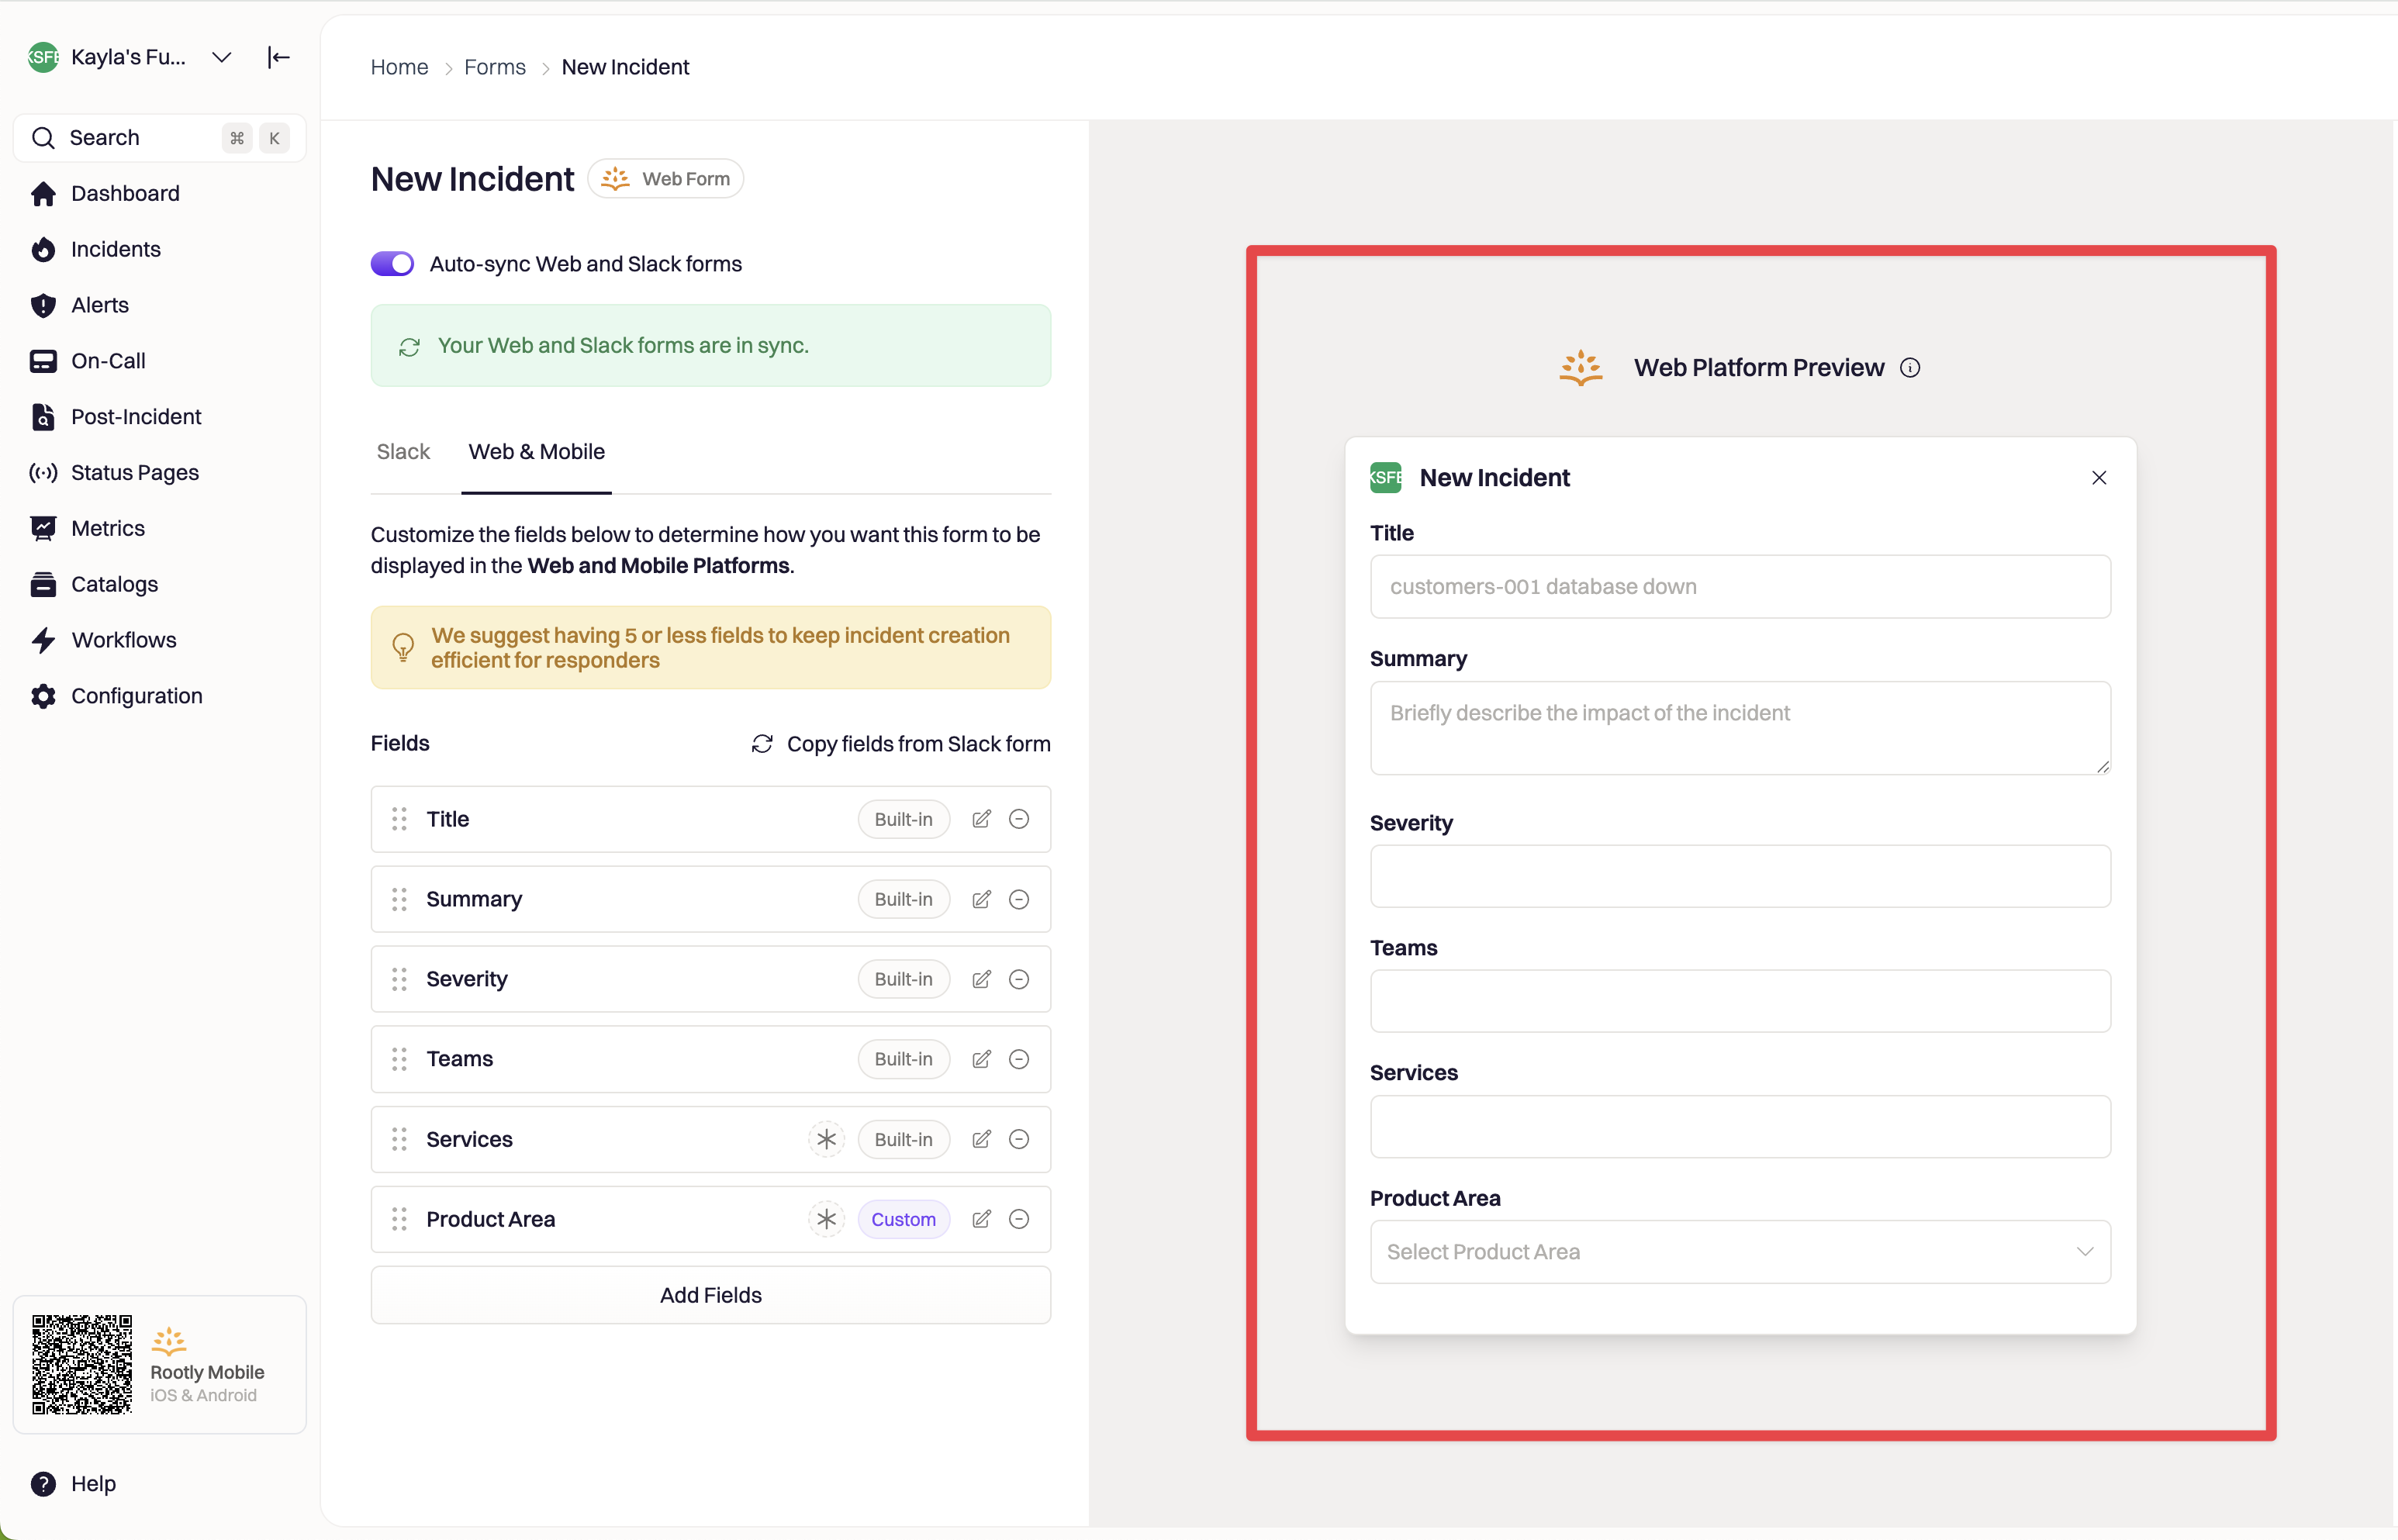
You'll be navigated to the edit form page of the selected form. The **left side of the page is the edit pane** where you can edit what fields are displayed and how they are displayed. The **right side of the page is the preview** of the form.
Get started with Rootly's custom lifecycle feature by reaching out to your account representative.
# **Edit Form**
To begin editing a form, select the Configure button under the form you'd like to edit.
You'll be navigated to the edit form page of the selected form. The **left side of the page is the edit pane** where you can edit what fields are displayed and how they are displayed. The **right side of the page is the preview** of the form.
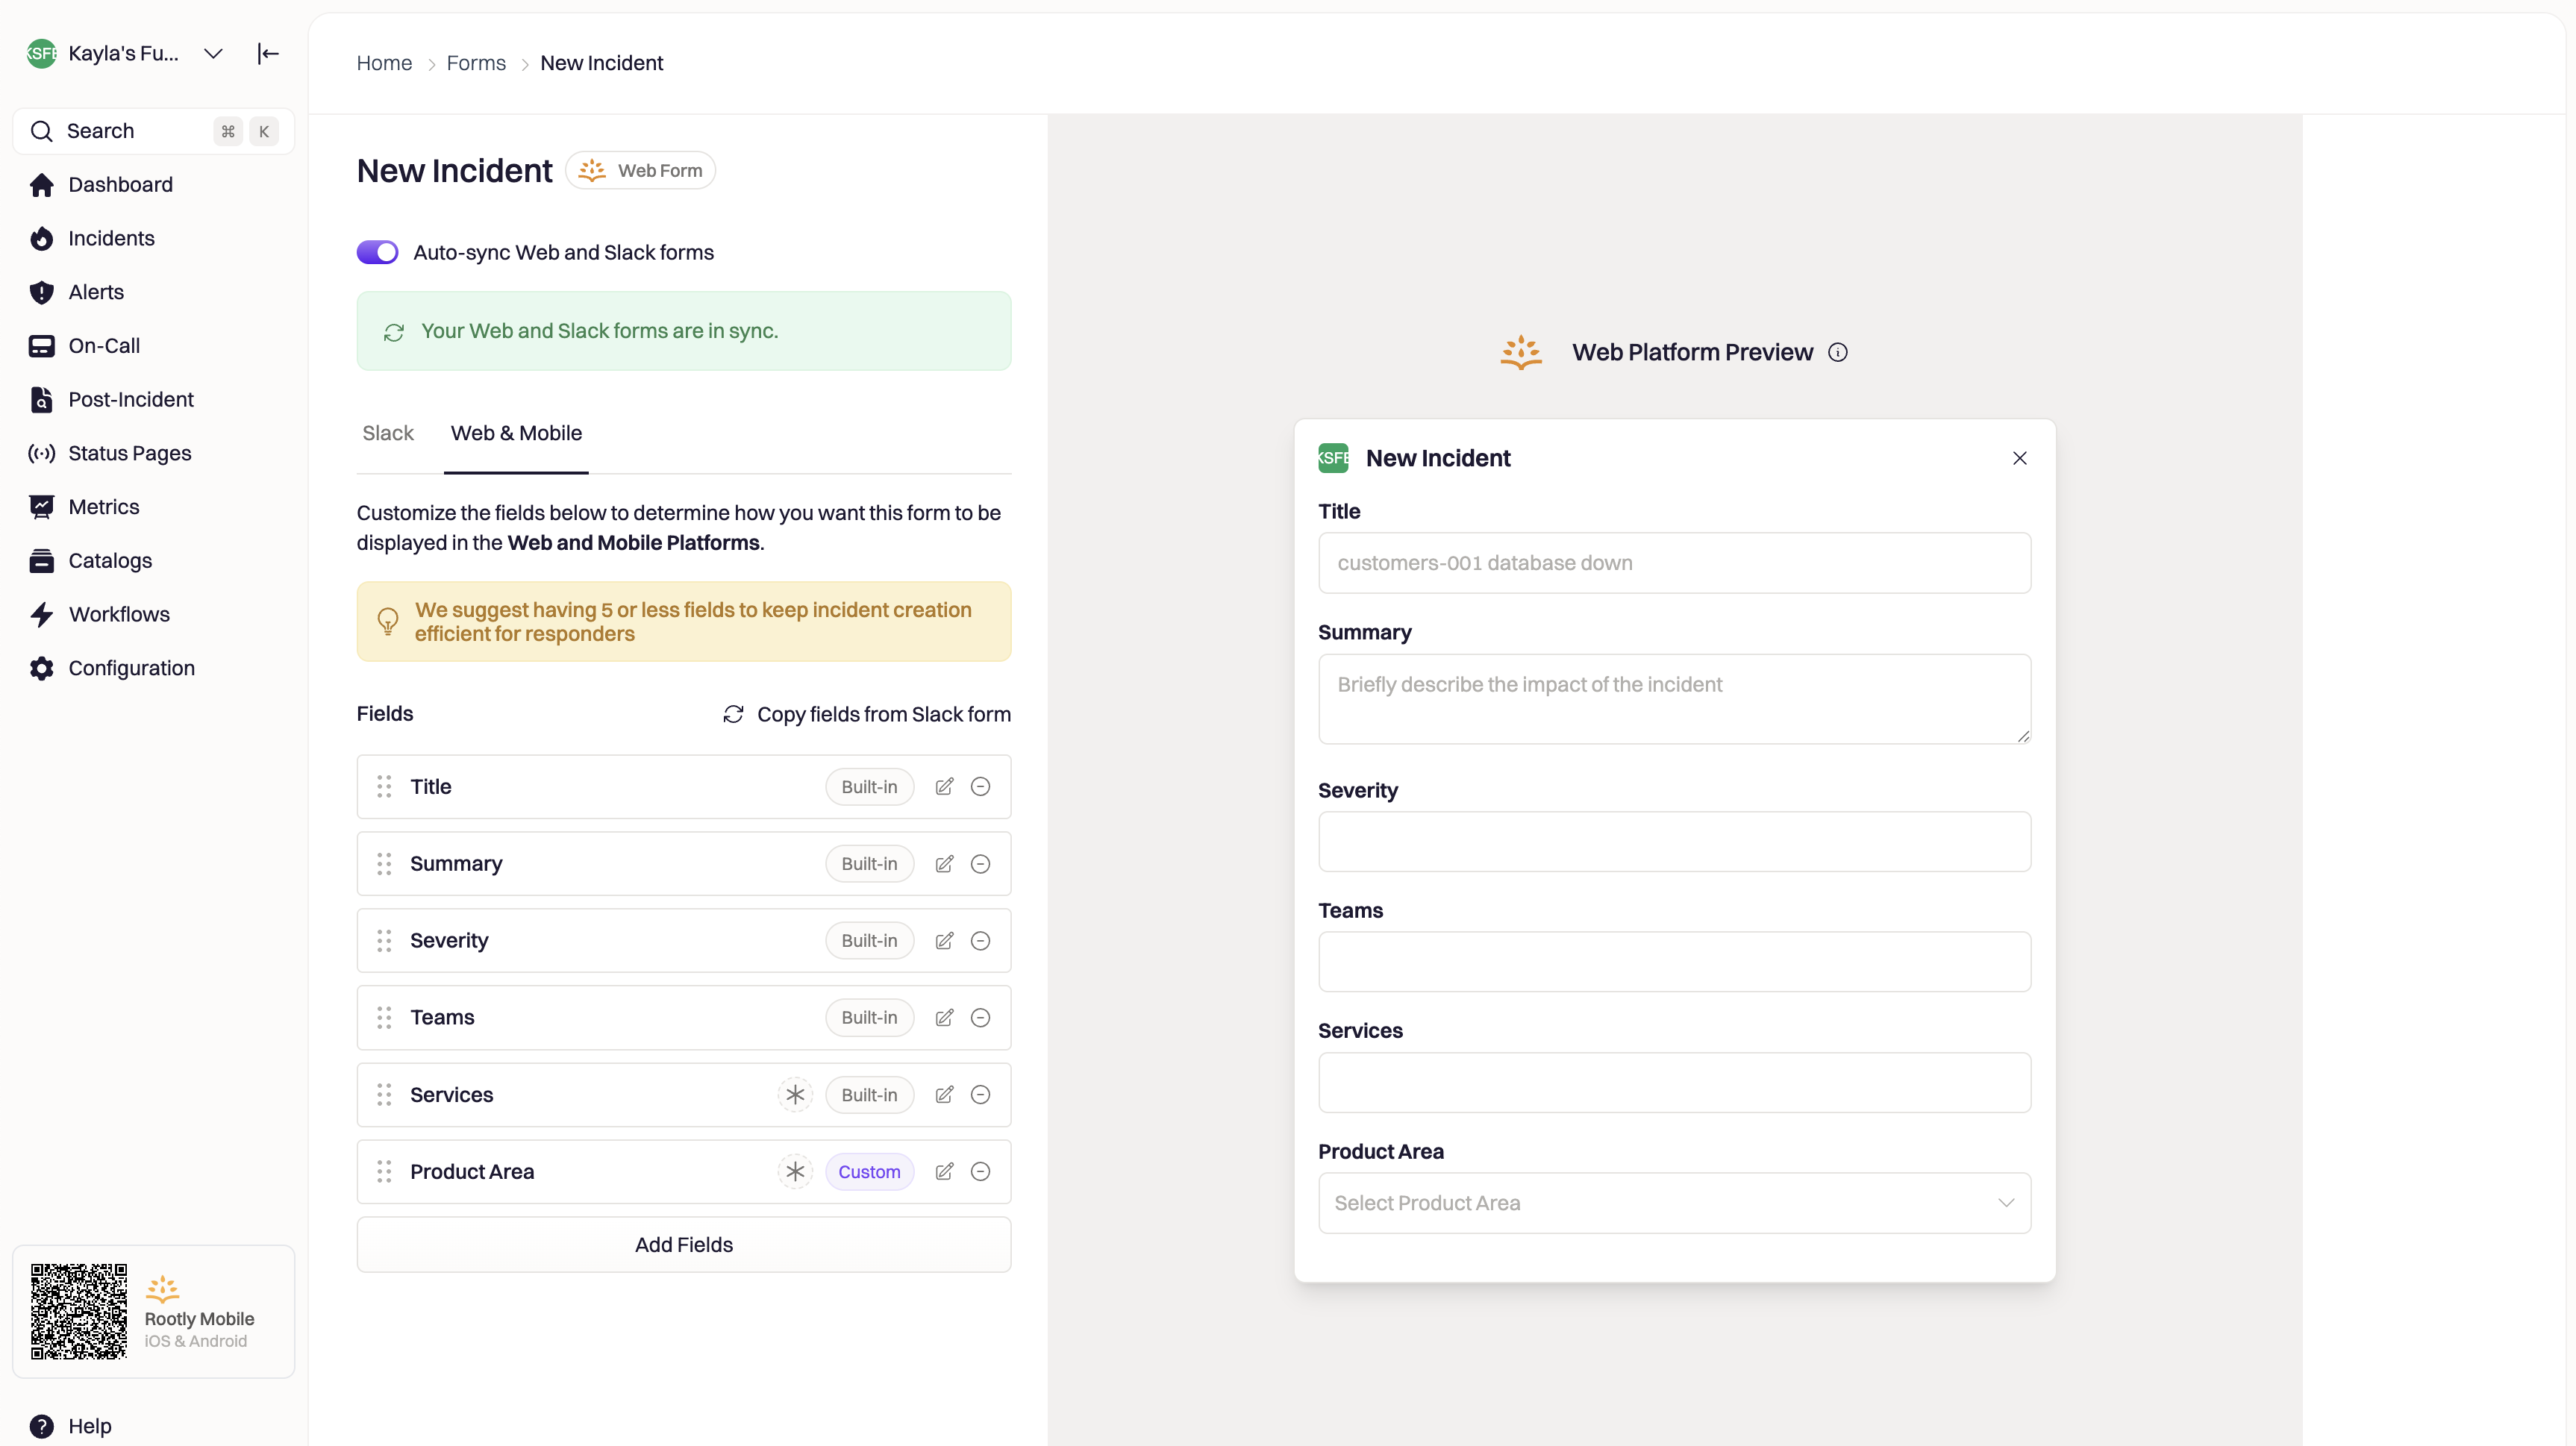 You can create separate versions of the form for Slack and Rootly Web/Mobile by toggling between the tabs on the left hand side. To ensure incident data is captured consistently, we recommend keeping the fields for each channel in sync.
## Adding fields to a form
Add new fields to your form by selecting the **Add Fields** button. Select all of the fields you'd like to add to the form, then **Add Fields**.
You can create separate versions of the form for Slack and Rootly Web/Mobile by toggling between the tabs on the left hand side. To ensure incident data is captured consistently, we recommend keeping the fields for each channel in sync.
## Adding fields to a form
Add new fields to your form by selecting the **Add Fields** button. Select all of the fields you'd like to add to the form, then **Add Fields**.
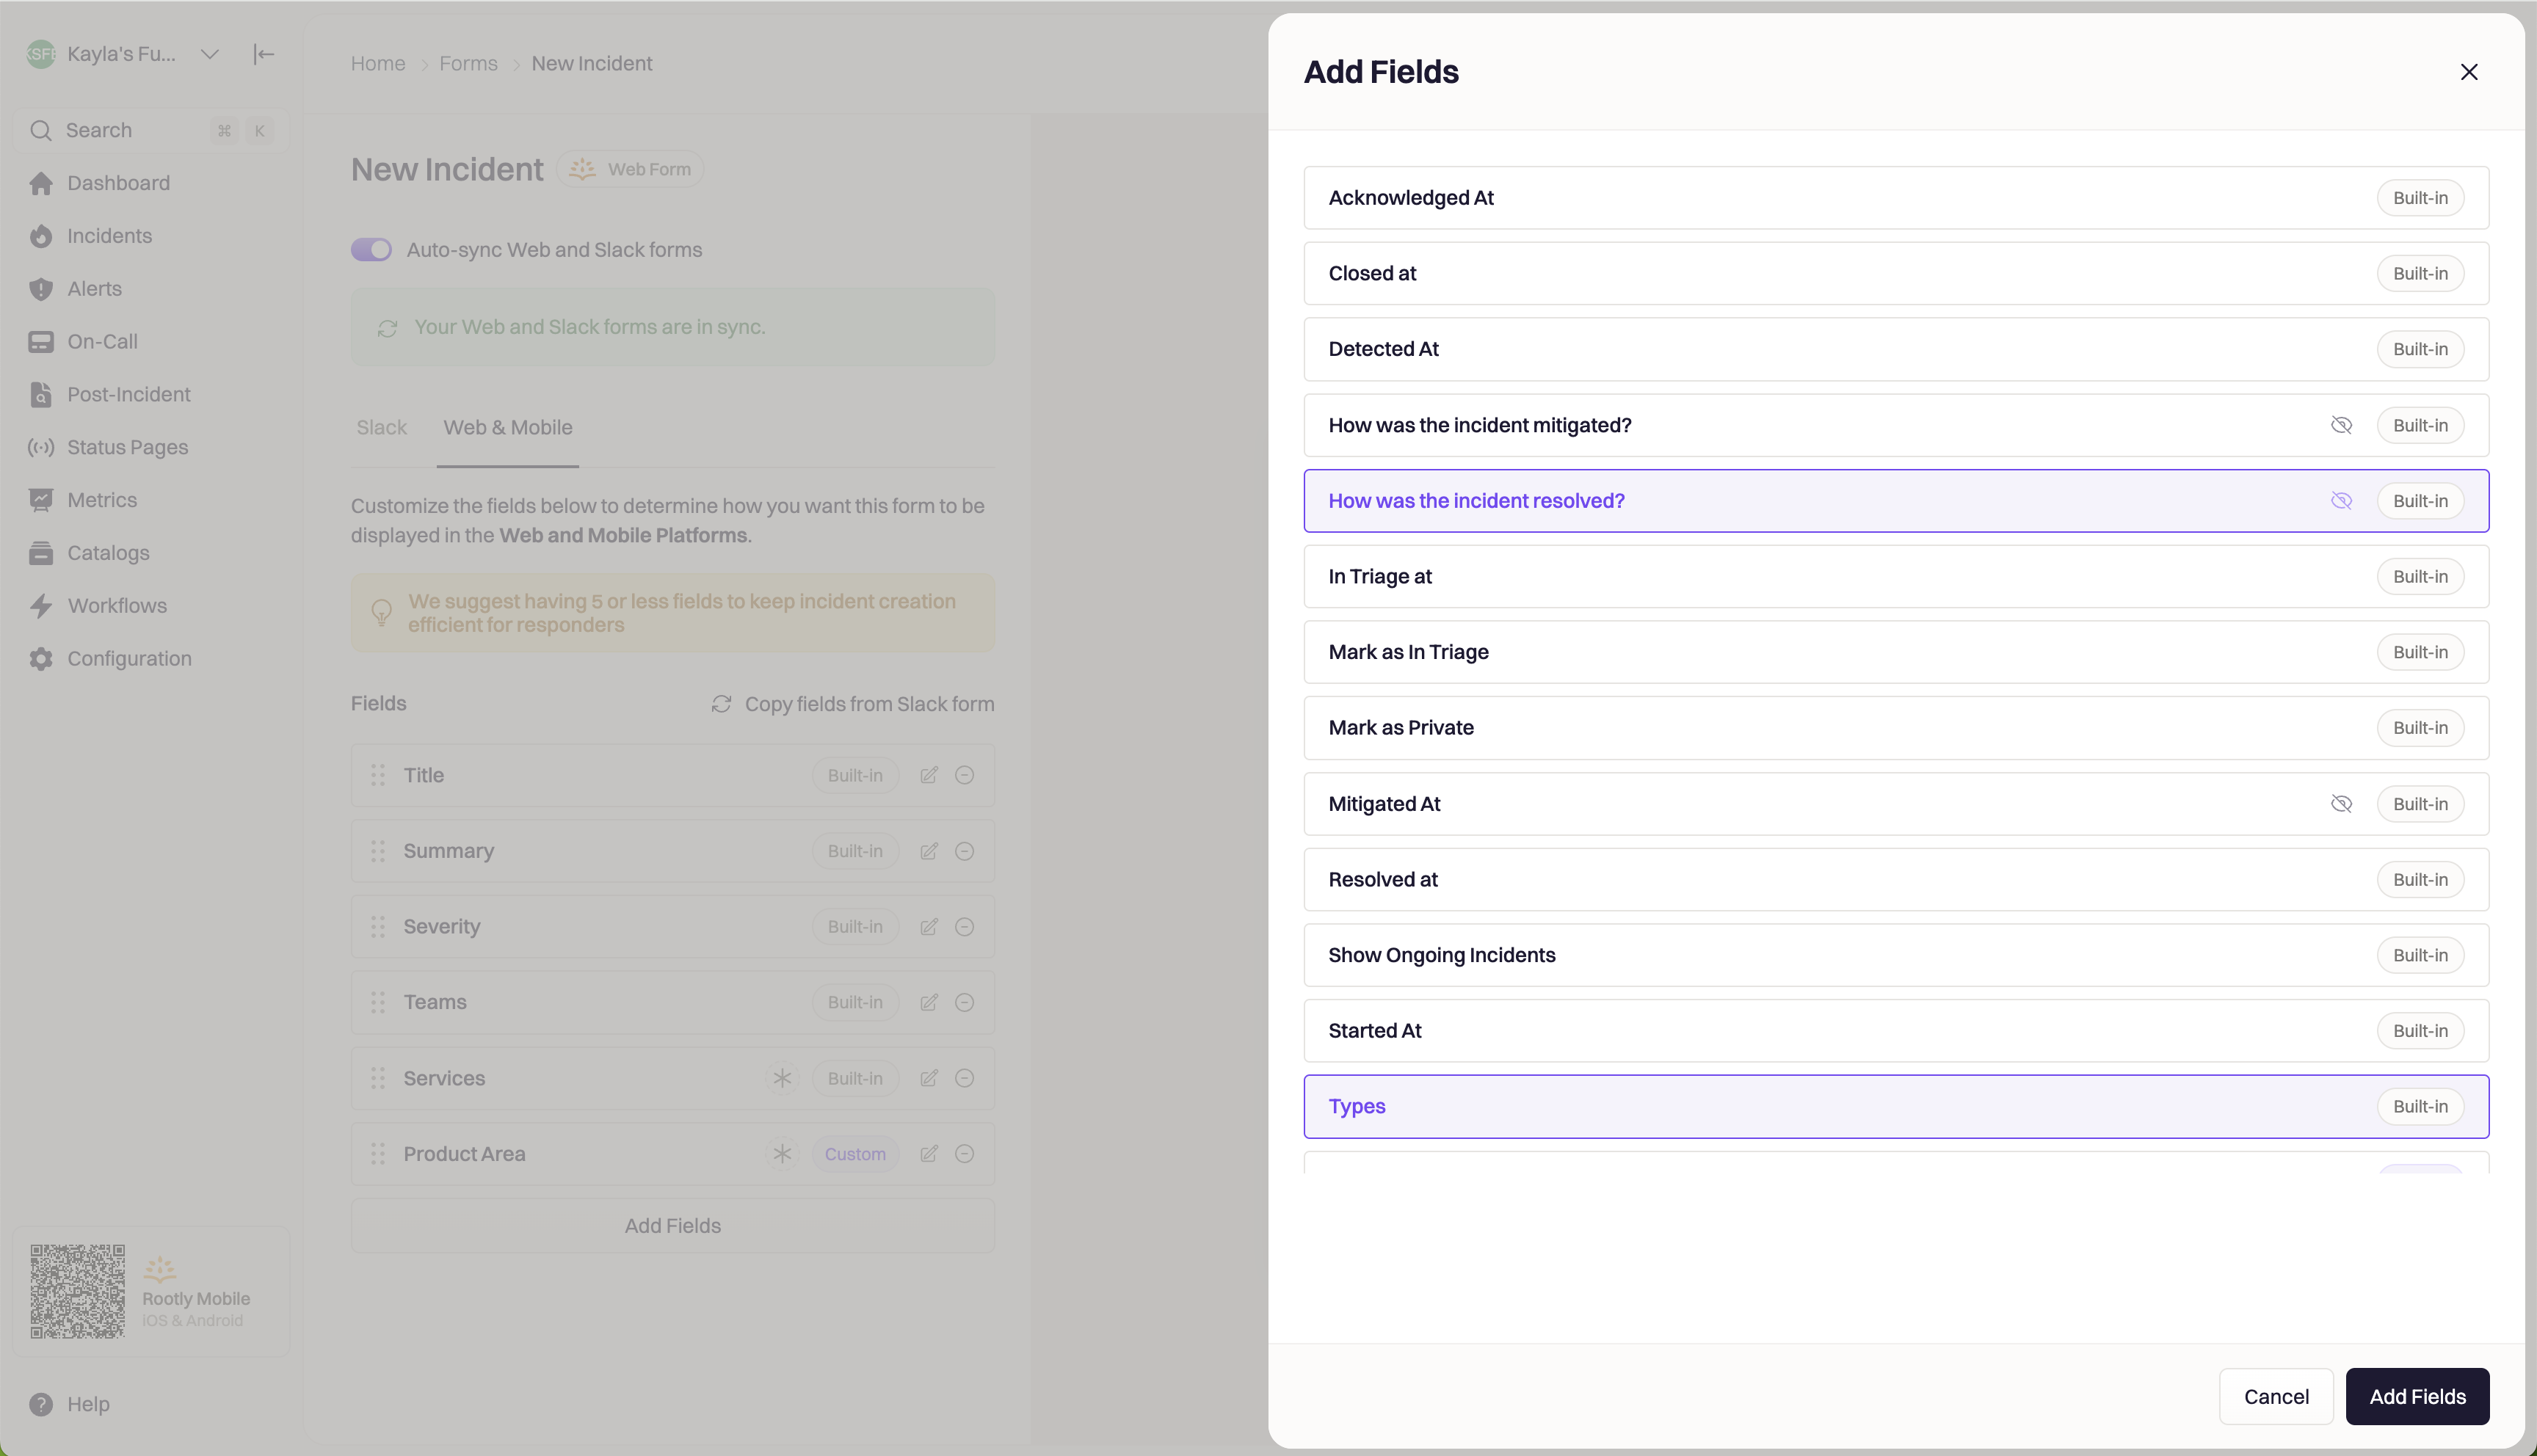 Once these fields are added to your form, you can drag and drop them to reorder the form. Remove a field by selecting the **minus** button on the right hand side of the field.
## Editing fields on a form
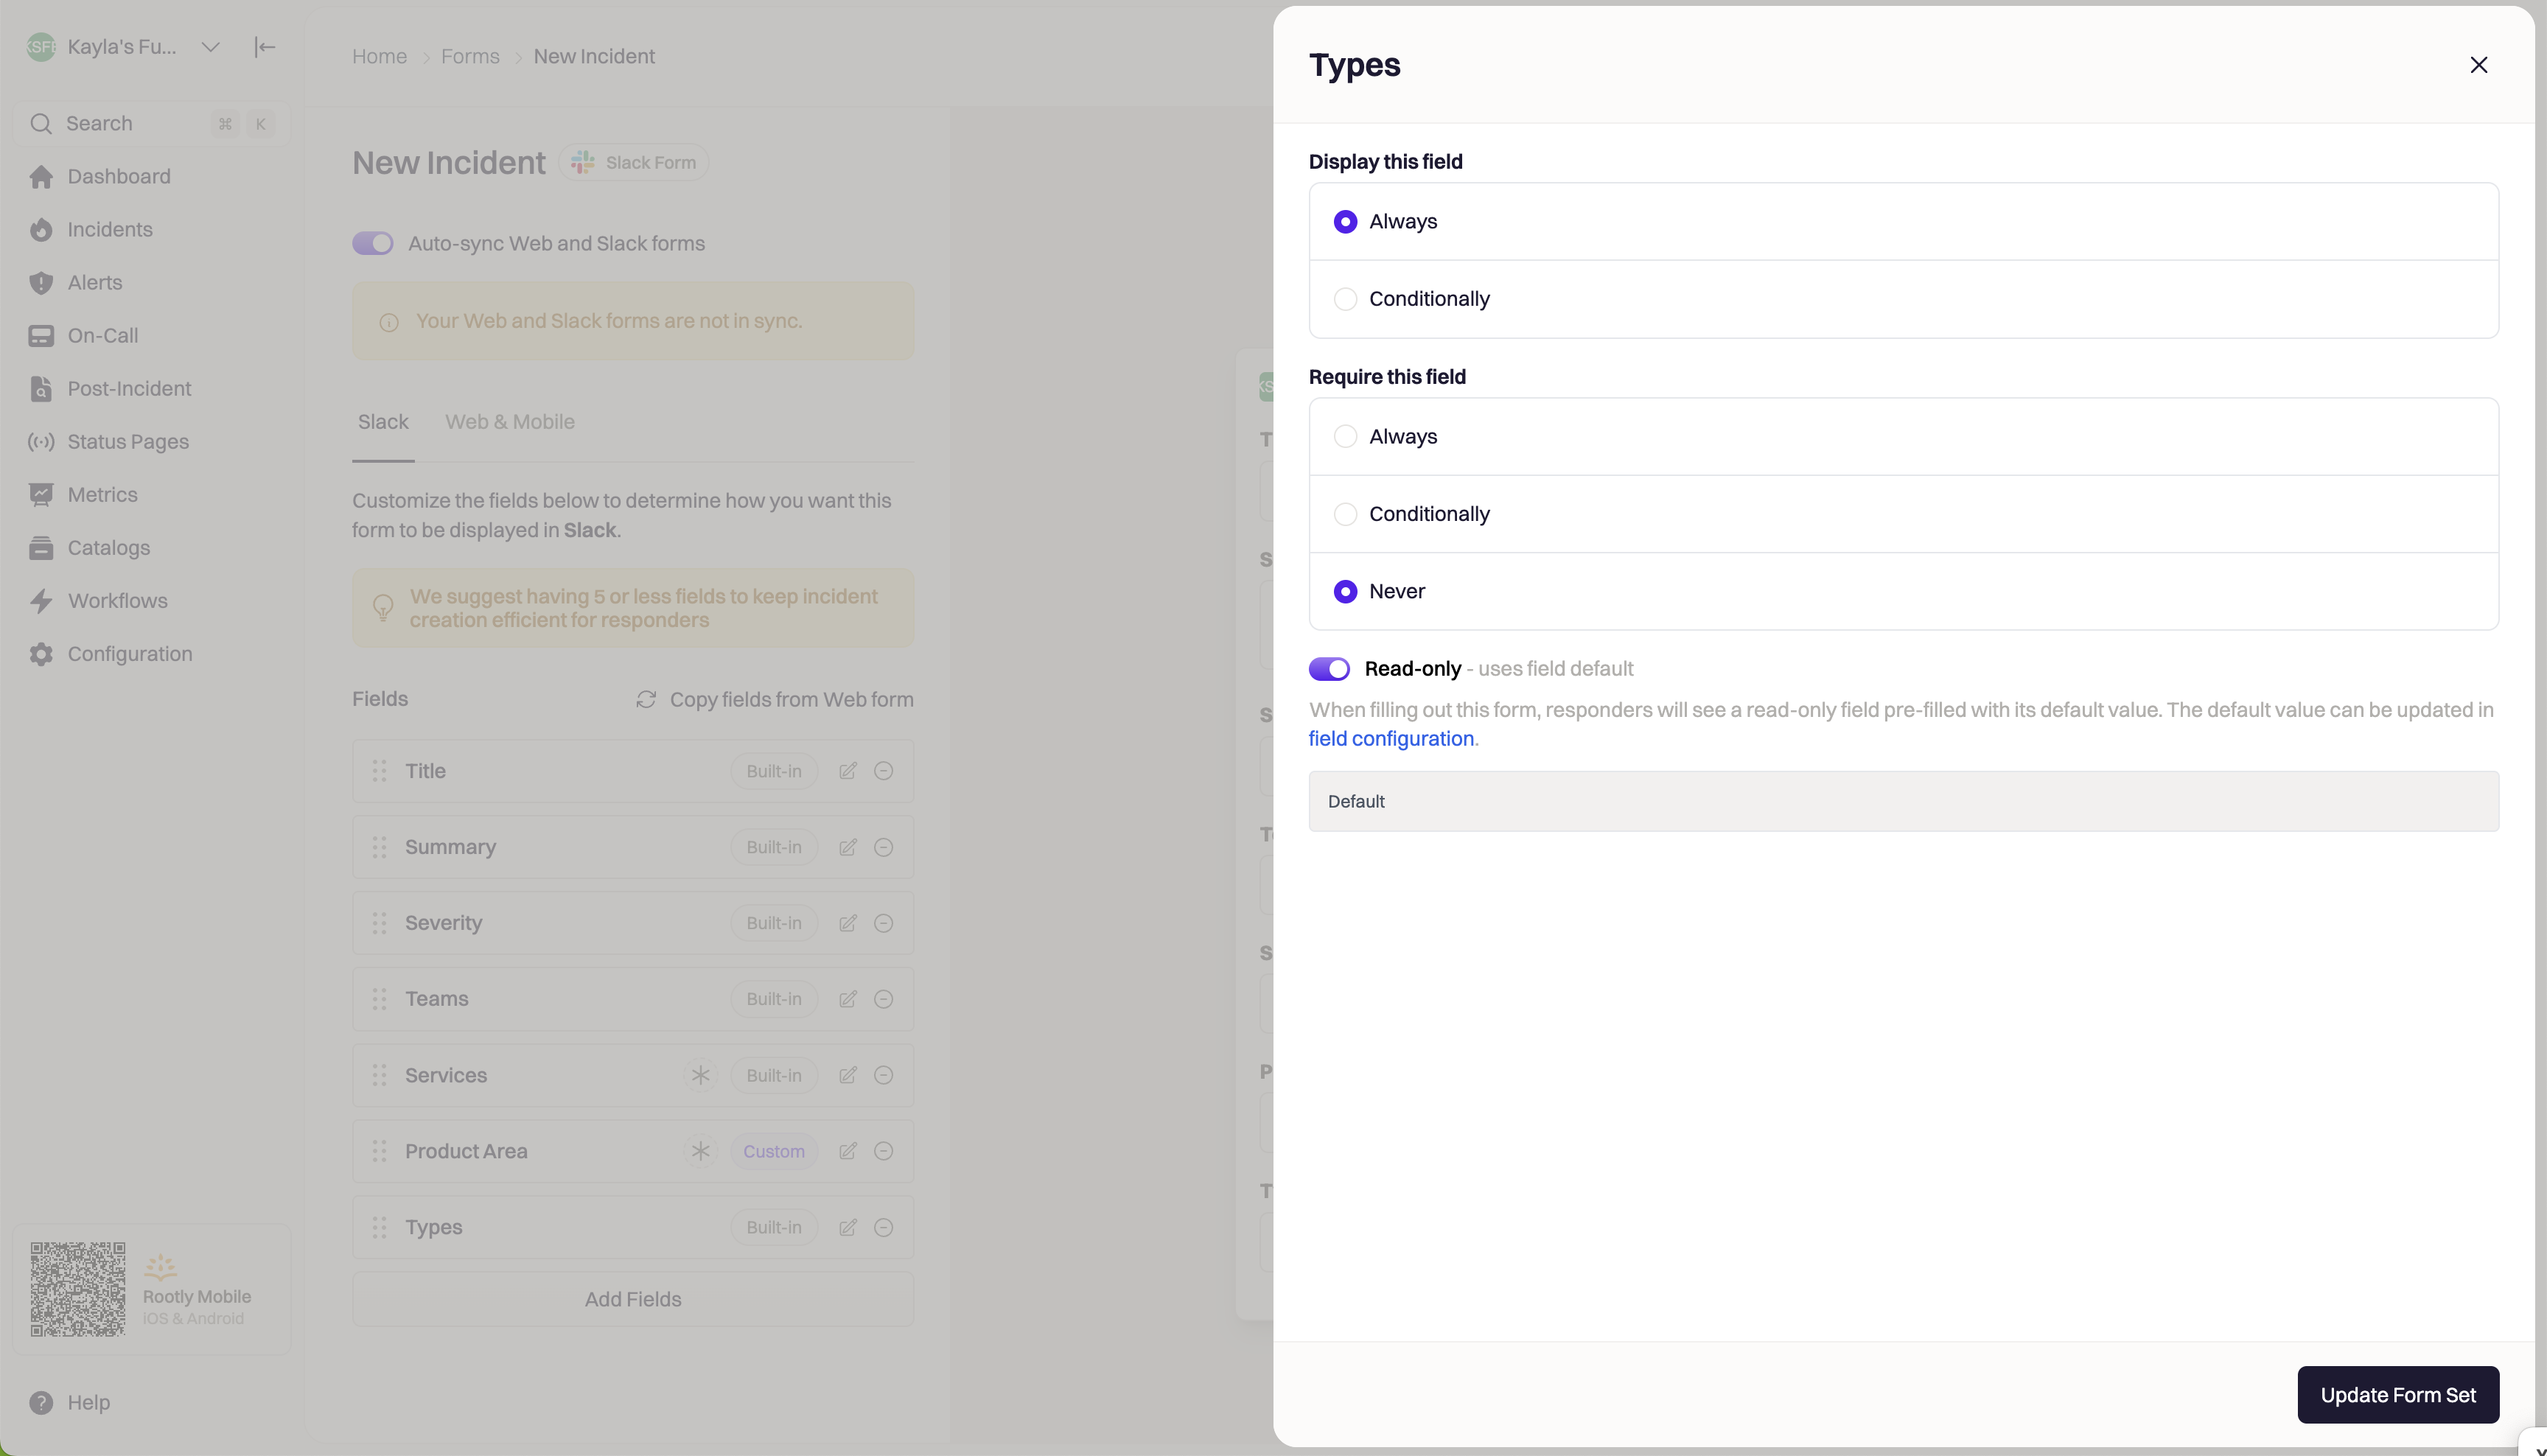
Once a field is added to a form, you can edit how and when the field is filled out. Select the edit button on the field you want to make changes to.
Once these fields are added to your form, you can drag and drop them to reorder the form. Remove a field by selecting the **minus** button on the right hand side of the field.
## Editing fields on a form
Once a field is added to a form, you can edit how and when the field is filled out. Select the edit button on the field you want to make changes to.
 ### Conditionally display and require a field
Once a field is added to a form, you can control when the field is displayed and if it is required. Select the edit button on the field that you want to make changes to.
If you only want the field to display under certain conditions or be required under certain conditions, select the **Conditionally** option under **Display this field** or **Require this field**.
Form fields can be displayed or required conditionally depending on the value of any field set above the field that you're editing. For example, if the first field on your form called "Teams" is set to a certain value, your second field can be conditionally displayed depending on the team's value.
### Read-only fields
A field can be set to 'read-only', which means that the value cannot be overwritten by your users. This is particularly useful when you want to set a field value on an incident, but do not want it to be manually set by your team.
When this setting is turned on, the field value will always be set to the default value. You cannot turn this setting on unless the field has a default value: this can be edited in the Fields section of the dashboard.
This setting only impacts the Form experience. Field values can still be overwritten in the Rootly Web UI on the Incident's details page.
# Preview
The preview on the right-hand side is interactive and generated in real-time. This is a great way to test out the user experience of your form, and ensure behavior of each field is correct.
### Conditionally display and require a field
Once a field is added to a form, you can control when the field is displayed and if it is required. Select the edit button on the field that you want to make changes to.
If you only want the field to display under certain conditions or be required under certain conditions, select the **Conditionally** option under **Display this field** or **Require this field**.
Form fields can be displayed or required conditionally depending on the value of any field set above the field that you're editing. For example, if the first field on your form called "Teams" is set to a certain value, your second field can be conditionally displayed depending on the team's value.
### Read-only fields
A field can be set to 'read-only', which means that the value cannot be overwritten by your users. This is particularly useful when you want to set a field value on an incident, but do not want it to be manually set by your team.
When this setting is turned on, the field value will always be set to the default value. You cannot turn this setting on unless the field has a default value: this can be edited in the Fields section of the dashboard.
This setting only impacts the Form experience. Field values can still be overwritten in the Rootly Web UI on the Incident's details page.
# Preview
The preview on the right-hand side is interactive and generated in real-time. This is a great way to test out the user experience of your form, and ensure behavior of each field is correct.