> ## Documentation Index
> Fetch the complete documentation index at: https://docs.rootly.com/llms.txt
> Use this file to discover all available pages before exploring further.
# Creating Action Items in Web Interface
> Add tasks and follow-ups to incidents through the web interface, with options for exporting to external tools and manual tracking.
### How Web-Based Action Items Work
From the incident page in the Rootly web app, you can create and manage **tasks** (work done during the incident) and **follow-ups** (work done after the incident to prevent recurrence).
Tasks and follow-ups live in dedicated tabs on the incident and are also reflected in retrospectives, exports, and integrations with external tools.
Use the web interface when you want a complete view of all action items for an incident, need richer editing controls, or want to export items to ticketing/project management tools.
 ***
### Creating Tasks and Follow-Ups from an Incident
Add a task or follow-up directly from the incident page.
Open the incident in the Rootly web app from your incidents list or a direct link.
Under the incident title, click either the Tasks tab (for work done during the incident) or the Follow-ups tab (for post-incident work).
Click + New Task or + New Followup.
A form will appear where you can enter details such as:
* Title (required)
* Description
* Assignee (person and/or team)
* Priority
* Status
* Due date (especially for follow-ups)
* Optional links to external systems (e.g., Jira issue URL)
Click Save to create the item.
The task or follow-up will appear in the list on the tab and be associated with the incident timeline for future reference and retrospectives.
Depending on your workspace configuration, you may see slightly different fields (for example, required teams, custom fields, or external ticket links). Your admin controls these under Configuration.
***
### Using Markdown in Action Item Descriptions
Action item descriptions support [Markdown](https://www.markdownguide.org/ "Markdown") so you can structure notes and instructions clearly.
You can use Markdown to:
* Add **bold** or *italic* emphasis
* Create bullet lists or numbered steps
* Insert links to dashboards, runbooks, or logs
* Highlight command snippets
Markdown makes it easier for assignees to understand exactly what needs to be done—especially for complex or multi-step work.
***
### Exporting Action Items Automatically (Smart Defaults)
With **Smart Defaults**, you can configure Rootly to automatically export tasks to external tools for tracking—so responders don’t need to create tickets manually.
These settings live under integration pages such as Jira, Asana, Motion, or Linear.
Examples:
* Automatically create a Jira issue whenever a new follow-up is created
* Push all high-priority follow-ups to Linear as issues
* Create Asana tasks for follow-ups tied to specific services
***
### Creating Tasks and Follow-Ups from an Incident
Add a task or follow-up directly from the incident page.
Open the incident in the Rootly web app from your incidents list or a direct link.
Under the incident title, click either the Tasks tab (for work done during the incident) or the Follow-ups tab (for post-incident work).
Click + New Task or + New Followup.
A form will appear where you can enter details such as:
* Title (required)
* Description
* Assignee (person and/or team)
* Priority
* Status
* Due date (especially for follow-ups)
* Optional links to external systems (e.g., Jira issue URL)
Click Save to create the item.
The task or follow-up will appear in the list on the tab and be associated with the incident timeline for future reference and retrospectives.
Depending on your workspace configuration, you may see slightly different fields (for example, required teams, custom fields, or external ticket links). Your admin controls these under Configuration.
***
### Using Markdown in Action Item Descriptions
Action item descriptions support [Markdown](https://www.markdownguide.org/ "Markdown") so you can structure notes and instructions clearly.
You can use Markdown to:
* Add **bold** or *italic* emphasis
* Create bullet lists or numbered steps
* Insert links to dashboards, runbooks, or logs
* Highlight command snippets
Markdown makes it easier for assignees to understand exactly what needs to be done—especially for complex or multi-step work.
***
### Exporting Action Items Automatically (Smart Defaults)
With **Smart Defaults**, you can configure Rootly to automatically export tasks to external tools for tracking—so responders don’t need to create tickets manually.
These settings live under integration pages such as Jira, Asana, Motion, or Linear.
Examples:
* Automatically create a Jira issue whenever a new follow-up is created
* Push all high-priority follow-ups to Linear as issues
* Create Asana tasks for follow-ups tied to specific services
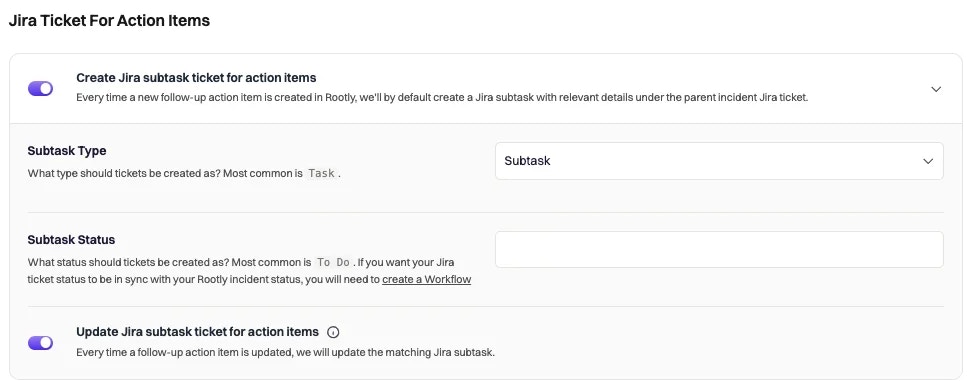 Use Smart Defaults when you want **every** action item (or a filtered subset) to end up in your external tracker without manual effort.
***
### Exporting Action Items Manually from an Incident
If you prefer more control, you can export action items manually from the **Tasks** and **Follow-ups** tabs.
1. Open the incident in the web app.
2. Go to the **Tasks** or **Follow-ups** tab.
3. Click the **Export to ticketing** button to send selected items to your configured tool (Jira, Linear, Asana, Trello, Zendesk, etc.).
Use Smart Defaults when you want **every** action item (or a filtered subset) to end up in your external tracker without manual effort.
***
### Exporting Action Items Manually from an Incident
If you prefer more control, you can export action items manually from the **Tasks** and **Follow-ups** tabs.
1. Open the incident in the web app.
2. Go to the **Tasks** or **Follow-ups** tab.
3. Click the **Export to ticketing** button to send selected items to your configured tool (Jira, Linear, Asana, Trello, Zendesk, etc.).
 During export, you may need to select:
* Which integration to use
* Project, board, team, or workspace
* Issue type or workflow state
* Whether to create a **subtask/sub-issue** when an incident already has a linked parent ticket
Manual export is perfect when only some action items should be tracked externally.
The **Export to ticketing** modal does not support [Liquid variables](/liquid/liquid). Anything you type into the description field is sent as literal text — `{{ incident.url }}` will not be interpolated. To enrich exported tickets with incident context (URL, severity, services, etc.), use the workflow pattern in the next section.
***
### Linking Exported Tasks Back to the Incident
When you export an action item via **Export to ticketing**, the resulting Jira (or Linear, Asana, ClickUp, etc.) ticket lands in your tracker without any incident context — no Rootly link, no severity, no service. That's a frequent gap: the assignee sees the ticket later, can't tell which incident it came from, and has to dig.
You can close the gap with a small **[Action Item Workflow](/workflows/action-item-workflows)** that enriches the ticket automatically the moment it's created. Pressing **Export to ticketing** stores the external ticket reference on the action item, which fires the `Action Item Updated` trigger — so a workflow can react in real time and write incident fields into the just-created ticket.
In Jira, add a **custom URL or text field** on the issue type used for exports — name it something like *"Source Incident"*. The custom-field path is what the Update Jira Issue action's field mapping targets and is also JQL-searchable later.
Adding entries to the Jira issue's **Links** panel (Jira "remote links" / web links) is a separate REST endpoint that the Update Jira Issue field mapping doesn't drive. If you specifically want a Links-panel entry rather than a custom field value, that's outside this walkthrough — keep the link in a custom field, or open the Jira issue manually and add a remote link.
In Rootly, go to **Workflows → Create Workflow** and pick **Action Item** as the type.
Configure:
* **Trigger:** `Action Item Updated`. This fires when **Export to ticketing** writes the external ticket reference back to the action item. It also fires on every other action-item update — see the safety guard in the Action step below.
* **Action:** add the **Update Jira Issue** action (see the [Jira Workflows](/integrations/jira/workflows) reference). Use `{{ action_item.jira_issue_id }}` in the **Jira Issue to Update** field. The action requires a valid Jira issue ID — if the action item doesn't have one yet (the export hasn't happened, or another kind of update fired the trigger), the action fails cleanly rather than running against the wrong issue. Enable **Skip on Failure** on the action so unrelated updates silently no-op instead of halting the workflow.
Open the **Advanced** tab on the Update Jira Issue action. Add a [custom field mapping](/integrations/jira/workflows#field-type-mappings) that sets the custom field you created in Step 1 to a [Liquid expression](/liquid/incident-variables) like `{{ incident.url }}`.
Common payloads:
| Goal | Liquid value |
| -------------------- | --------------------------------------------------------------------- |
| Just the Rootly link | `{{ incident.url }}` |
| Title plus link | `{{ incident.title }} — {{ incident.url }}` |
| Severity-aware label | `[{{ incident.severity }}] {{ incident.title }} ({{ incident.url }})` |
Save the workflow. Future Export to Ticketing presses on action items will write the incident link into the custom Jira field automatically, in addition to whatever the export modal recorded.
The same shape of pattern is available for other ticketing tools that have action-item-workflow Update actions — **Linear**, **Asana**, **ClickUp**, **Shortcut**, **Zendesk**, **GitHub**, **GitLab**, and **Trello** all expose an "Update \[Tool] Issue/Task" action that can be invoked from an Action Item Workflow. The exact field-mapping mechanism and supported field types differ per tool — open the [integration page](/integrations/overview) for the tool you use and check its workflows or functionalities reference to see the action's available fields and how custom-field mapping works for that tool, then mirror the pattern above.
***
### Best Practices
* **Create tasks early** — capture investigation steps while context is fresh.
* **Use follow-ups for long-term improvements** — reliability work, runbook updates, etc.
* **Assign owners immediately** — unassigned items go stale.
* **Set due dates** — especially for follow-ups tied to retrospectives.
* **Use Markdown for clarity** — links and structured notes help assignees move faster.
* **Export to ticketing systems when appropriate** — keep work aligned with your team’s backlog.
* **Review open follow-ups regularly** — ensures continuous improvement.
***
### Troubleshooting
Your workspace or role may have restricted access, or you may not have permission to manage action items for this incident.
Check with your Rootly admin.
Some organizations disable new action items after certain incident lifecycle stages (e.g., after resolution or close).
If the creation buttons are missing, your configuration may enforce these rules.
Exporting requires at least one ticketing integration (Jira, Linear, Asana, etc.) to be configured.
Check Configuration → Integrations.
The external tool may have missing required fields or permission restrictions.
Verify:
* Project/workspace is valid
* Issue type and fields are allowed
* The integration user has permission to create tickets
Your admin may have enabled custom fields, required teams, or experimental improvements.
These settings change which form fields appear.
During export, you may need to select:
* Which integration to use
* Project, board, team, or workspace
* Issue type or workflow state
* Whether to create a **subtask/sub-issue** when an incident already has a linked parent ticket
Manual export is perfect when only some action items should be tracked externally.
The **Export to ticketing** modal does not support [Liquid variables](/liquid/liquid). Anything you type into the description field is sent as literal text — `{{ incident.url }}` will not be interpolated. To enrich exported tickets with incident context (URL, severity, services, etc.), use the workflow pattern in the next section.
***
### Linking Exported Tasks Back to the Incident
When you export an action item via **Export to ticketing**, the resulting Jira (or Linear, Asana, ClickUp, etc.) ticket lands in your tracker without any incident context — no Rootly link, no severity, no service. That's a frequent gap: the assignee sees the ticket later, can't tell which incident it came from, and has to dig.
You can close the gap with a small **[Action Item Workflow](/workflows/action-item-workflows)** that enriches the ticket automatically the moment it's created. Pressing **Export to ticketing** stores the external ticket reference on the action item, which fires the `Action Item Updated` trigger — so a workflow can react in real time and write incident fields into the just-created ticket.
In Jira, add a **custom URL or text field** on the issue type used for exports — name it something like *"Source Incident"*. The custom-field path is what the Update Jira Issue action's field mapping targets and is also JQL-searchable later.
Adding entries to the Jira issue's **Links** panel (Jira "remote links" / web links) is a separate REST endpoint that the Update Jira Issue field mapping doesn't drive. If you specifically want a Links-panel entry rather than a custom field value, that's outside this walkthrough — keep the link in a custom field, or open the Jira issue manually and add a remote link.
In Rootly, go to **Workflows → Create Workflow** and pick **Action Item** as the type.
Configure:
* **Trigger:** `Action Item Updated`. This fires when **Export to ticketing** writes the external ticket reference back to the action item. It also fires on every other action-item update — see the safety guard in the Action step below.
* **Action:** add the **Update Jira Issue** action (see the [Jira Workflows](/integrations/jira/workflows) reference). Use `{{ action_item.jira_issue_id }}` in the **Jira Issue to Update** field. The action requires a valid Jira issue ID — if the action item doesn't have one yet (the export hasn't happened, or another kind of update fired the trigger), the action fails cleanly rather than running against the wrong issue. Enable **Skip on Failure** on the action so unrelated updates silently no-op instead of halting the workflow.
Open the **Advanced** tab on the Update Jira Issue action. Add a [custom field mapping](/integrations/jira/workflows#field-type-mappings) that sets the custom field you created in Step 1 to a [Liquid expression](/liquid/incident-variables) like `{{ incident.url }}`.
Common payloads:
| Goal | Liquid value |
| -------------------- | --------------------------------------------------------------------- |
| Just the Rootly link | `{{ incident.url }}` |
| Title plus link | `{{ incident.title }} — {{ incident.url }}` |
| Severity-aware label | `[{{ incident.severity }}] {{ incident.title }} ({{ incident.url }})` |
Save the workflow. Future Export to Ticketing presses on action items will write the incident link into the custom Jira field automatically, in addition to whatever the export modal recorded.
The same shape of pattern is available for other ticketing tools that have action-item-workflow Update actions — **Linear**, **Asana**, **ClickUp**, **Shortcut**, **Zendesk**, **GitHub**, **GitLab**, and **Trello** all expose an "Update \[Tool] Issue/Task" action that can be invoked from an Action Item Workflow. The exact field-mapping mechanism and supported field types differ per tool — open the [integration page](/integrations/overview) for the tool you use and check its workflows or functionalities reference to see the action's available fields and how custom-field mapping works for that tool, then mirror the pattern above.
***
### Best Practices
* **Create tasks early** — capture investigation steps while context is fresh.
* **Use follow-ups for long-term improvements** — reliability work, runbook updates, etc.
* **Assign owners immediately** — unassigned items go stale.
* **Set due dates** — especially for follow-ups tied to retrospectives.
* **Use Markdown for clarity** — links and structured notes help assignees move faster.
* **Export to ticketing systems when appropriate** — keep work aligned with your team’s backlog.
* **Review open follow-ups regularly** — ensures continuous improvement.
***
### Troubleshooting
Your workspace or role may have restricted access, or you may not have permission to manage action items for this incident.
Check with your Rootly admin.
Some organizations disable new action items after certain incident lifecycle stages (e.g., after resolution or close).
If the creation buttons are missing, your configuration may enforce these rules.
Exporting requires at least one ticketing integration (Jira, Linear, Asana, etc.) to be configured.
Check Configuration → Integrations.
The external tool may have missing required fields or permission restrictions.
Verify:
* Project/workspace is valid
* Issue type and fields are allowed
* The integration user has permission to create tickets
Your admin may have enabled custom fields, required teams, or experimental improvements.
These settings change which form fields appear.