> ## Documentation Index
> Fetch the complete documentation index at: https://docs.rootly.com/llms.txt
> Use this file to discover all available pages before exploring further.
# Creating Incidents via Slack Interface
> Create incidents from Slack using slash commands or message actions with customizable fields, validation, severity, and channel auto-creation.
### Overview
Slack is one of the fastest and most natural places to declare an incident. Whether a responder notices an issue in conversation, spots a customer report, or sees a monitoring message posted into a channel, Rootly’s Slack integration lets you create an incident instantly — directly from where your team already works.
Use Slack when you need **speed**, **context**, and **collaboration without switching tools**.
Slack-based creation supports:
* Customizable incident fields
* Required-field validation
* Private incident creation
* Automated Slack channel creation
* Full integration with workflows and lifecycle updates
Need help installing the Rootly Slack app? See the **Slack Integration Guide**.
### Create a New Incident in Slack
**Method 1 — Use a Slash Command**
1. Type:
```
/rootly new
```
in any Slack channel.
2. Press **Enter** to open the New Incident form.
This is the fastest way to start a new incident manually.
**Method 2 — Create an Incident From a Slack Message**
Use this when the trigger is a message, alert, screenshot, or customer report already posted in Slack.
1. Hover over the message
2. Click **More actions** (three dots)
3. Select **Create an incident**
The New Incident form will open **pre-filled with a link to the original message**, giving responders immediate context.
Message-based creation provides the clearest starting point for responders and is ideal for customer complaints, noisy alerts, or discussions that evolve into incidents.
The New Incident form appears as a Slack modal and includes the essential fields needed to start coordinated response.
Most fields are customizable in **Configuration → Forms**.
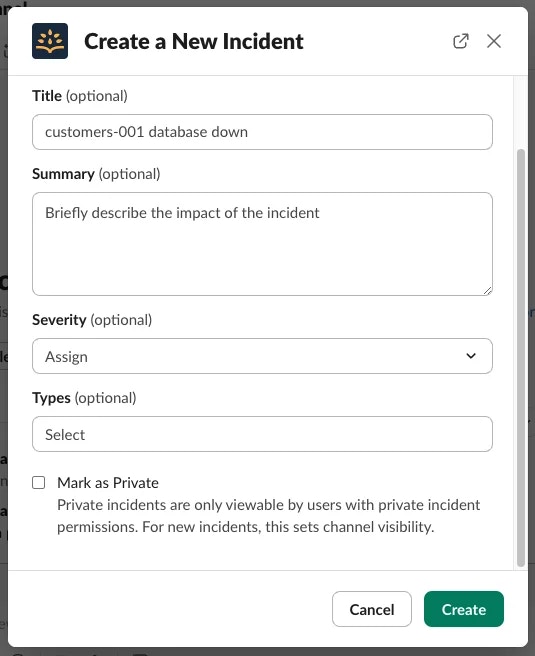 **Default Fields**
| Field | Description |
| :------------------ | :------------------------------------------------------------------- |
| **Title** | Title of the incident; also used to name the Slack incident channel. |
| **Summary** | A concise description of the issue. |
| **Severity** | Default levels SEV3 → SEV0. |
| **Type** | Default categories: Cloud, Security, Customer-Facing, Default. |
| **Mark as Private** | Restricts visibility to permitted users. |
**Additional Notes**
* Required fields are marked with a **\***
* Leaving **Title** blank triggers the **Automatic Incident Title Generator**
* Only privileged users can create or access **Private** incidents
* Private mode is ideal for sensitive or security-related issues
If your team uses **Mark as In Triage**, selecting it will start the incident in **Triage** instead of **Started**. See *Incident Lifecycle* for details.
Click **Create**.
Rootly will immediately:
* Create a **dedicated Slack incident channel**
* Post the initial system message
* Log the creation event in the Timeline
* Trigger any configured workflows
* Role assignment
* Stakeholder notifications
* Ticket creation
* Checklists
* Channel topic updates
**Default Fields**
| Field | Description |
| :------------------ | :------------------------------------------------------------------- |
| **Title** | Title of the incident; also used to name the Slack incident channel. |
| **Summary** | A concise description of the issue. |
| **Severity** | Default levels SEV3 → SEV0. |
| **Type** | Default categories: Cloud, Security, Customer-Facing, Default. |
| **Mark as Private** | Restricts visibility to permitted users. |
**Additional Notes**
* Required fields are marked with a **\***
* Leaving **Title** blank triggers the **Automatic Incident Title Generator**
* Only privileged users can create or access **Private** incidents
* Private mode is ideal for sensitive or security-related issues
If your team uses **Mark as In Triage**, selecting it will start the incident in **Triage** instead of **Started**. See *Incident Lifecycle* for details.
Click **Create**.
Rootly will immediately:
* Create a **dedicated Slack incident channel**
* Post the initial system message
* Log the creation event in the Timeline
* Trigger any configured workflows
* Role assignment
* Stakeholder notifications
* Ticket creation
* Checklists
* Channel topic updates
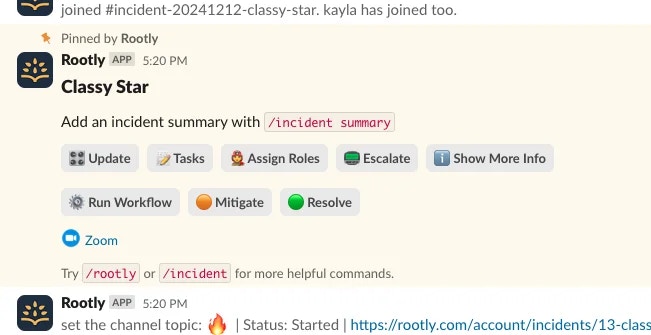 Most teams automate channel setup, role assignments, and initial communication, so responders can focus on investigation — not coordination.
### After the Incident Is Created
The Slack incident channel becomes your command center. From here you can:
* Update lifecycle status with `/rootly status`
* Resolve or cancel with `/rootly resolve` or `/rootly cancel`
* Add timeline events
* Modify fields using `/rootly edit`
* Run workflows using `/rootly workflow`
* Generate an AI summary using `/rootly summary`
* Invite responders and collaborate in real time
All changes sync automatically with the Rootly Web UI and appear in the Timeline.
### Customizing the Slack Incident Form
Your Slack form can be fully tailored to match your Web UI form.
**To customize:**
1. Go to **Configuration → Forms**
2. Under **Default Forms**, click **Configure** on *New Incident*
3. Select the **Slack** tab
4. (Optional) Click **Copy fields from Web form**
The editor shows:
* Left side → the form structure
* Right side → real-time preview
Most teams automate channel setup, role assignments, and initial communication, so responders can focus on investigation — not coordination.
### After the Incident Is Created
The Slack incident channel becomes your command center. From here you can:
* Update lifecycle status with `/rootly status`
* Resolve or cancel with `/rootly resolve` or `/rootly cancel`
* Add timeline events
* Modify fields using `/rootly edit`
* Run workflows using `/rootly workflow`
* Generate an AI summary using `/rootly summary`
* Invite responders and collaborate in real time
All changes sync automatically with the Rootly Web UI and appear in the Timeline.
### Customizing the Slack Incident Form
Your Slack form can be fully tailored to match your Web UI form.
**To customize:**
1. Go to **Configuration → Forms**
2. Under **Default Forms**, click **Configure** on *New Incident*
3. Select the **Slack** tab
4. (Optional) Click **Copy fields from Web form**
The editor shows:
* Left side → the form structure
* Right side → real-time preview
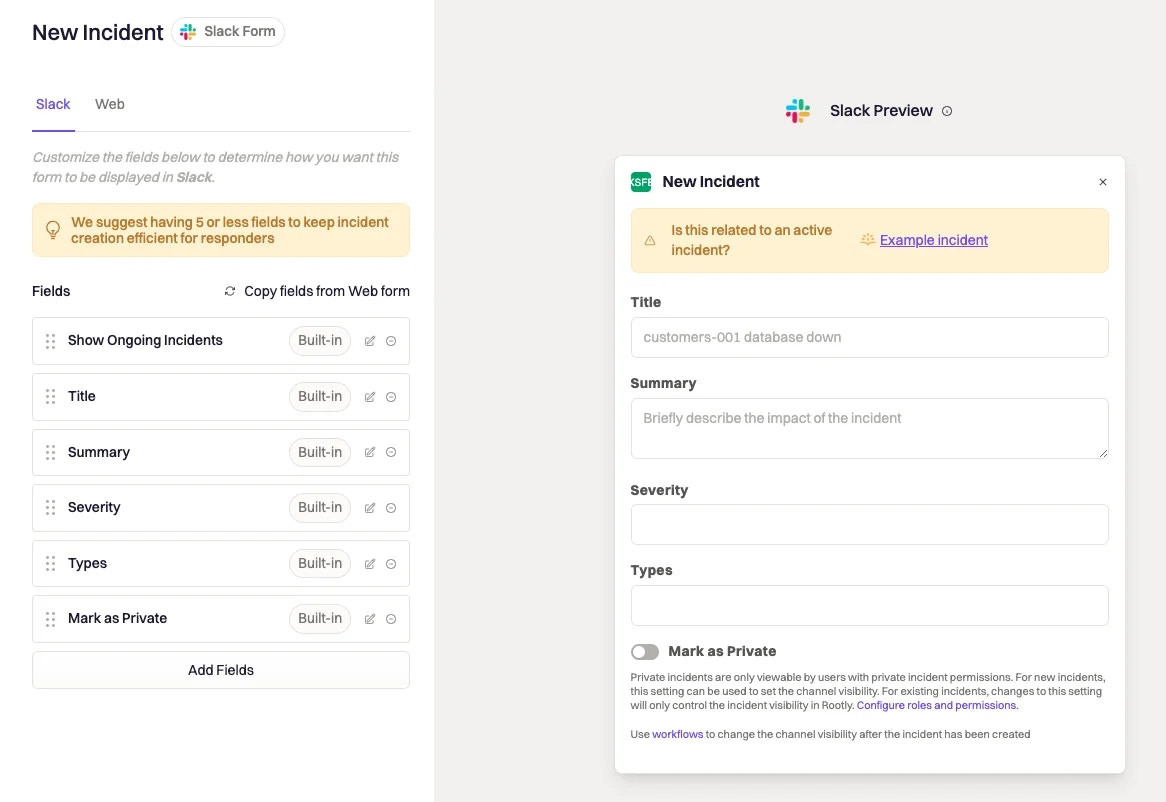 **You can customize:**
* Field order
* Field visibility
* Required fields
* Custom field types (dropdowns, multi-selects, relations, etc.)
**Controls:**
* Drag handle → reorder
* Pencil icon → edit
* Minus icon → remove
* **Add Fields** → add new fields
Changes save automatically.
We recommend keeping Slack and Web forms aligned. This ensures responders have a consistent experience no matter where incidents originate.
### Troubleshooting
Make sure you’re inside a **Rootly incident channel**, not a normal channel.
You need the correct permissions (owner/admin/private-incident access).
Your workspace likely uses **sub-statuses**, which disable the mitigate command.\
Use `/rootly status` instead.
Your workspace may enforce:
* Required fields
* Conditional fields
* Required lifecycle metadata
Check for missing fields marked with **\***.
Check:
* Slack integration is connected
* Auto-create channels is enabled
* Private incident behavior matches workspace rules
### Best Practices
* Prefer **message-based creation** for rich context
* Keep fields minimal but meaningful
* Use Private mode for sensitive incidents
* Train responders to use `/rootly status` for lifecycle updates
* Align Slack + Web forms for consistency
* Automate repetitive tasks (channel setup, assignments, notifications)
High-quality incident creation through Slack accelerates response, reduces confusion, and keeps everyone aligned from the very first minute.
**You can customize:**
* Field order
* Field visibility
* Required fields
* Custom field types (dropdowns, multi-selects, relations, etc.)
**Controls:**
* Drag handle → reorder
* Pencil icon → edit
* Minus icon → remove
* **Add Fields** → add new fields
Changes save automatically.
We recommend keeping Slack and Web forms aligned. This ensures responders have a consistent experience no matter where incidents originate.
### Troubleshooting
Make sure you’re inside a **Rootly incident channel**, not a normal channel.
You need the correct permissions (owner/admin/private-incident access).
Your workspace likely uses **sub-statuses**, which disable the mitigate command.\
Use `/rootly status` instead.
Your workspace may enforce:
* Required fields
* Conditional fields
* Required lifecycle metadata
Check for missing fields marked with **\***.
Check:
* Slack integration is connected
* Auto-create channels is enabled
* Private incident behavior matches workspace rules
### Best Practices
* Prefer **message-based creation** for rich context
* Keep fields minimal but meaningful
* Use Private mode for sensitive incidents
* Train responders to use `/rootly status` for lifecycle updates
* Align Slack + Web forms for consistency
* Automate repetitive tasks (channel setup, assignments, notifications)
High-quality incident creation through Slack accelerates response, reduces confusion, and keeps everyone aligned from the very first minute.