> ## Documentation Index
> Fetch the complete documentation index at: https://docs.rootly.com/llms.txt
> Use this file to discover all available pages before exploring further.
# Creating Incidents via Web Interface
> Create incidents through the Rootly web interface with customizable form fields, severity selection, validation rules, and post-creation automation triggers.
### Overview
The Rootly web interface provides the most complete and structured way to create an incident. It supports rich field configuration, required-field validation, access controls, and the full power of automations and workflows.
Use the web interface when you need clarity, accuracy, and full control over the incident creation experience.
The Web UI is the most reliable way to create high-quality incidents. It enforces all required fields, validations, and permissions set by your workspace.
### Create a New Incident in the Web App
You can initiate a new incident from several locations:
* **Dashboard → Create Incident** (top-right)
* **Incidents → Create Incident** (top-right)
**Global Action Menu → Create Incident** (bottom-left)
This opens the full New Incident form.
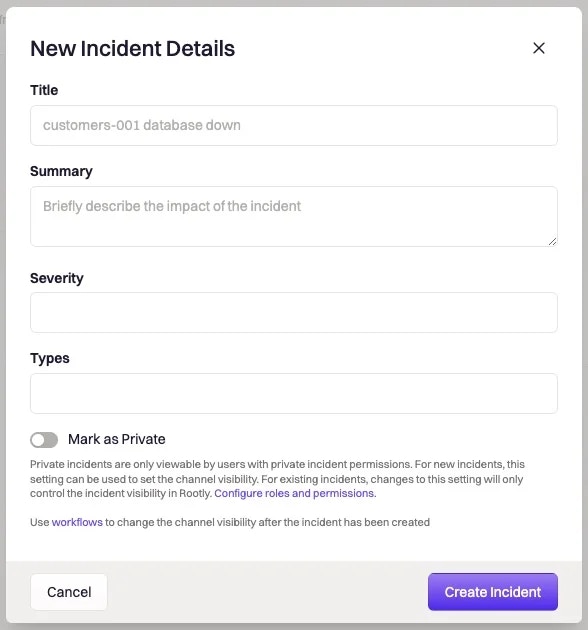
 The New Incident form captures all core information needed to begin coordinated response and trigger automation.
Most fields are customizable under **Configuration → Forms**.
**Default fields include:**
| Field | Description |
| :------------------ | :------------------------------------------------------------------ |
| **Title** | Name of the incident; also used to generate the Slack channel name. |
| **Summary** | Short description of what’s happening. |
| **Severity** | Defaults from SEV3 → SEV0. |
| **Type** | Defaults: Cloud, Security, Customer-Facing, Default. |
| **Mark as Private** | Restricts visibility to permitted users. |
The New Incident form captures all core information needed to begin coordinated response and trigger automation.
Most fields are customizable under **Configuration → Forms**.
**Default fields include:**
| Field | Description |
| :------------------ | :------------------------------------------------------------------ |
| **Title** | Name of the incident; also used to generate the Slack channel name. |
| **Summary** | Short description of what’s happening. |
| **Severity** | Defaults from SEV3 → SEV0. |
| **Type** | Defaults: Cloud, Security, Customer-Facing, Default. |
| **Mark as Private** | Restricts visibility to permitted users. |
 **Additional Notes**
* Required fields are marked with a **\***
* Leaving **Title** blank activates the **Automatic Incident Title Generator**
* Only owners, admins, or privileged users can create/view private incidents
* Private incidents are recommended for security-, privacy-, or customer-sensitive issues
If your team uses **Mark as In Triage**, selecting this checkbox starts the incident in **Triage** instead of **Started**. See the *Incident Lifecycle* page for details on how these statuses differ.
Your workspace may enforce:
* Required fields on incident **creation**
* Required fields for **specific lifecycle transitions**
* Required fields based on **severity**, **incident type**, or **team**
If you miss a required field, the Web UI will block submission and highlight the missing values.
Completing required metadata during creation prevents blockers later when moving the incident from Started → Mitigated → Resolved.
Depending on how your team configures the form, you may see optional sections such as:
* Services
* Functionalities
* Environments
* Groups
* Incident Types
* Labels
* Notify Emails
* Custom form fields
* Test Incident checkbox (if enabled)
Adding contextual metadata improves:
* Automated routing
* Workflow execution
* Analytics and dashboards
* Retrospective quality
Click **Create Incident**.
Upon creation, Rootly will automatically:
* Create the incident record
* Capture lifecycle timestamps (e.g., started\_at)
* Trigger your incident-creation workflows
* Create a Slack incident channel (if enabled)
* Assign default responders or roles
* Add initial timeline entries
* Redirect you to the newly created incident page
Most teams automate channel creation, role assignment, and stakeholder notifications to reduce manual overhead and speed up initial response.**Customize the New Incident form in the Web app**
### After the Incident Is Created
Once the incident is open, you can:
* Update lifecycle status (Triage → Started → Mitigated → Resolved → Closed)
* Assign roles and add responders
* Add timeline entries
* Attach or review alerts
* Trigger or monitor workflows
* Publish stakeholder updates
* Track action items and tasks
* Join the Slack channel associated with the incident
All changes are tracked automatically and appear in the Timeline for retrospective analysis.
### Customizing the New Incident Form
Navigate to:
**Configuration → Forms → New Incident → Configure**
Then select the **Web** tab.
**Additional Notes**
* Required fields are marked with a **\***
* Leaving **Title** blank activates the **Automatic Incident Title Generator**
* Only owners, admins, or privileged users can create/view private incidents
* Private incidents are recommended for security-, privacy-, or customer-sensitive issues
If your team uses **Mark as In Triage**, selecting this checkbox starts the incident in **Triage** instead of **Started**. See the *Incident Lifecycle* page for details on how these statuses differ.
Your workspace may enforce:
* Required fields on incident **creation**
* Required fields for **specific lifecycle transitions**
* Required fields based on **severity**, **incident type**, or **team**
If you miss a required field, the Web UI will block submission and highlight the missing values.
Completing required metadata during creation prevents blockers later when moving the incident from Started → Mitigated → Resolved.
Depending on how your team configures the form, you may see optional sections such as:
* Services
* Functionalities
* Environments
* Groups
* Incident Types
* Labels
* Notify Emails
* Custom form fields
* Test Incident checkbox (if enabled)
Adding contextual metadata improves:
* Automated routing
* Workflow execution
* Analytics and dashboards
* Retrospective quality
Click **Create Incident**.
Upon creation, Rootly will automatically:
* Create the incident record
* Capture lifecycle timestamps (e.g., started\_at)
* Trigger your incident-creation workflows
* Create a Slack incident channel (if enabled)
* Assign default responders or roles
* Add initial timeline entries
* Redirect you to the newly created incident page
Most teams automate channel creation, role assignment, and stakeholder notifications to reduce manual overhead and speed up initial response.**Customize the New Incident form in the Web app**
### After the Incident Is Created
Once the incident is open, you can:
* Update lifecycle status (Triage → Started → Mitigated → Resolved → Closed)
* Assign roles and add responders
* Add timeline entries
* Attach or review alerts
* Trigger or monitor workflows
* Publish stakeholder updates
* Track action items and tasks
* Join the Slack channel associated with the incident
All changes are tracked automatically and appear in the Timeline for retrospective analysis.
### Customizing the New Incident Form
Navigate to:
**Configuration → Forms → New Incident → Configure**
Then select the **Web** tab.
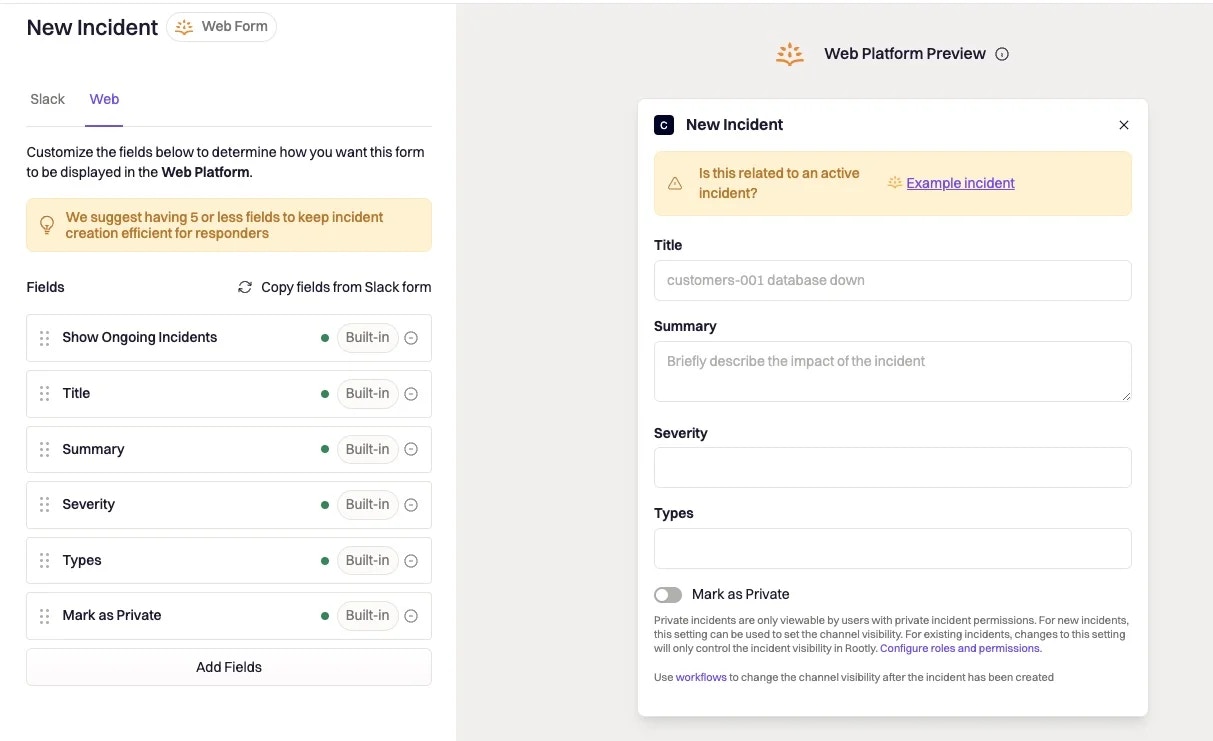 You can optionally copy the structure from the Slack form using:
**Copy fields from Slack form**
* Left panel: current form structure
* Right panel: real-time preview
You can customize:
* Field order
* Field visibility
* Required fields
* Custom field types (dropdowns, multi-selects, relations, etc.)
Use:
* **Drag handle (six dots)** → reorder fields
* **Pencil icon** → edit a field
* **Minus icon** → remove a field
* **Add Fields** → add new fields
Changes save automatically.
We recommend keeping Slack and Web forms aligned so responders have a consistent experience regardless of where incidents are created.
### Troubleshooting
Check for:
* Missing required fields
* Missing permissions
* Private incident restrictions
Confirm that workflow conditions match:
* Severity
* Type
* Services
* Environments
* Groups
Required-fields enforcement or conditional visibility rules may be preventing submission.
Verify:
* Slack integration is enabled
* Auto-channel creation is turned on
* The incident wasn’t created as private (depending on workspace rules)
### Best Practices
* Use structured fields (Severity, Services, Environments) for clarity & analytics
* Keep required fields minimal but meaningful
* Use Private mode for security or privacy-sensitive incidents
* Align Slack and Web forms for consistency
* Automate repetitive creation steps with workflows
* Provide descriptive titles and actionable summaries
High-quality incident creation dramatically accelerates response and improves clarity for everyone involved.
You can optionally copy the structure from the Slack form using:
**Copy fields from Slack form**
* Left panel: current form structure
* Right panel: real-time preview
You can customize:
* Field order
* Field visibility
* Required fields
* Custom field types (dropdowns, multi-selects, relations, etc.)
Use:
* **Drag handle (six dots)** → reorder fields
* **Pencil icon** → edit a field
* **Minus icon** → remove a field
* **Add Fields** → add new fields
Changes save automatically.
We recommend keeping Slack and Web forms aligned so responders have a consistent experience regardless of where incidents are created.
### Troubleshooting
Check for:
* Missing required fields
* Missing permissions
* Private incident restrictions
Confirm that workflow conditions match:
* Severity
* Type
* Services
* Environments
* Groups
Required-fields enforcement or conditional visibility rules may be preventing submission.
Verify:
* Slack integration is enabled
* Auto-channel creation is turned on
* The incident wasn’t created as private (depending on workspace rules)
### Best Practices
* Use structured fields (Severity, Services, Environments) for clarity & analytics
* Keep required fields minimal but meaningful
* Use Private mode for security or privacy-sensitive incidents
* Align Slack and Web forms for consistency
* Automate repetitive creation steps with workflows
* Provide descriptive titles and actionable summaries
High-quality incident creation dramatically accelerates response and improves clarity for everyone involved.