> ## Documentation Index
> Fetch the complete documentation index at: https://docs.rootly.com/llms.txt
> Use this file to discover all available pages before exploring further.
# Workflows
> Automate Confluence page creation, updates, and labelling for incident retrospectives using Rootly workflow actions with parent page and template support.
## Overview
Workflows let you automate Confluence page creation and control exactly what information Rootly publishes during an incident. You can trigger a page creation when an incident resolves, when a retrospective begins, or on any other workflow event — and use Liquid variables to populate pages with live incident data.
If you do not need advanced trigger or condition logic, skip to [Step 3](#step-3-add-the-create-confluence-page-action) to add the action directly.
## Step 1: Create a Workflow
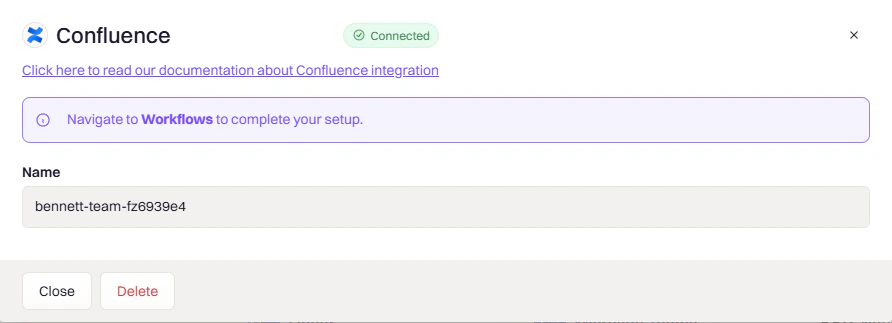
Navigate to **Workflows** in the Rootly sidebar and click **Create Workflow**.
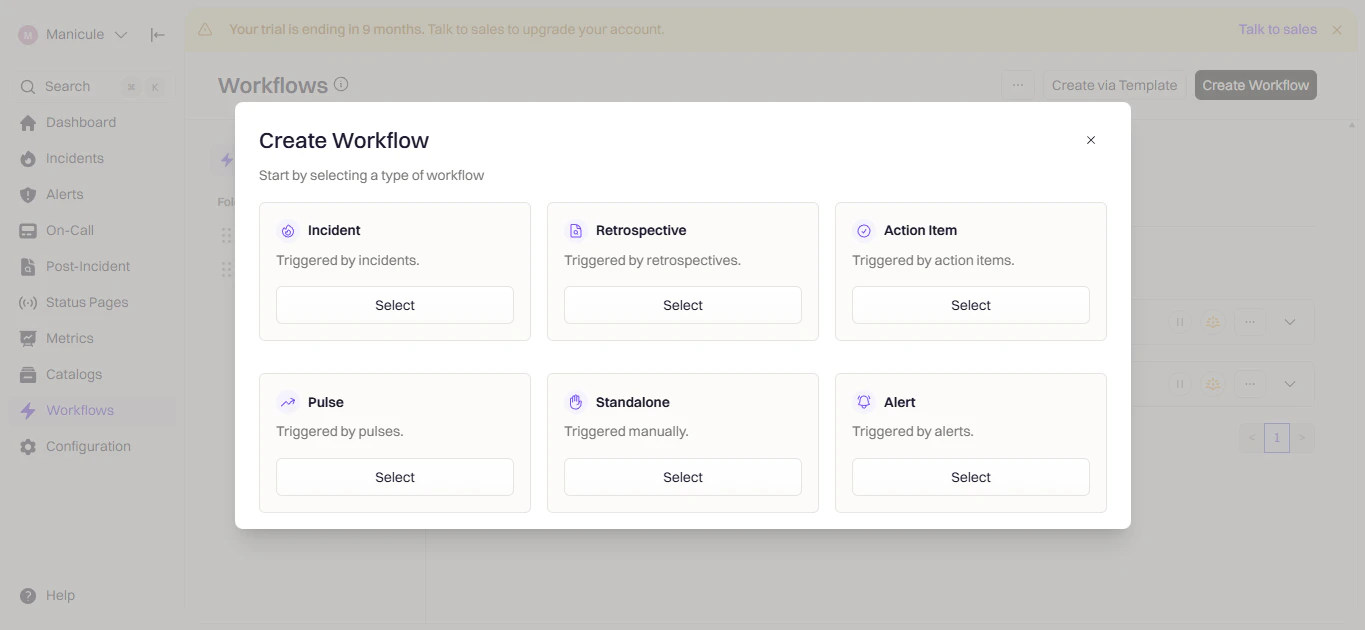
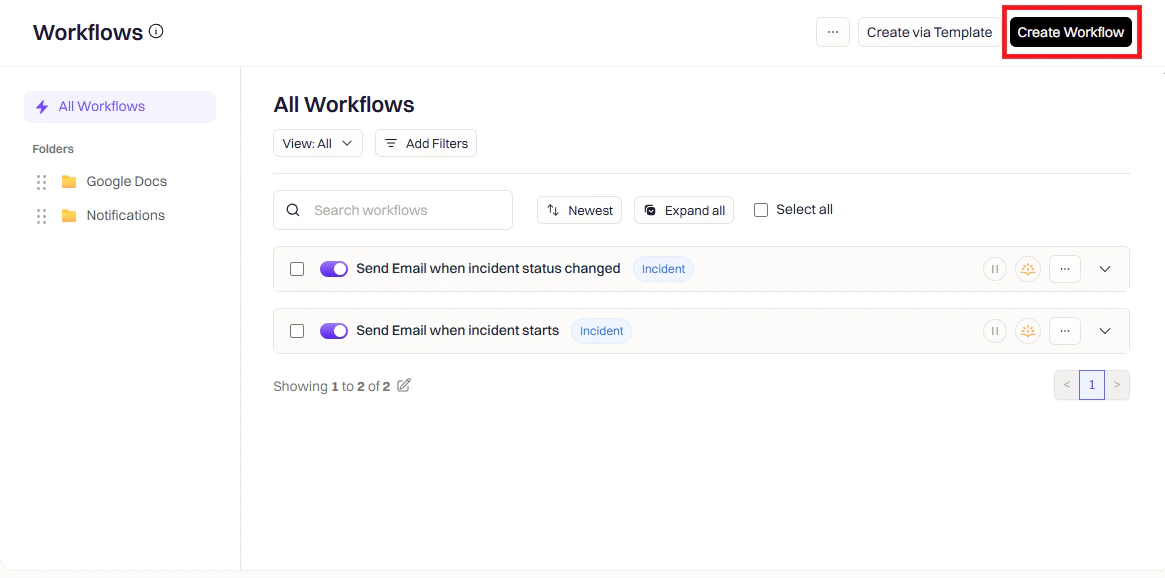 Select the workflow type that matches your use case:
* **Incident** — trigger actions during active incidents
* **Retrospective** — trigger actions when a retrospective begins or changes status
* **Pulse** — trigger actions on a schedule
Select the workflow type that matches your use case:
* **Incident** — trigger actions during active incidents
* **Retrospective** — trigger actions when a retrospective begins or changes status
* **Pulse** — trigger actions on a schedule
 ## Step 2: Configure Triggers
Triggers define when the workflow runs.
## Step 2: Configure Triggers
Triggers define when the workflow runs.
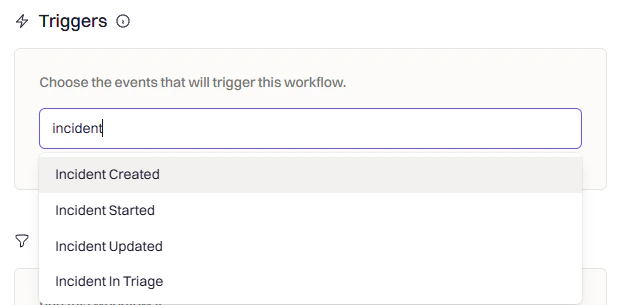 | Trigger | When it fires |
| -------------------------------- | ----------------------------------------------------------- |
| **Incident Created** | A new incident is opened |
| **Incident Updated** | A field like severity or status changes |
| **Incident Status Changed** | The incident moves into a specific status |
| **Retrospective Status Changed** | The retrospective status changes (e.g., Started, Published) |
| **Manual Trigger** | An operator runs the workflow manually from the UI |
For retrospective pages, use **Retrospective Status Changed** with a condition of **Status equals Started** so pages are created when a retrospective kicks off.
## Step 3: Add Conditions
Conditions let you refine when the workflow executes after a trigger fires.
| Trigger | When it fires |
| -------------------------------- | ----------------------------------------------------------- |
| **Incident Created** | A new incident is opened |
| **Incident Updated** | A field like severity or status changes |
| **Incident Status Changed** | The incident moves into a specific status |
| **Retrospective Status Changed** | The retrospective status changes (e.g., Started, Published) |
| **Manual Trigger** | An operator runs the workflow manually from the UI |
For retrospective pages, use **Retrospective Status Changed** with a condition of **Status equals Started** so pages are created when a retrospective kicks off.
## Step 3: Add Conditions
Conditions let you refine when the workflow executes after a trigger fires.
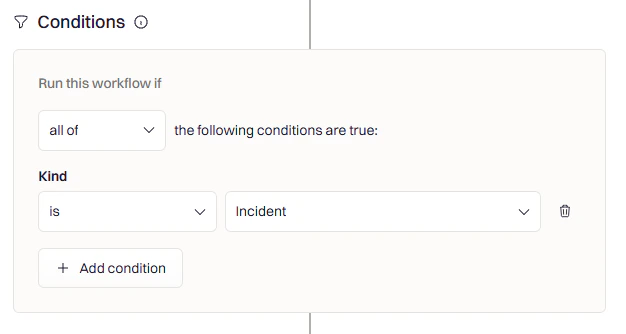 Common condition patterns:
* **Severity filter** — only create a page for SEV-1 or SEV-2 incidents
* **Team or service filter** — scope page creation to incidents affecting specific teams or services
* **Incident type** — ensure the workflow only runs when Kind is set to **Incident**
* **Environment** — only generate pages for production or customer-impacting issues
## Step 4: Add the Create Confluence Page Action
Click **Add Action** and search for **Confluence**.
Common condition patterns:
* **Severity filter** — only create a page for SEV-1 or SEV-2 incidents
* **Team or service filter** — scope page creation to incidents affecting specific teams or services
* **Incident type** — ensure the workflow only runs when Kind is set to **Incident**
* **Environment** — only generate pages for production or customer-impacting issues
## Step 4: Add the Create Confluence Page Action
Click **Add Action** and search for **Confluence**.
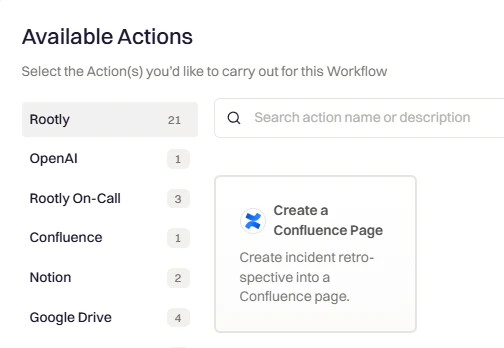
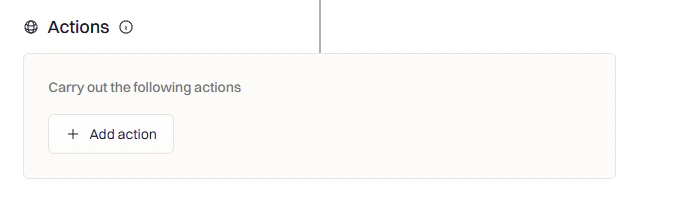 Choose **Create Confluence Page** from the results.
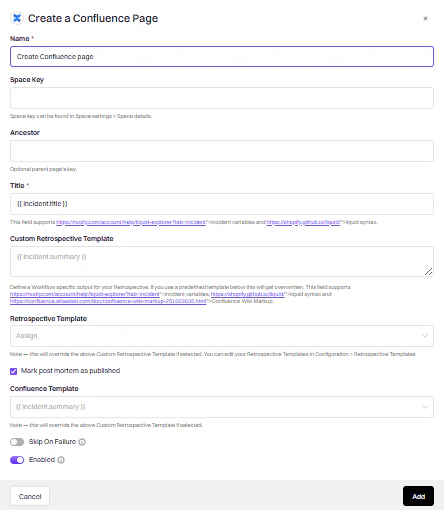 Fill in the fields using the table below.
Click **Add**, enter a workflow name, and click **Create Workflow**.
### Action Fields
| Field | Required | Description |
| ----------------------------------- | -------- | ---------------------------------------------------------------------------------------------------------------------- |
| **Space Key** | Yes | The Confluence space where the page will be created. Find this under **Space Settings → Space Details** in Confluence. |
| **Title** | Yes | The page title. Supports Liquid syntax (e.g., `{{ incident.title }}`). |
| **Ancestor** | No | Page ID of a parent page. If blank, the page is created at the root of the space. |
| **Confluence Template** | No | A template fetched from your Confluence space. Overrides both retrospective template fields. |
| **Custom Retrospective Template** | No | Define page content directly using Liquid variables. Overrides the Retrospective Template field. |
| **Retrospective Template** | No | A pre-built template from [Retrospective Templates](https://rootly.com/account/retrospective-steps?tab=documents). |
| **Mark Retrospective as Published** | No | Publish the page immediately rather than leaving it as a draft. |
If a **Confluence Template** is selected, it overrides both the **Custom Retrospective Template** and **Retrospective Template** fields.
## Update an Existing Confluence Page
In addition to creating pages, Rootly can update pages that already exist. Add an **Update Confluence Page** action and configure the following fields:
| Field | Required | Description |
| ----------------------- | -------- | ------------------------------------------------------------------------------------------------------------ |
| **Page ID** | Yes | The ID of the Confluence page to update. Supports Liquid syntax to reference a page created in a prior step. |
| **Title** | No | Updated page title. Leave blank to keep the existing title. |
| **Content** | No | Updated page content using Liquid variables. |
| **Confluence Template** | No | Re-apply a Confluence template when updating the page. |
## Creating a Confluence Template
Rootly fetches page templates directly from your Confluence space via the API. Templates you create in Confluence appear automatically in the **Confluence Template** dropdown within the workflow action.
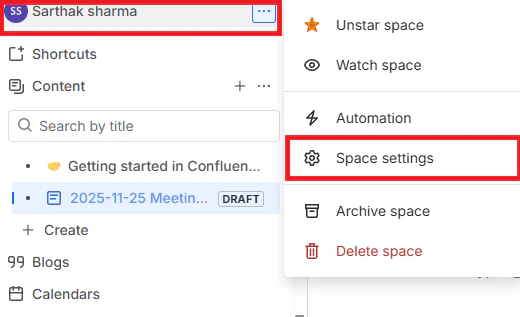
Navigate to the space where you want to create the template and open **Space Settings**.
Fill in the fields using the table below.
Click **Add**, enter a workflow name, and click **Create Workflow**.
### Action Fields
| Field | Required | Description |
| ----------------------------------- | -------- | ---------------------------------------------------------------------------------------------------------------------- |
| **Space Key** | Yes | The Confluence space where the page will be created. Find this under **Space Settings → Space Details** in Confluence. |
| **Title** | Yes | The page title. Supports Liquid syntax (e.g., `{{ incident.title }}`). |
| **Ancestor** | No | Page ID of a parent page. If blank, the page is created at the root of the space. |
| **Confluence Template** | No | A template fetched from your Confluence space. Overrides both retrospective template fields. |
| **Custom Retrospective Template** | No | Define page content directly using Liquid variables. Overrides the Retrospective Template field. |
| **Retrospective Template** | No | A pre-built template from [Retrospective Templates](https://rootly.com/account/retrospective-steps?tab=documents). |
| **Mark Retrospective as Published** | No | Publish the page immediately rather than leaving it as a draft. |
If a **Confluence Template** is selected, it overrides both the **Custom Retrospective Template** and **Retrospective Template** fields.
## Update an Existing Confluence Page
In addition to creating pages, Rootly can update pages that already exist. Add an **Update Confluence Page** action and configure the following fields:
| Field | Required | Description |
| ----------------------- | -------- | ------------------------------------------------------------------------------------------------------------ |
| **Page ID** | Yes | The ID of the Confluence page to update. Supports Liquid syntax to reference a page created in a prior step. |
| **Title** | No | Updated page title. Leave blank to keep the existing title. |
| **Content** | No | Updated page content using Liquid variables. |
| **Confluence Template** | No | Re-apply a Confluence template when updating the page. |
## Creating a Confluence Template
Rootly fetches page templates directly from your Confluence space via the API. Templates you create in Confluence appear automatically in the **Confluence Template** dropdown within the workflow action.
Navigate to the space where you want to create the template and open **Space Settings**.
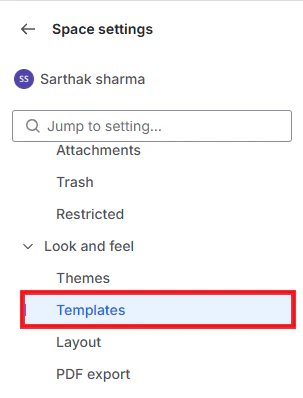
 Under **Look and Feel**, select **Templates**.
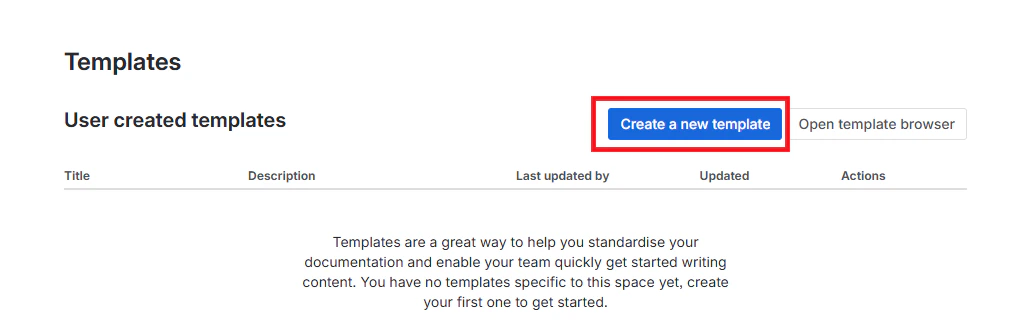
 Click **Create New Template** and add your content. Liquid syntax is fully supported.
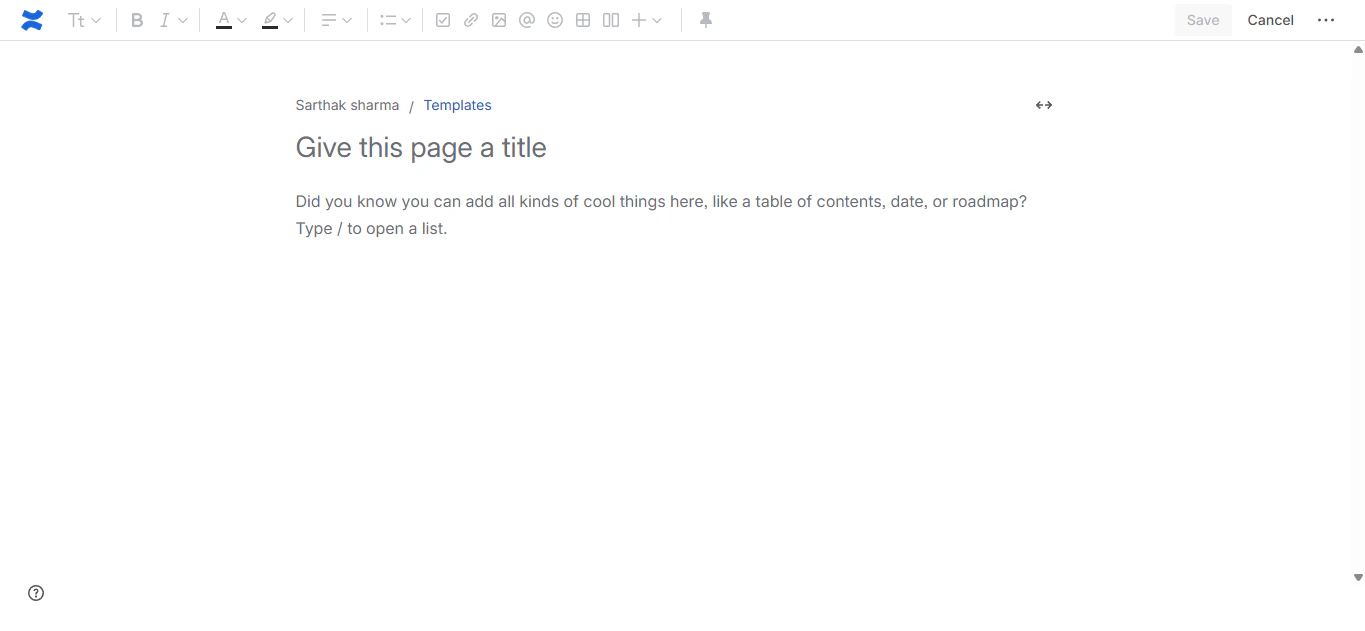 Click **Save**. The template will appear in the **Confluence Template** dropdown the next time you configure a Create Confluence Page action.
## Template Examples
Use the [Liquid Variable Explorer](https://rootly.com/account/help/liquid-explorer) to test variables before deploying templates in production.
```markdown theme={null}
# Retrospective: {{ incident.title }}
**Date:** {{ incident.started_at | date: "%Y-%m-%d" }}
**Severity:** {{ incident.severity }}
**Status:** {{ incident.status }}
## Summary
{{ incident.summary }}
## Timeline
{{ incident.timeline_table_markdown }}
## Services Affected
{% for service in incident.services %}
- {{ service }}
{% endfor %}
## Teams Involved
{% for group in incident.groups %}
- {{ group.name }}
{% endfor %}
## Follow-Up Items
{% for action_item in incident.action_items %}
- {{ action_item.summary }} ({{ action_item.status }})
{% endfor %}
## Lessons Learned
[To be completed by the team]
```
```markdown theme={null}
# Executive Summary: {{ incident.title }}
**Date:** {{ incident.started_at | date: "%B %d, %Y" }}
**Severity:** {{ incident.severity }}
**Duration:** {{ incident.duration }} minutes
## What Happened
{{ incident.summary }}
## Resolution
{{ incident.resolution_message }}
## Key Metrics
- Services Affected: {{ incident.services | size }}
- Time to Resolution: {{ incident.duration }} minutes
## Next Steps
{% for action_item in incident.action_items %}
- {{ action_item.summary }}
{% endfor %}
```
```markdown theme={null}
# Root Cause Analysis: {{ incident.title }}
**Started:** {{ incident.started_at | date: "%Y-%m-%d %H:%M %Z" }}
**Resolved:** {{ incident.resolved_at | date: "%Y-%m-%d %H:%M %Z" }}
**Duration:** {{ incident.duration }} minutes
## Affected Services
{% for service in incident.services %}
- {{ service }}
{% endfor %}
## Detailed Timeline
{{ incident.timeline_table_markdown }}
## Root Cause
[To be completed by engineering team]
## Resolution Steps
{{ incident.resolution_message }}
## Preventive Measures
{% for action_item in incident.action_items %}
- {{ action_item.summary }} ({{ action_item.status }})
{% endfor %}
```
## Frequently Asked Questions
Rootly fetches templates from your Confluence space via the API. Ensure the template was saved in the correct space and that your Rootly integration has access to that space. Try disconnecting and reconnecting the integration to refresh the template list.
Check the workflow run log in Rootly for error details. Common causes include an invalid Space Key, a missing or incorrect Ancestor page ID, or a Liquid variable that returned an empty value for the Title field (Title is required). Verify the Space Key matches exactly what appears in **Space Settings → Space Details** in Confluence.
Use the [Liquid Variable Explorer](https://rootly.com/account/help/liquid-explorer) to verify that the variable returns a value for your incident. Some variables like `incident.resolved_at` will be empty if the incident has not yet resolved. Add a fallback using Liquid filters (e.g., `{{ incident.resolved_at | default: "TBD" }}`).
Add multiple **Create Confluence Page** actions to the same workflow, each configured with a different Space Key. Each action runs sequentially and creates an independent page.
Use the **Update Confluence Page** action after a **Create Confluence Page** action. Reference the created page ID via Liquid using the output of the prior step.
Click **Save**. The template will appear in the **Confluence Template** dropdown the next time you configure a Create Confluence Page action.
## Template Examples
Use the [Liquid Variable Explorer](https://rootly.com/account/help/liquid-explorer) to test variables before deploying templates in production.
```markdown theme={null}
# Retrospective: {{ incident.title }}
**Date:** {{ incident.started_at | date: "%Y-%m-%d" }}
**Severity:** {{ incident.severity }}
**Status:** {{ incident.status }}
## Summary
{{ incident.summary }}
## Timeline
{{ incident.timeline_table_markdown }}
## Services Affected
{% for service in incident.services %}
- {{ service }}
{% endfor %}
## Teams Involved
{% for group in incident.groups %}
- {{ group.name }}
{% endfor %}
## Follow-Up Items
{% for action_item in incident.action_items %}
- {{ action_item.summary }} ({{ action_item.status }})
{% endfor %}
## Lessons Learned
[To be completed by the team]
```
```markdown theme={null}
# Executive Summary: {{ incident.title }}
**Date:** {{ incident.started_at | date: "%B %d, %Y" }}
**Severity:** {{ incident.severity }}
**Duration:** {{ incident.duration }} minutes
## What Happened
{{ incident.summary }}
## Resolution
{{ incident.resolution_message }}
## Key Metrics
- Services Affected: {{ incident.services | size }}
- Time to Resolution: {{ incident.duration }} minutes
## Next Steps
{% for action_item in incident.action_items %}
- {{ action_item.summary }}
{% endfor %}
```
```markdown theme={null}
# Root Cause Analysis: {{ incident.title }}
**Started:** {{ incident.started_at | date: "%Y-%m-%d %H:%M %Z" }}
**Resolved:** {{ incident.resolved_at | date: "%Y-%m-%d %H:%M %Z" }}
**Duration:** {{ incident.duration }} minutes
## Affected Services
{% for service in incident.services %}
- {{ service }}
{% endfor %}
## Detailed Timeline
{{ incident.timeline_table_markdown }}
## Root Cause
[To be completed by engineering team]
## Resolution Steps
{{ incident.resolution_message }}
## Preventive Measures
{% for action_item in incident.action_items %}
- {{ action_item.summary }} ({{ action_item.status }})
{% endfor %}
```
## Frequently Asked Questions
Rootly fetches templates from your Confluence space via the API. Ensure the template was saved in the correct space and that your Rootly integration has access to that space. Try disconnecting and reconnecting the integration to refresh the template list.
Check the workflow run log in Rootly for error details. Common causes include an invalid Space Key, a missing or incorrect Ancestor page ID, or a Liquid variable that returned an empty value for the Title field (Title is required). Verify the Space Key matches exactly what appears in **Space Settings → Space Details** in Confluence.
Use the [Liquid Variable Explorer](https://rootly.com/account/help/liquid-explorer) to verify that the variable returns a value for your incident. Some variables like `incident.resolved_at` will be empty if the incident has not yet resolved. Add a fallback using Liquid filters (e.g., `{{ incident.resolved_at | default: "TBD" }}`).
Add multiple **Create Confluence Page** actions to the same workflow, each configured with a different Space Key. Each action runs sequentially and creates an independent page.
Use the **Update Confluence Page** action after a **Create Confluence Page** action. Reference the created page ID via Liquid using the output of the prior step.