> ## Documentation Index
> Fetch the complete documentation index at: https://docs.rootly.com/llms.txt
> Use this file to discover all available pages before exploring further.
# Google Calendar
> Connect Google Calendar to Rootly to schedule incident meetings from workflows, and import a calendar as a holiday feed for on-call schedules.
The Google Calendar integration connects Rootly with your Google Workspace so incident workflows can schedule calendar events, attach video meetings, and invite responders automatically. A Google Calendar can also be imported as a holiday feed to overlay company holidays on your on-call schedules.
With the Google Calendar integration, you can:
* Create Google Calendar events from incident workflows, with a video meeting attached
* Invite responders drawn from the incident's roles and teams
* Update an existing event's time, attendees, or duration as an incident evolves
* Import a calendar's iCal feed to overlay holidays on Rootly on-call schedules
## Before You Begin
Before setting up the integration, make sure you have:
* A Rootly account with admin permission to manage integrations
* A Google Workspace account, or a Google Cloud project if you are using a service account
Rootly recommends installing with a **service account** so the integration does not break if the installing user leaves your organization.
## Installation
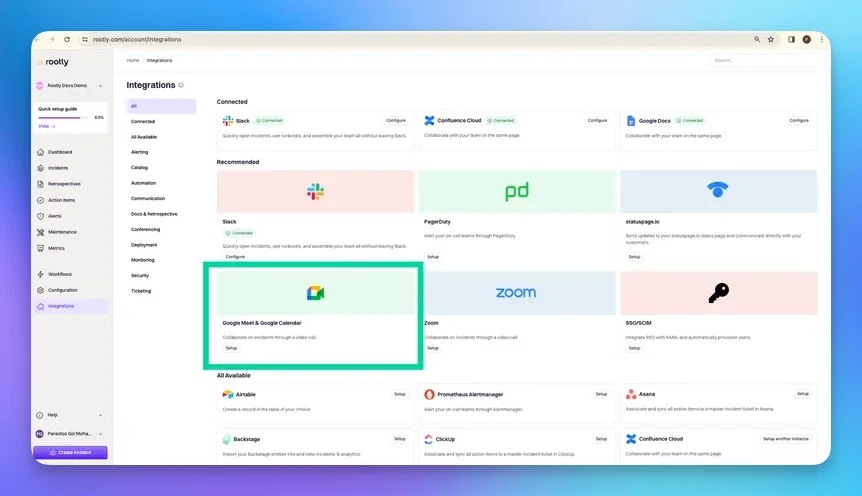
Locate **Google Calendar** on the [integrations catalog](https://rootly.com/account/integrations) and click **Setup**.
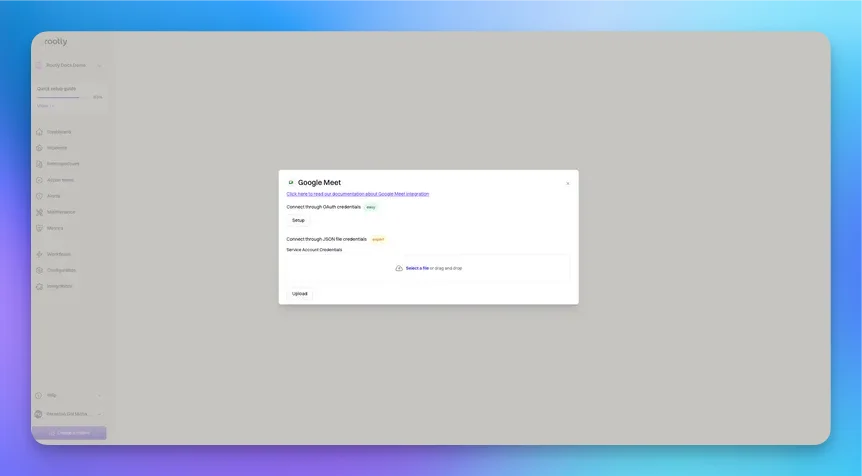
 You will be prompted to choose a connection method: OAuth credentials, or JSON file credentials.
 Use this method for non-GCP service accounts. It is the simplest approach.
To install as a shared identity rather than a personal one:
1. Create a Google account with a generic email (for example, `acme_rootly@company.com`).
2. Log into that Google account in your browser.
3. Add `acme_rootly@company.com` as a member of your Rootly organization.
4. Follow the steps below while signed in as that account.
Click **Setup** to begin. You will be prompted to select a Google account.
Use this method for non-GCP service accounts. It is the simplest approach.
To install as a shared identity rather than a personal one:
1. Create a Google account with a generic email (for example, `acme_rootly@company.com`).
2. Log into that Google account in your browser.
3. Add `acme_rootly@company.com` as a member of your Rootly organization.
4. Follow the steps below while signed in as that account.
Click **Setup** to begin. You will be prompted to select a Google account.
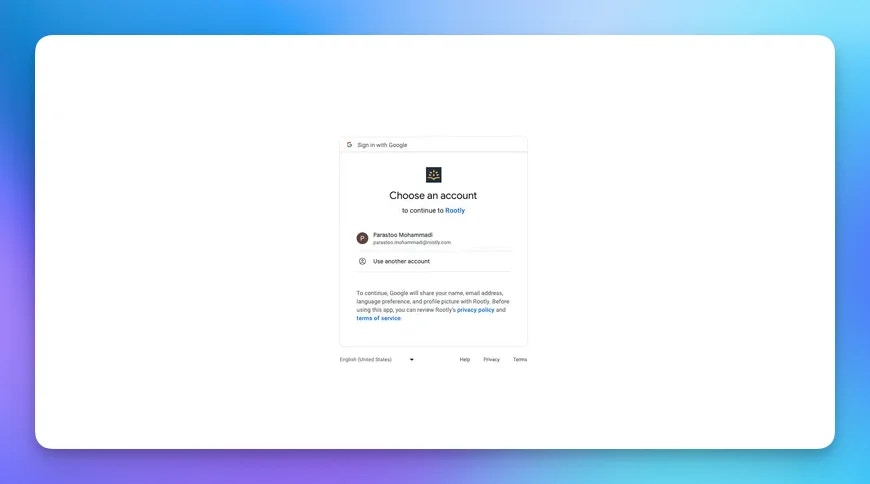 After selecting an account, grant Rootly permission to integrate with it.
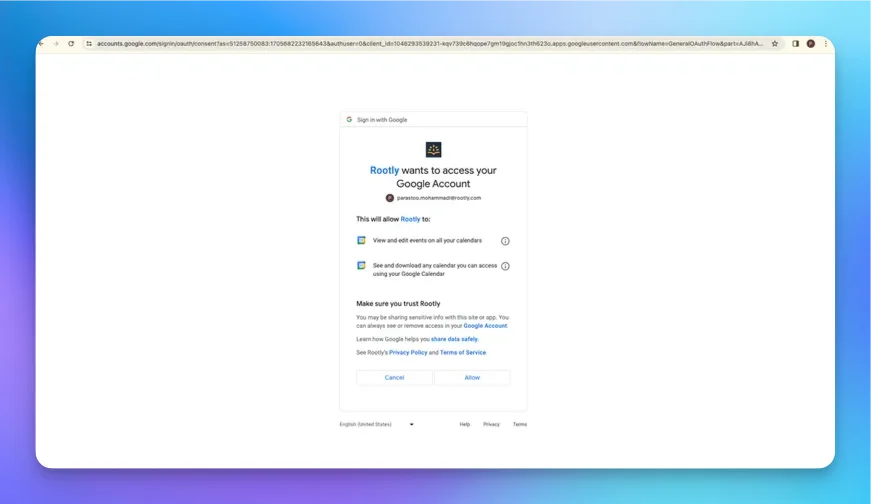 Select **Allow**. You are redirected back to Rootly and the installation is complete.
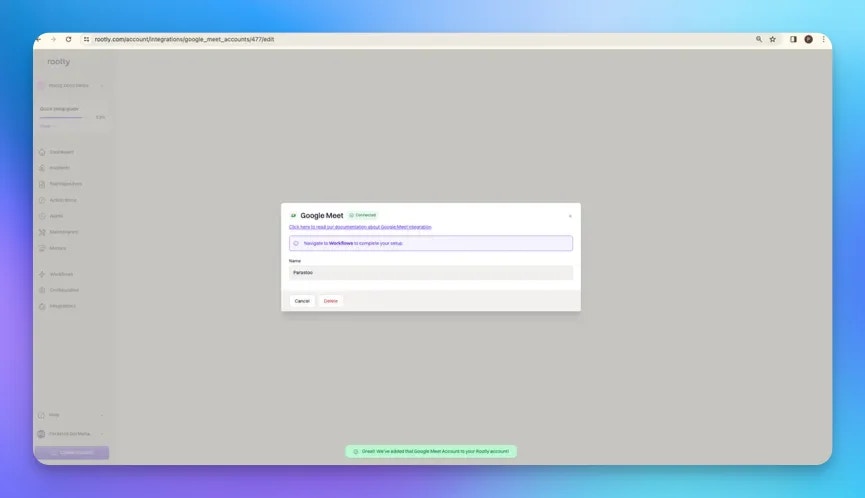 Use this method for GCP service accounts. See the [Google service account overview](https://cloud.google.com/iam/docs/service-account-overview) for background.
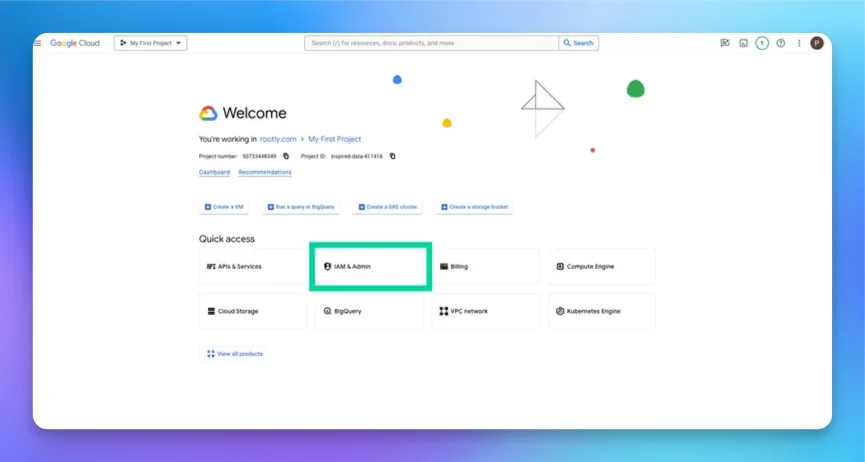
In the [Google Cloud console](https://console.cloud.google.com/), open **IAM & Admin**.
Use this method for GCP service accounts. See the [Google service account overview](https://cloud.google.com/iam/docs/service-account-overview) for background.
In the [Google Cloud console](https://console.cloud.google.com/), open **IAM & Admin**.
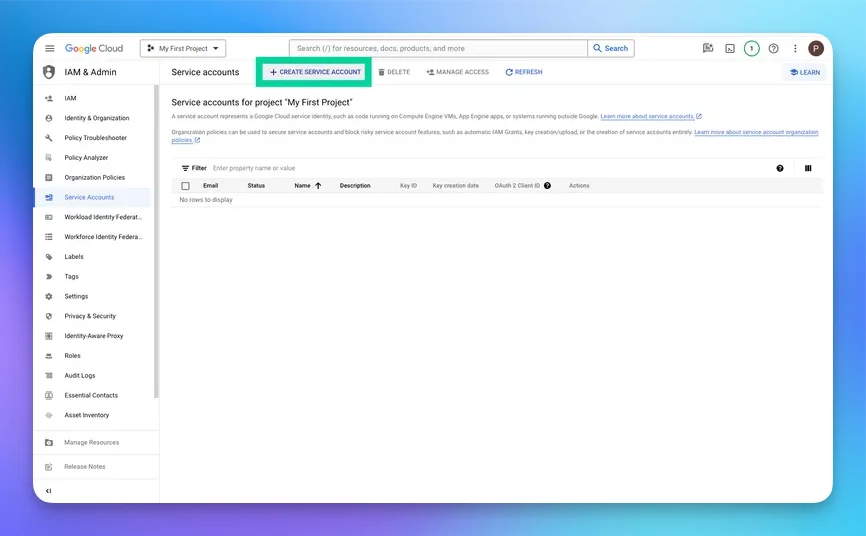
 Navigate to **Service Accounts** and click **Create Service Account**.
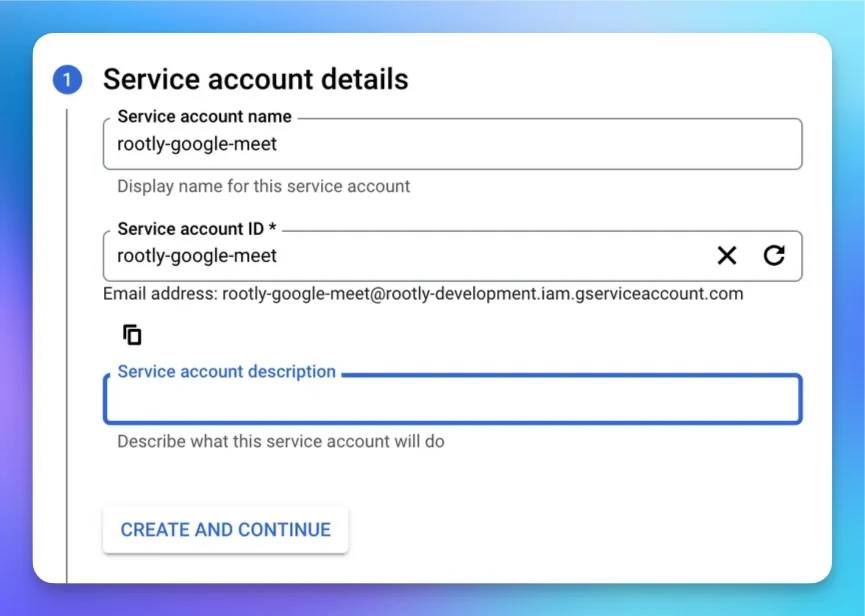
 Fill in the service account details — the Service Account ID is generated automatically. Click **Done**.
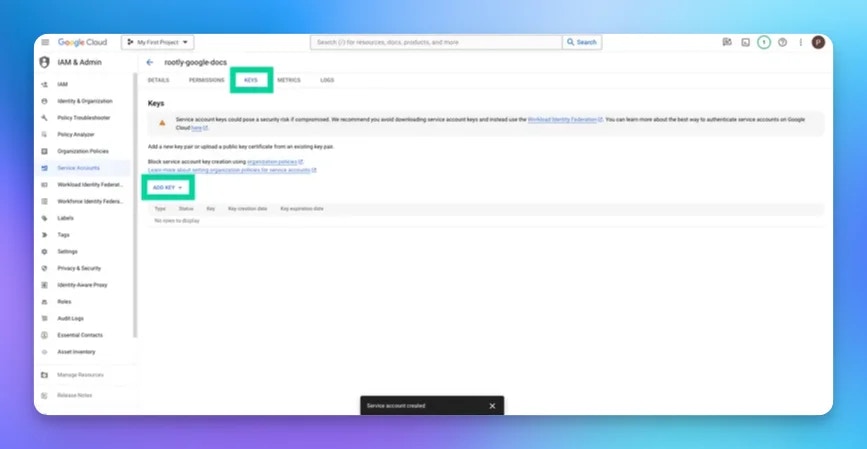
 Open the **Keys** tab and click **Add a Key**.
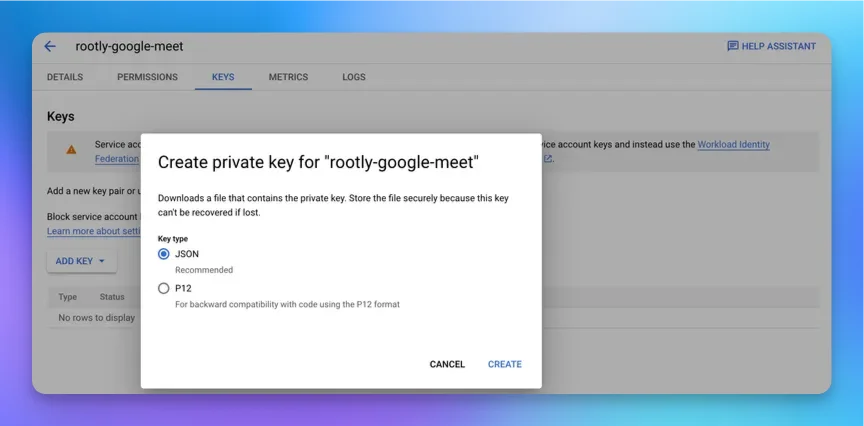
 Create a key and download it in JSON format.
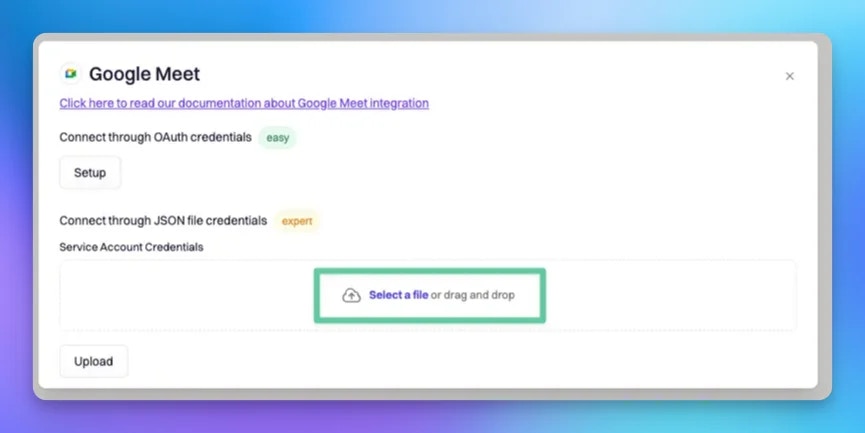
 Return to the Rootly integration page and upload the JSON file.
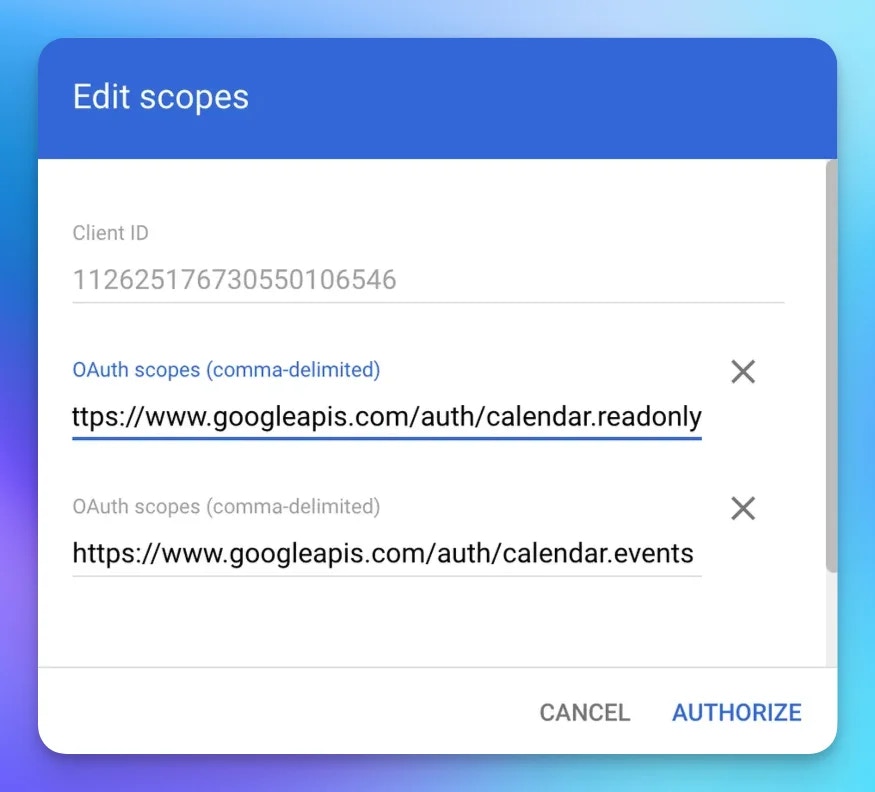
 In [admin.google.com](https://admin.google.com/), go to **Security > API Controls > Domain Wide Delegation**. Select your service account and add these scopes:
```text theme={null}
https://www.googleapis.com/auth/calendar.readonly
https://www.googleapis.com/auth/calendar.events
```
In [admin.google.com](https://admin.google.com/), go to **Security > API Controls > Domain Wide Delegation**. Select your service account and add these scopes:
```text theme={null}
https://www.googleapis.com/auth/calendar.readonly
https://www.googleapis.com/auth/calendar.events
```
 In [admin.google.com](https://admin.google.com/), go to **Google Workspace > Core Google Workspace** and select **Google Calendar**.
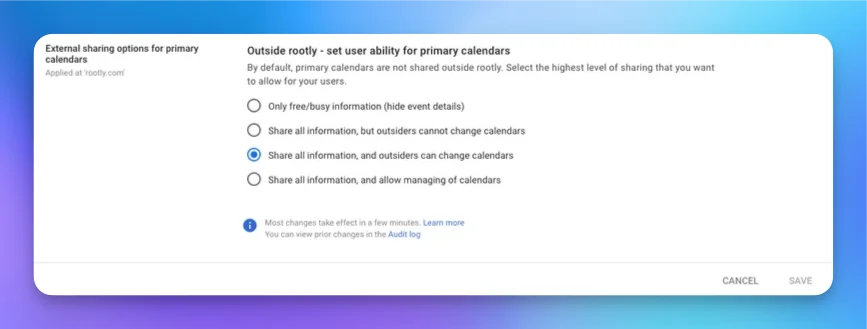
Configure external sharing options for the primary calendar:
In [admin.google.com](https://admin.google.com/), go to **Google Workspace > Core Google Workspace** and select **Google Calendar**.
Configure external sharing options for the primary calendar:
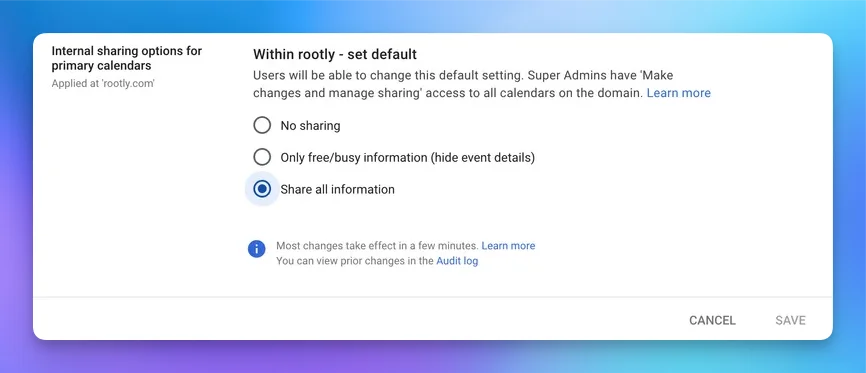
 Configure internal sharing options for the primary calendar:
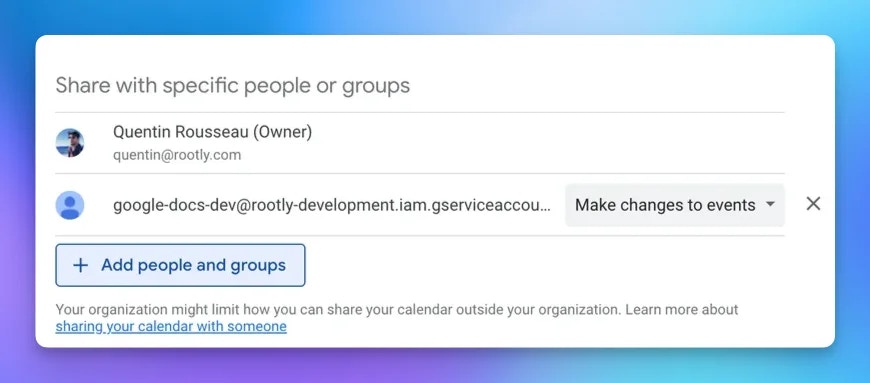
 Open your own calendar's settings and share it with the service account email, granting **Make changes to events** permission.
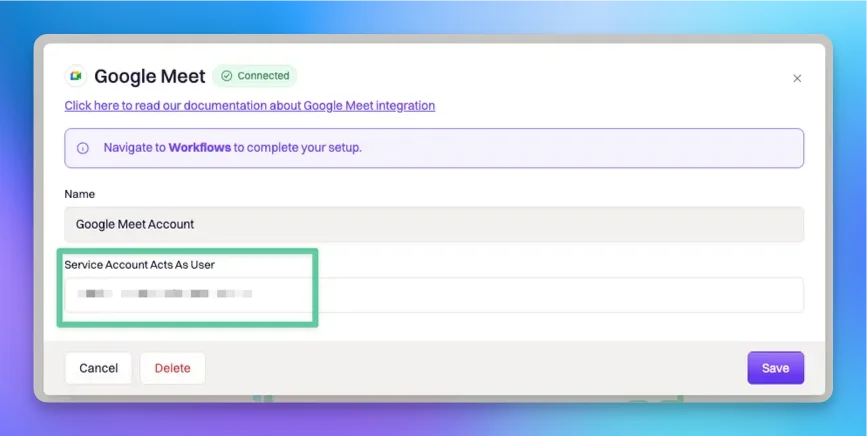
 In the Rootly integration, enter the email of the user you want to schedule meetings as, then click **Save**.
 ## Workflow Actions
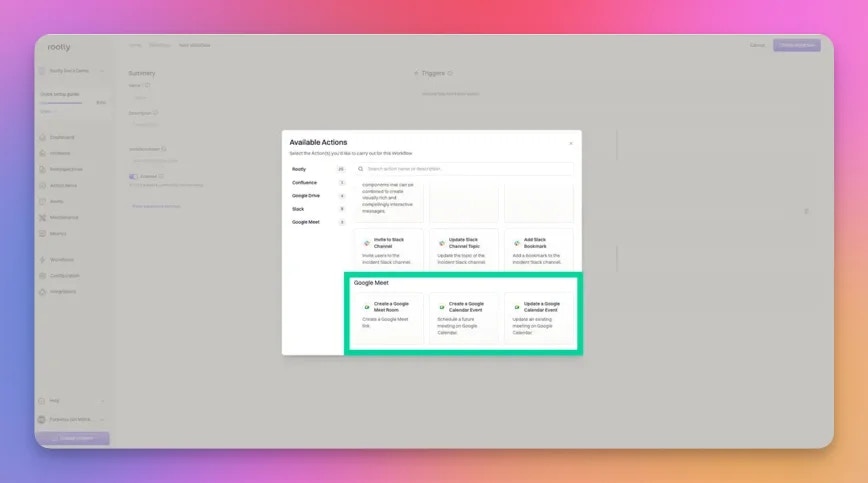
The Google Calendar integration uses workflows to schedule calendar events automatically. If you are unfamiliar with how workflows function, visit the [Workflows](/workflows/workflows) documentation first.
## Workflow Actions
The Google Calendar integration uses workflows to schedule calendar events automatically. If you are unfamiliar with how workflows function, visit the [Workflows](/workflows/workflows) documentation first.
 Use the [Incident Variable Explorer](https://rootly.com/account/help/liquid-explorer) to preview what Liquid variables return for your incidents.
### Create a Google Calendar Event
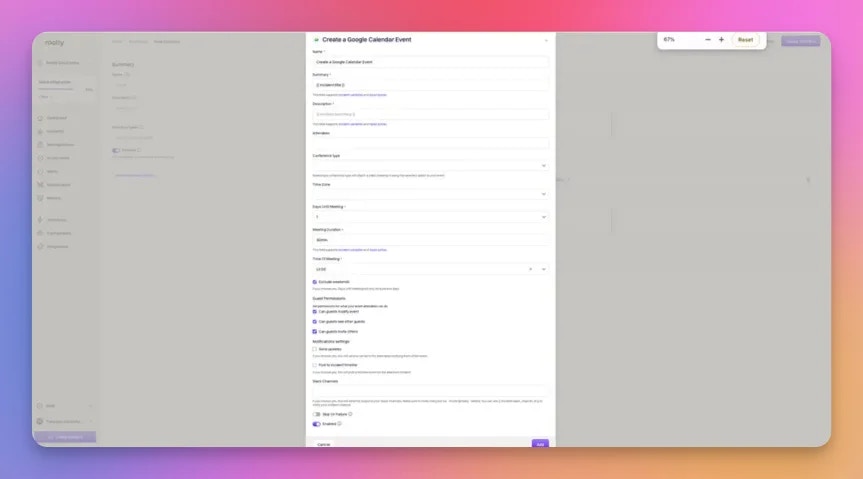
Schedules a new calendar event, optionally with a video meeting attached.
| Field | Description | Required |
| ---------------------- | ----------------------------------------------------------------------------------------------------------------------- | -------- |
| **Name** | Display name for this workflow action | |
| **Summary** | Event title. Defaults to `{{ incident.title }}`. Supports Liquid | Yes |
| **Description** | Event description. Supports Liquid | |
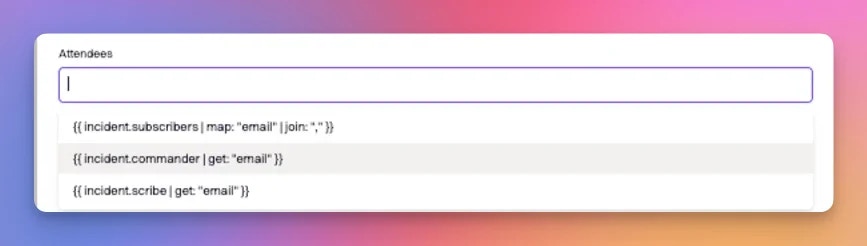
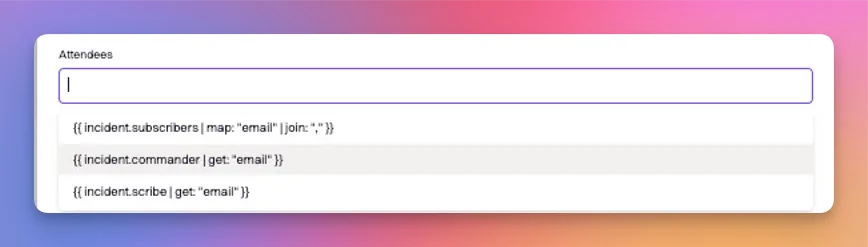
| **Attendees** | Attendee email addresses, entered directly or drawn from the incident | |
| **Conference Type** | Video meeting to attach to the event. Select **Hangout** to attach a Google Meet | |
| **Time Zone** | Time zone used to schedule the event | |
| **Days Until Meeting** | Number of days from now until the event | |
| **Meeting Duration** | Length of the event. Supports Liquid | |
| **Time of Meeting** | Start time, interpreted in the selected **Time Zone** | |
| **Slack Channels** | Slack channels to post the result to. Use `{{ incident.slack_channel_id }}` or `{{ parent_incident.slack_channel_id }}` | |
Use the [Incident Variable Explorer](https://rootly.com/account/help/liquid-explorer) to preview what Liquid variables return for your incidents.
### Create a Google Calendar Event
Schedules a new calendar event, optionally with a video meeting attached.
| Field | Description | Required |
| ---------------------- | ----------------------------------------------------------------------------------------------------------------------- | -------- |
| **Name** | Display name for this workflow action | |
| **Summary** | Event title. Defaults to `{{ incident.title }}`. Supports Liquid | Yes |
| **Description** | Event description. Supports Liquid | |
| **Attendees** | Attendee email addresses, entered directly or drawn from the incident | |
| **Conference Type** | Video meeting to attach to the event. Select **Hangout** to attach a Google Meet | |
| **Time Zone** | Time zone used to schedule the event | |
| **Days Until Meeting** | Number of days from now until the event | |
| **Meeting Duration** | Length of the event. Supports Liquid | |
| **Time of Meeting** | Start time, interpreted in the selected **Time Zone** | |
| **Slack Channels** | Slack channels to post the result to. Use `{{ incident.slack_channel_id }}` or `{{ parent_incident.slack_channel_id }}` | |
 ### Update a Google Calendar Event
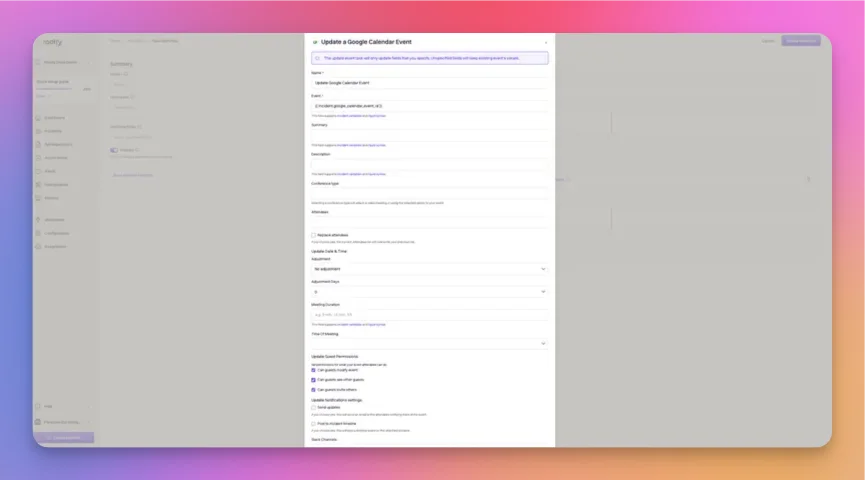
Updates an existing calendar event. Only the fields you specify are changed; unspecified fields keep their existing values.
| Field | Description | Required |
| -------------------- | --------------------------------------------------------------------------------------------------- | -------- |
| **Name** | Display name for this workflow action | |
| **Event** | Calendar event ID to update. Defaults to `{{ incident.google_calendar_event_id }}`. Supports Liquid | Yes |
| **Summary** | Updated event title. Supports Liquid | |
| **Description** | Updated event description. Supports Liquid | |
| **Conference Type** | Video meeting to attach to the event | |
| **Attendees** | Updated attendees. Overwrites the existing list only when **Replace attendees** is checked | |
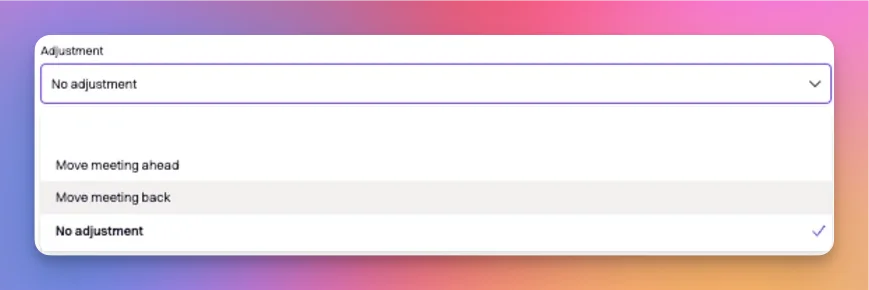
| **Adjustment** | Type of date-and-time adjustment to apply, if any | |
| **Adjustment Days** | Number of days by which to adjust the event, if any | |
| **Meeting Duration** | Updated event length. Supports Liquid | |
| **Time of Meeting** | Updated start time, interpreted in the selected **Time Zone** | |
| **Slack Channels** | Slack channels to post the result to | |
### Update a Google Calendar Event
Updates an existing calendar event. Only the fields you specify are changed; unspecified fields keep their existing values.
| Field | Description | Required |
| -------------------- | --------------------------------------------------------------------------------------------------- | -------- |
| **Name** | Display name for this workflow action | |
| **Event** | Calendar event ID to update. Defaults to `{{ incident.google_calendar_event_id }}`. Supports Liquid | Yes |
| **Summary** | Updated event title. Supports Liquid | |
| **Description** | Updated event description. Supports Liquid | |
| **Conference Type** | Video meeting to attach to the event | |
| **Attendees** | Updated attendees. Overwrites the existing list only when **Replace attendees** is checked | |
| **Adjustment** | Type of date-and-time adjustment to apply, if any | |
| **Adjustment Days** | Number of days by which to adjust the event, if any | |
| **Meeting Duration** | Updated event length. Supports Liquid | |
| **Time of Meeting** | Updated start time, interpreted in the selected **Time Zone** | |
| **Slack Channels** | Slack channels to post the result to | |
 ## Importing a Google Calendar as a PTO Feed
The OAuth integration above is for event-based workflow actions. If your goal is instead to **overlay** holidays on your Rootly on-call schedules — for example, a shared team calendar tracking company holidays — no OAuth is required. Rootly accepts a Google Calendar's iCal URL as a holiday calendar feed.
Use the calendar's **Secret address in iCal format** for any calendar containing HR or PTO data. The secret address works without making the calendar publicly readable on the internet. Reserve the **Public address** for calendars that are already meant to be shareable, such as a company-wide holidays calendar.
In Google Calendar, hover over the calendar in the left sidebar, click the overflow menu, and choose **Settings and sharing**.
Scroll to the **Integrate calendar** section and copy the URL that fits your use case:
* For private or sensitive calendars, copy the URL under **Secret address in iCal format**. Treat this URL as a credential — anyone with it can subscribe to the calendar.
* For calendars already intended to be public (like company holidays), copy the URL under **Public address in iCal format**. This option requires the calendar to be set as public under **Access permissions**.
Do not use the **Embed code** or the **Public URL to this calendar**. Those are for embedding the calendar on a webpage and will not work as a feed. Only the iCal URLs end in `.ics`.
In the Rootly dashboard, go to **On-Call → Schedules**, open the **Holiday calendars** dropdown, and select **Add a holiday calendar**. Paste the iCal URL, give the calendar a descriptive name, and save.
For the full behavior of holiday calendars in Rootly — conflict highlighting, recurring events, multi-region setups — see [Adding a Holiday Calendar](/on-call/holiday-calendar).
## Uninstall
To remove the Google Calendar integration, open the integrations panel in Rootly and select **Configure > Delete**.
## Related Resources
* [Workflows](/workflows/workflows)
* [Adding a Holiday Calendar](/on-call/holiday-calendar)
* [Integrations overview](/integrations/overview)
## Importing a Google Calendar as a PTO Feed
The OAuth integration above is for event-based workflow actions. If your goal is instead to **overlay** holidays on your Rootly on-call schedules — for example, a shared team calendar tracking company holidays — no OAuth is required. Rootly accepts a Google Calendar's iCal URL as a holiday calendar feed.
Use the calendar's **Secret address in iCal format** for any calendar containing HR or PTO data. The secret address works without making the calendar publicly readable on the internet. Reserve the **Public address** for calendars that are already meant to be shareable, such as a company-wide holidays calendar.
In Google Calendar, hover over the calendar in the left sidebar, click the overflow menu, and choose **Settings and sharing**.
Scroll to the **Integrate calendar** section and copy the URL that fits your use case:
* For private or sensitive calendars, copy the URL under **Secret address in iCal format**. Treat this URL as a credential — anyone with it can subscribe to the calendar.
* For calendars already intended to be public (like company holidays), copy the URL under **Public address in iCal format**. This option requires the calendar to be set as public under **Access permissions**.
Do not use the **Embed code** or the **Public URL to this calendar**. Those are for embedding the calendar on a webpage and will not work as a feed. Only the iCal URLs end in `.ics`.
In the Rootly dashboard, go to **On-Call → Schedules**, open the **Holiday calendars** dropdown, and select **Add a holiday calendar**. Paste the iCal URL, give the calendar a descriptive name, and save.
For the full behavior of holiday calendars in Rootly — conflict highlighting, recurring events, multi-region setups — see [Adding a Holiday Calendar](/on-call/holiday-calendar).
## Uninstall
To remove the Google Calendar integration, open the integrations panel in Rootly and select **Configure > Delete**.
## Related Resources
* [Workflows](/workflows/workflows)
* [Adding a Holiday Calendar](/on-call/holiday-calendar)
* [Integrations overview](/integrations/overview)