> ## Documentation Index
> Fetch the complete documentation index at: https://docs.rootly.com/llms.txt
> Use this file to discover all available pages before exploring further.
# Honeycomb
> Receive Honeycomb alerts in Rootly to trigger incidents, notify Slack, page your on-call team, and automatically resolve alerts when triggers clear.
## Overview
Rootly receives alerts from Honeycomb via webhooks. When Honeycomb detects anomalies like latency spikes, error rate increases, or threshold breaches, it sends an alert to Rootly. From there, Rootly can create an incident, notify Slack, or page your on-call team automatically.
## Before You Begin
You will need a Honeycomb account with admin access to create API keys and alert policies, and a Rootly account with Admin permissions to create integrations.
## Step 1: Get Your API Key from Honeycomb
You will first create a Configuration API key in Honeycomb. Rootly uses this key to authenticate your environment and generate the webhook URL and secret needed in the next steps.
Log into Honeycomb and select the environment you want to integrate with Rootly.
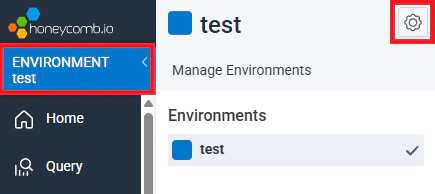 Go to **Settings → API Keys** and click **Create a Configuration API Key**.
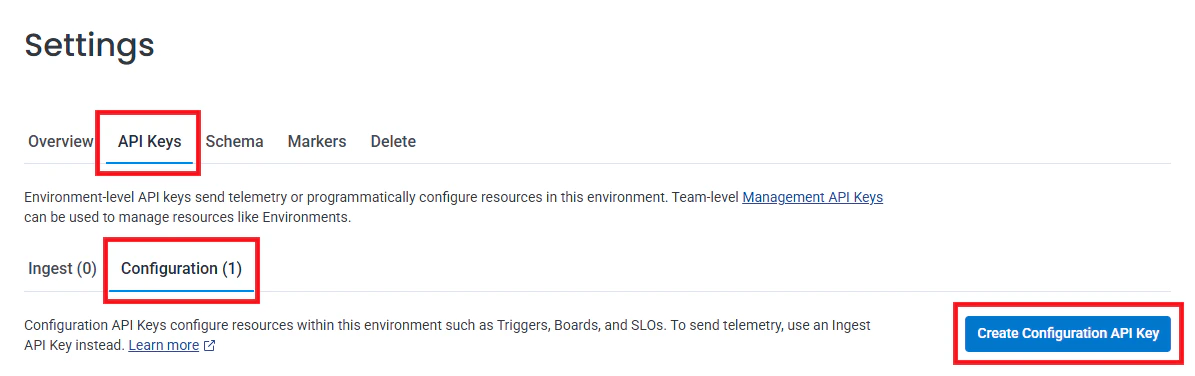 Honeycomb has two types of API keys: **Configuration** and **Management**. Rootly requires a **Configuration** (environment-level) key.
Name the key, set any permissions, and click **Create Key**. Copy the key immediately — you will need it in the next step.
Honeycomb has two types of API keys: **Configuration** and **Management**. Rootly requires a **Configuration** (environment-level) key.
Name the key, set any permissions, and click **Create Key**. Copy the key immediately — you will need it in the next step.
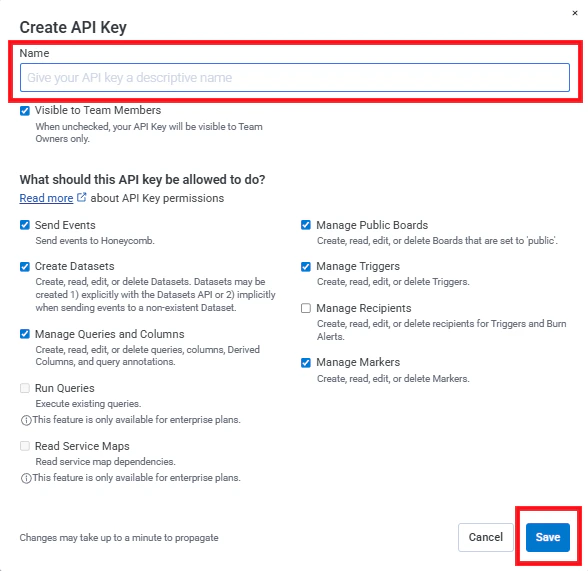
 The API key is used only to authenticate Rootly to your Honeycomb environment and generate a webhook URL and secret. Rootly does not make direct calls to Honeycomb to read or write data.
## Step 2: Connect Honeycomb in Rootly
Now that you have your Honeycomb API key, connect the integration in Rootly to generate the webhook URL and secret you will configure in Honeycomb.
In Rootly, navigate to **Configuration → Integrations** and search for **Honeycomb**.
The API key is used only to authenticate Rootly to your Honeycomb environment and generate a webhook URL and secret. Rootly does not make direct calls to Honeycomb to read or write data.
## Step 2: Connect Honeycomb in Rootly
Now that you have your Honeycomb API key, connect the integration in Rootly to generate the webhook URL and secret you will configure in Honeycomb.
In Rootly, navigate to **Configuration → Integrations** and search for **Honeycomb**.
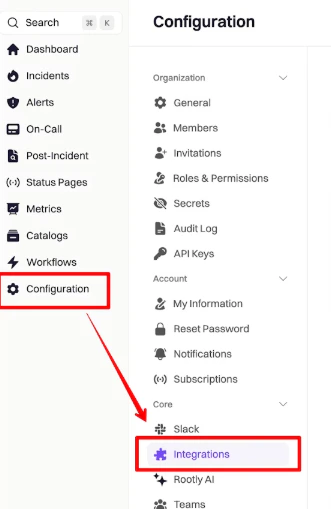
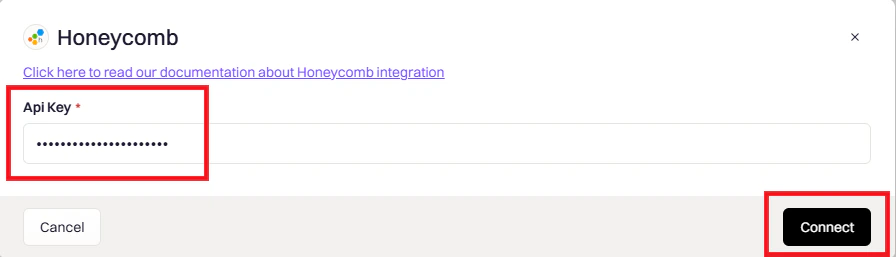
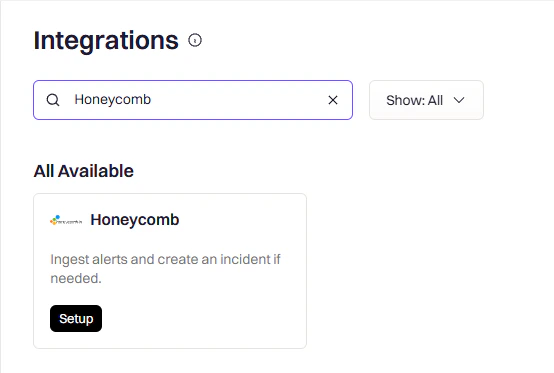 Click **Setup**, paste your Honeycomb API key, and click **Connect**.
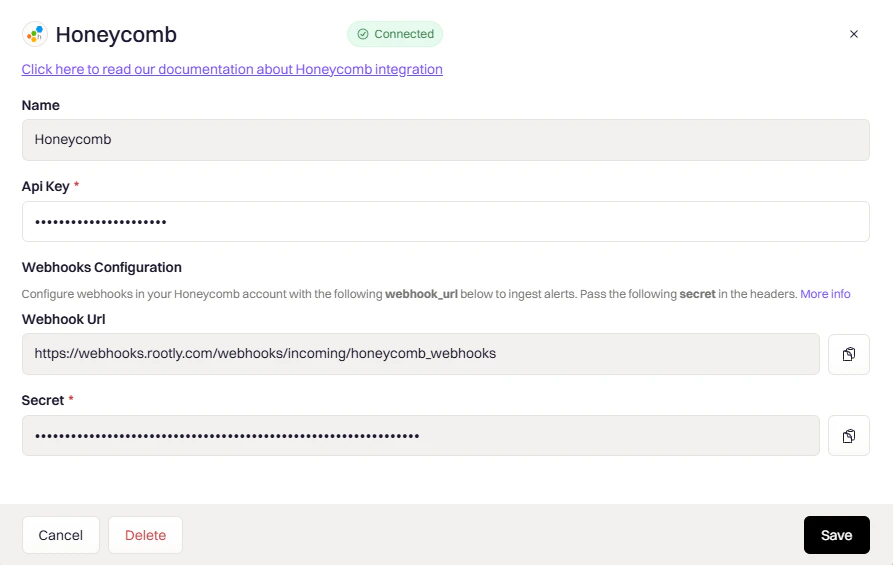
 After connecting, Rootly displays a **Webhook URL** and **Secret**. Copy both — you will need them in Step 3.
 ## Step 3: Create a Webhook in Honeycomb
Now that you have the Webhook URL and Secret from Rootly, go back to Honeycomb and create a webhook integration that forwards alerts to Rootly. The webhook URL format depends on whether you want to page someone or just surface alerts.
In Honeycomb, navigate to **Account → Team Settings → Integrations**.
## Step 3: Create a Webhook in Honeycomb
Now that you have the Webhook URL and Secret from Rootly, go back to Honeycomb and create a webhook integration that forwards alerts to Rootly. The webhook URL format depends on whether you want to page someone or just surface alerts.
In Honeycomb, navigate to **Account → Team Settings → Integrations**.
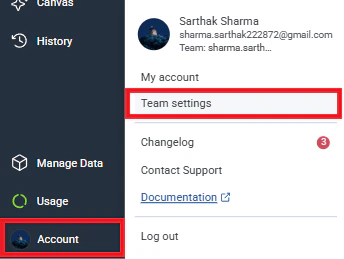
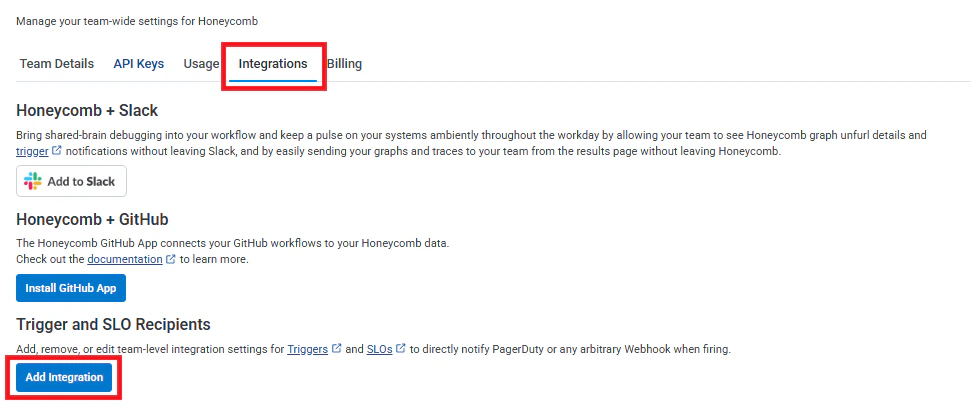 Click **Add Integration**, select **Webhook** as the provider, and give it a descriptive name (e.g., `Rootly Alerts` or `Page On-Call`).
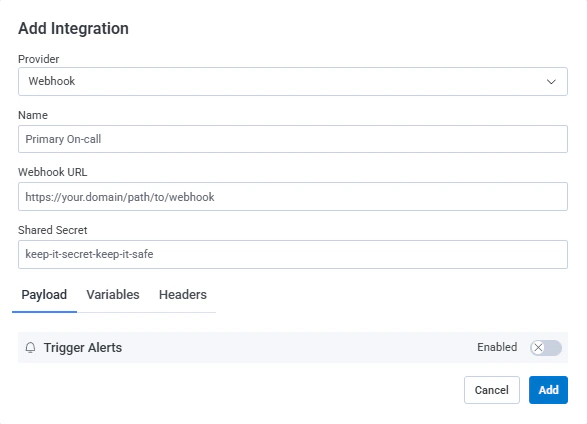 Choose the alert type and enter the appropriate URL:
Alerts appear in Rootly's Alerts page without paging anyone. Use this for low-priority or informational notifications.
```
https://webhooks.rootly.com/webhooks/incoming/honeycomb_webhooks?secret=YOUR_SECRET
```
Replace `YOUR_SECRET` with the secret from Rootly.
Choose the alert type and enter the appropriate URL:
Alerts appear in Rootly's Alerts page without paging anyone. Use this for low-priority or informational notifications.
```
https://webhooks.rootly.com/webhooks/incoming/honeycomb_webhooks?secret=YOUR_SECRET
```
Replace `YOUR_SECRET` with the secret from Rootly.
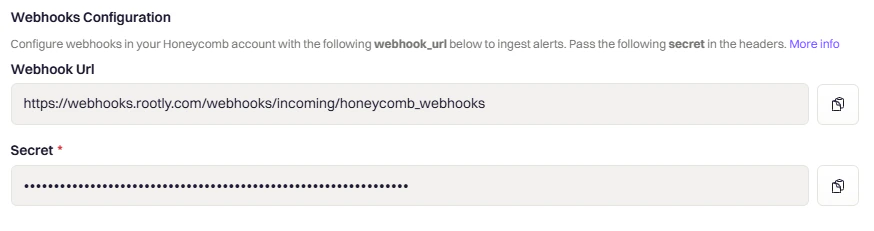 Alerts trigger an on-call notification for a specific Rootly resource. Replace `RESOURCE_TYPE` and `RESOURCE_ID` with your target.
```
https://webhooks.rootly.com/webhooks/incoming/honeycomb_webhooks/notify/RESOURCE_TYPE/RESOURCE_ID?secret=YOUR_SECRET
```
| Parameter | Allowed values |
| --------------- | ---------------------------------------------- |
| `RESOURCE_TYPE` | `User`, `Group`, `EscalationPolicy`, `Service` |
| `RESOURCE_ID` | Found by editing the resource in Rootly |
The secret must appear in both the Webhook URL query string **and** the Shared Secret field. They must match exactly.
Click **Add** to create the webhook integration.
Alerts trigger an on-call notification for a specific Rootly resource. Replace `RESOURCE_TYPE` and `RESOURCE_ID` with your target.
```
https://webhooks.rootly.com/webhooks/incoming/honeycomb_webhooks/notify/RESOURCE_TYPE/RESOURCE_ID?secret=YOUR_SECRET
```
| Parameter | Allowed values |
| --------------- | ---------------------------------------------- |
| `RESOURCE_TYPE` | `User`, `Group`, `EscalationPolicy`, `Service` |
| `RESOURCE_ID` | Found by editing the resource in Rootly |
The secret must appear in both the Webhook URL query string **and** the Shared Secret field. They must match exactly.
Click **Add** to create the webhook integration.
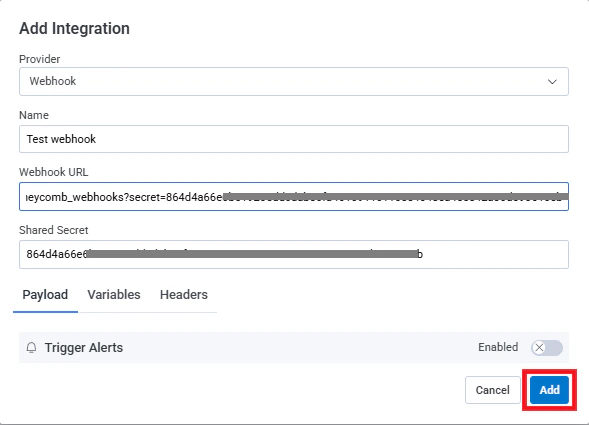 Your webhook is now active. Any Honeycomb alert policy using this integration will send alerts to Rootly.
## Verify Installation
1. Go to the [Alerts page](https://rootly.com/account/alerts) in Rootly
2. Trigger a test alert in Honeycomb
3. Confirm the alert appears in Rootly within a few seconds
## Uninstall
To remove the Honeycomb integration:
1. Go to **Configuration → Integrations** and find **Honeycomb**
2. Click the **Connected** button to reveal the disconnect option
3. Click **Delete**
Your webhook is now active. Any Honeycomb alert policy using this integration will send alerts to Rootly.
## Verify Installation
1. Go to the [Alerts page](https://rootly.com/account/alerts) in Rootly
2. Trigger a test alert in Honeycomb
3. Confirm the alert appears in Rootly within a few seconds
## Uninstall
To remove the Honeycomb integration:
1. Go to **Configuration → Integrations** and find **Honeycomb**
2. Click the **Connected** button to reveal the disconnect option
3. Click **Delete**
 Disconnecting in Rootly does not stop Honeycomb from sending alerts. Delete the webhook in Honeycomb under **Team Settings → Integrations** to stop alert delivery.
## Frequently Asked Questions
Verify the webhook URL includes the secret as a query parameter (`?secret=...`). Confirm the Shared Secret field in Honeycomb matches the URL secret exactly. Check that the alert policy in Honeycomb is using this webhook integration.
The secret in the URL must match the Shared Secret field exactly — regenerate the secret in Rootly and update both places in Honeycomb if needed. Also verify you are using a **Configuration** API key, not a Management key.
Verify you are using the `/notify/RESOURCE_TYPE/RESOURCE_ID` URL format. Confirm the resource type is one of `User`, `Group`, `EscalationPolicy`, or `Service`, and that the resource ID exists in Rootly.
Disconnecting in Rootly does not stop Honeycomb from sending alerts. Delete the webhook in Honeycomb under **Team Settings → Integrations** to stop alert delivery.
## Frequently Asked Questions
Verify the webhook URL includes the secret as a query parameter (`?secret=...`). Confirm the Shared Secret field in Honeycomb matches the URL secret exactly. Check that the alert policy in Honeycomb is using this webhook integration.
The secret in the URL must match the Shared Secret field exactly — regenerate the secret in Rootly and update both places in Honeycomb if needed. Also verify you are using a **Configuration** API key, not a Management key.
Verify you are using the `/notify/RESOURCE_TYPE/RESOURCE_ID` URL format. Confirm the resource type is one of `User`, `Group`, `EscalationPolicy`, or `Service`, and that the resource ID exists in Rootly.