> ## Documentation Index
> Fetch the complete documentation index at: https://docs.rootly.com/llms.txt
> Use this file to discover all available pages before exploring further.
# Alerts
> Configure New Relic to send alert events into Rootly using a webhook notification channel with bearer token authentication, routing, and resolution sync.
## Introduction
New Relic can send alert events into Rootly as alerts using a webhook notification channel. Once alerts are flowing into Rootly, you can use alert workflows to create incidents, notify Slack channels, or page on-call targets.
With New Relic alerts in Rootly, you can:
* Receive New Relic issue events as Rootly alerts
* Filter and route alerts using workflow conditions on fields like `priority`, `state`, and `workflowName`
* Use alert workflows to automate incident creation and follow-up actions
## Before You Begin
Before configuring alert ingestion, make sure you have:
* The New Relic integration already installed in Rootly — see the [Installation](/integrations/new-relic/installation) page
* Access to configure notification channels or destinations in New Relic
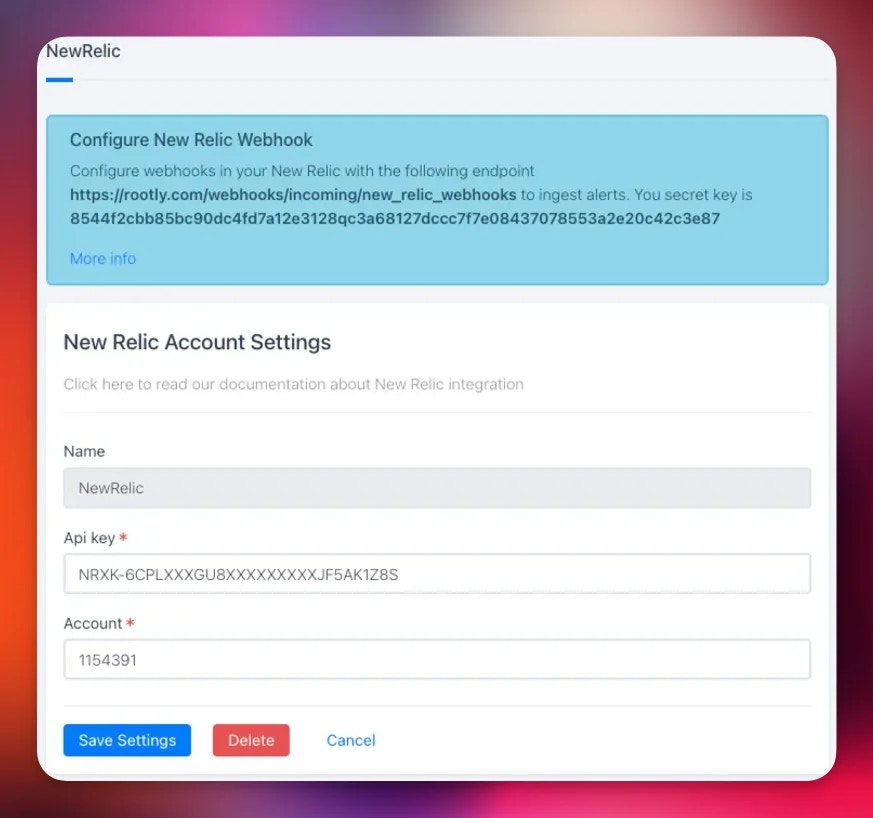
* The bearer token from your Rootly New Relic integration settings
You must install the New Relic integration in Rootly before setting up the webhook. The bearer token is generated during installation and is required for authentication.
## Configure a Webhook in New Relic
In New Relic, navigate to **Alerts > Notification channels** and create a new channel.
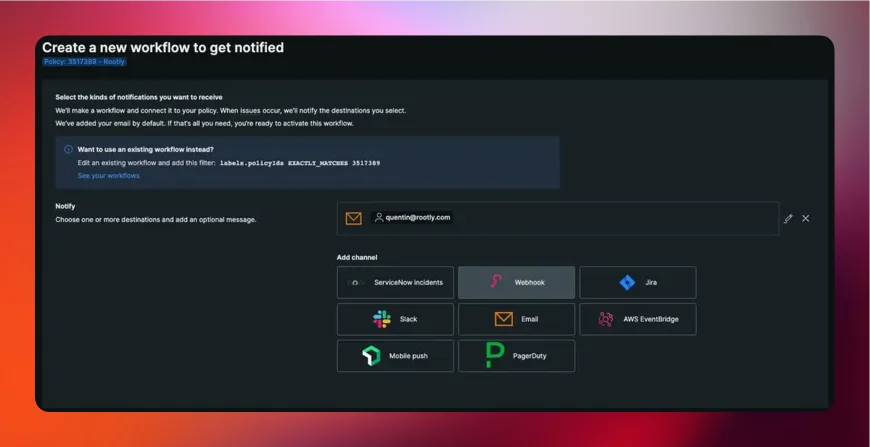 Select **Webhook** as the channel type and configure it with the following values:
* **Webhook URL**: `https://webhooks.rootly.com/webhooks/incoming/new_relic_webhooks`
* **Auth type**: Bearer token
* **Token**: the bearer token shown in your Rootly New Relic integration settings
Select **Webhook** as the channel type and configure it with the following values:
* **Webhook URL**: `https://webhooks.rootly.com/webhooks/incoming/new_relic_webhooks`
* **Auth type**: Bearer token
* **Token**: the bearer token shown in your Rootly New Relic integration settings
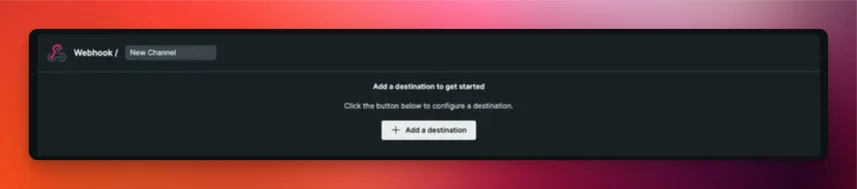
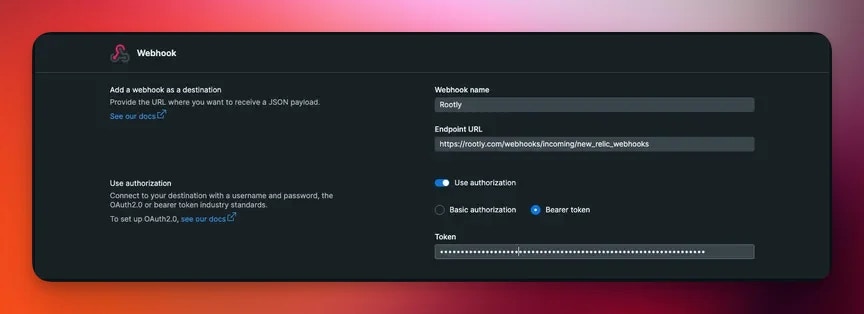 Your bearer token is available in Rootly under **Integrations > New Relic > Configure**.
 Click **Test Notification** in New Relic. A test alert should appear on your [Rootly Alerts page](https://rootly.com/account/alerts).
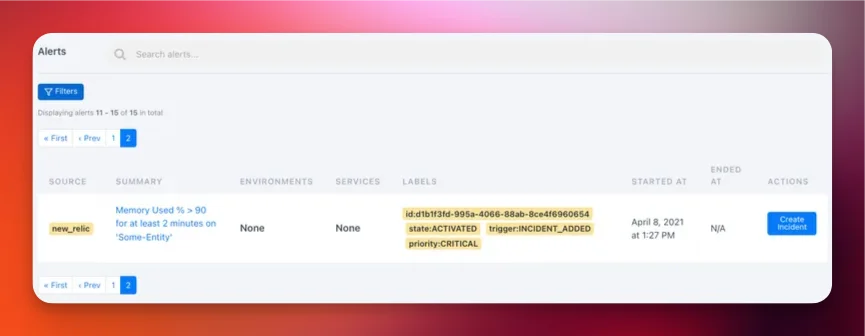 If the test alert appears in Rootly, the integration is working correctly. You can now attach this channel to New Relic alert policies.
## How Alerts Are Mapped
Rootly extracts the following fields from each New Relic alert payload:
* **Summary** — the `title` field from the New Relic issue
* **External ID** — the issue `id`, used to deduplicate alerts
* **External URL** — the `issueUrl`, linking back to the New Relic issue
* **Labels** — `state`, `trigger`, `priority`, and `workflowName` are attached as Rootly alert labels
New Relic `priority` and `state` values are available as alert labels in Rootly. You can use these in workflow run conditions to handle critical vs warning alerts differently.
## Troubleshooting
Verify that the webhook URL and bearer token are correct. Use the **Test Notification** button in New Relic to confirm delivery. Ensure the notification channel is attached to the alert policy that fired.
Rootly extracts fields from the standard New Relic issue payload. If your New Relic account uses a customized payload template for the webhook channel, ensure it still includes the standard fields: `title`, `id`, `issueUrl`, `state`, `priority`, and `createdAt`.
Confirm you are using the token from the Rootly New Relic integration settings, not your New Relic API key. These are different credentials — the bearer token is generated by Rootly for authenticating inbound webhooks.
If the test alert appears in Rootly, the integration is working correctly. You can now attach this channel to New Relic alert policies.
## How Alerts Are Mapped
Rootly extracts the following fields from each New Relic alert payload:
* **Summary** — the `title` field from the New Relic issue
* **External ID** — the issue `id`, used to deduplicate alerts
* **External URL** — the `issueUrl`, linking back to the New Relic issue
* **Labels** — `state`, `trigger`, `priority`, and `workflowName` are attached as Rootly alert labels
New Relic `priority` and `state` values are available as alert labels in Rootly. You can use these in workflow run conditions to handle critical vs warning alerts differently.
## Troubleshooting
Verify that the webhook URL and bearer token are correct. Use the **Test Notification** button in New Relic to confirm delivery. Ensure the notification channel is attached to the alert policy that fired.
Rootly extracts fields from the standard New Relic issue payload. If your New Relic account uses a customized payload template for the webhook channel, ensure it still includes the standard fields: `title`, `id`, `issueUrl`, `state`, `priority`, and `createdAt`.
Confirm you are using the token from the Rootly New Relic integration settings, not your New Relic API key. These are different credentials — the bearer token is generated by Rootly for authenticating inbound webhooks.