> ## Documentation Index
> Fetch the complete documentation index at: https://docs.rootly.com/llms.txt
> Use this file to discover all available pages before exploring further.
# Alert Workflows
> Create Sentry alert rules and use their payloads to build automated incident response workflows in Rootly, including routing, paging, and incident creation.
Once Sentry is connected, you define alert rules in Sentry that determine when to forward alerts to Rootly, then build workflows in Rootly that react to those alerts — declaring incidents, paging responders, and kicking off your response process automatically.
## Step 1: Create Alert Rules in Sentry
You'll start in Sentry by defining the alert rules that determine when an event should be forwarded to Rootly. These rules let you specify conditions based on error frequency, type, tags, severity, or any combination — so only the alerts that matter reach Rootly. Every alert that passes these conditions will land in Rootly's alert feed with the full Sentry payload attached.
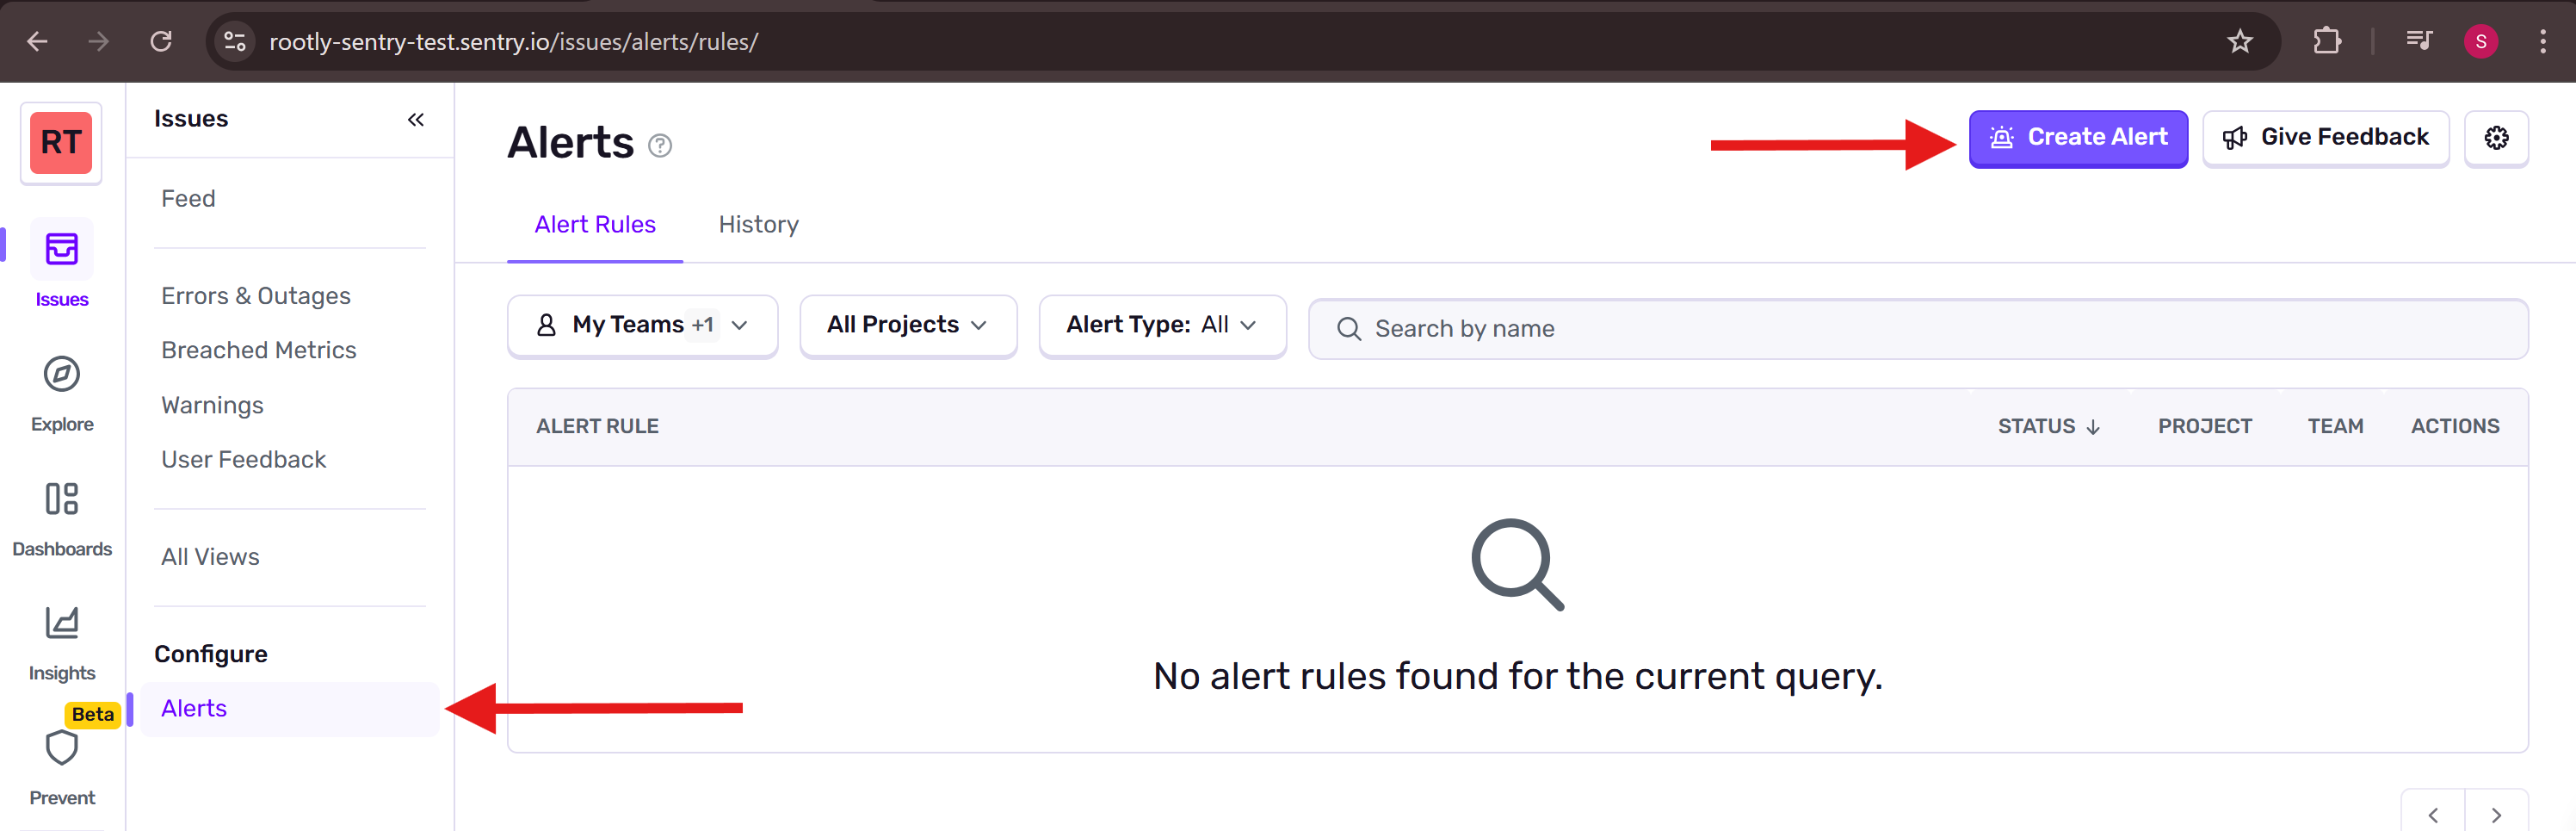
In Sentry, go to **Issues → Alerts**, then click **Create Alert**.
 Select the type of alert you want to create — for example, an **Error Alert** — then click **Set Conditions**.
Set your conditions under the **When** and **If** fields. For example: trigger when an issue is seen more than 10 times in 1 hour, or when a specific tag like `environment:production` is present. The more precisely you scope these, the less noise your Rootly workflows will see.
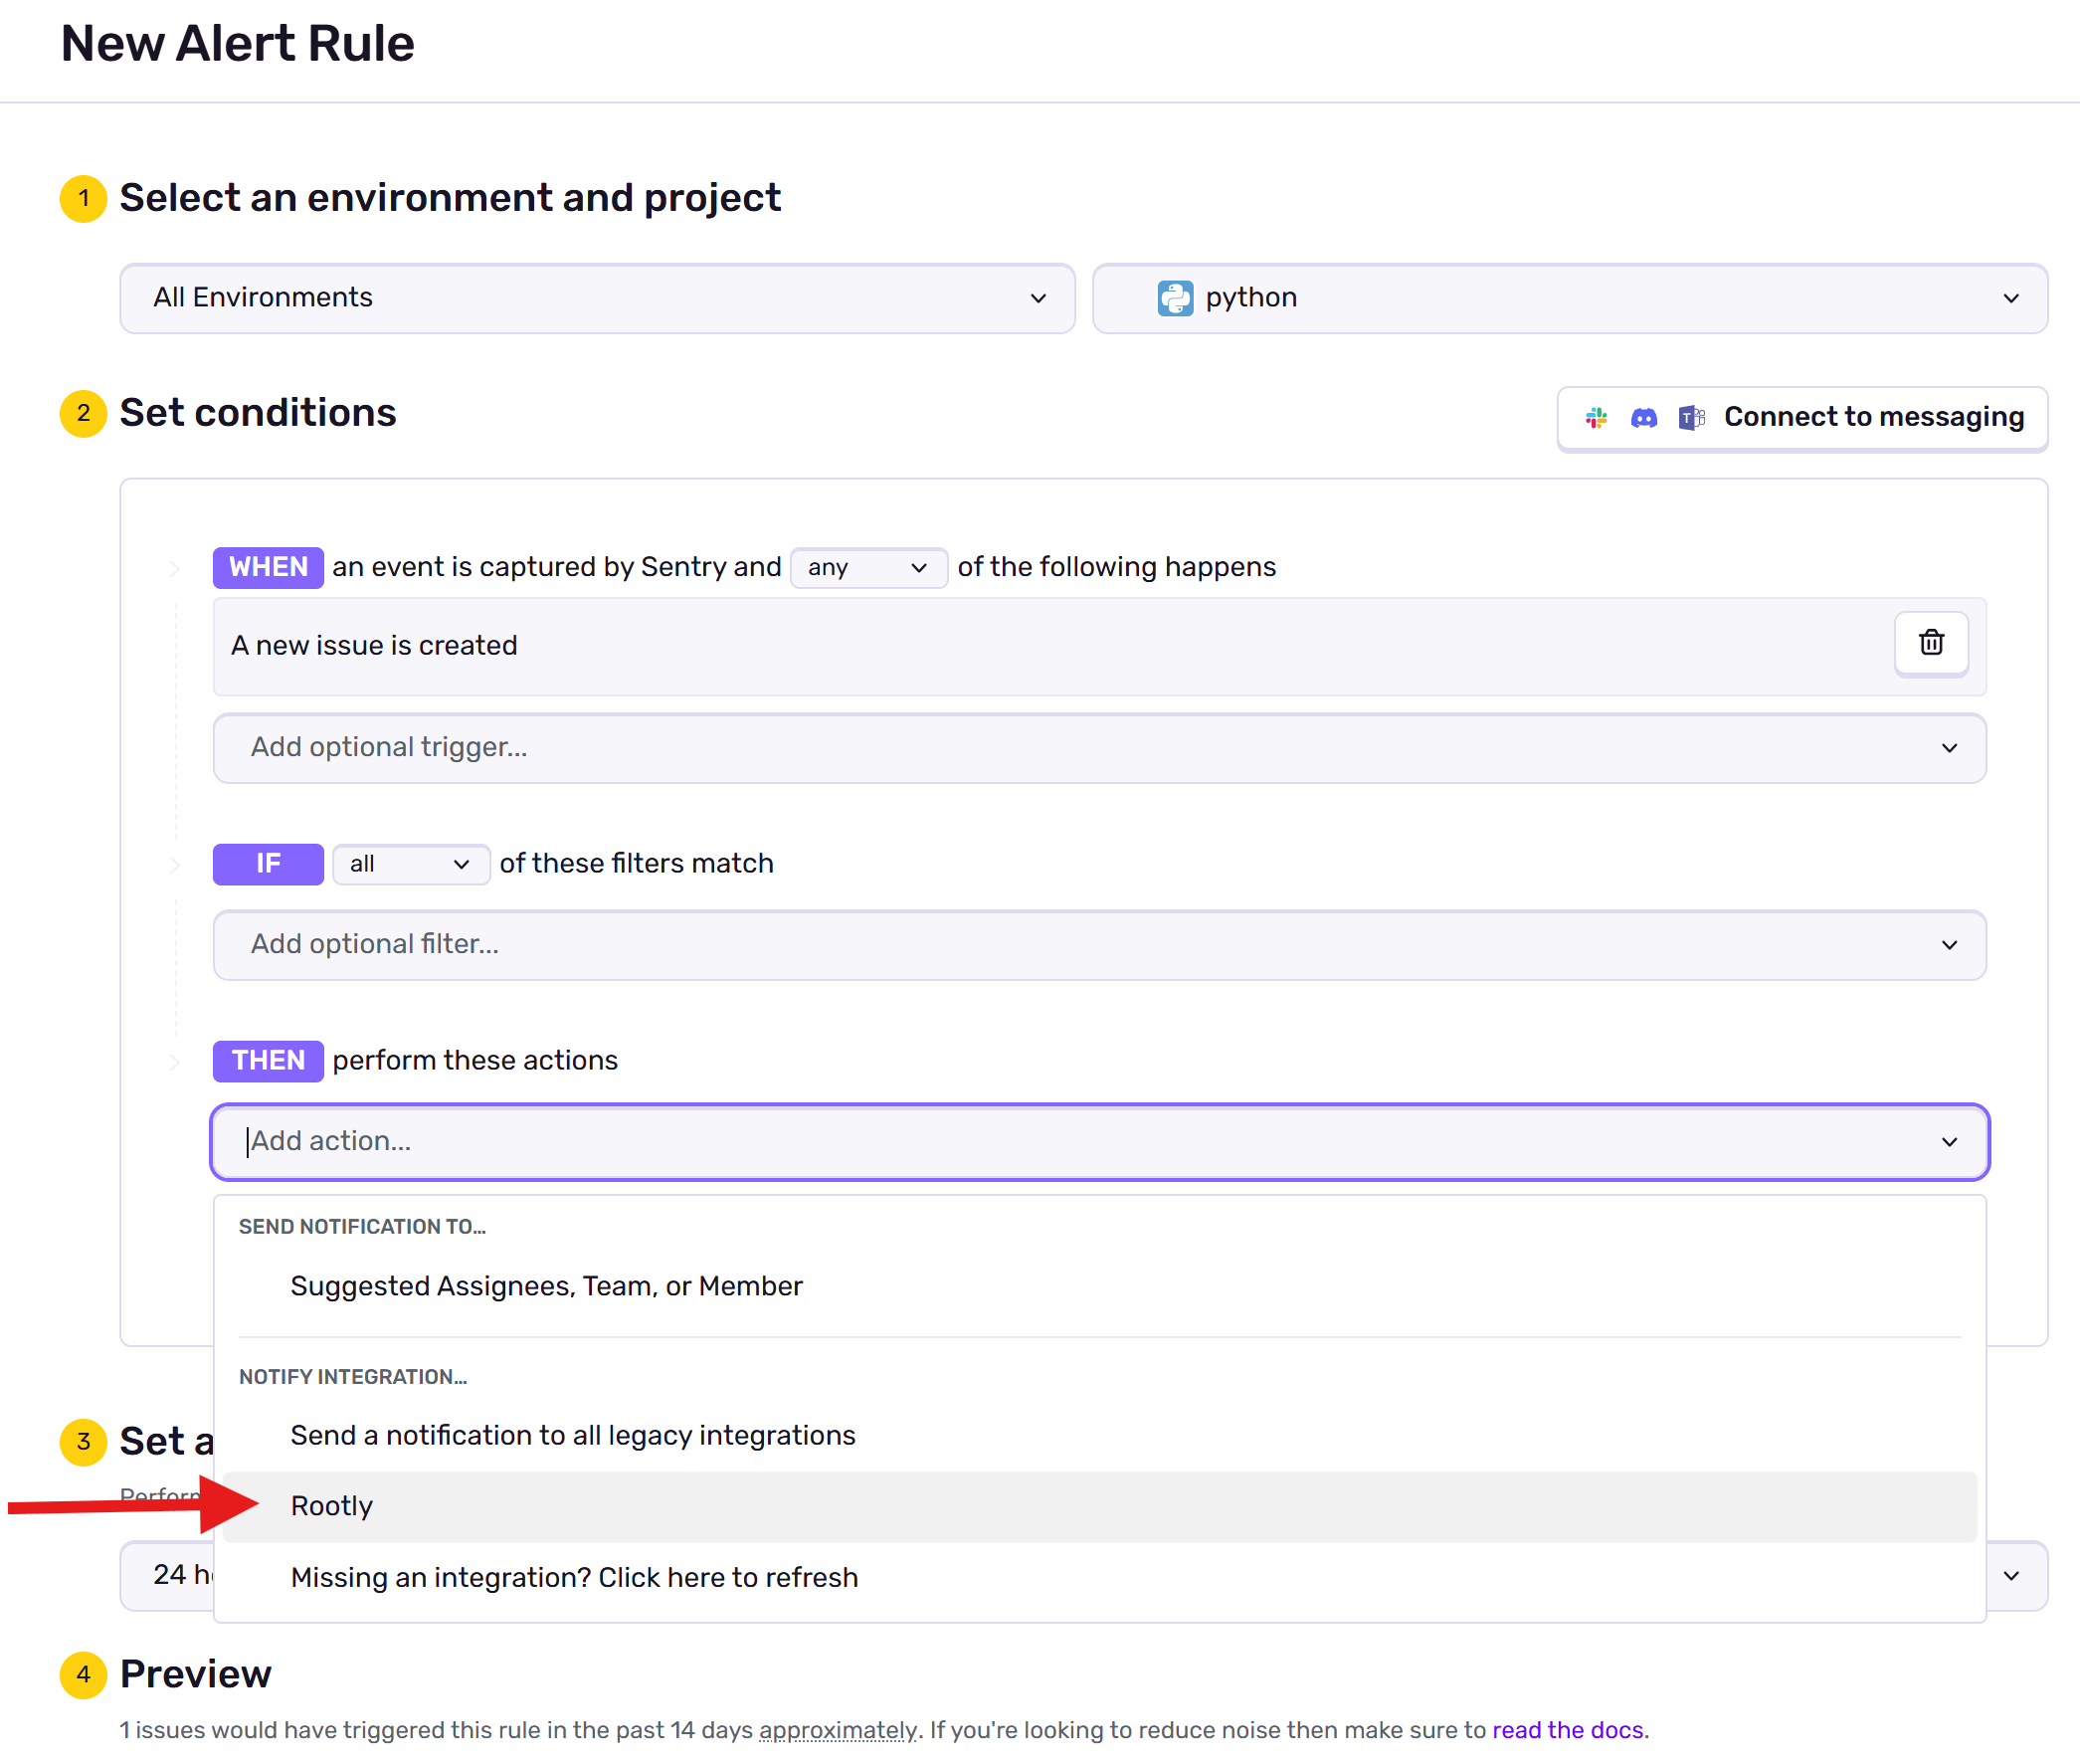
Under the **Then** section, select **Rootly** as the action. This tells Sentry to forward the alert payload to Rootly whenever your conditions are met.
Select the type of alert you want to create — for example, an **Error Alert** — then click **Set Conditions**.
Set your conditions under the **When** and **If** fields. For example: trigger when an issue is seen more than 10 times in 1 hour, or when a specific tag like `environment:production` is present. The more precisely you scope these, the less noise your Rootly workflows will see.
Under the **Then** section, select **Rootly** as the action. This tells Sentry to forward the alert payload to Rootly whenever your conditions are met.
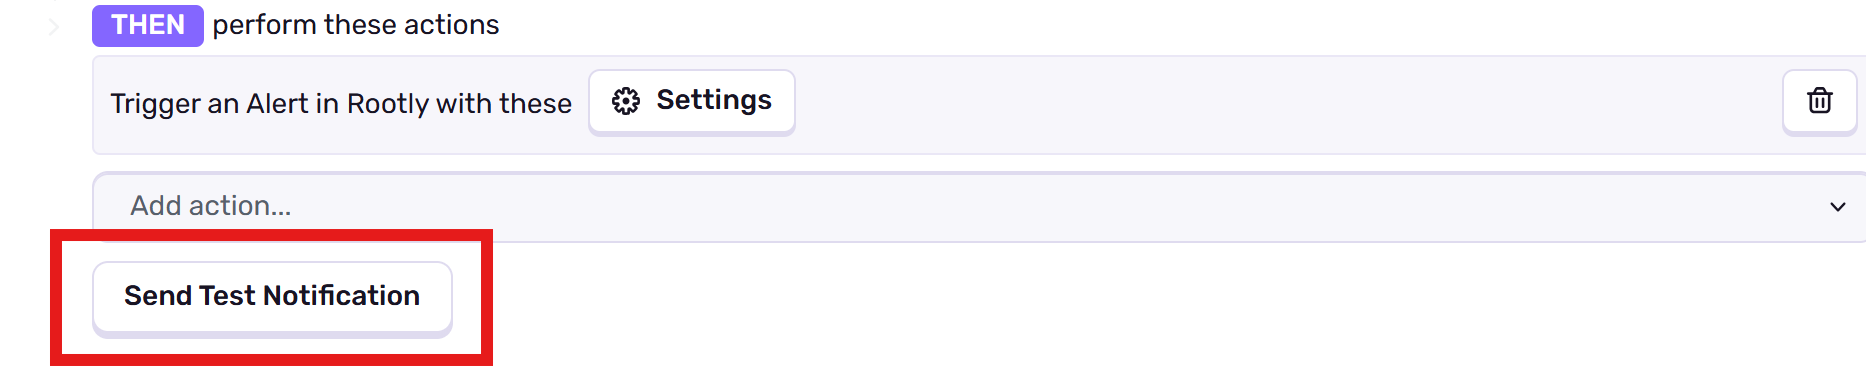
 Use Sentry's **Send Test Notification** to fire a real test alert to Rootly. This sends a live payload so you can inspect exactly what fields are available before writing your workflow conditions.
 The test alert will appear in **Rootly → Alerts**. Click on it to view the full payload — you'll use these fields when writing workflow conditions in the next step.
## Step 2: Build the Workflow in Rootly
With alerts now flowing into Rootly, you create a workflow that reacts to them. Rootly workflows let you inspect the incoming alert payload, apply conditions to filter which alerts should trigger a response, and chain together actions like creating an incident, paging on-call, or sending notifications. You only need one workflow per alert pattern — conditions handle the filtering.
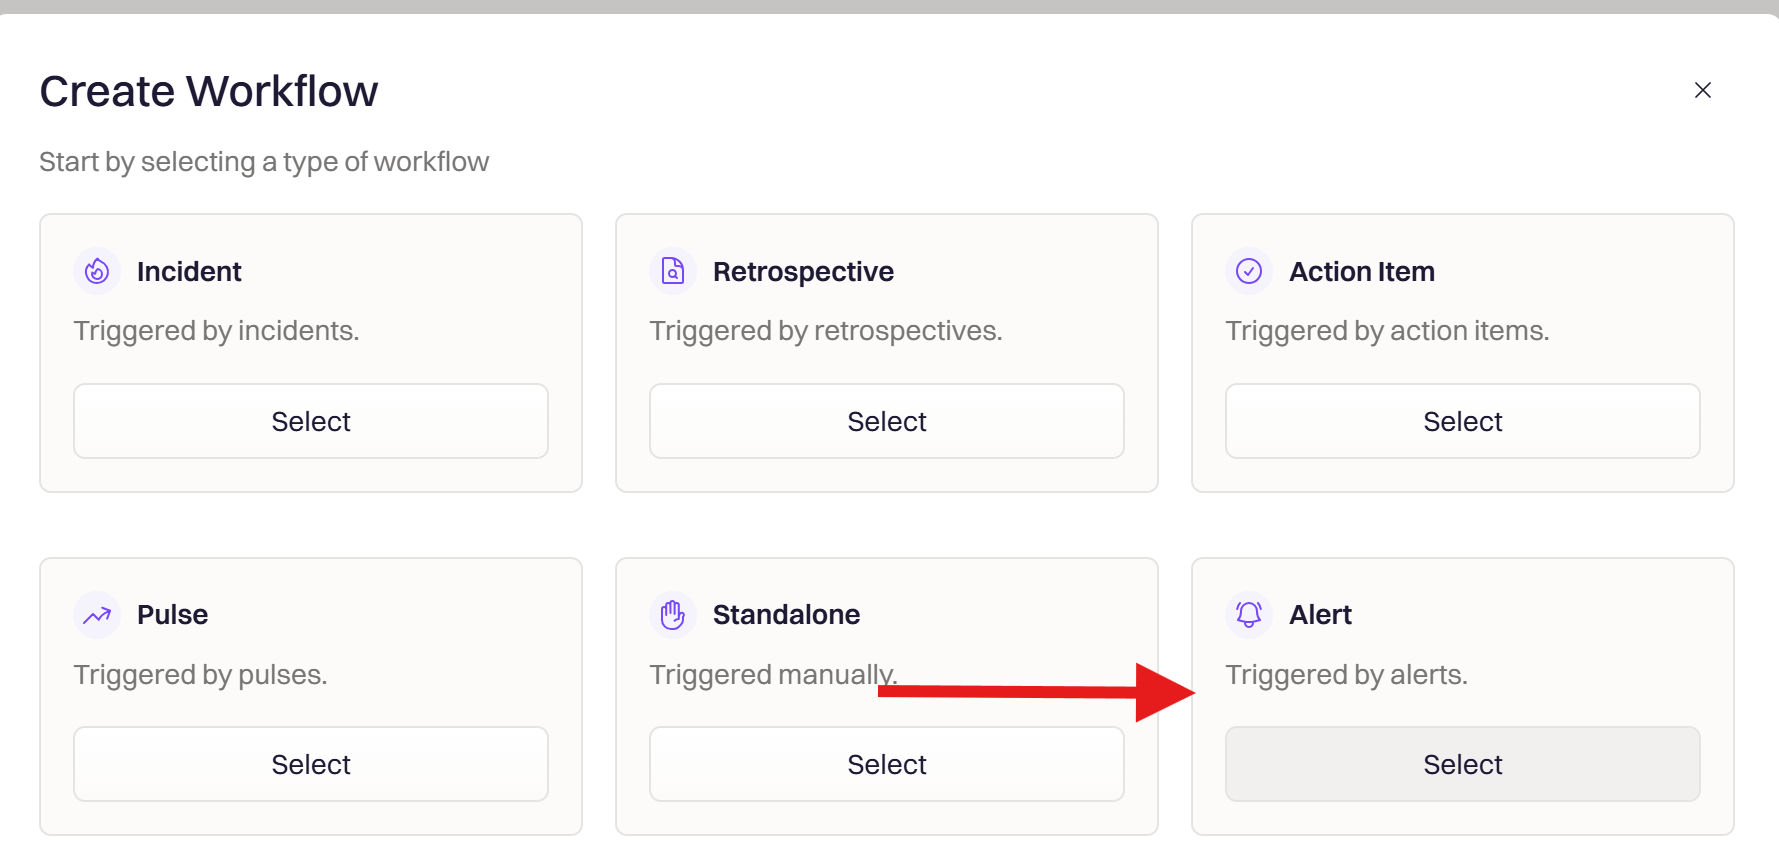
In Rootly, go to **Workflows** and click **Create Workflow**.
The test alert will appear in **Rootly → Alerts**. Click on it to view the full payload — you'll use these fields when writing workflow conditions in the next step.
## Step 2: Build the Workflow in Rootly
With alerts now flowing into Rootly, you create a workflow that reacts to them. Rootly workflows let you inspect the incoming alert payload, apply conditions to filter which alerts should trigger a response, and chain together actions like creating an incident, paging on-call, or sending notifications. You only need one workflow per alert pattern — conditions handle the filtering.
In Rootly, go to **Workflows** and click **Create Workflow**.
 Select the **Alert** workflow type. This workflow will trigger whenever Rootly receives an **alert** from any source — including Sentry. Conditions in a later step will narrow it down to Sentry alerts specifically.
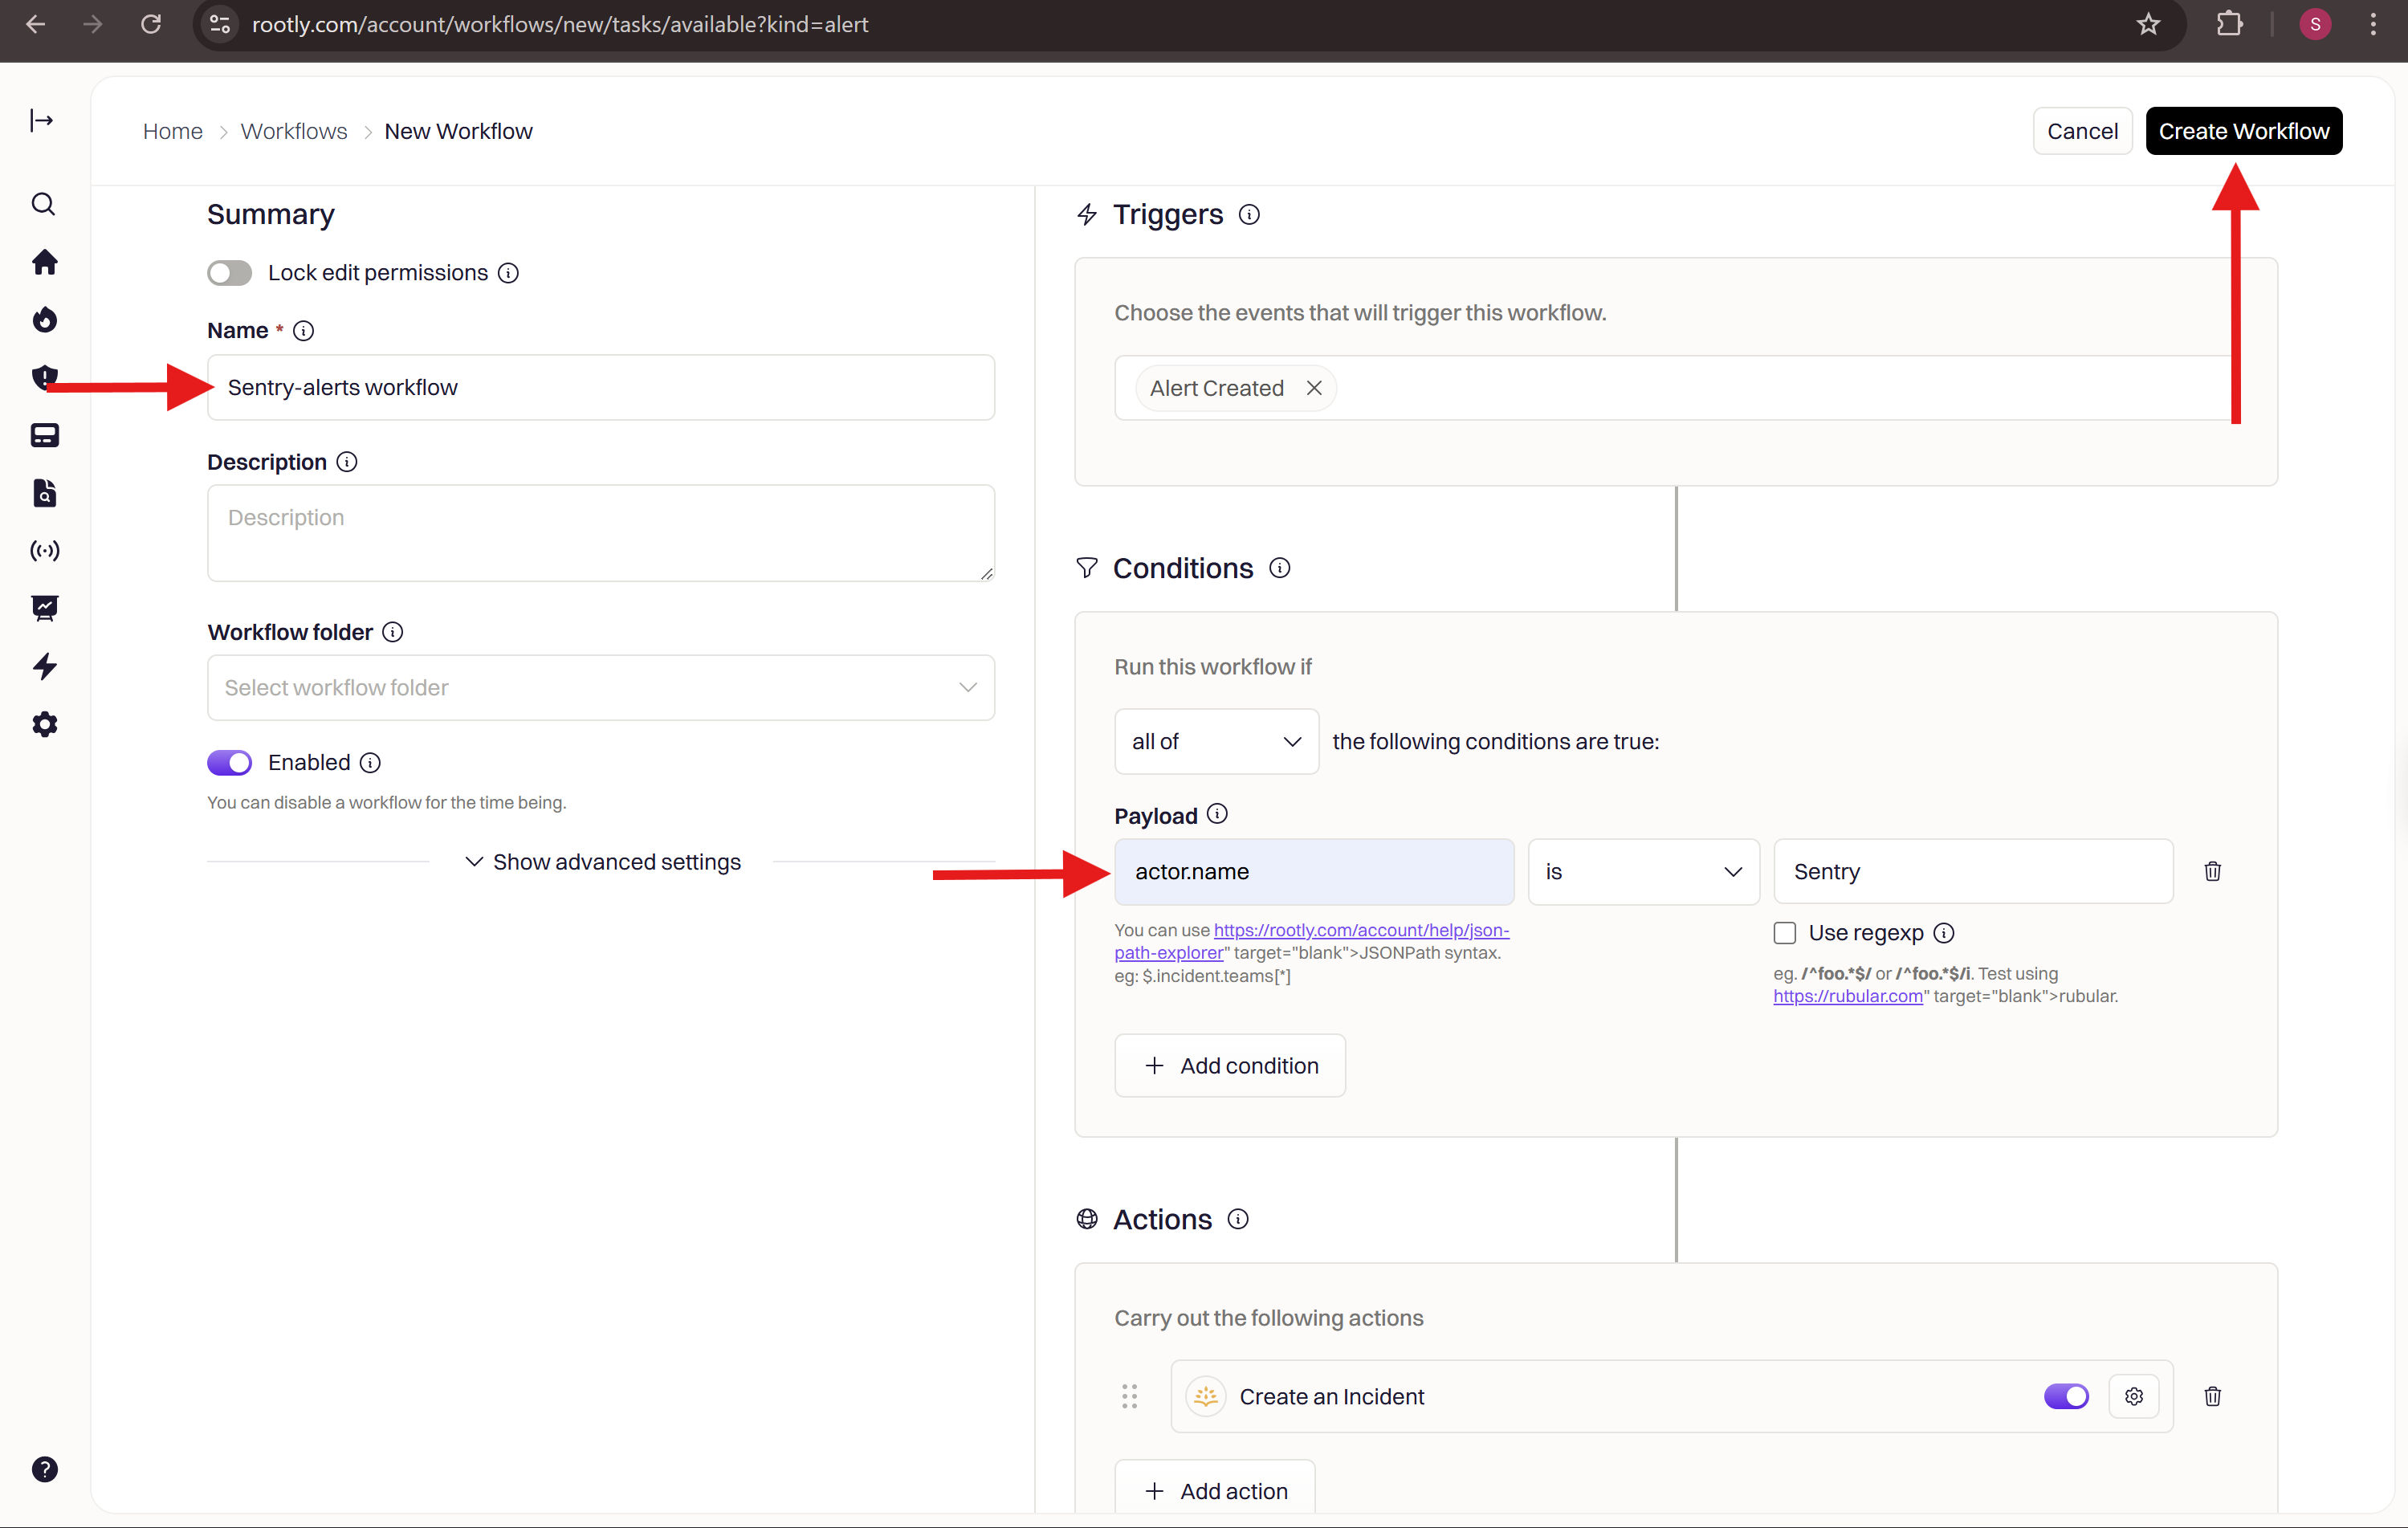
 Give your workflow a clear name like "Create Incident for Sentry Errors".
There are additional optional settings you can configure here, such as:
* **Workflow description** — helps your team understand what this workflow does
* **Repeat configuration** — controls whether the workflow can fire multiple times for the same alert
The trigger defines which alert event activates this workflow.
For **Alert** type workflows, two triggers are available:
1. **Alert Created** — fires when a new alert is received from Sentry
2. **Alert Status Updated** — fires when an existing alert changes state (e.g., resolved or acknowledged)
Select **Alert Created** to run the workflow whenever a new Sentry alert arrives. Use **Alert Status Updated** if you want to automatically close an incident when Sentry marks the issue resolved.
Conditions filter which alerts trigger the workflow. Use one of the following to match alerts from Sentry:
Run this workflow if `any of` the following conditions are true:
* **Source** is `Sentry`
Run this workflow if `any of` the following conditions are true:
* **Payload**: `actor.name` is `Sentry`
The Sentry alert payload contains many fields you can use for more advanced conditions — environment, project, level, tags, and more. Open the test alert you sent earlier to browse all available fields.
Add one or more actions that should occur when the workflow is triggered. Common actions include:
* **Create Incident** — declares an incident with context pulled directly from the alert payload
* **Page Rootly On-Call** — immediately pages the on-call responder for the affected service
* **Send SMS or Email** — notifies stakeholders outside of Slack
You can chain multiple actions depending on your response process — for example: create the incident, then page on-call, then post a message to a Slack channel.
Click **Create Workflow**. The workflow is now active and will fire automatically on the next matching Sentry alert.
Give your workflow a clear name like "Create Incident for Sentry Errors".
There are additional optional settings you can configure here, such as:
* **Workflow description** — helps your team understand what this workflow does
* **Repeat configuration** — controls whether the workflow can fire multiple times for the same alert
The trigger defines which alert event activates this workflow.
For **Alert** type workflows, two triggers are available:
1. **Alert Created** — fires when a new alert is received from Sentry
2. **Alert Status Updated** — fires when an existing alert changes state (e.g., resolved or acknowledged)
Select **Alert Created** to run the workflow whenever a new Sentry alert arrives. Use **Alert Status Updated** if you want to automatically close an incident when Sentry marks the issue resolved.
Conditions filter which alerts trigger the workflow. Use one of the following to match alerts from Sentry:
Run this workflow if `any of` the following conditions are true:
* **Source** is `Sentry`
Run this workflow if `any of` the following conditions are true:
* **Payload**: `actor.name` is `Sentry`
The Sentry alert payload contains many fields you can use for more advanced conditions — environment, project, level, tags, and more. Open the test alert you sent earlier to browse all available fields.
Add one or more actions that should occur when the workflow is triggered. Common actions include:
* **Create Incident** — declares an incident with context pulled directly from the alert payload
* **Page Rootly On-Call** — immediately pages the on-call responder for the affected service
* **Send SMS or Email** — notifies stakeholders outside of Slack
You can chain multiple actions depending on your response process — for example: create the incident, then page on-call, then post a message to a Slack channel.
Click **Create Workflow**. The workflow is now active and will fire automatically on the next matching Sentry alert.
 ## Step 3: Verify
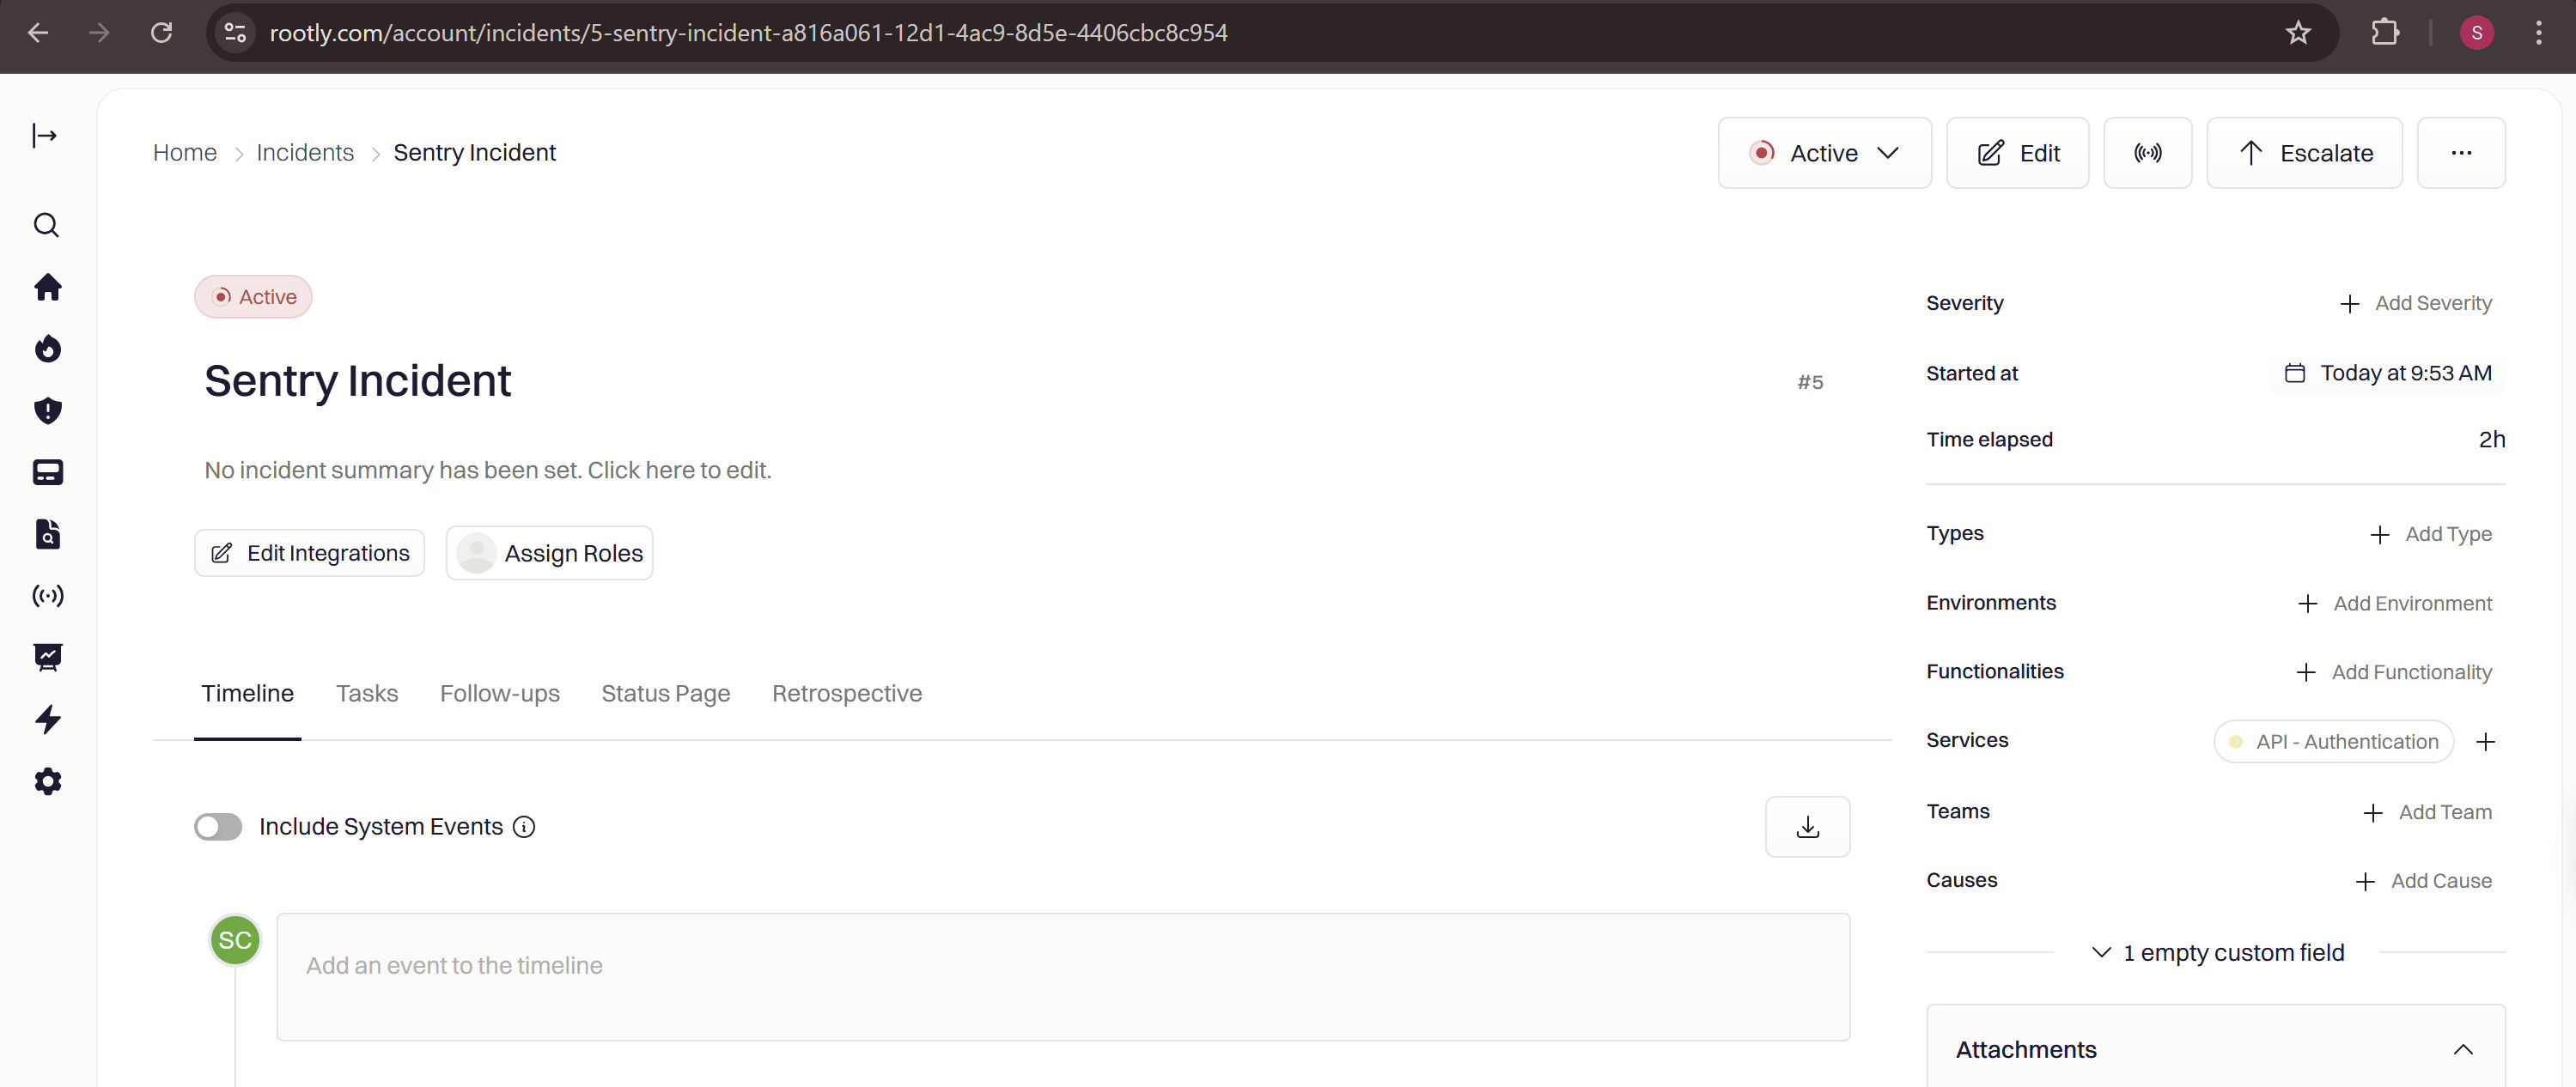
Return to Sentry and trigger the alert rule again — or send another test notification. Confirm that the workflow activates inside Rootly and that the expected incident or action is created. You can monitor workflow execution in **Rootly → Workflows → Activity**.
## Step 3: Verify
Return to Sentry and trigger the alert rule again — or send another test notification. Confirm that the workflow activates inside Rootly and that the expected incident or action is created. You can monitor workflow execution in **Rootly → Workflows → Activity**.
 ## How Alert Fields Are Mapped
Rootly extracts the following fields from each Sentry alert type and makes them available as conditions and variables inside your workflows:
Issue title, issue ID, issue URL, error type, level, and project name. Supports automatic resolution — when Sentry sends a resolved event, Rootly resolves the corresponding alert.
Alert title, alert ID, and web URL. Does not support automatic resolution — must be resolved manually or via a workflow action.
`level`, `type`, `project`, and `status` are extracted as labels on every alert where available. Use these as workflow conditions to filter by severity, environment, or state.
## Troubleshooting
Confirm the Rootly app is installed in your Sentry organization and that the alert rule has Rootly set as an action. Verify the rule conditions are being met by triggering a test event.
This is expected — metric alerts don't support automatic resolution. Resolve them manually or configure a workflow action to resolve them based on a follow-up Sentry event.
Check that the value follows `type:id` format exactly (e.g. `EscalationPolicy:abc-123`) and that the resource exists in Rootly. Setting the value to `none` disables paging. An invalid or missing resource is silently ignored.
Confirm the value is a valid Rootly alert urgency ID belonging to your team. Invalid urgency IDs are silently ignored and no urgency will be assigned to the alert.
## How Alert Fields Are Mapped
Rootly extracts the following fields from each Sentry alert type and makes them available as conditions and variables inside your workflows:
Issue title, issue ID, issue URL, error type, level, and project name. Supports automatic resolution — when Sentry sends a resolved event, Rootly resolves the corresponding alert.
Alert title, alert ID, and web URL. Does not support automatic resolution — must be resolved manually or via a workflow action.
`level`, `type`, `project`, and `status` are extracted as labels on every alert where available. Use these as workflow conditions to filter by severity, environment, or state.
## Troubleshooting
Confirm the Rootly app is installed in your Sentry organization and that the alert rule has Rootly set as an action. Verify the rule conditions are being met by triggering a test event.
This is expected — metric alerts don't support automatic resolution. Resolve them manually or configure a workflow action to resolve them based on a follow-up Sentry event.
Check that the value follows `type:id` format exactly (e.g. `EscalationPolicy:abc-123`) and that the resource exists in Rootly. Setting the value to `none` disables paging. An invalid or missing resource is silently ignored.
Confirm the value is a valid Rootly alert urgency ID belonging to your team. Invalid urgency IDs are silently ignored and no urgency will be assigned to the alert.