> ## Documentation Index
> Fetch the complete documentation index at: https://docs.rootly.com/llms.txt
> Use this file to discover all available pages before exploring further.
# Installation
> Install the Rootly ServiceNow integration via OAuth and configure Business Rule webhooks for bidirectional incident sync, field mapping, and ticket automation.
## Introduction
The ServiceNow integration connects Rootly with your ServiceNow instance bidirectionally. Rootly can create and update ServiceNow incidents through workflow actions, and ServiceNow can send incident events to Rootly as alerts using Business Rules.
With the ServiceNow integration, you can:
* Automatically create ServiceNow incidents from Rootly incidents
* Update ServiceNow incident priority, state, and custom fields as incidents evolve
* Receive ServiceNow incident events as Rootly alerts to trigger on-call paging
* Sync ServiceNow CMDB business applications to Rootly services
## Before You Begin
Before setting up the integration, make sure you have:
* A Rootly account with admin permission to manage integrations
* A ServiceNow instance with admin access
* Permission to create OAuth Application Registry entries in ServiceNow
We recommend installing with a dedicated ServiceNow service account so the integration does not break if an individual user leaves your organization.
## Installation
### Part 1: Connect Rootly to ServiceNow (OAuth)
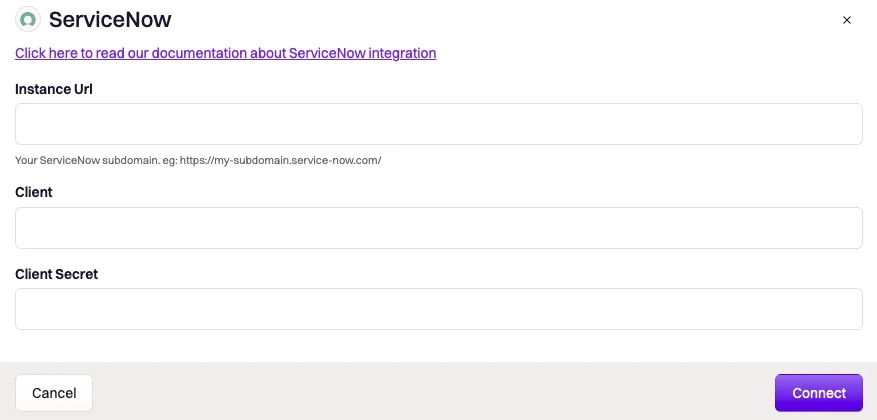
Log into Rootly as an Admin and navigate to **Configurations > Integrations > ServiceNow**. Click **Setup**.
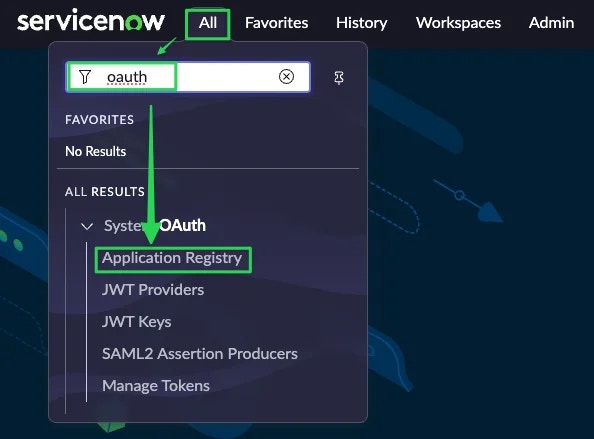
 Log into your ServiceNow instance as an Admin and navigate to **System OAuth > Application Registry**.
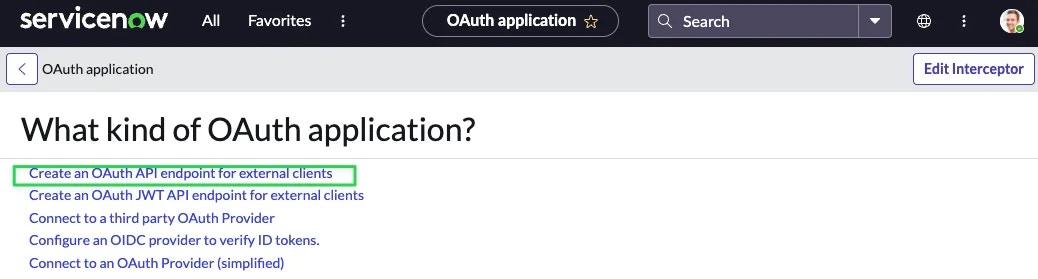
 Click **New**, then select **Create an OAuth API endpoint for external clients**.
 Fill in the following fields and click **Submit**:
| ServiceNow Field | Value |
| ---------------- | ---------------------------------------------- |
| `Name` | `Rootly` |
| `Redirect URL` | `https://rootly.com/auth/service_now/callback` |
Fill in the following fields and click **Submit**:
| ServiceNow Field | Value |
| ---------------- | ---------------------------------------------- |
| `Name` | `Rootly` |
| `Redirect URL` | `https://rootly.com/auth/service_now/callback` |
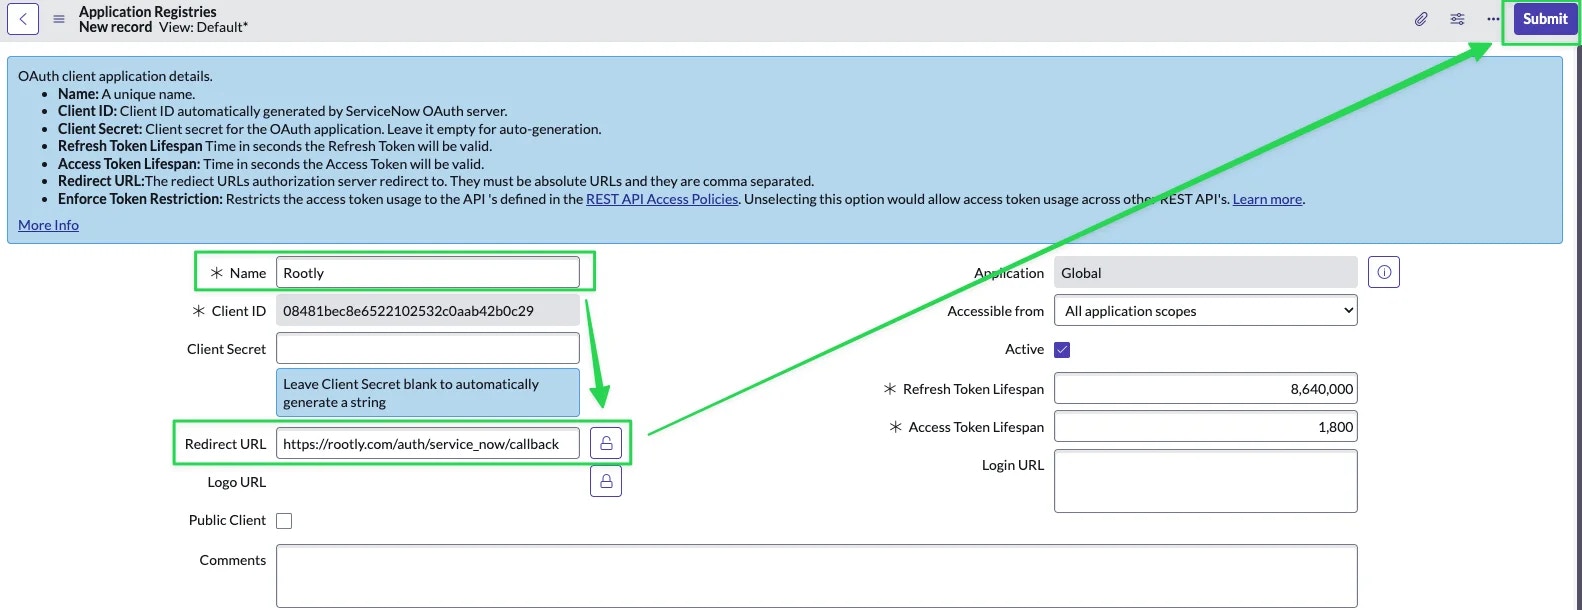 Open the application you just created in ServiceNow and copy the **Client ID** and **Client Secret**.
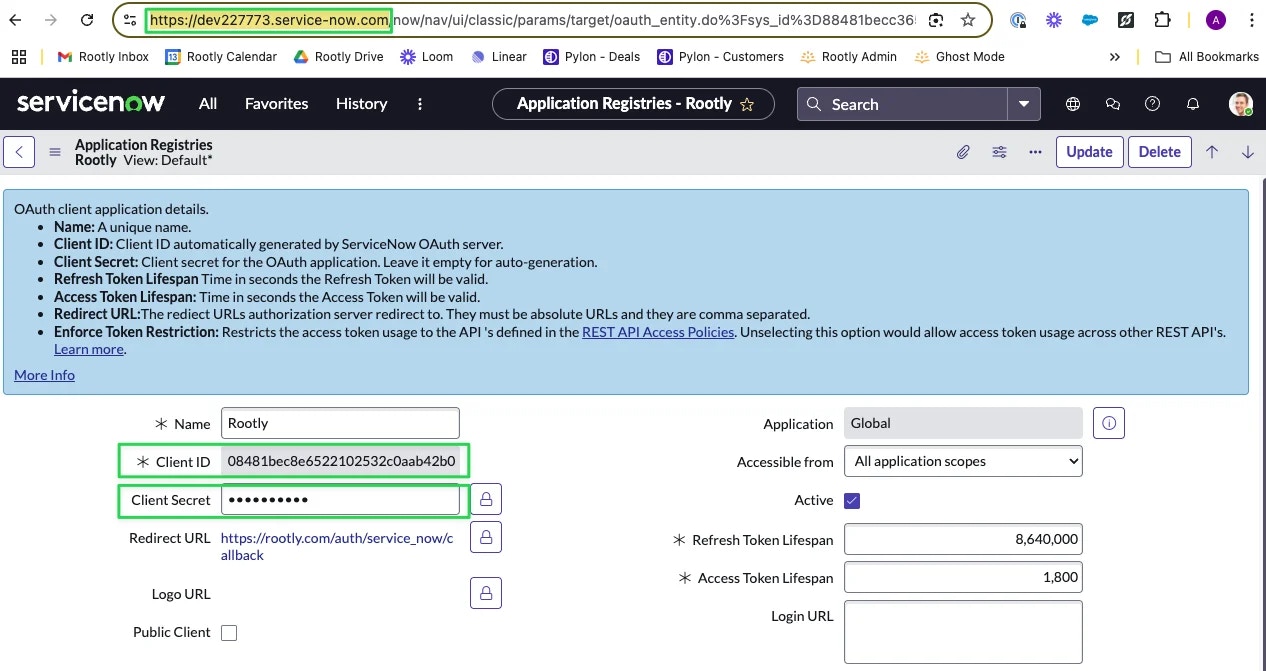 When copying the **Client Secret**, you may need to unmask it by clicking the lock icon. Masked values sometimes do not copy correctly in ServiceNow.
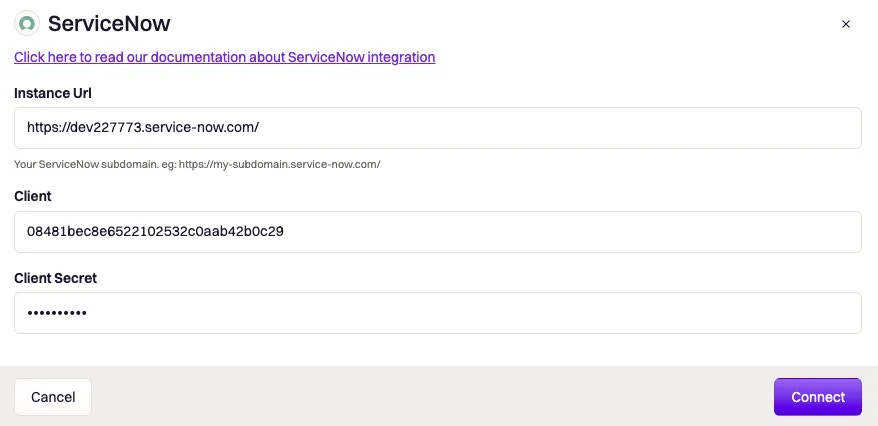
Paste the Client ID, Client Secret, and your ServiceNow instance URL into the Rootly setup modal and click **Connect**.
When copying the **Client Secret**, you may need to unmask it by clicking the lock icon. Masked values sometimes do not copy correctly in ServiceNow.
Paste the Client ID, Client Secret, and your ServiceNow instance URL into the Rootly setup modal and click **Connect**.
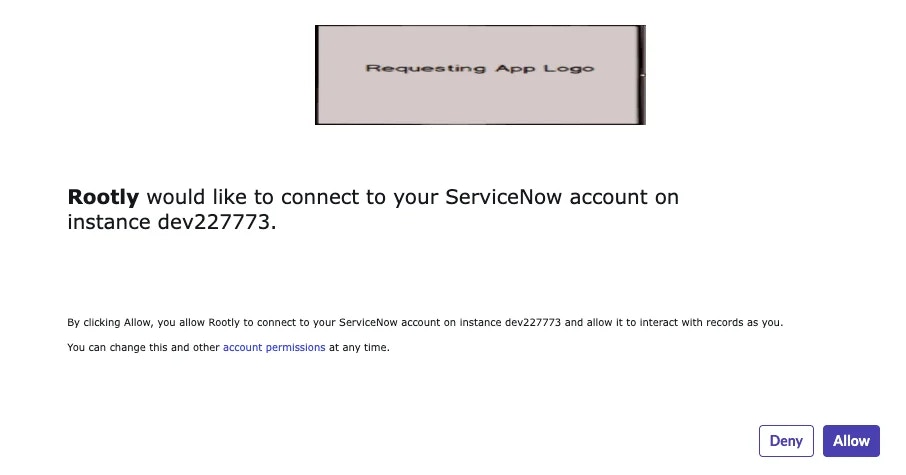
 You will be redirected to ServiceNow to authorize the connection. Click **Allow**.
 After authorization, the **Create a ServiceNow Incident** and **Update a ServiceNow Incident** workflow actions are available in your Genius workflows.
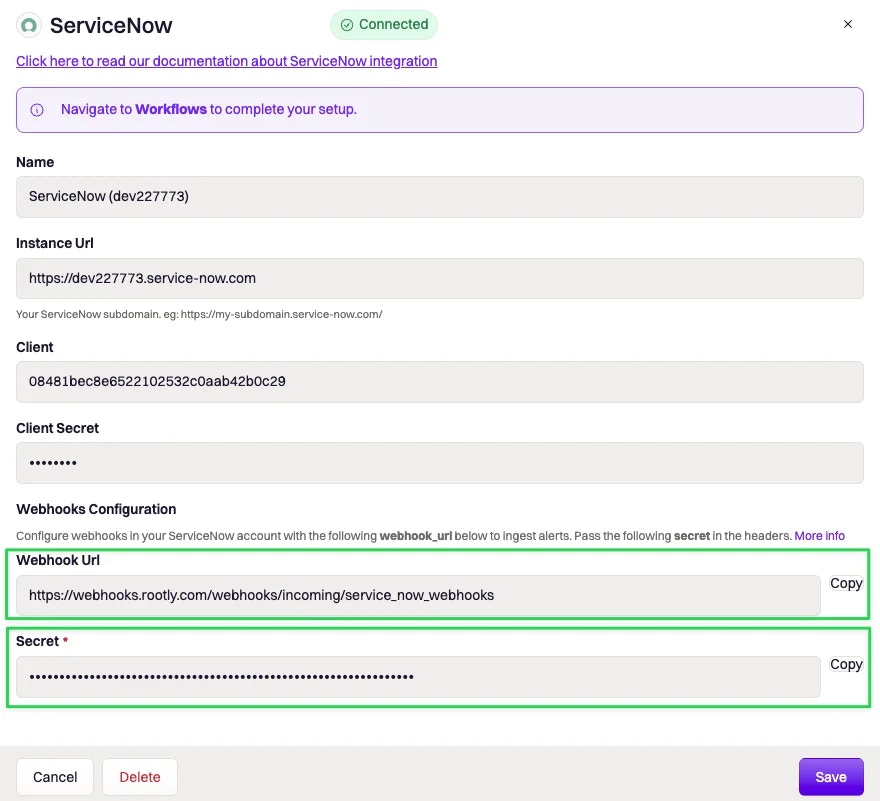
### Part 2: Receive ServiceNow Events in Rootly (Webhooks)
To receive ServiceNow incident events as Rootly alerts, configure a Business Rule in ServiceNow to send events to Rootly's webhook endpoint.
In Rootly, open the ServiceNow integration settings. Copy the **Webhook URL** and **Secret** values shown on the integration page.
In ServiceNow, navigate to **System Definition > Business Rules**.
There are multiple Business Rules pages in ServiceNow. Make sure you select the one under **System Definition**.
Click **New** and fill in:
| Field | Value |
| ---------- | -------------------------------------------------- |
| `Name` | Any descriptive name (e.g. `Send to Rootly`) |
| `Table` | `Incident [incident]` |
| `Advanced` | Check this |
| `When` | `After` |
| `Insert` | Check to receive events when incidents are created |
| `Update` | Check to receive events when incidents are updated |
| `Delete` | Check to receive events when incidents are deleted |
After authorization, the **Create a ServiceNow Incident** and **Update a ServiceNow Incident** workflow actions are available in your Genius workflows.
### Part 2: Receive ServiceNow Events in Rootly (Webhooks)
To receive ServiceNow incident events as Rootly alerts, configure a Business Rule in ServiceNow to send events to Rootly's webhook endpoint.
In Rootly, open the ServiceNow integration settings. Copy the **Webhook URL** and **Secret** values shown on the integration page.
In ServiceNow, navigate to **System Definition > Business Rules**.
There are multiple Business Rules pages in ServiceNow. Make sure you select the one under **System Definition**.
Click **New** and fill in:
| Field | Value |
| ---------- | -------------------------------------------------- |
| `Name` | Any descriptive name (e.g. `Send to Rootly`) |
| `Table` | `Incident [incident]` |
| `Advanced` | Check this |
| `When` | `After` |
| `Insert` | Check to receive events when incidents are created |
| `Update` | Check to receive events when incidents are updated |
| `Delete` | Check to receive events when incidents are deleted |
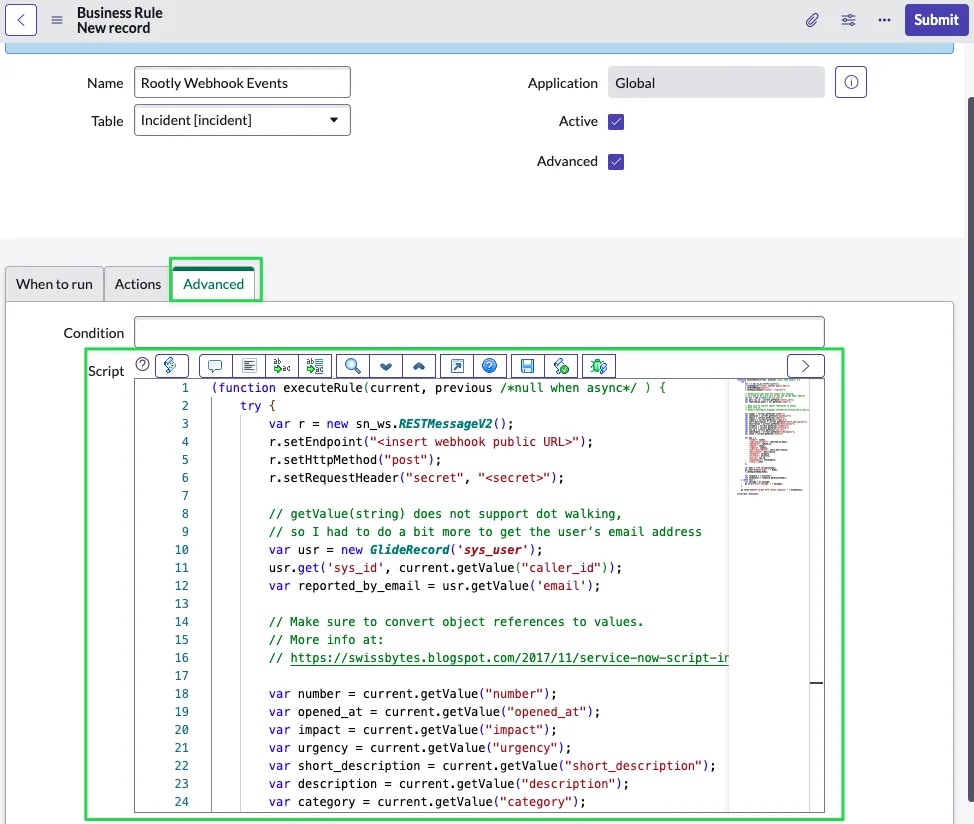 Navigate to the **Advanced** tab and replace the script with the following:
```js theme={null}
(function executeRule(current, previous /*null when async*/ ) {
try {
var r = new sn_ws.RESTMessageV2();
r.setEndpoint("");
r.setHttpMethod("post");
r.setRequestHeader("secret", "");
var usr = new GlideRecord('sys_user');
usr.get('sys_id', current.getValue("caller_id"));
var reported_by_email = usr.getValue('email');
var number = current.getValue("number");
var opened_at = current.getValue("opened_at");
var impact = current.getValue("impact");
var urgency = current.getValue("urgency");
var short_description = current.getValue("short_description");
var description = current.getValue("description");
var category = current.getValue("category");
var priority = current.getValue("priority");
var sys_id = current.getValue("sys_id");
var subcategory = current.getValue("subcategory");
var state = current.getValue("state");
var obj = {
"number": number,
"reported_by_email": reported_by_email,
"opened_at": opened_at,
"impact": impact,
"urgency": urgency,
"short_description": short_description,
"description": description,
"category": category,
"priority": priority,
"sys_id": sys_id,
"subcategory": subcategory,
"state": state
};
var body = JSON.stringify(obj);
r.setRequestBody(body);
var response = r.execute();
var httpStatus = response.getStatusCode();
} catch (ex) {
var message = ex.message;
gs.error("Error message: " + message);
}
gs.info("Webhook target HTTP status response: " + httpStatus);
})(current, previous);
```
Replace `` and `` with the values from the Rootly ServiceNow integration page.
Navigate to the **Advanced** tab and replace the script with the following:
```js theme={null}
(function executeRule(current, previous /*null when async*/ ) {
try {
var r = new sn_ws.RESTMessageV2();
r.setEndpoint("");
r.setHttpMethod("post");
r.setRequestHeader("secret", "");
var usr = new GlideRecord('sys_user');
usr.get('sys_id', current.getValue("caller_id"));
var reported_by_email = usr.getValue('email');
var number = current.getValue("number");
var opened_at = current.getValue("opened_at");
var impact = current.getValue("impact");
var urgency = current.getValue("urgency");
var short_description = current.getValue("short_description");
var description = current.getValue("description");
var category = current.getValue("category");
var priority = current.getValue("priority");
var sys_id = current.getValue("sys_id");
var subcategory = current.getValue("subcategory");
var state = current.getValue("state");
var obj = {
"number": number,
"reported_by_email": reported_by_email,
"opened_at": opened_at,
"impact": impact,
"urgency": urgency,
"short_description": short_description,
"description": description,
"category": category,
"priority": priority,
"sys_id": sys_id,
"subcategory": subcategory,
"state": state
};
var body = JSON.stringify(obj);
r.setRequestBody(body);
var response = r.execute();
var httpStatus = response.getStatusCode();
} catch (ex) {
var message = ex.message;
gs.error("Error message: " + message);
}
gs.info("Webhook target HTTP status response: " + httpStatus);
})(current, previous);
```
Replace `` and `` with the values from the Rootly ServiceNow integration page.
 Click **Submit**.
### How Alerts Are Mapped
Each ServiceNow event received creates a Rootly alert with the following fields:
| Rootly Alert Field | ServiceNow Source |
| ------------------ | ------------------------------------------------------ |
| Summary | `short_description`, then `description`, then `number` |
| External ID | `sys_id` |
| External URL | `url` (if provided in payload) |
Alert labels:
| Label | ServiceNow Field |
| ------------- | ---------------- |
| `id` | `sys_id` |
| `number` | `number` |
| `impact` | `impact` |
| `urgency` | `urgency` |
| `category` | `category` |
| `subcategory` | `subcategory` |
| `state` | `state` |
## Using ServiceNow as an Alert Source
If your org uses Rootly On-Call, ServiceNow alerts can be used to page on-call users. Once the Business Rule is configured, alerts from ServiceNow will appear in your Rootly alert feed and can trigger on-call notifications through alert workflows.
## Uninstall
To remove the ServiceNow integration, navigate to **Configuration > Integrations > ServiceNow > Delete**.
Click **Submit**.
### How Alerts Are Mapped
Each ServiceNow event received creates a Rootly alert with the following fields:
| Rootly Alert Field | ServiceNow Source |
| ------------------ | ------------------------------------------------------ |
| Summary | `short_description`, then `description`, then `number` |
| External ID | `sys_id` |
| External URL | `url` (if provided in payload) |
Alert labels:
| Label | ServiceNow Field |
| ------------- | ---------------- |
| `id` | `sys_id` |
| `number` | `number` |
| `impact` | `impact` |
| `urgency` | `urgency` |
| `category` | `category` |
| `subcategory` | `subcategory` |
| `state` | `state` |
## Using ServiceNow as an Alert Source
If your org uses Rootly On-Call, ServiceNow alerts can be used to page on-call users. Once the Business Rule is configured, alerts from ServiceNow will appear in your Rootly alert feed and can trigger on-call notifications through alert workflows.
## Uninstall
To remove the ServiceNow integration, navigate to **Configuration > Integrations > ServiceNow > Delete**.