> ## Documentation Index
> Fetch the complete documentation index at: https://docs.rootly.com/llms.txt
> Use this file to discover all available pages before exploring further.
# SSO
> Enable single sign-on for Rootly with SAML 2.0 compatible identity providers including Okta, Google, OneLogin, Auth0, Azure AD, JumpCloud, and more.
## Installation
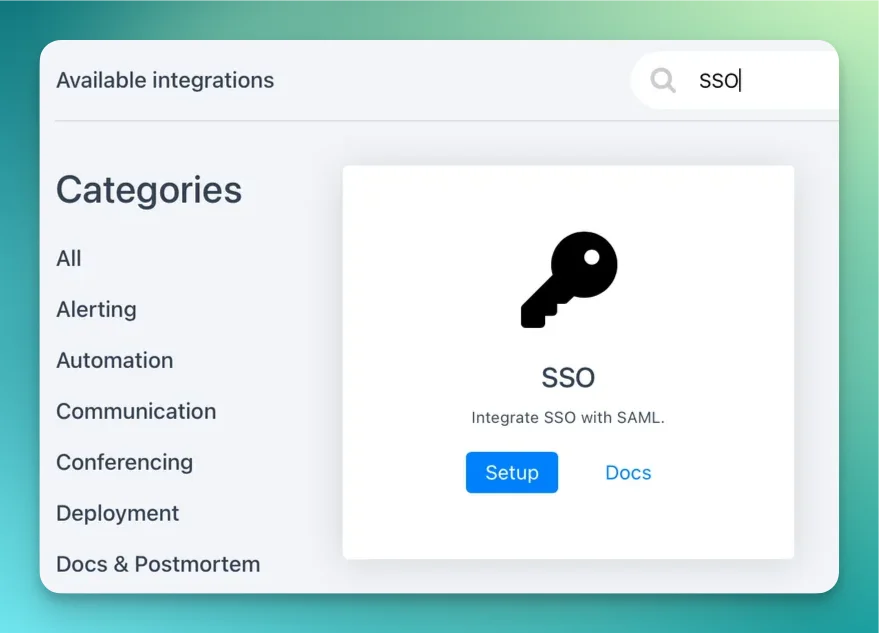
You can set up this integration as a **logged in admin user** in the integrations page:
 ## Identity Providers
Rootly is compatible with **any identity provider** supporting **SAML 2.0.**
Depending on the identity provider, you might be asked for the following information during your setup process:
### Service Provider Details
| Field | Value |
| ---------------------------- | -------------------------------------------------------- |
| **ACS URL** | `https://rootly.com/users/saml/auth` |
| **Entity ID / Audience URI** | `https://rootly.com/users/saml/metadata` |
| **SP Metadata URL** | `https://rootly.com/users/saml/metadata` |
| **Name ID Format** | `urn:oasis:names:tc:SAML:1.1:nameid-format:emailAddress` |
| **Binding** | HTTP-POST |
### SAML Attribute Mapping
Rootly reads the following attributes from the SAML assertion. Email is taken from the NameID element and is required. All other attributes are optional but recommended for accurate Just-In-Time (JIT) provisioning.
| Rootly field | SAML attribute |
| -------------- | ---------------------------- |
| Email | NameID (emailAddress format) |
| First name | `name.givenName` |
| Last name | `name.familyName` |
| Preferred name | `displayName` |
| Phone number | `phoneNumbers.work` |
### Certificate Requirements
Rootly requires a PEM-encoded X.509 certificate from your IdP to validate SAML assertions.
* Must be in PEM format with `-----BEGIN CERTIFICATE-----` and `-----END CERTIFICATE-----` headers
* Must not be expired — Rootly rejects expired certificates at save time
* Must match the certificate your IdP uses to sign SAML responses
### Okta
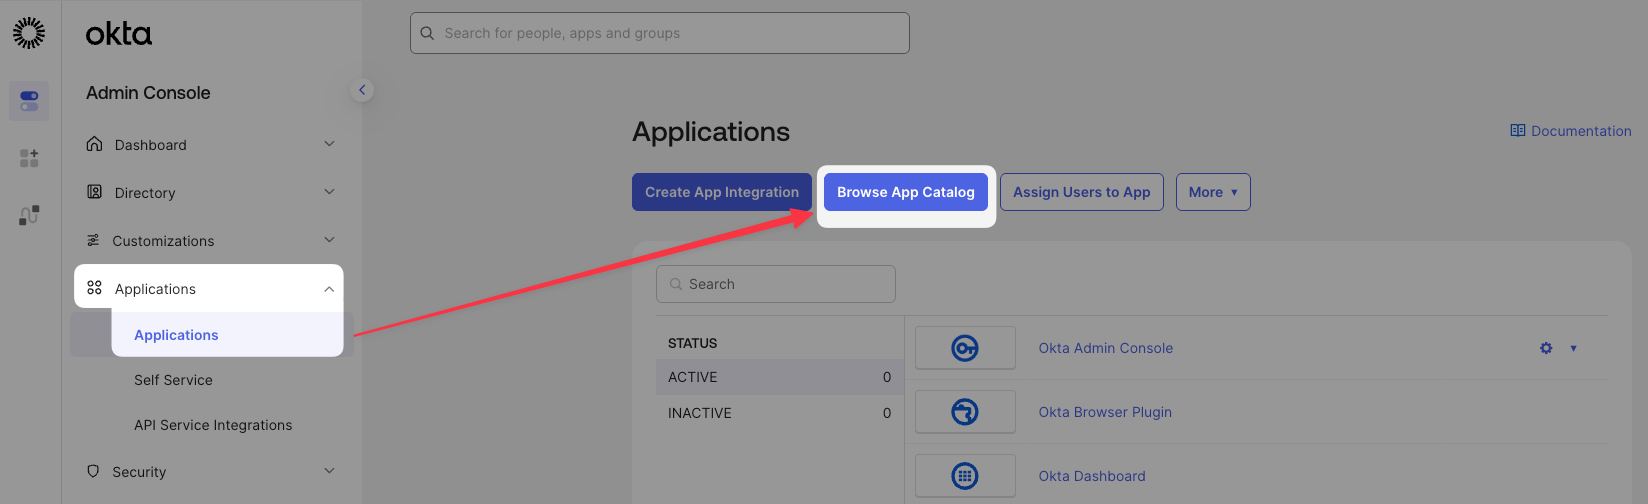
Let's go to the **Applications > Applications > Browse App Catalog**.
## Identity Providers
Rootly is compatible with **any identity provider** supporting **SAML 2.0.**
Depending on the identity provider, you might be asked for the following information during your setup process:
### Service Provider Details
| Field | Value |
| ---------------------------- | -------------------------------------------------------- |
| **ACS URL** | `https://rootly.com/users/saml/auth` |
| **Entity ID / Audience URI** | `https://rootly.com/users/saml/metadata` |
| **SP Metadata URL** | `https://rootly.com/users/saml/metadata` |
| **Name ID Format** | `urn:oasis:names:tc:SAML:1.1:nameid-format:emailAddress` |
| **Binding** | HTTP-POST |
### SAML Attribute Mapping
Rootly reads the following attributes from the SAML assertion. Email is taken from the NameID element and is required. All other attributes are optional but recommended for accurate Just-In-Time (JIT) provisioning.
| Rootly field | SAML attribute |
| -------------- | ---------------------------- |
| Email | NameID (emailAddress format) |
| First name | `name.givenName` |
| Last name | `name.familyName` |
| Preferred name | `displayName` |
| Phone number | `phoneNumbers.work` |
### Certificate Requirements
Rootly requires a PEM-encoded X.509 certificate from your IdP to validate SAML assertions.
* Must be in PEM format with `-----BEGIN CERTIFICATE-----` and `-----END CERTIFICATE-----` headers
* Must not be expired — Rootly rejects expired certificates at save time
* Must match the certificate your IdP uses to sign SAML responses
### Okta
Let's go to the **Applications > Applications > Browse App Catalog**.
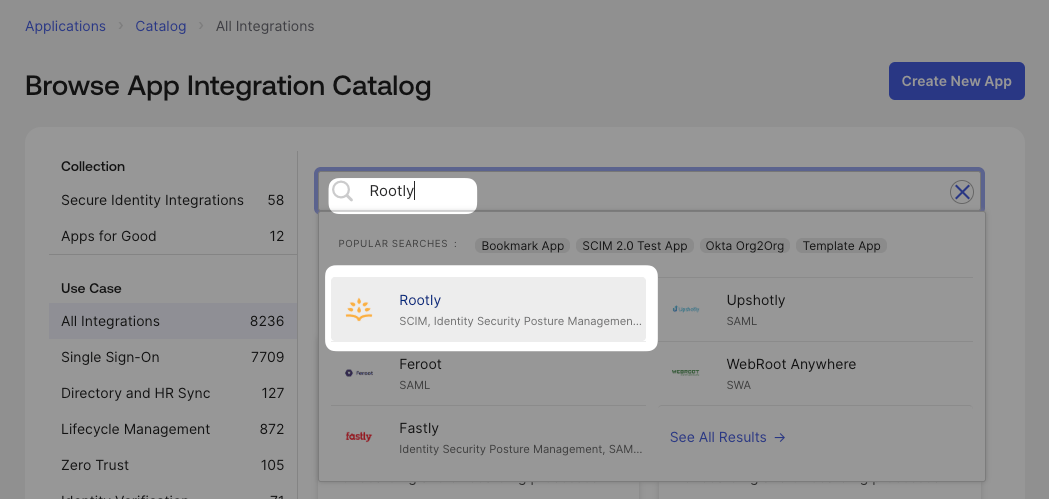
 Search for "**Rootly"**.
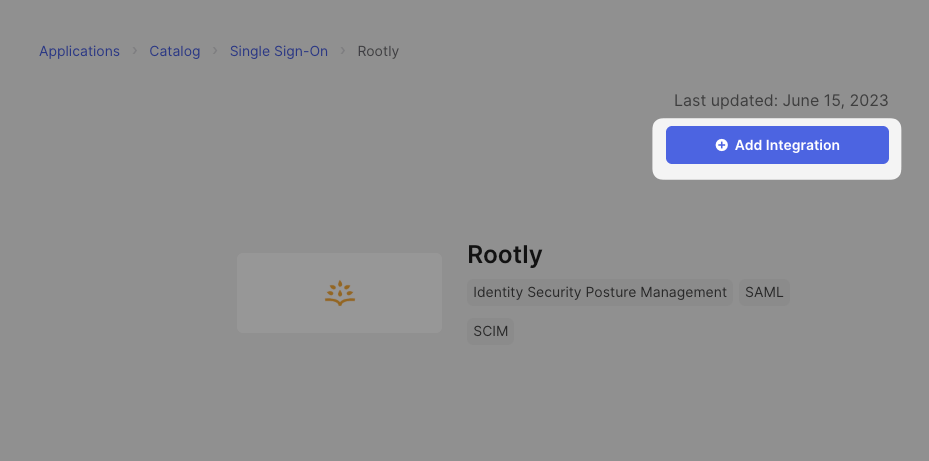
 Click on **Add Integration**.
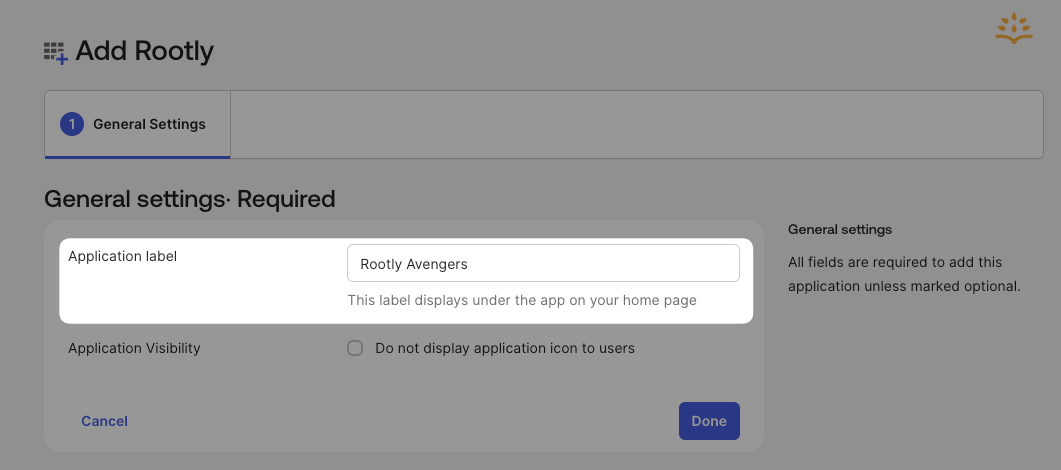
 Give the app a name.
TIP: If you're planning on using multiple orgs on Rootly, consider naming each Rootly app in Okta a name that corresponds to each org.
Give the app a name.
TIP: If you're planning on using multiple orgs on Rootly, consider naming each Rootly app in Okta a name that corresponds to each org.
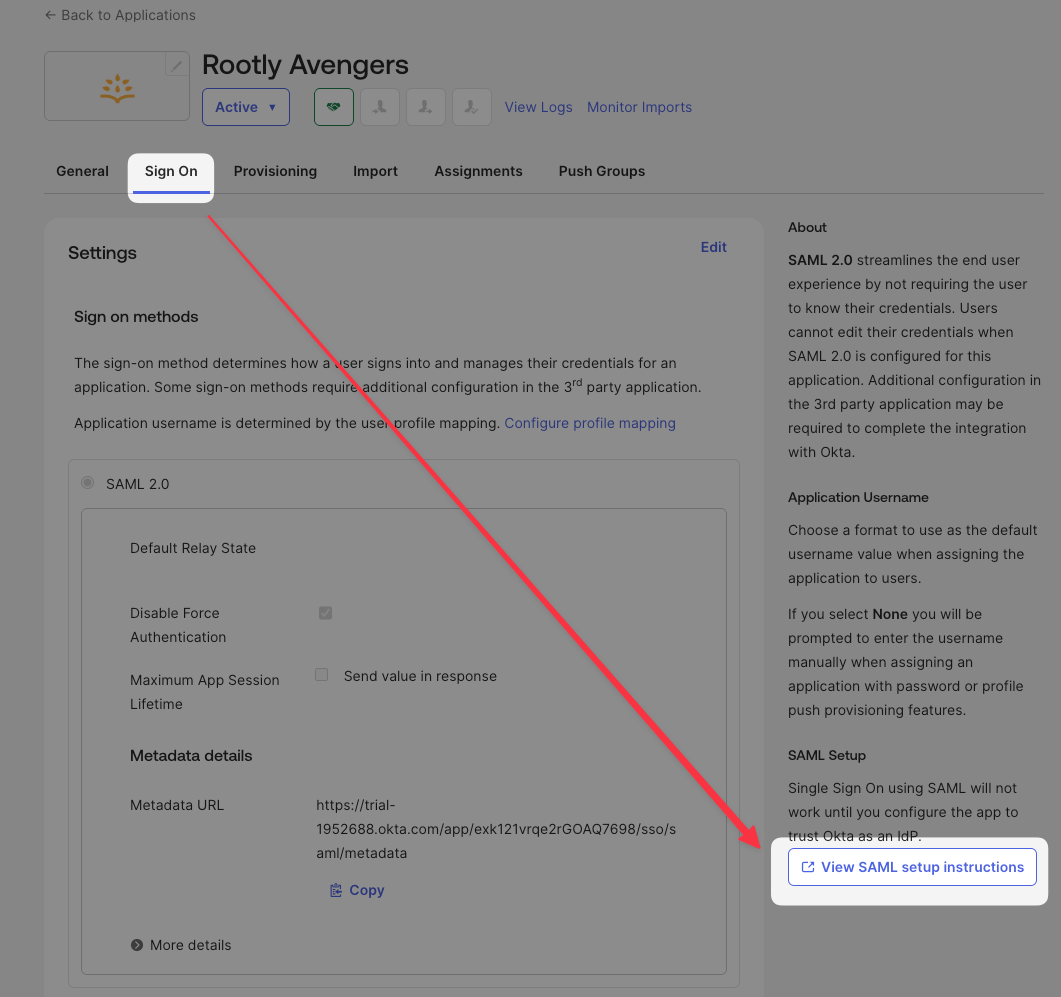
 Select **SAML 2.0**.
Now our app is created let's go back in **Applications > Rootly** and click **View Setup Instructions:**
Select **SAML 2.0**.
Now our app is created let's go back in **Applications > Rootly** and click **View Setup Instructions:**
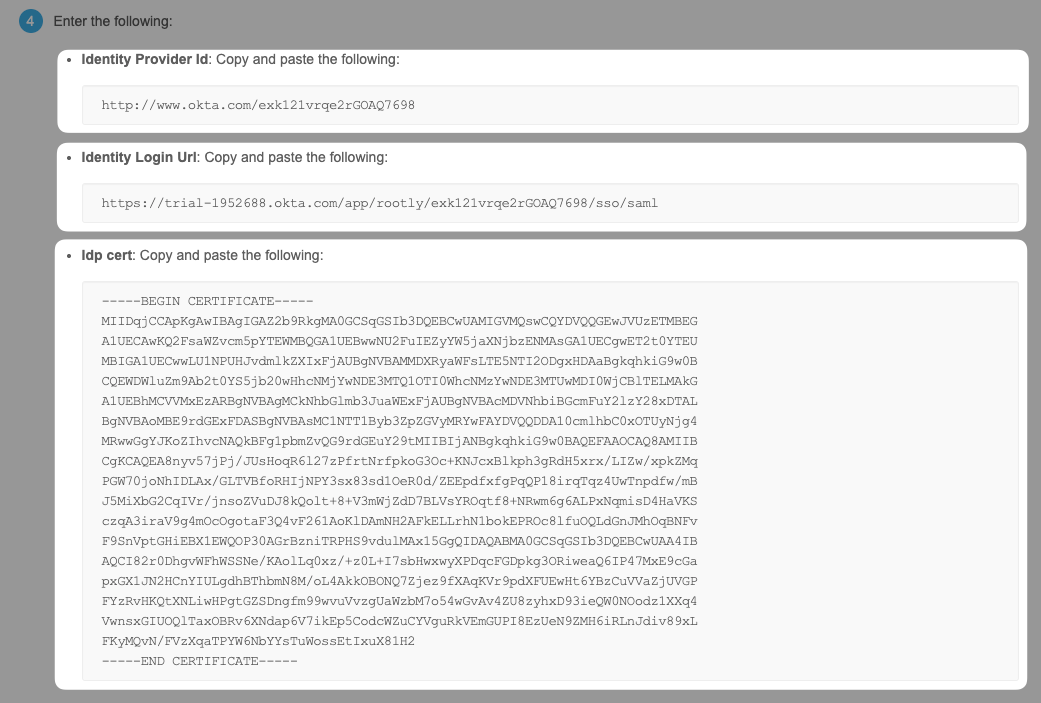
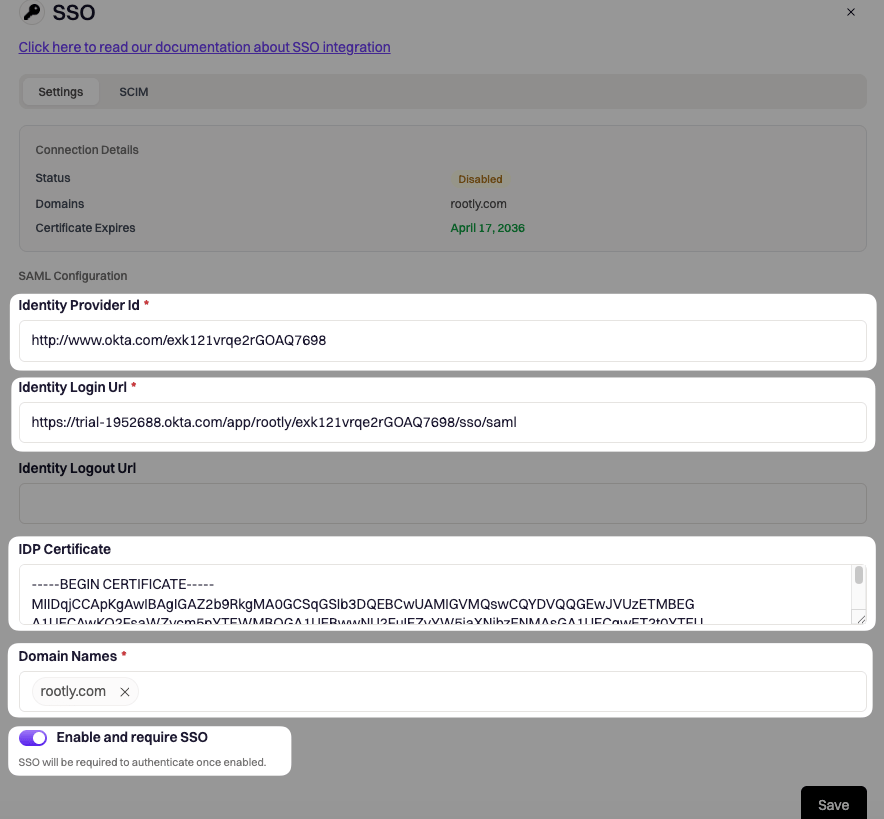
 Finally copy the fields as shown below into **Rootly**, this information from Okta is unique to your organization.
| Okta field | Rootly field |
| ------------------------------------ | -------------------- |
| Identity Provider Issuer | Identity Provider ID |
| Identity Provider Single Sign-On URL | Identity Login URL |
| X.509 Certificate | IdP Cert |
Finally copy the fields as shown below into **Rootly**, this information from Okta is unique to your organization.
| Okta field | Rootly field |
| ------------------------------------ | -------------------- |
| Identity Provider Issuer | Identity Provider ID |
| Identity Provider Single Sign-On URL | Identity Login URL |
| X.509 Certificate | IdP Cert |
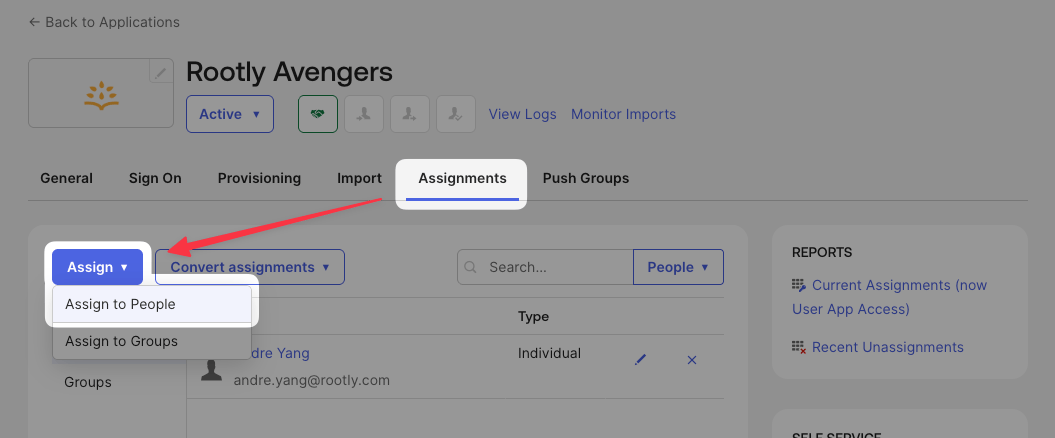
 Test your SSO integration by assigning yourself or a test user to the app. Go to **Assignments > Assign > Assign to People**.
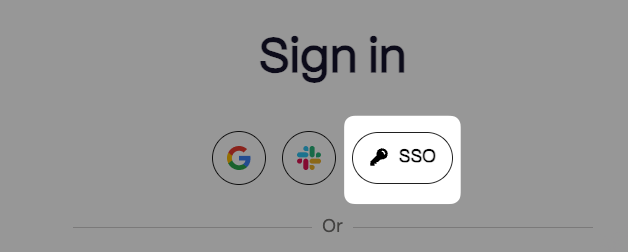
 If you're already logged into Rootly, go ahead and logout. Then Navigate to the signon link [https://rootly.com/users/sign\_in](https://rootly.com/users/sign_in). Click on **SSO**.
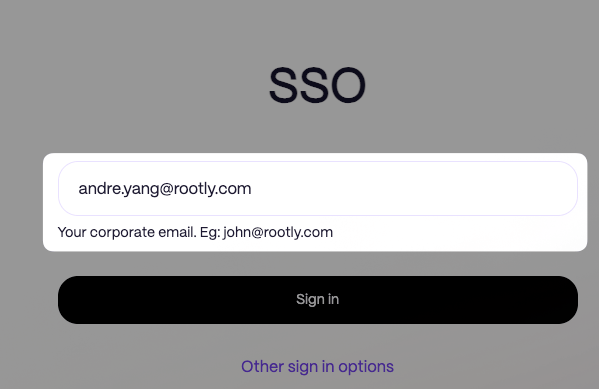
 Enter your full work email (not just the domain) and click **Sign In**.
 You are all set!
### Google
You will need to access the **Google Admin Console:** [https://admin.google.com/ac/home](https://admin.google.com/ac/home).
Follow screenshot steps as below:
You are all set!
### Google
You will need to access the **Google Admin Console:** [https://admin.google.com/ac/home](https://admin.google.com/ac/home).
Follow screenshot steps as below:
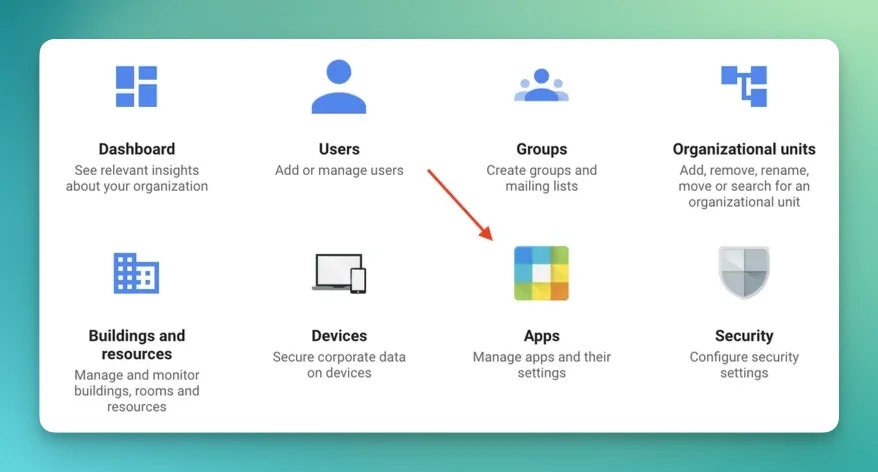
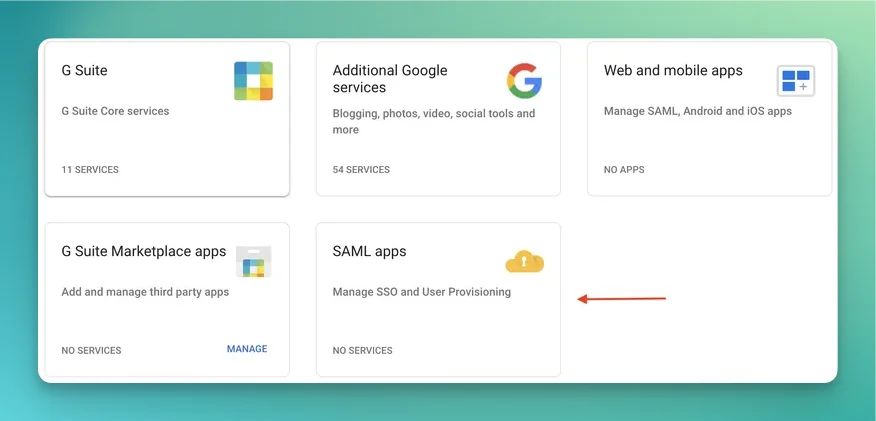
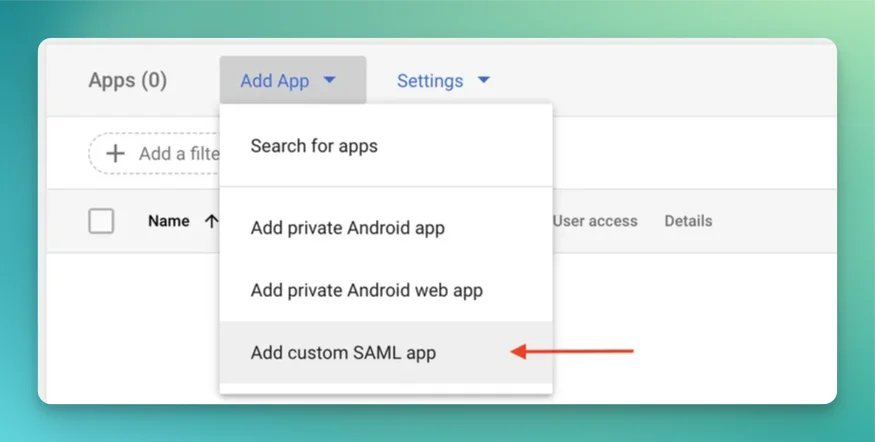
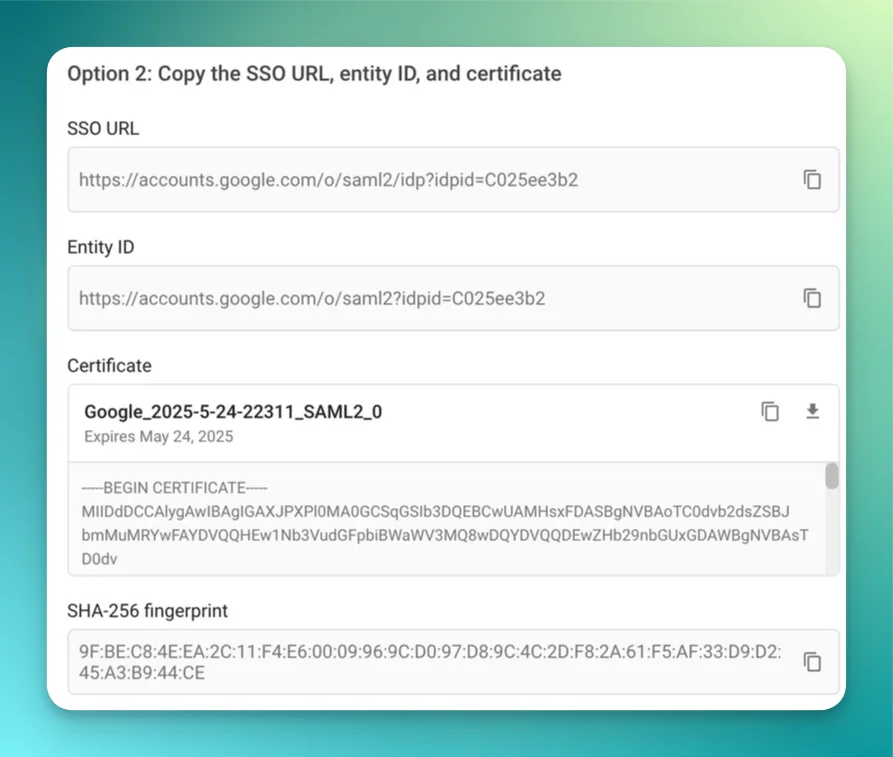
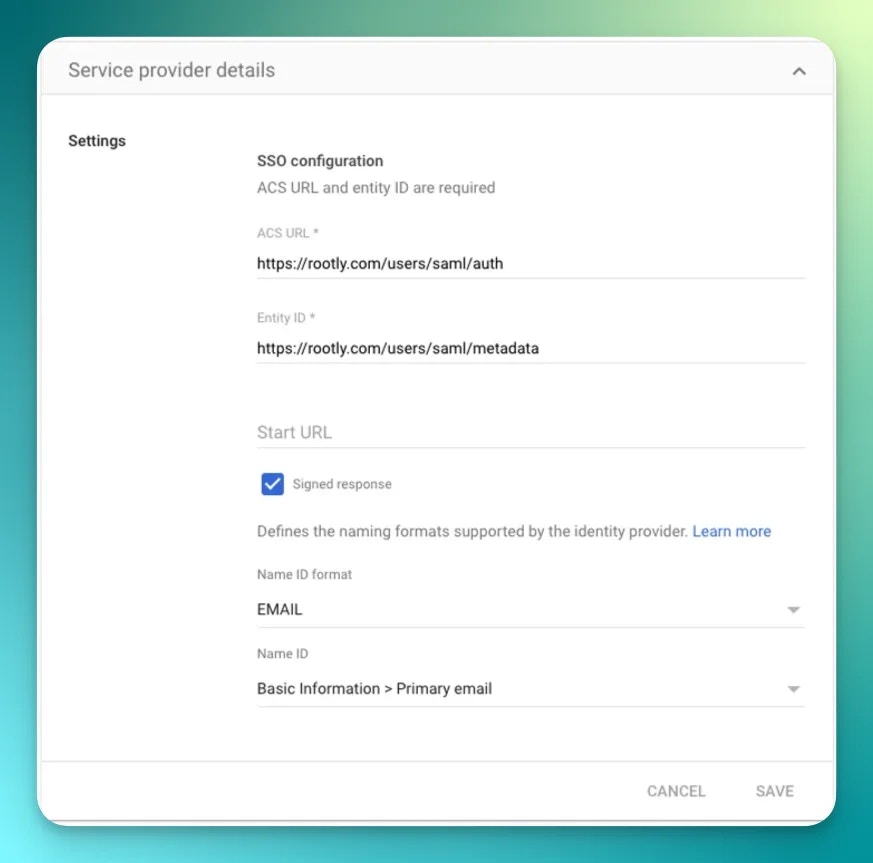 Make sure `Signed Response` is checked and the app `ON for everyone` is checked in your org unit.
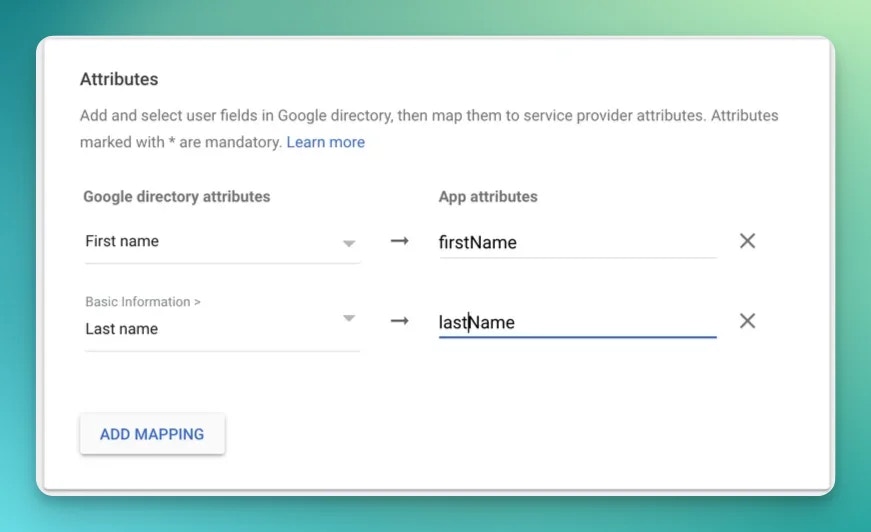
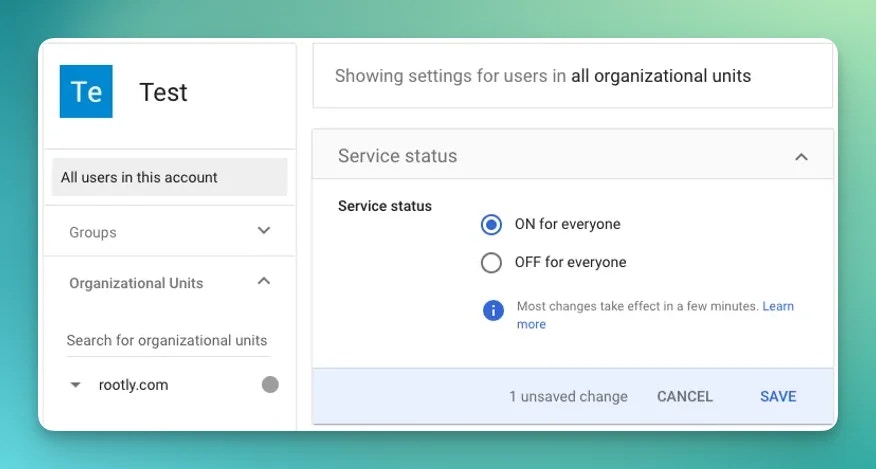 And finally let's edit the attributes mapping.
| Google Workspace field | SAML attribute |
| ---------------------- | ----------------- |
| Primary email | NameID |
| First name | `name.givenName` |
| Last name | `name.familyName` |
And finally let's edit the attributes mapping.
| Google Workspace field | SAML attribute |
| ---------------------- | ----------------- |
| Primary email | NameID |
| First name | `name.givenName` |
| Last name | `name.familyName` |
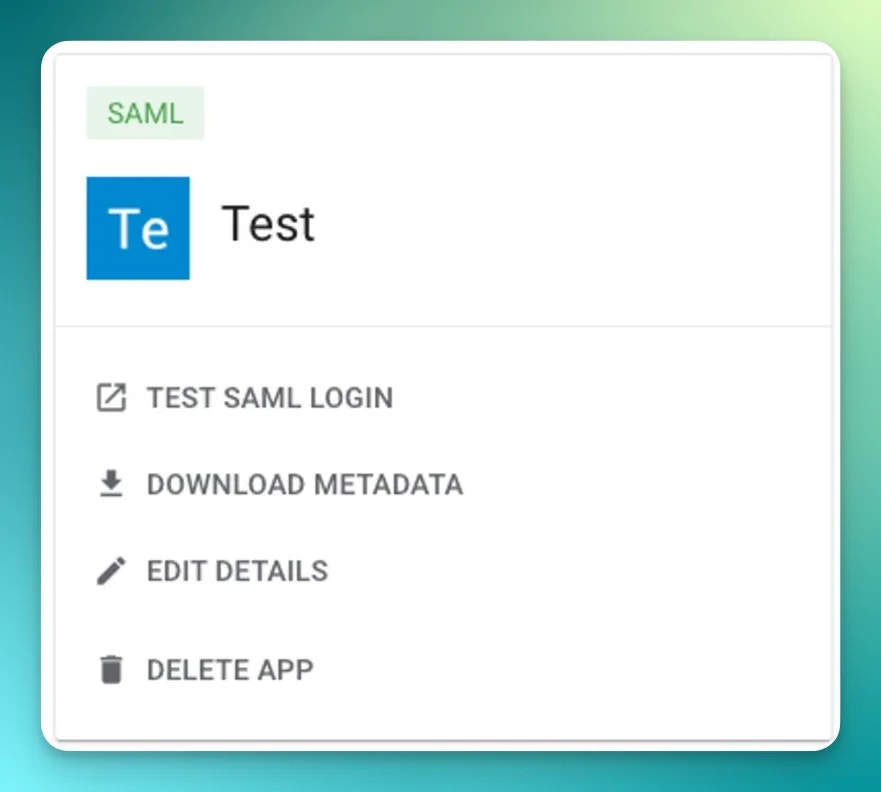
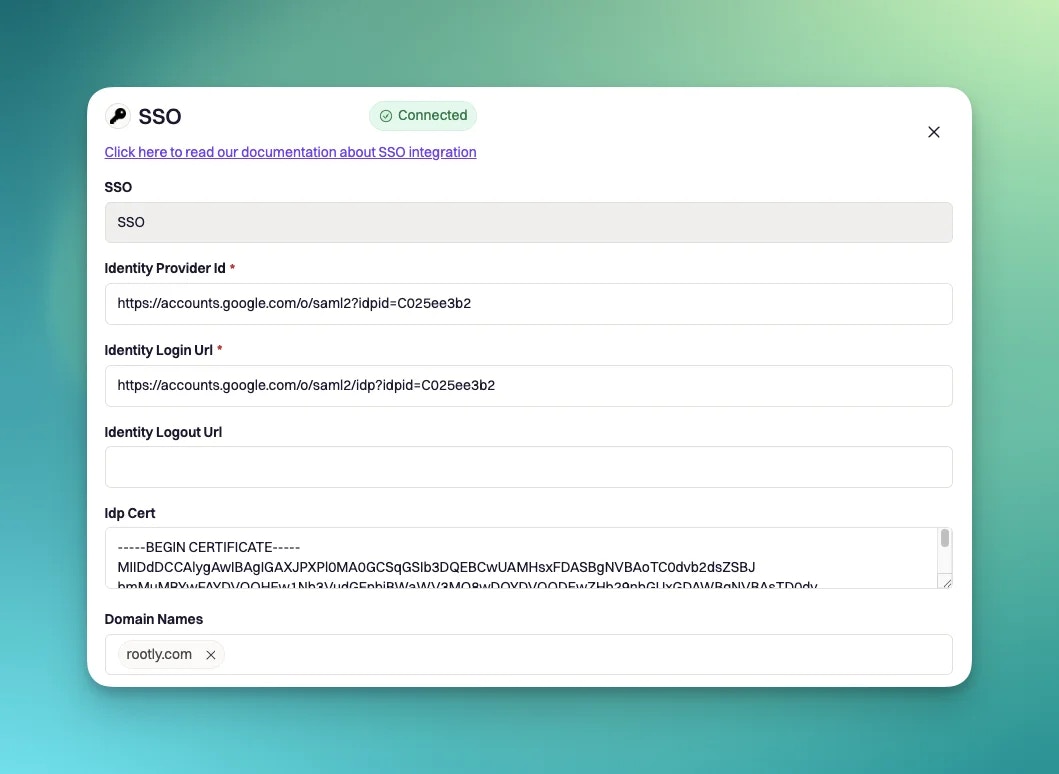
 Let's switch to Rootly. You can get the identity login url by clicking on the `TEST SAML LOGIN` button.
 ### OneLogin
Browse the Applications Store page and install Rootly.
### OneLogin
Browse the Applications Store page and install Rootly.
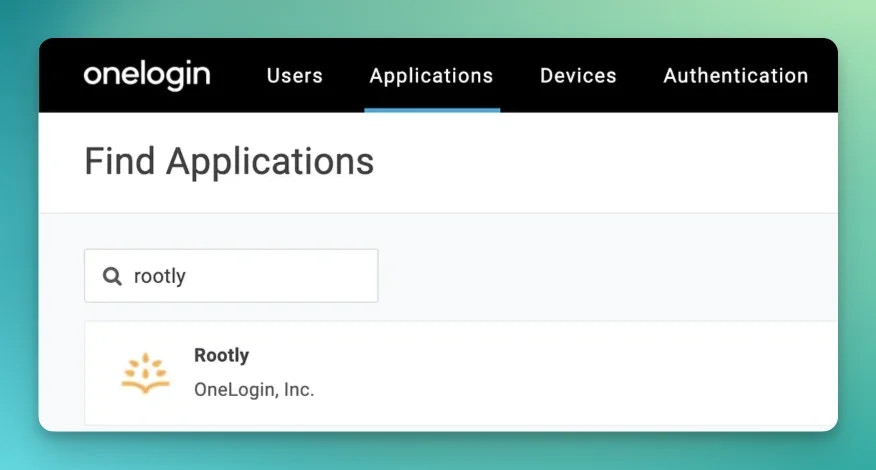 Copy fields over Rootly like shown below
* Issuer URL **->** Identity Provider ID
* SAML 2.0 endpoint **->** Identity Login Url
* In the certificate section > View Details > X.509 Certificate **->** Idp Cert
Copy fields over Rootly like shown below
* Issuer URL **->** Identity Provider ID
* SAML 2.0 endpoint **->** Identity Login Url
* In the certificate section > View Details > X.509 Certificate **->** Idp Cert
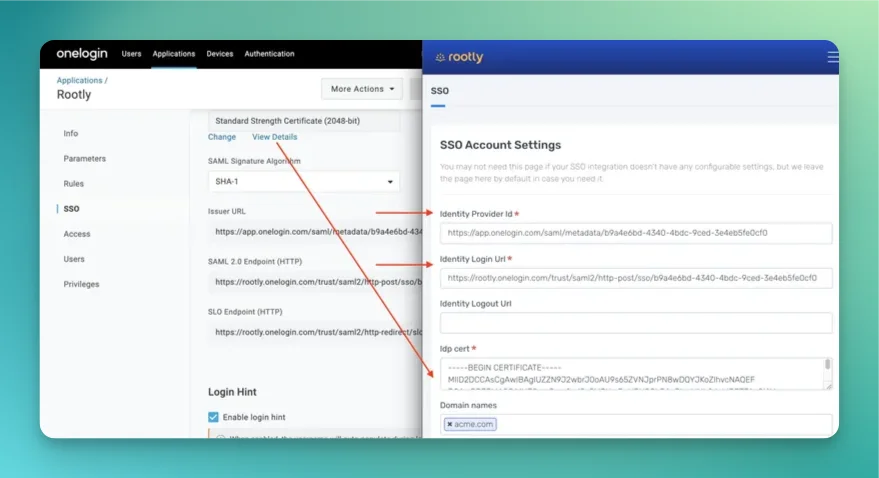 You are all set!
### Auth0
Docs: [https://marketplace.auth0.com/integrations/rootly-sso-integration](https://marketplace.auth0.com/integrations/rootly-sso-integration)
### Azure
Install SSO integration through the Azure marketplace
* Marketplace: [https://azuremarketplace.microsoft.com/en-US/marketplace/apps/aad.rootly](https://azuremarketplace.microsoft.com/en-US/marketplace/apps/aad.rootly)
* Tutorial: [https://docs.microsoft.com/en-us/azure/active-directory/saas-apps/rootly-tutorial](https://docs.microsoft.com/en-us/azure/active-directory/saas-apps/rootly-tutorial)
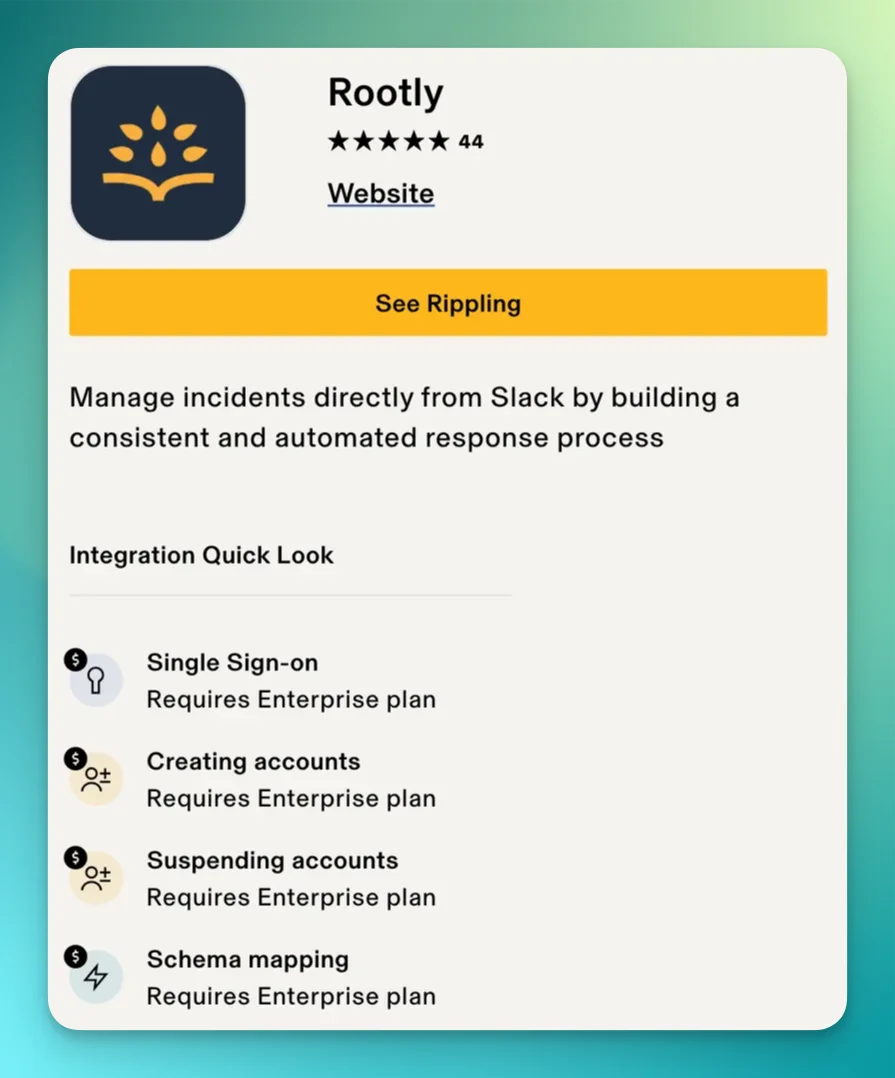
### Rippling
Integrate Rippling SSO + SCIM in one click [https://www.rippling.com/app-shop/app/rootly](https://www.rippling.com/app-shop/app/rootly)
You are all set!
### Auth0
Docs: [https://marketplace.auth0.com/integrations/rootly-sso-integration](https://marketplace.auth0.com/integrations/rootly-sso-integration)
### Azure
Install SSO integration through the Azure marketplace
* Marketplace: [https://azuremarketplace.microsoft.com/en-US/marketplace/apps/aad.rootly](https://azuremarketplace.microsoft.com/en-US/marketplace/apps/aad.rootly)
* Tutorial: [https://docs.microsoft.com/en-us/azure/active-directory/saas-apps/rootly-tutorial](https://docs.microsoft.com/en-us/azure/active-directory/saas-apps/rootly-tutorial)
### Rippling
Integrate Rippling SSO + SCIM in one click [https://www.rippling.com/app-shop/app/rootly](https://www.rippling.com/app-shop/app/rootly)
 ### Keycloak
Keycloak is an open-source identity and access management solution. Follow these steps to configure SAML SSO with Rootly.
#### Prerequisites
* Access to Keycloak admin console
* Keycloak realm set up (can use default `master` realm for testing)
* User account in Keycloak with email attribute configured
#### Step 1: Create SAML Client in Keycloak
1. Navigate to **Clients** in the Keycloak admin console
2. Click **Create Client**
3. Select **SAML** as the client type
4. Set **Client ID** to: `https://rootly.com/users/saml/metadata`
5. Click **Next** and **Save**
#### Step 2: Configure Client Settings
Navigate to your client's **Settings** tab and configure:
**Access Settings:**
* **Root URL**: `https://rootly.com/users/saml`
* **Home URL**: `https://rootly.com/users/saml`
* **Valid redirect URIs**:
* `https://rootly.com/*`
* `https://rootly.com/users/saml/auth`
* **Master SAML Processing URL**: `https://rootly.com/users/saml/auth`
**SAML Capabilities:**
* **Name ID format**: `email`
* **Force POST binding**: `On`
* **Include AuthnStatement**: `On`
**Signature and Encryption:**
* **Sign documents**: `On`
* **Sign assertions**: `On`
* **Signature algorithm**: `RSA_SHA256`
* **SAML signature key name**: `KEY_ID`
* **Canonicalization method**: `EXCLUSIVE`
#### Step 3: Configure Keys
Navigate to the **Keys** tab:
* **Client signature required**: `Off`
* **Encrypt assertions**: `Off`
#### Step 4: Configure Name ID Mapper
1. Go to **Client scopes** → **Dedicated scopes** → **Mappers**
2. Create or edit the **Email** mapper:
* **Mapper type**: `User Attribute Mapper For NameID`
* **Name**: `Email`
* **Name ID Format**: `urn:oasis:names:tc:SAML:1.1:nameid-format:emailAddress`
* **User Attribute**: `email`
#### Step 5: Configure User Email
Ensure your test user has an email address set:
1. Navigate to **Users** → Select your user
2. Go to **Details** tab
3. Set **Email** field (e.g., `user@company.com`)
4. Set **Email verified**: `Yes`
#### Step 6: Get Keycloak Configuration
Collect the following information from Keycloak:
1. **Identity Provider ID**: `https://your-keycloak-host/realms/your-realm`
2. **Identity Login URL**: `https://your-keycloak-host/realms/your-realm/protocol/saml`
3. **Certificate**:
* Go to **Realm Settings** → **Keys** → **RS256** → **Certificate**
* Copy the certificate and format with proper PEM headers:
```text theme={null}
-----BEGIN CERTIFICATE-----
[certificate content]
-----END CERTIFICATE-----
```
#### Step 7: Configure Rootly
In your Rootly SSO integration modal, set:
| Rootly Field | Keycloak Value |
| ---------------------- | ------------------------------------------------------------ |
| `Identity Provider Id` | `https://your-keycloak-host/realms/your-realm` |
| `Identity Login Url` | `https://your-keycloak-host/realms/your-realm/protocol/saml` |
| `Identity Logout Url` | Leave blank or set logout URL |
| `Idp Cert` | PEM-formatted certificate from Keycloak |
| `Domain Name` | Your domain (e.g. company.com) |
### Jumpcloud
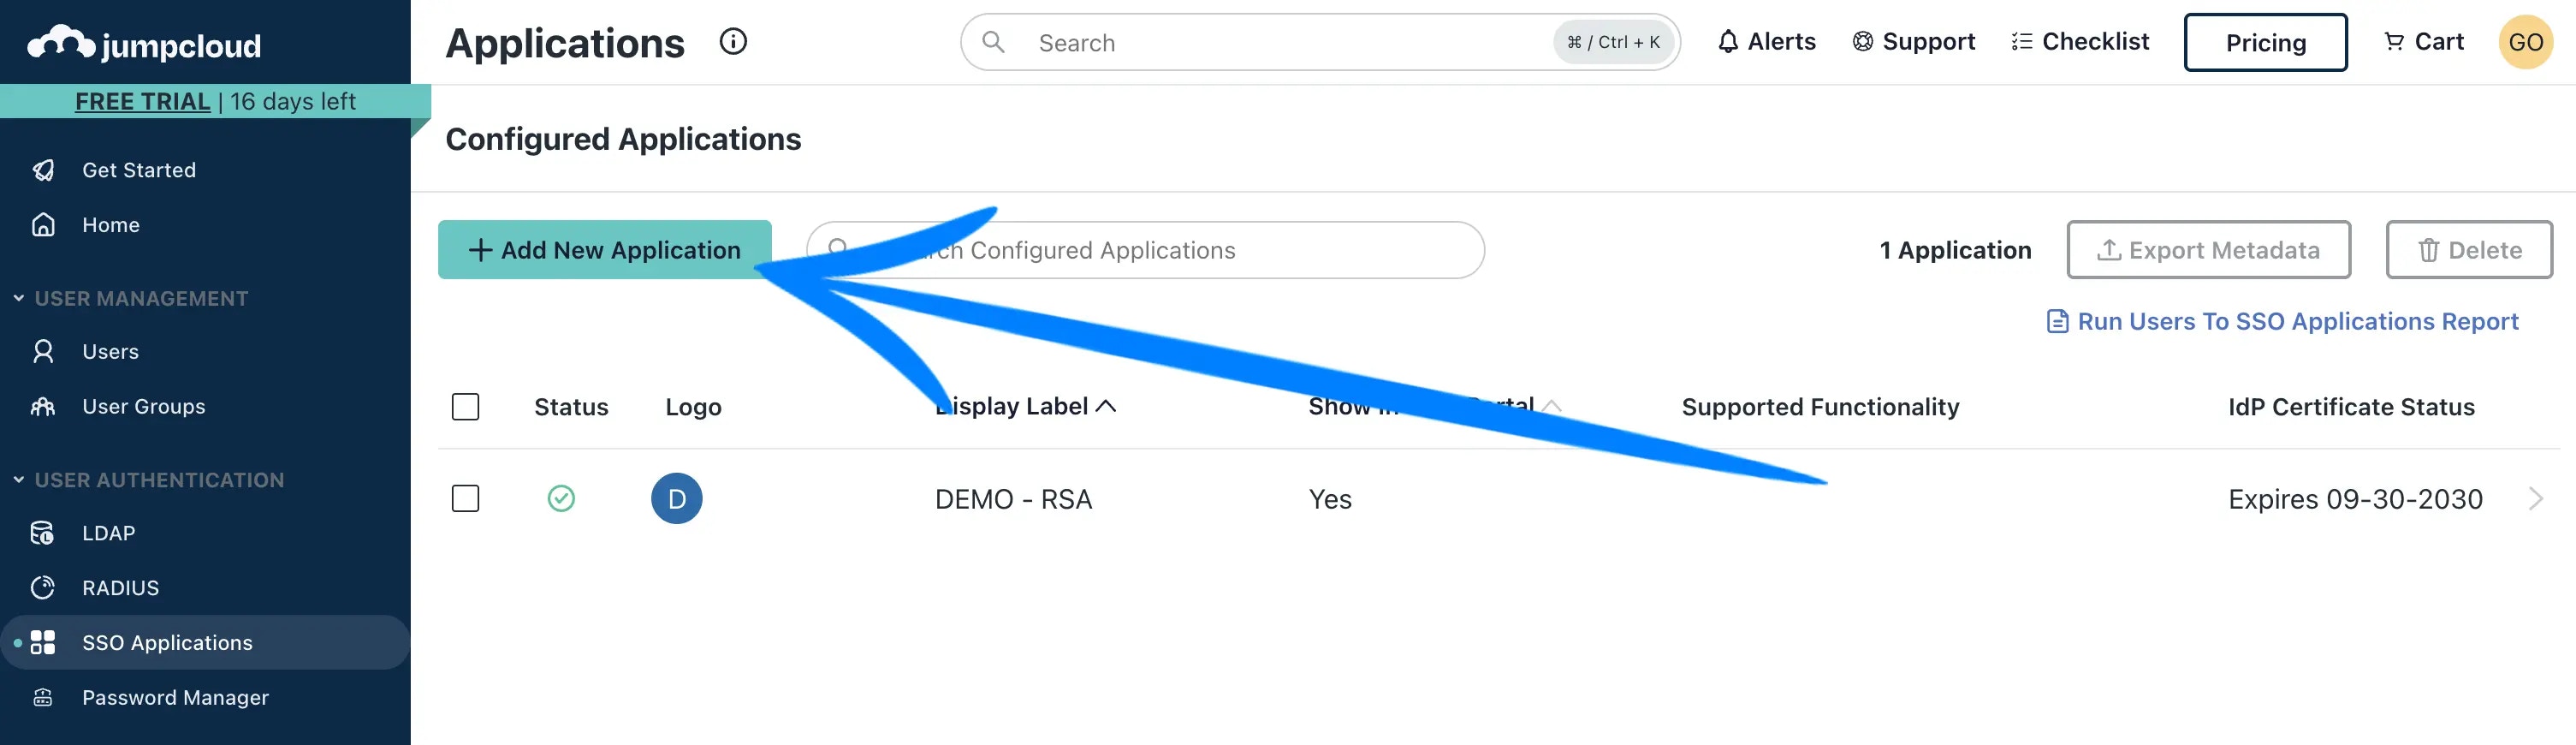
Let's begin by navigating to the **SSO Applications** page from the left navigation.
### Keycloak
Keycloak is an open-source identity and access management solution. Follow these steps to configure SAML SSO with Rootly.
#### Prerequisites
* Access to Keycloak admin console
* Keycloak realm set up (can use default `master` realm for testing)
* User account in Keycloak with email attribute configured
#### Step 1: Create SAML Client in Keycloak
1. Navigate to **Clients** in the Keycloak admin console
2. Click **Create Client**
3. Select **SAML** as the client type
4. Set **Client ID** to: `https://rootly.com/users/saml/metadata`
5. Click **Next** and **Save**
#### Step 2: Configure Client Settings
Navigate to your client's **Settings** tab and configure:
**Access Settings:**
* **Root URL**: `https://rootly.com/users/saml`
* **Home URL**: `https://rootly.com/users/saml`
* **Valid redirect URIs**:
* `https://rootly.com/*`
* `https://rootly.com/users/saml/auth`
* **Master SAML Processing URL**: `https://rootly.com/users/saml/auth`
**SAML Capabilities:**
* **Name ID format**: `email`
* **Force POST binding**: `On`
* **Include AuthnStatement**: `On`
**Signature and Encryption:**
* **Sign documents**: `On`
* **Sign assertions**: `On`
* **Signature algorithm**: `RSA_SHA256`
* **SAML signature key name**: `KEY_ID`
* **Canonicalization method**: `EXCLUSIVE`
#### Step 3: Configure Keys
Navigate to the **Keys** tab:
* **Client signature required**: `Off`
* **Encrypt assertions**: `Off`
#### Step 4: Configure Name ID Mapper
1. Go to **Client scopes** → **Dedicated scopes** → **Mappers**
2. Create or edit the **Email** mapper:
* **Mapper type**: `User Attribute Mapper For NameID`
* **Name**: `Email`
* **Name ID Format**: `urn:oasis:names:tc:SAML:1.1:nameid-format:emailAddress`
* **User Attribute**: `email`
#### Step 5: Configure User Email
Ensure your test user has an email address set:
1. Navigate to **Users** → Select your user
2. Go to **Details** tab
3. Set **Email** field (e.g., `user@company.com`)
4. Set **Email verified**: `Yes`
#### Step 6: Get Keycloak Configuration
Collect the following information from Keycloak:
1. **Identity Provider ID**: `https://your-keycloak-host/realms/your-realm`
2. **Identity Login URL**: `https://your-keycloak-host/realms/your-realm/protocol/saml`
3. **Certificate**:
* Go to **Realm Settings** → **Keys** → **RS256** → **Certificate**
* Copy the certificate and format with proper PEM headers:
```text theme={null}
-----BEGIN CERTIFICATE-----
[certificate content]
-----END CERTIFICATE-----
```
#### Step 7: Configure Rootly
In your Rootly SSO integration modal, set:
| Rootly Field | Keycloak Value |
| ---------------------- | ------------------------------------------------------------ |
| `Identity Provider Id` | `https://your-keycloak-host/realms/your-realm` |
| `Identity Login Url` | `https://your-keycloak-host/realms/your-realm/protocol/saml` |
| `Identity Logout Url` | Leave blank or set logout URL |
| `Idp Cert` | PEM-formatted certificate from Keycloak |
| `Domain Name` | Your domain (e.g. company.com) |
### Jumpcloud
Let's begin by navigating to the **SSO Applications** page from the left navigation.
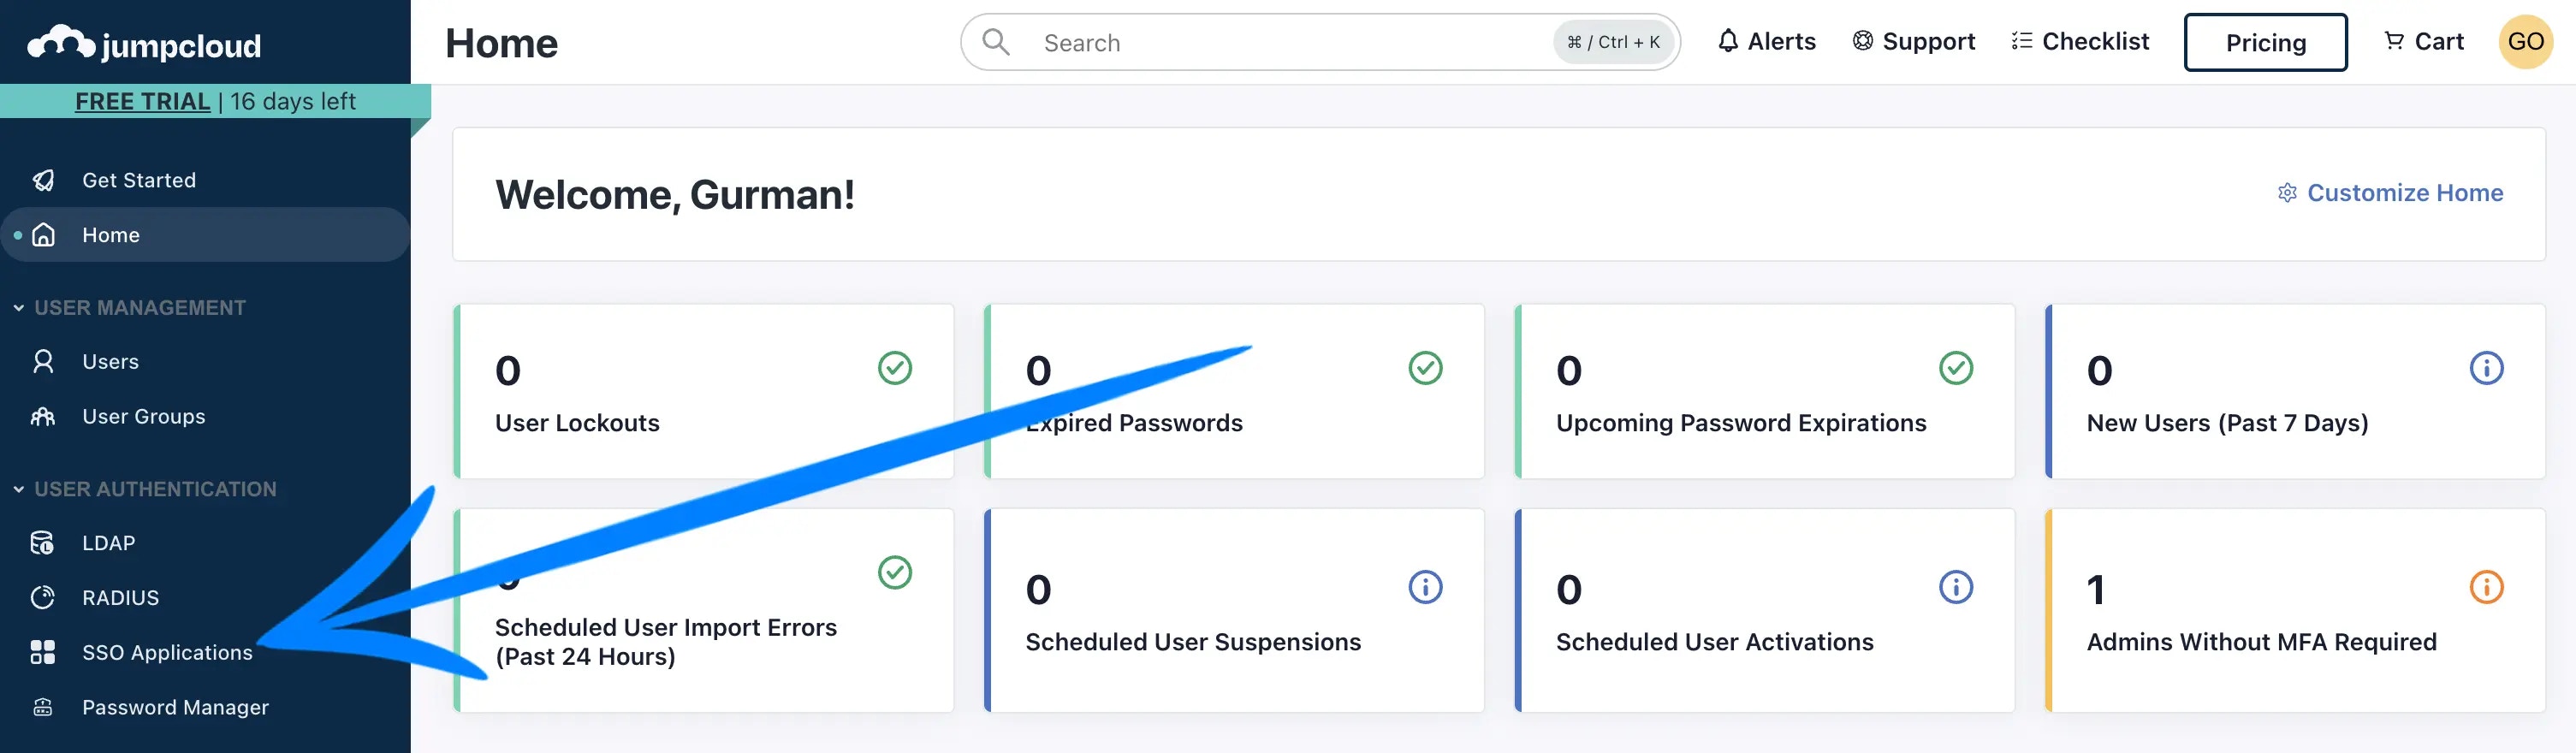 Click **Add New Application**
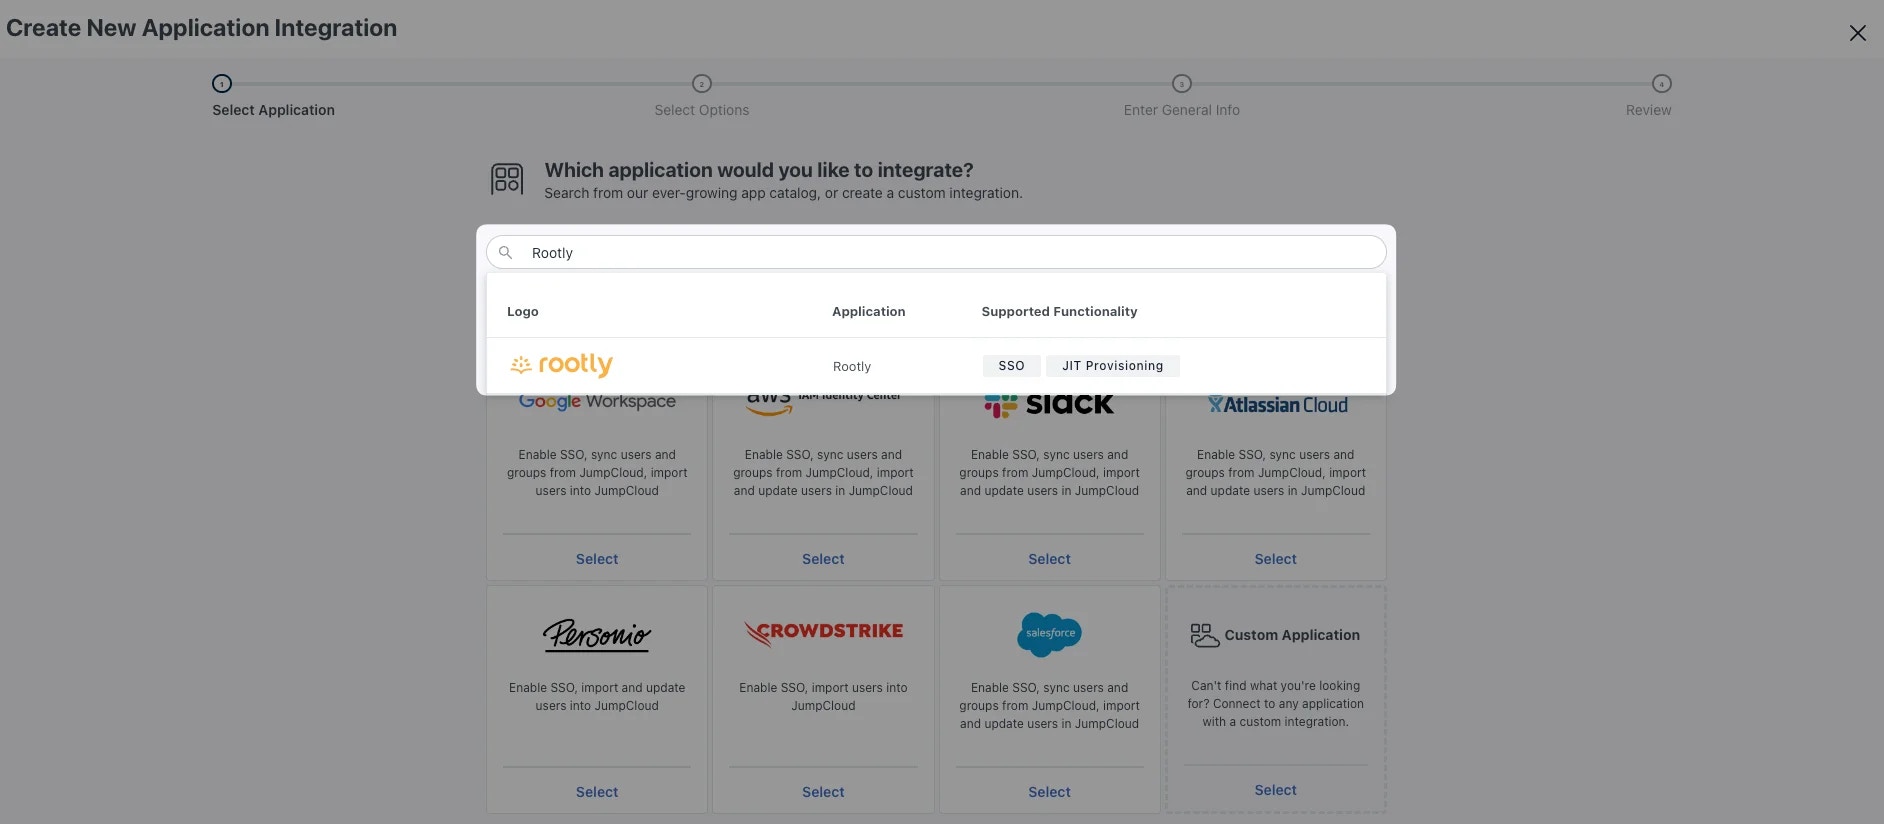
 Search for and install the **Rootly** application.
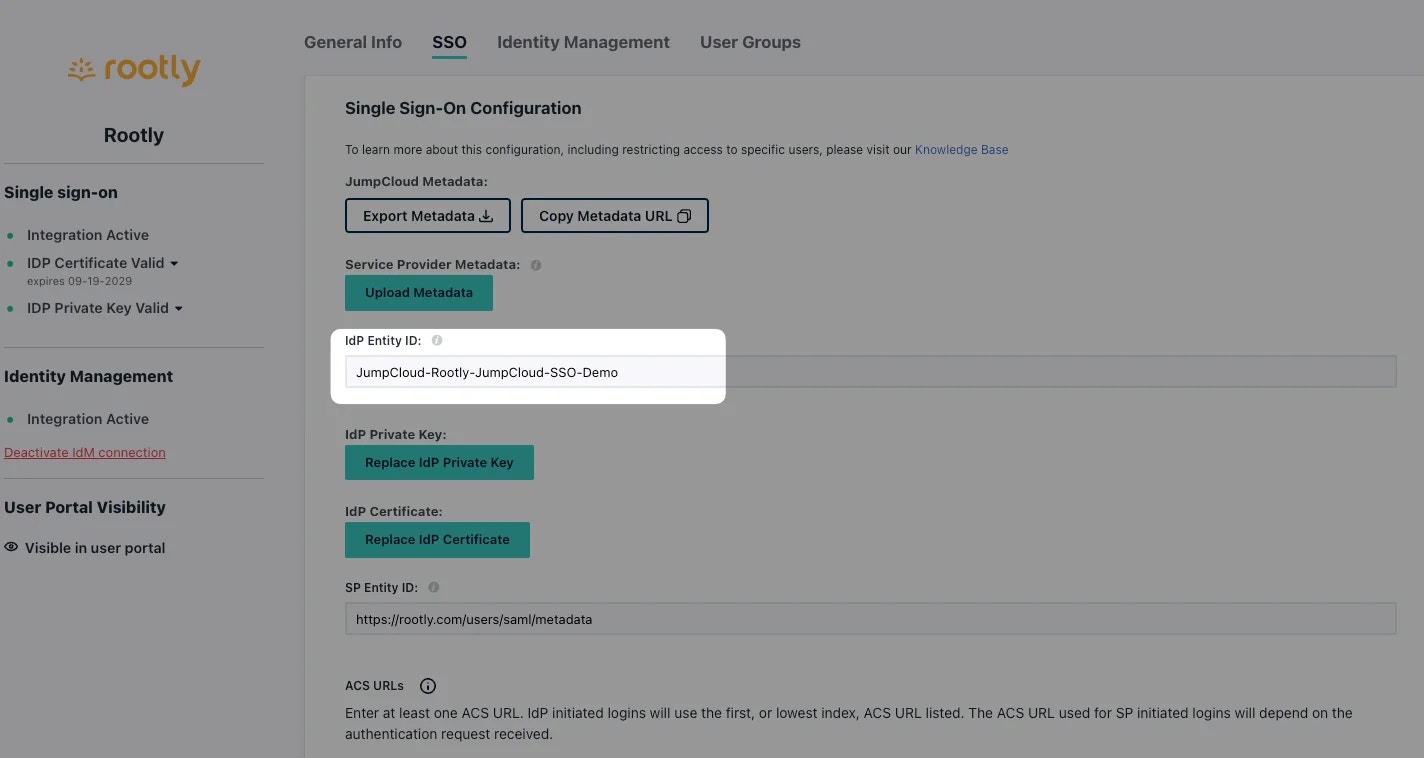
 Once installed, select the Rootly application to enter edit mode and navigate to the **SSO** tab.
Update the `IdP Entity ID` from `JumpCloud` to `JumpCloud-`.
Once installed, select the Rootly application to enter edit mode and navigate to the **SSO** tab.
Update the `IdP Entity ID` from `JumpCloud` to `JumpCloud-`.
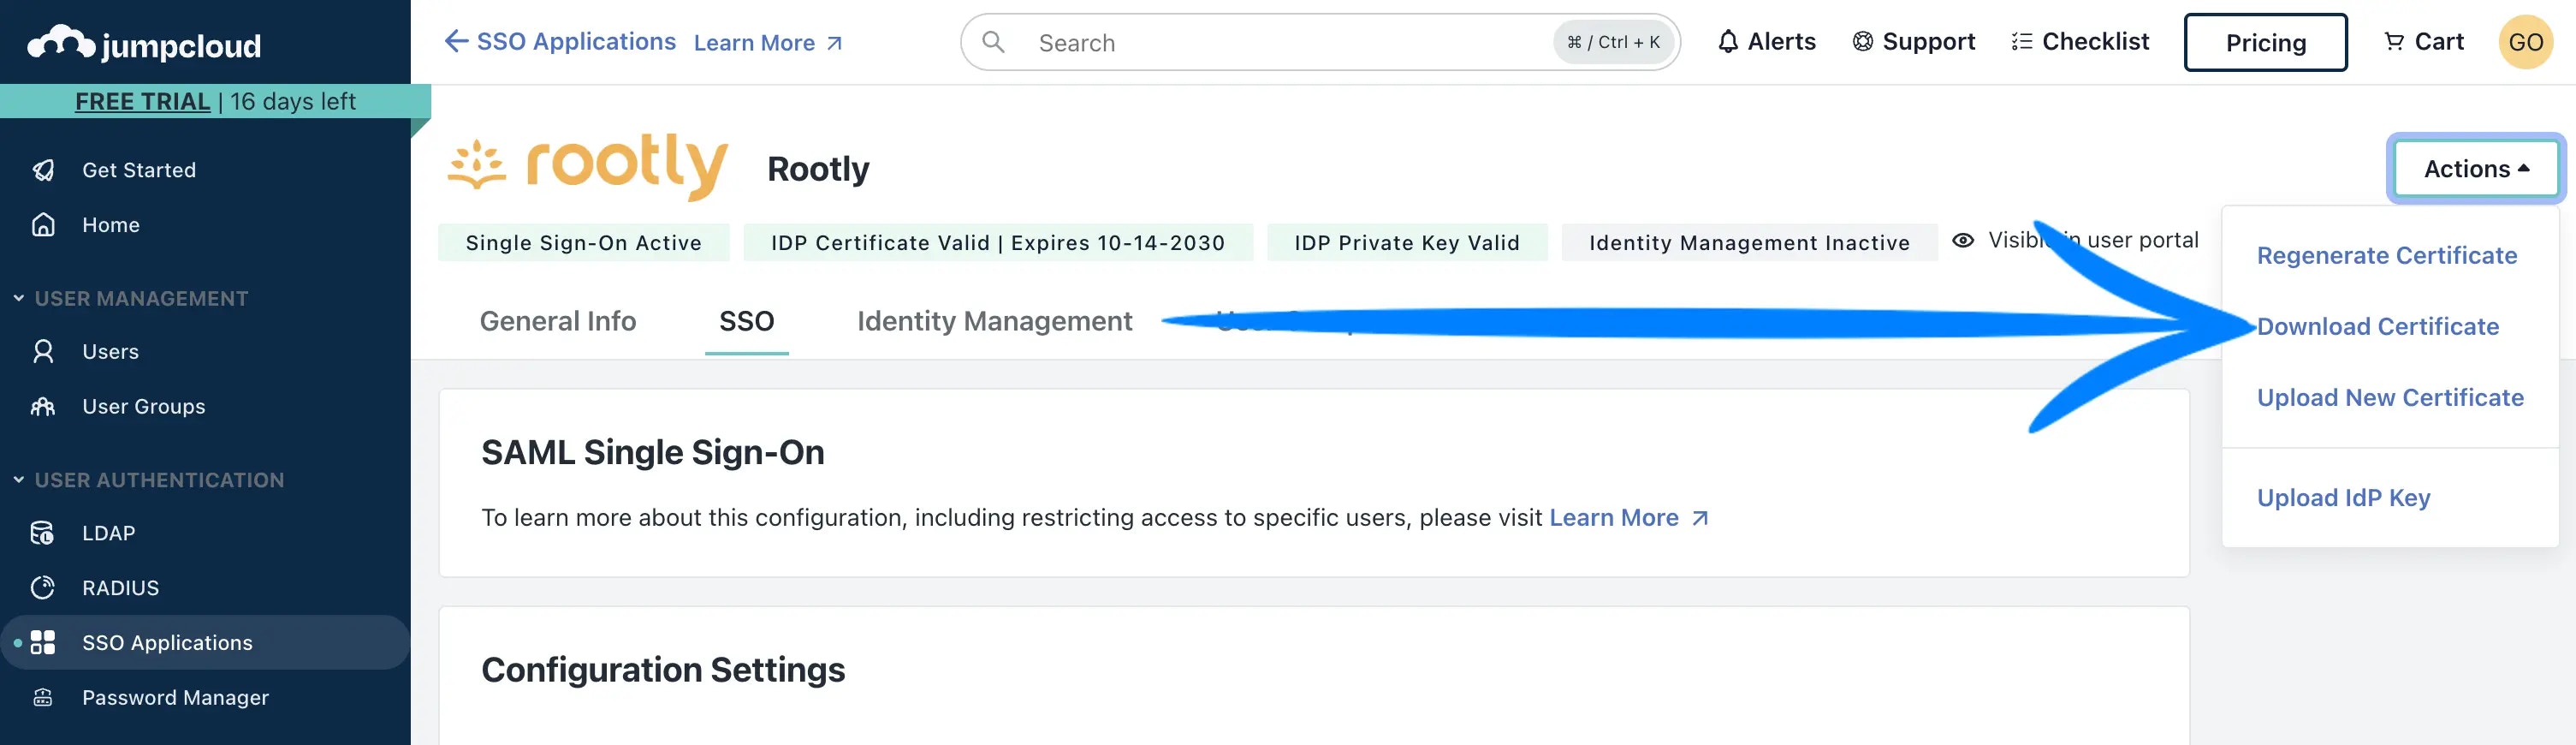
 Download your **IDP Certificate**. It should download as a `.pem` file.
 Navigate to your **Rootly SSO Integration** modal and fill in the following fields with the corresponding values from JumpCloud.
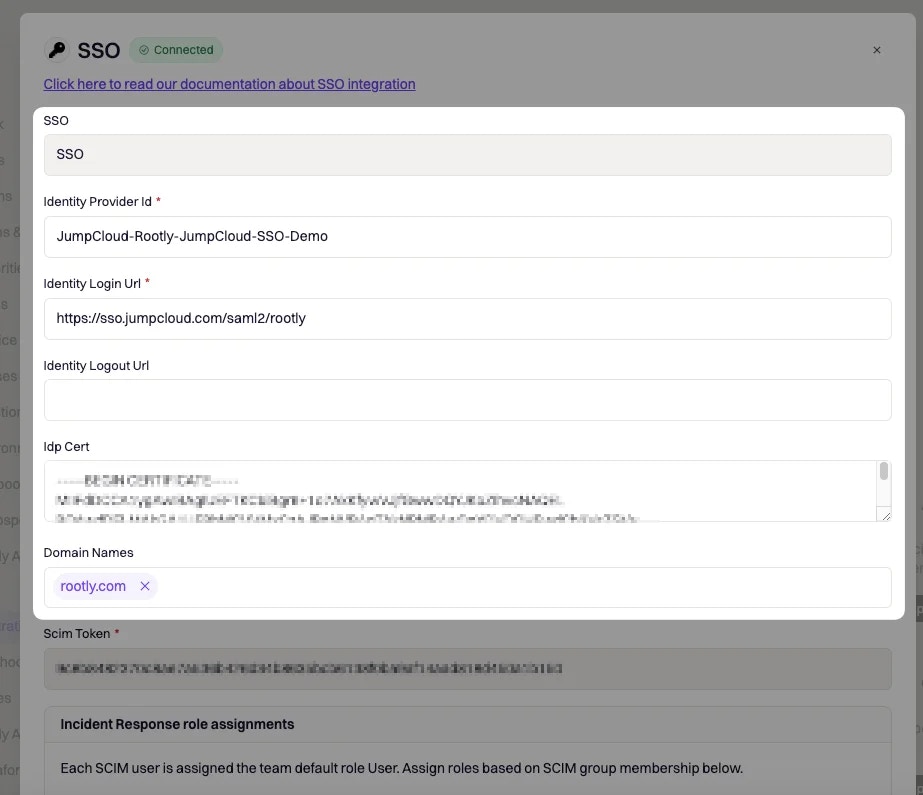 | Rootly Field | JumpCloud Field |
| ---------------------- | ---------------------------------------------------------------------------------------------------------------------------- |
| `Identity Provider Id` | `IdP Entity ID ` |
| `Identity Login Url` | `IDP URL` |
| `Identity Logout Url` | Leave blank or choose any page you'd want to navigate your user to when they log out. |
| `Idp Cert` | Open the certificate you downloaded in the previous step with a text editor of your choice. Copy and paste the text content. |
| `Domain Name` | Your domain (e.g. mycompany.com) |
Go ahead `Enable` and `Save` your SSO setup in Rootly.
| Rootly Field | JumpCloud Field |
| ---------------------- | ---------------------------------------------------------------------------------------------------------------------------- |
| `Identity Provider Id` | `IdP Entity ID ` |
| `Identity Login Url` | `IDP URL` |
| `Identity Logout Url` | Leave blank or choose any page you'd want to navigate your user to when they log out. |
| `Idp Cert` | Open the certificate you downloaded in the previous step with a text editor of your choice. Copy and paste the text content. |
| `Domain Name` | Your domain (e.g. mycompany.com) |
Go ahead `Enable` and `Save` your SSO setup in Rootly.
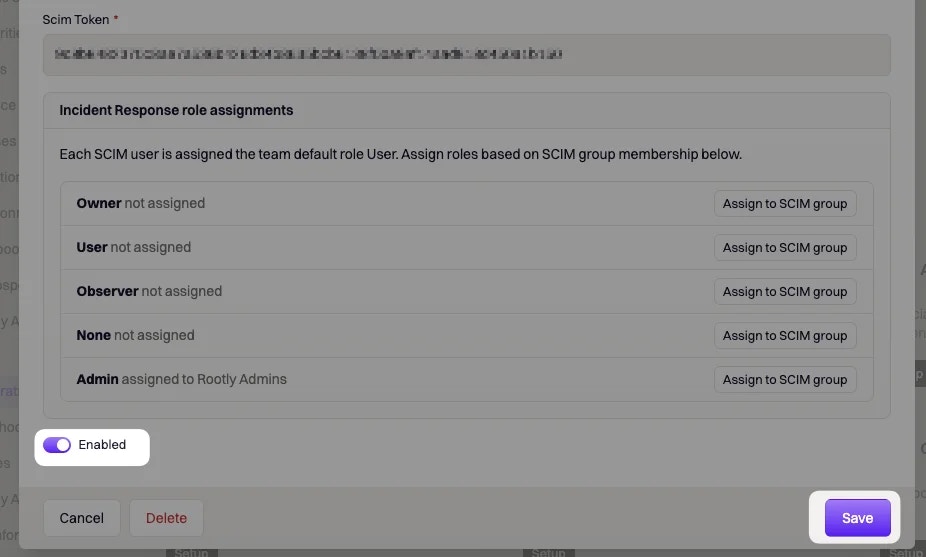 You're now SSO enabled!
If you want to set up **Just-In-Time (JIT) provisioning**, navigate to the **Identity Management** tab in edit mode and set the following fields according to the mappings below.
You're now SSO enabled!
If you want to set up **Just-In-Time (JIT) provisioning**, navigate to the **Identity Management** tab in edit mode and set the following fields according to the mappings below.
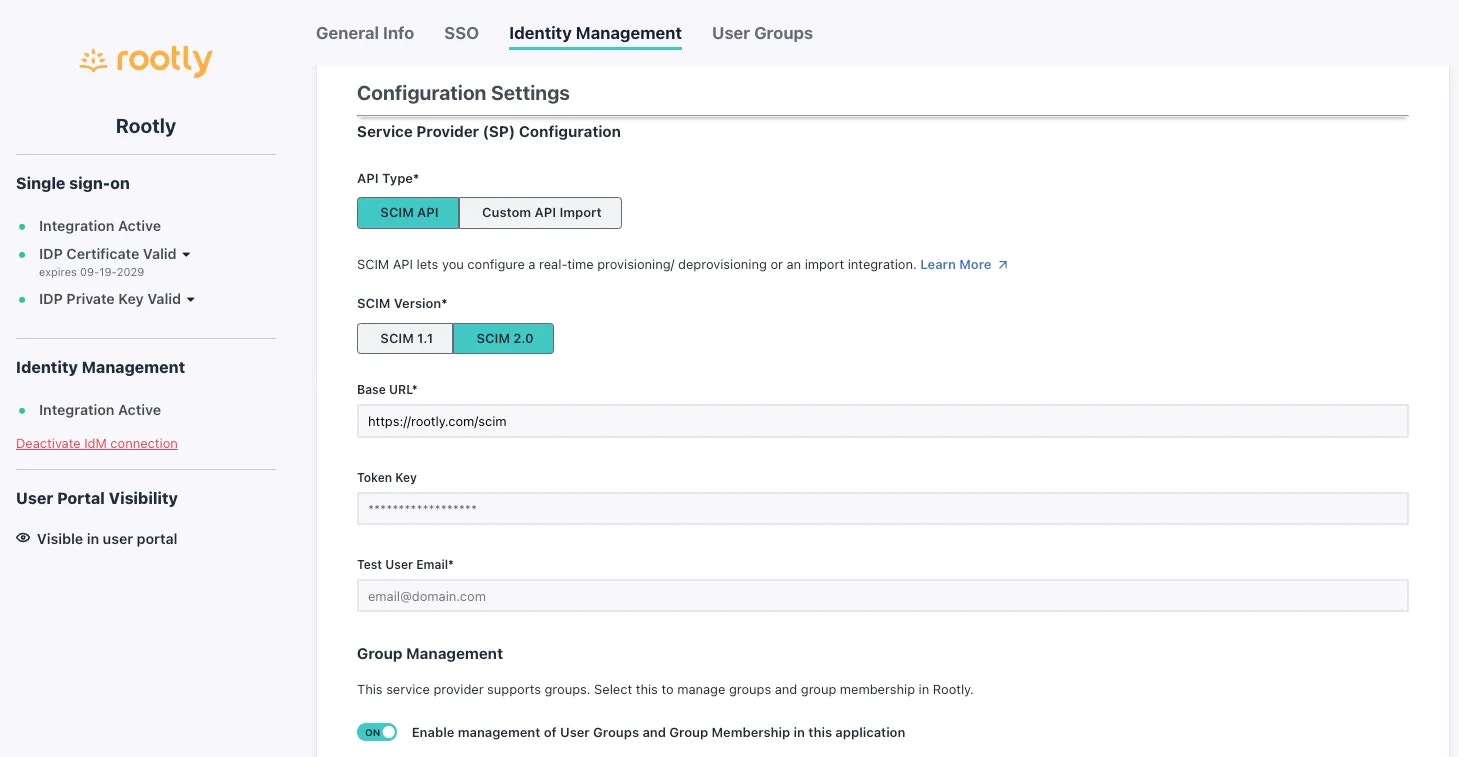 * `API Type`: `SCIM API`
* `SCIM Version`: `SCIM 2.0`
* `Base URL`: `https://rootly.com/scim`
* `Token Key`: Pick this value up from your SSO Configuration screen in Rootly
* `API Type`: `SCIM API`
* `SCIM Version`: `SCIM 2.0`
* `Base URL`: `https://rootly.com/scim`
* `Token Key`: Pick this value up from your SSO Configuration screen in Rootly
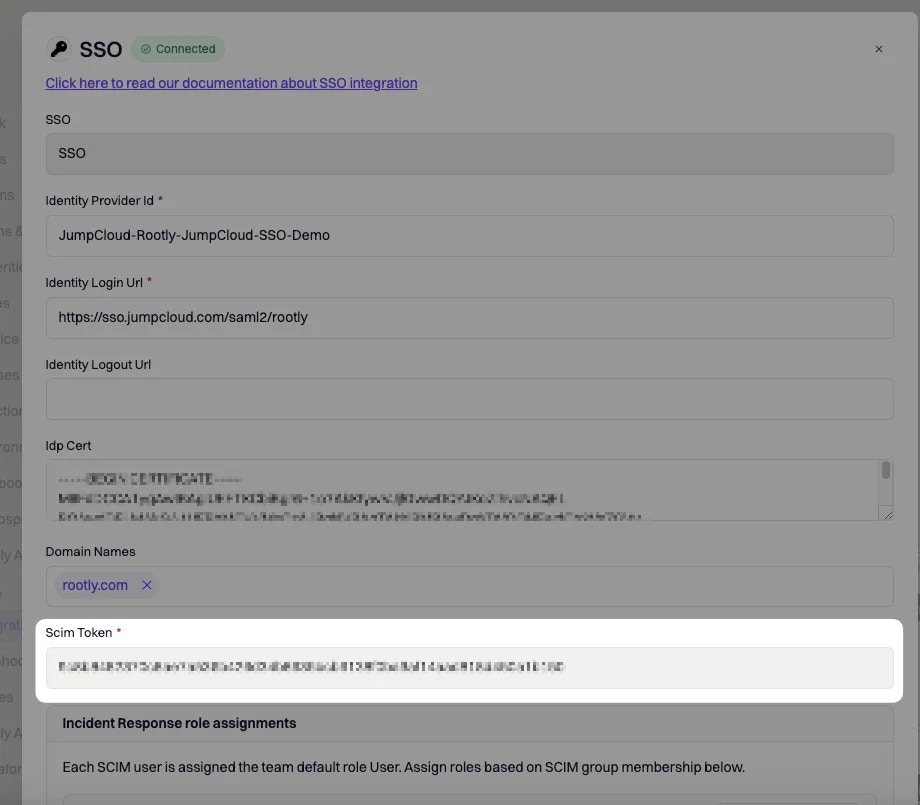 * `Test User Email`: You can use your own email as long as the email domain matches the one set in your Rootly SSO configuration page.
Go ahead and select `Test Connection`. You should see a successful message once a connection is confirmed.
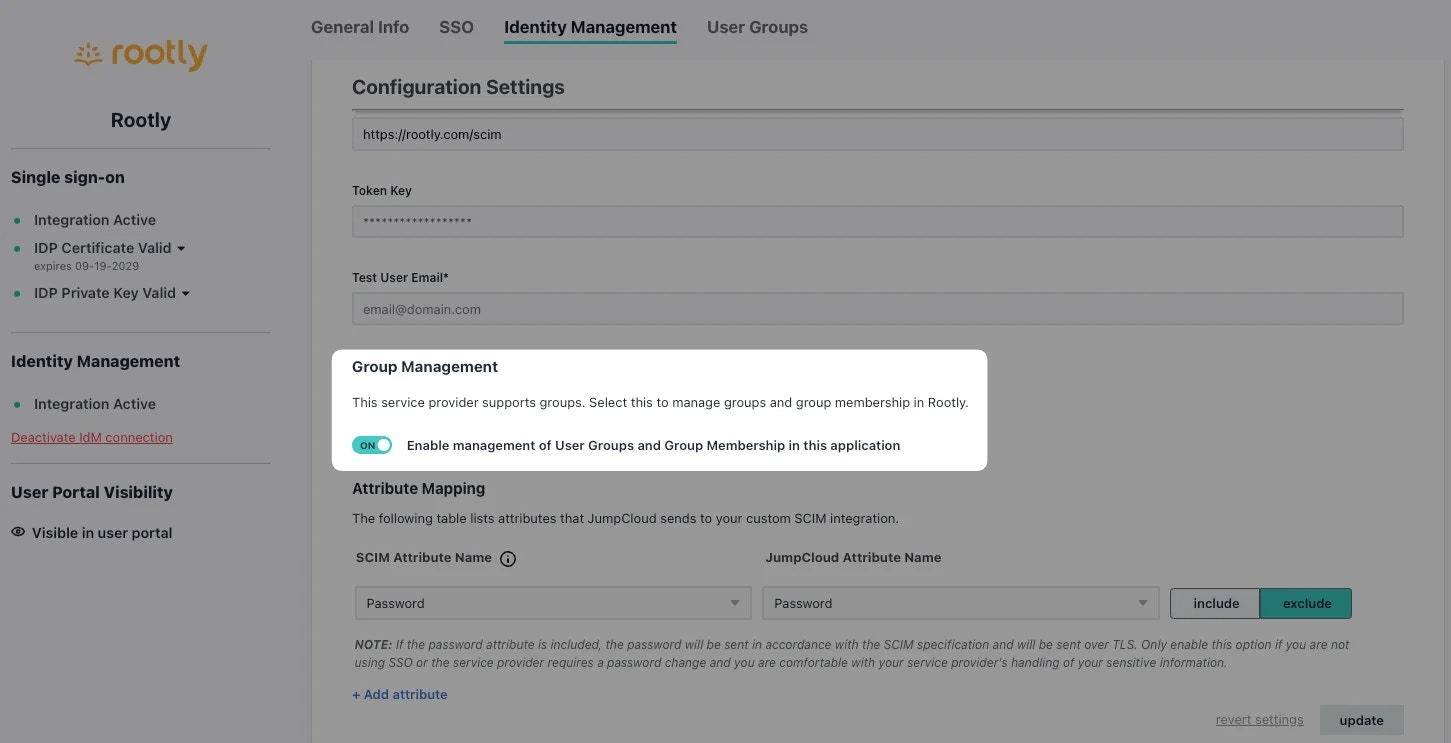
If you'd like to **provision users by JumpCloud Groups**, go ahead and select the following option. This will allow you to provision the users in each JumpCloud Group with a specific Rootly Role.
* `Test User Email`: You can use your own email as long as the email domain matches the one set in your Rootly SSO configuration page.
Go ahead and select `Test Connection`. You should see a successful message once a connection is confirmed.
If you'd like to **provision users by JumpCloud Groups**, go ahead and select the following option. This will allow you to provision the users in each JumpCloud Group with a specific Rootly Role.
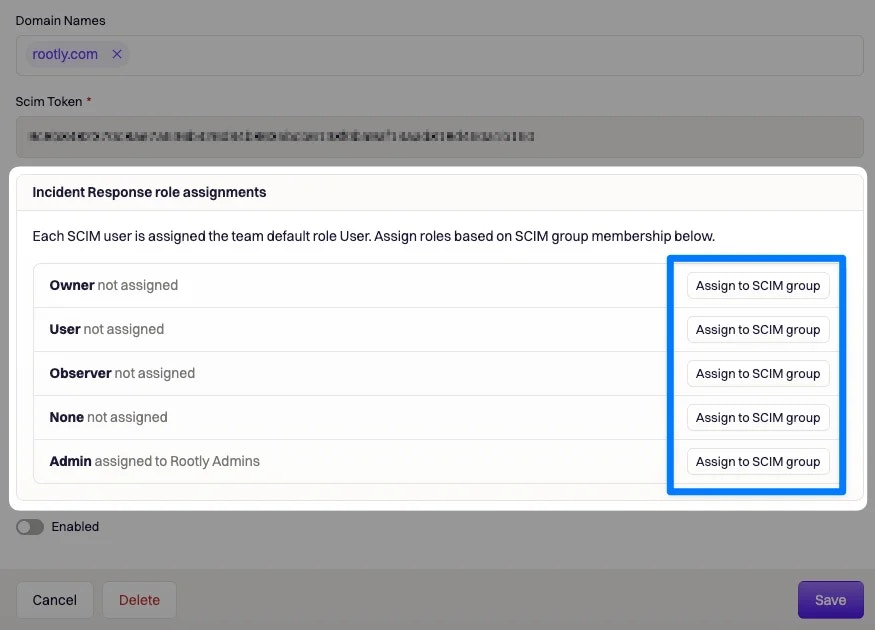
 Navigate to your **Rootly SSO Integrations** modal and map the desired JumpCloud Group to the desired Rootly Role.
 Go ahead and `Save` your configuration. You're all set for JIT user provisioning!
## Login Behavior
If you have SSO enabled, all other login methods such as Google, Slack, Email/Password will automatically redirect to SSO for any user whose email domain matches a configured SSO account. Users on domains that are not associated with an active SSO configuration continue to use their regular login method.
## Misconfiguration
If you set up SSO incorrectly, you may not be able to sign in anymore. In that case please contact [support@rootly.com](mailto:support@rootly.com) or use the lower right chat widget for live assistance.
Go ahead and `Save` your configuration. You're all set for JIT user provisioning!
## Login Behavior
If you have SSO enabled, all other login methods such as Google, Slack, Email/Password will automatically redirect to SSO for any user whose email domain matches a configured SSO account. Users on domains that are not associated with an active SSO configuration continue to use their regular login method.
## Misconfiguration
If you set up SSO incorrectly, you may not be able to sign in anymore. In that case please contact [support@rootly.com](mailto:support@rootly.com) or use the lower right chat widget for live assistance.