 ## Alert Routes (required)
The Alert Route condition ensures that alerts will be grouped based on the triggered alert's route.
## Alert Routes (required)
The Alert Route condition ensures that alerts will be grouped based on the triggered alert's route.
 ### Step 1: Select your route condition.
First, select the route that should be used to consider an alert for a group.
* All services, teams and escalation policies will consider alerts regardless of their target route.
* All services will consider alerts that are routed to any service.
* All teams will consider alerts that are routed to any team.
* All escalation policies will consider alerts that are routed to any escalation policy.
* Select routes will consider alerts routed to a specific service, team, or escalation policy. For example, only group alerts that are routed to a specific team.
* Select 'Select routes' in the first dropdown under 'Alert routes'.
* Select the target service, team, or escalation policy that you would like to group alerts by.
### Step 2: Select your group's route logic.
Next, define how the alerts should be grouped based on the alert's route. For example, you can define a group that will group alerts regardless of their routed service or only group alerts together if they're routed to the same service.
* Groups should only contain alerts for the same route: This ensures that alerts will only be grouped if they're routing to the same service, team, or escalation policy defined in step 1. For example, alerts routing to Service A will be grouped together, and alerts routing to Service B will be grouped together.
* Groups can contain alerts for any selected route: This will group alerts regardless of the destination service, team, or escalation policy defined in step 1. For example, any alert routed to any team will be grouped together.
### Step 1: Select your route condition.
First, select the route that should be used to consider an alert for a group.
* All services, teams and escalation policies will consider alerts regardless of their target route.
* All services will consider alerts that are routed to any service.
* All teams will consider alerts that are routed to any team.
* All escalation policies will consider alerts that are routed to any escalation policy.
* Select routes will consider alerts routed to a specific service, team, or escalation policy. For example, only group alerts that are routed to a specific team.
* Select 'Select routes' in the first dropdown under 'Alert routes'.
* Select the target service, team, or escalation policy that you would like to group alerts by.
### Step 2: Select your group's route logic.
Next, define how the alerts should be grouped based on the alert's route. For example, you can define a group that will group alerts regardless of their routed service or only group alerts together if they're routed to the same service.
* Groups should only contain alerts for the same route: This ensures that alerts will only be grouped if they're routing to the same service, team, or escalation policy defined in step 1. For example, alerts routing to Service A will be grouped together, and alerts routing to Service B will be grouped together.
* Groups can contain alerts for any selected route: This will group alerts regardless of the destination service, team, or escalation policy defined in step 1. For example, any alert routed to any team will be grouped together.
 ## Time Window (required)
* The group's time window defines how long alerts should be grouped together before creating a new group for new incoming alerts.
* The time window is set on a rolling basis, and will start based on when the last alert was added to the group.
* For example, a 10 minute time window will result in a group continuing to accept new alerts until a 10 minute down-time where no new alerts have been added to the group.
## Time Window (required)
* The group's time window defines how long alerts should be grouped together before creating a new group for new incoming alerts.
* The time window is set on a rolling basis, and will start based on when the last alert was added to the group.
* For example, a 10 minute time window will result in a group continuing to accept new alerts until a 10 minute down-time where no new alerts have been added to the group.
 ## Content Matching (optional)
* Content Matching allows for more granularity to define the conditions under which alerts get grouped together.
* Alert Title can be used to group alerts that come in with the same title.
* Alert Urgency can be used to group by different urgencies (high, medium, low)
* Payload can be used when you want to group alerts based off any specific field from your payload.
* Example: When you want to group alerts based off of a specific alert features in your payload, they payload may look something similar to \$.alert.feature
## Content Matching (optional)
* Content Matching allows for more granularity to define the conditions under which alerts get grouped together.
* Alert Title can be used to group alerts that come in with the same title.
* Alert Urgency can be used to group by different urgencies (high, medium, low)
* Payload can be used when you want to group alerts based off any specific field from your payload.
* Example: When you want to group alerts based off of a specific alert features in your payload, they payload may look something similar to \$.alert.feature
 ## Working with Alert Groups
The initial alert in a group is considered the group's leader. The leader is the alert that initially paged the responder. Any matching grouped alerts will become members of the leader's group.
## Working with Alert Groups
The initial alert in a group is considered the group's leader. The leader is the alert that initially paged the responder. Any matching grouped alerts will become members of the leader's group.
 When a subsequent alert is grouped with a leader, the leader will act as the source of truth for all grouped alerts.
* Any new alerts that match the group will be automatically grouped under the leader. They will not page the responder.
* Any status changes to the group's leader will also update all of the alert member's statuses.
* You can review any individual alert's group from the alert in the Rootly dashboard under the 'Alert Group' tab.
When a subsequent alert is grouped with a leader, the leader will act as the source of truth for all grouped alerts.
* Any new alerts that match the group will be automatically grouped under the leader. They will not page the responder.
* Any status changes to the group's leader will also update all of the alert member's statuses.
* You can review any individual alert's group from the alert in the Rootly dashboard under the 'Alert Group' tab.
 # Alert Routing
Source: https://docs.rootly.com/alert-routing
Determine which teams, services, and escalation policies an incoming alert is routed to with Alert Routes.
Routing incoming alerts ensures that the appropriate responders are paged to begin investigating any potential issues and events from your monitoring tools.
Rootly has two ways to route alerts to a team, service, or escalation policy:
1. Directly in your monitoring tools: Follow the instructions on your Alert Source to learn how to route through your monitoring tool.
2. In Rootly with Alert Routes.
This guide will help you configure your routing logic inside of Rootly using Alert Routes.
# 
# Create an Alert Route
Create an Alert Route by navigating to **Alerts > Routes** and select **New Route**. An Alert Route includes the following information:
1. A descriptive name.
2. An owning team: the admin of the owning team(s) will be granted edit access to the Alert Route.
3. An Alert Source: check out our [Integration documentation](https://docs.rootly.com/integrations/overview) to see how to connect your monitoring tools with Rootly's Alert Source integrations.
4. Conditions: when an Alert from the source in step 3 should be routed.
5. Destination: where the accepted Alert should be routed.
Once you've configured all the details on your Alert Route, make sure to **Save** and enable the route to begin routing your Alerts.
## Setting team ownership
Use the Owning Team field to assign ownership over the Alert Route.
The Owning Team's Team Admin will be granted create, update, and delete permissions for the Alert Route.
**Note**: Team Admins are only able to create Alert Routes assigned to their team. They will also only be able to route alerts from Alert Sources owned by their team.
## Conditions
Use Conditions to set rules for when an Alert from the Alert Source is eligible for being routed to the Destination.
For example, if your organization using a single webhook for your monitoring tool, add a Condition to only route an Alert to a specific Team if the payload indicates that Team's product area is impacted.
As you update your Conditions, the right-hand Alert Preview window will update to reflect the Alerts that fulfill the Condition criteria.
If an Alert Route doesn't have any conditions, all Alerts from the Alert Source are eligible to be routed by the Alert Route.
# Alert Routing
Source: https://docs.rootly.com/alert-routing
Determine which teams, services, and escalation policies an incoming alert is routed to with Alert Routes.
Routing incoming alerts ensures that the appropriate responders are paged to begin investigating any potential issues and events from your monitoring tools.
Rootly has two ways to route alerts to a team, service, or escalation policy:
1. Directly in your monitoring tools: Follow the instructions on your Alert Source to learn how to route through your monitoring tool.
2. In Rootly with Alert Routes.
This guide will help you configure your routing logic inside of Rootly using Alert Routes.
# 
# Create an Alert Route
Create an Alert Route by navigating to **Alerts > Routes** and select **New Route**. An Alert Route includes the following information:
1. A descriptive name.
2. An owning team: the admin of the owning team(s) will be granted edit access to the Alert Route.
3. An Alert Source: check out our [Integration documentation](https://docs.rootly.com/integrations/overview) to see how to connect your monitoring tools with Rootly's Alert Source integrations.
4. Conditions: when an Alert from the source in step 3 should be routed.
5. Destination: where the accepted Alert should be routed.
Once you've configured all the details on your Alert Route, make sure to **Save** and enable the route to begin routing your Alerts.
## Setting team ownership
Use the Owning Team field to assign ownership over the Alert Route.
The Owning Team's Team Admin will be granted create, update, and delete permissions for the Alert Route.
**Note**: Team Admins are only able to create Alert Routes assigned to their team. They will also only be able to route alerts from Alert Sources owned by their team.
## Conditions
Use Conditions to set rules for when an Alert from the Alert Source is eligible for being routed to the Destination.
For example, if your organization using a single webhook for your monitoring tool, add a Condition to only route an Alert to a specific Team if the payload indicates that Team's product area is impacted.
As you update your Conditions, the right-hand Alert Preview window will update to reflect the Alerts that fulfill the Condition criteria.
If an Alert Route doesn't have any conditions, all Alerts from the Alert Source are eligible to be routed by the Alert Route.
 **Step 2: Configure Alert Urgency on Heartbeats** (recommended)
* Navigate to **On-Call** --> **Heartbeats**
* Edit existing Heartbeat or **+ New Heartbeat**
* Set desired **Alert Urgency** for Heartbeat
**Step 2: Configure Alert Urgency on Heartbeats** (recommended)
* Navigate to **On-Call** --> **Heartbeats**
* Edit existing Heartbeat or **+ New Heartbeat**
* Set desired **Alert Urgency** for Heartbeat
 **Step 3: Configure Alert Urgency on Live Call Routing** (required)
* Navigate to **On-Call** --> **Live Call Routing**
* Edit existing Routing Number or **+ New Routing Number**
* Navigate to **Routing Rules** tab and set desired **Alert Urgency**
**Step 3: Configure Alert Urgency on Live Call Routing** (required)
* Navigate to **On-Call** --> **Live Call Routing**
* Edit existing Routing Number or **+ New Routing Number**
* Navigate to **Routing Rules** tab and set desired **Alert Urgency**
 **Step 3: Configure Alert Urgency on Alert Sources** (required)
* Naviagte to **Alert Sources** and select the Alert Source you want to configure Alert Urgency on then navigate to the **Configure** tab.
* *Note:* *By default all Alert Sources will default to High urgency.*
* Next you will add any desired conditions by clicking **+ Add Condition**
* When adding conditions you can choose a field from your alert payload to set conditions based off of.
* Datadog Example
**Step 3: Configure Alert Urgency on Alert Sources** (required)
* Naviagte to **Alert Sources** and select the Alert Source you want to configure Alert Urgency on then navigate to the **Configure** tab.
* *Note:* *By default all Alert Sources will default to High urgency.*
* Next you will add any desired conditions by clicking **+ Add Condition**
* When adding conditions you can choose a field from your alert payload to set conditions based off of.
* Datadog Example
 **Step 3: Configuring Escalation Paths for Alert Urgency** (recommended) The most common use case here is for when you want High Urgency alerts to *always* wake up on-call personnel regardless of working hours and Low Urgency alerts not to page and wake up the on-call personnel outside of working hours.
* Next Navigate to **Escalation Policies** and select the escalation policy you wan to build an escalation path for.
* Set **Working Hours** for your escalation policy
* Then click **+ New Path**
* Set a Name for your path (required)
* Add conditions to **Use this path when** by clicking **+ Add condition**
* Here you can set Alert Urgency, choose to have it be Within working hours or not, as well as JSON path
* Next you'll select a Notification Type
* You will choose between **Audible Notifications** and **Quiet Notifications**
* For additional information on audible notifications verses quiet notifications setup please visit the [On-Call Notifications](/on-call/on-call-notifications "On-Call Notifications") documentation.
**Step 3: Configuring Escalation Paths for Alert Urgency** (recommended) The most common use case here is for when you want High Urgency alerts to *always* wake up on-call personnel regardless of working hours and Low Urgency alerts not to page and wake up the on-call personnel outside of working hours.
* Next Navigate to **Escalation Policies** and select the escalation policy you wan to build an escalation path for.
* Set **Working Hours** for your escalation policy
* Then click **+ New Path**
* Set a Name for your path (required)
* Add conditions to **Use this path when** by clicking **+ Add condition**
* Here you can set Alert Urgency, choose to have it be Within working hours or not, as well as JSON path
* Next you'll select a Notification Type
* You will choose between **Audible Notifications** and **Quiet Notifications**
* For additional information on audible notifications verses quiet notifications setup please visit the [On-Call Notifications](/on-call/on-call-notifications "On-Call Notifications") documentation.
 **Step 4: Configure your own personal nortifcations for** **Audible Notifications and Quiet Notifications** (required)
* For additional information on audible notifications verses quiet notifications setup please visit the [On-Call Notifications](/on-call/on-call-notifications "On-Call Notifications") documentation.
# Overview
Source: https://docs.rootly.com/alerts
Alerts are events created by your observability providers to notify responders a system or customer needs attention.
## Overview
Examples could include:
* A Pagerduty Incident has been created
* A Datadog alert triggered
* A Zendesk ticket has been created
Alerts can be associated with your incidents to add more context for your responders.
Rootly integrates with the following providers allowing the automated logging of alerts:
| | |
| ------------------------------------------------- | --------------------------------------------------- |
| Integration | Trigger |
| [PagerDuty](/integrations/pagerduty "PagerDuty") | - When a PagerDuty Incident is created |
| [Opsgenie](/integrations/opsgenie "Opsgenie") | - When a Opsgenie Incident is created |
| [VictorOps](/integrations/victor-ops "VictorOps") | - When a VictorOps Incident is created |
| [Datadog](/integrations/datadog "Datadog") | - When a Datadog alert is triggered |
| [Zendesk](/integrations/zendesk "Zendesk") | - When a Zendesk ticket is created ( customizable ) |
| [Nobl9](/integrations/nobl9 "Nobl9") | - When a SLO is not satisfied anymore |
| [Sentry](/integrations/sentry "Sentry") | - When a Sentry alert is triggered |
**Don't see your observability provider? Rootly can ingest alerts via** [**generic webhooks**](/integrations/generic-webhook-alert-source "generic webhooks")**.**
# [DEPRECATED] Creates a custom field option
Source: https://docs.rootly.com/api-reference/[deprecated]-customfieldoptions/[deprecated]-creates-a-custom-field-option
https://rootly-heroku.s3.amazonaws.com/swagger/v1/swagger.json post /v1/custom_fields/{custom_field_id}/options
[DEPRECATED] Use form field endpoints instead. Creates a new custom field option from provided data
# [DEPRECATED] Delete a custom field option
Source: https://docs.rootly.com/api-reference/[deprecated]-customfieldoptions/[deprecated]-delete-a-custom-field-option
https://rootly-heroku.s3.amazonaws.com/swagger/v1/swagger.json delete /v1/custom_field_options/{id}
[DEPRECATED] Use form field endpoints instead. Delete a specific Custom Field Option by id
# [DEPRECATED] List custom field options
Source: https://docs.rootly.com/api-reference/[deprecated]-customfieldoptions/[deprecated]-list-custom-field-options
https://rootly-heroku.s3.amazonaws.com/swagger/v1/swagger.json get /v1/custom_fields/{custom_field_id}/options
[DEPRECATED] Use form field endpoints instead. List custom field options
# [DEPRECATED] Retrieves a custom field option
Source: https://docs.rootly.com/api-reference/[deprecated]-customfieldoptions/[deprecated]-retrieves-a-custom-field-option
https://rootly-heroku.s3.amazonaws.com/swagger/v1/swagger.json get /v1/custom_field_options/{id}
[DEPRECATED] Use form field endpoints instead. Retrieves a specific custom field option by id
# [DEPRECATED] Update a custom field option
Source: https://docs.rootly.com/api-reference/[deprecated]-customfieldoptions/[deprecated]-update-a-custom-field-option
https://rootly-heroku.s3.amazonaws.com/swagger/v1/swagger.json put /v1/custom_field_options/{id}
[DEPRECATED] Use form field endpoints instead. Update a specific custom field option by id
# [DEPRECATED] Creates a Custom Field
Source: https://docs.rootly.com/api-reference/[deprecated]-customfields/[deprecated]-creates-a-custom-field
https://rootly-heroku.s3.amazonaws.com/swagger/v1/swagger.json post /v1/custom_fields
[DEPRECATED] Use form field endpoints instead. Creates a new custom field from provided data
# [DEPRECATED] Delete a Custom Field
Source: https://docs.rootly.com/api-reference/[deprecated]-customfields/[deprecated]-delete-a-custom-field
https://rootly-heroku.s3.amazonaws.com/swagger/v1/swagger.json delete /v1/custom_fields/{id}
[DEPRECATED] Use form field endpoints instead. Delete a specific custom field by id
# [DEPRECATED] List Custom Fields
Source: https://docs.rootly.com/api-reference/[deprecated]-customfields/[deprecated]-list-custom-fields
https://rootly-heroku.s3.amazonaws.com/swagger/v1/swagger.json get /v1/custom_fields
[DEPRECATED] Use form field endpoints instead. List Custom fields
# [DEPRECATED] Retrieves a Custom Field
Source: https://docs.rootly.com/api-reference/[deprecated]-customfields/[deprecated]-retrieves-a-custom-field
https://rootly-heroku.s3.amazonaws.com/swagger/v1/swagger.json get /v1/custom_fields/{id}
Retrieves a specific custom_field by id
# [DEPRECATED] Update a Custom Field
Source: https://docs.rootly.com/api-reference/[deprecated]-customfields/[deprecated]-update-a-custom-field
https://rootly-heroku.s3.amazonaws.com/swagger/v1/swagger.json put /v1/custom_fields/{id}
[DEPRECATED] Use form field endpoints instead. Update a specific custom field by id
# [DEPRECATED] Creates an incident custom field selection
Source: https://docs.rootly.com/api-reference/[deprecated]-incidentcustomfieldselections/[deprecated]-creates-an-incident-custom-field-selection
https://rootly-heroku.s3.amazonaws.com/swagger/v1/swagger.json post /v1/incidents/{incident_id}/custom_field_selections
[DEPRECATED] Use form field endpoints instead. Creates a new incident custom field selection from provided data
# [DEPRECATED] Delete an incident custom field selection
Source: https://docs.rootly.com/api-reference/[deprecated]-incidentcustomfieldselections/[deprecated]-delete-an-incident-custom-field-selection
https://rootly-heroku.s3.amazonaws.com/swagger/v1/swagger.json delete /v1/incident_custom_field_selections/{id}
[DEPRECATED] Use form field endpoints instead. Delete a specific incident custom field selection by id
# [DEPRECATED] List incident custom field selections
Source: https://docs.rootly.com/api-reference/[deprecated]-incidentcustomfieldselections/[deprecated]-list-incident-custom-field-selections
https://rootly-heroku.s3.amazonaws.com/swagger/v1/swagger.json get /v1/incidents/{incident_id}/custom_field_selections
[DEPRECATED] Use form field endpoints instead. List incident custom field selections
# [DEPRECATED] Retrieves an incident custom field selection
Source: https://docs.rootly.com/api-reference/[deprecated]-incidentcustomfieldselections/[deprecated]-retrieves-an-incident-custom-field-selection
https://rootly-heroku.s3.amazonaws.com/swagger/v1/swagger.json get /v1/incident_custom_field_selections/{id}
[DEPRECATED] Use form field endpoints instead. Retrieves a specific incident custom field selection by id
# [DEPRECATED] Update an incident custom field selection
Source: https://docs.rootly.com/api-reference/[deprecated]-incidentcustomfieldselections/[deprecated]-update-an-incident-custom-field-selection
https://rootly-heroku.s3.amazonaws.com/swagger/v1/swagger.json put /v1/incident_custom_field_selections/{id}
[DEPRECATED] Use form field endpoints instead. Update a specific incident custom field selection by id
# [DEPRECATED] Creates a workflow custom field selection
Source: https://docs.rootly.com/api-reference/[deprecated]-workflowcustomfieldselections/[deprecated]-creates-a-workflow-custom-field-selection
https://rootly-heroku.s3.amazonaws.com/swagger/v1/swagger.json post /v1/workflows/{workflow_id}/custom_field_selections
[DEPRECATED] Use form field endpoints instead. Creates a new workflow custom field selection from provided data
# [DEPRECATED] Delete a workflow custom field selection
Source: https://docs.rootly.com/api-reference/[deprecated]-workflowcustomfieldselections/[deprecated]-delete-a-workflow-custom-field-selection
https://rootly-heroku.s3.amazonaws.com/swagger/v1/swagger.json delete /v1/workflow_custom_field_selections/{id}
[DEPRECATED] Use form field endpoints instead. Delete a specific workflow custom field selection by id
# [DEPRECATED] List workflow custom field selections
Source: https://docs.rootly.com/api-reference/[deprecated]-workflowcustomfieldselections/[deprecated]-list-workflow-custom-field-selections
https://rootly-heroku.s3.amazonaws.com/swagger/v1/swagger.json get /v1/workflows/{workflow_id}/custom_field_selections
[DEPRECATED] Use form field endpoints instead. List workflow custom field selections
# [DEPRECATED] Retrieves a workflow custom field selection
Source: https://docs.rootly.com/api-reference/[deprecated]-workflowcustomfieldselections/[deprecated]-retrieves-a-workflow-custom-field-selection
https://rootly-heroku.s3.amazonaws.com/swagger/v1/swagger.json get /v1/workflow_custom_field_selections/{id}
[DEPRECATED] Use form field endpoints instead. Retrieves a specific workflow custom field selection by id
# [DEPRECATED] Update a workflow custom field selection
Source: https://docs.rootly.com/api-reference/[deprecated]-workflowcustomfieldselections/[deprecated]-update-a-workflow-custom-field-selection
https://rootly-heroku.s3.amazonaws.com/swagger/v1/swagger.json put /v1/workflow_custom_field_selections/{id}
[DEPRECATED] Use form field endpoints instead. Update a specific workflow custom field selection by id
# Create alert event
Source: https://docs.rootly.com/api-reference/alertevents/create-alert-event
https://rootly-heroku.s3.amazonaws.com/swagger/v1/swagger.json post /v1/alerts/{alert_id}/events
Creates a new alert event
# Delete alert event
Source: https://docs.rootly.com/api-reference/alertevents/delete-alert-event
https://rootly-heroku.s3.amazonaws.com/swagger/v1/swagger.json delete /v1/alert_events/{id}
Deletes a specific alert event
# List alert events
Source: https://docs.rootly.com/api-reference/alertevents/list-alert-events
https://rootly-heroku.s3.amazonaws.com/swagger/v1/swagger.json get /v1/alerts/{alert_id}/events
List alert_events
# Retrieve alert event
Source: https://docs.rootly.com/api-reference/alertevents/retrieve-alert-event
https://rootly-heroku.s3.amazonaws.com/swagger/v1/swagger.json get /v1/alert_events/{id}
Retrieves a specific alert_event by id
# Update alert event
Source: https://docs.rootly.com/api-reference/alertevents/update-alert-event
https://rootly-heroku.s3.amazonaws.com/swagger/v1/swagger.json patch /v1/alert_events/{id}
Updates a specific alert event
# Creates an alert group
Source: https://docs.rootly.com/api-reference/alertgroups/creates-an-alert-group
https://rootly-heroku.s3.amazonaws.com/swagger/v1/swagger.json post /v1/alert_groups
Creates a new alert group
# Delete an alert group
Source: https://docs.rootly.com/api-reference/alertgroups/delete-an-alert-group
https://rootly-heroku.s3.amazonaws.com/swagger/v1/swagger.json delete /v1/alert_groups/{id}
Delete a specific alert group by id
# List alert groups
Source: https://docs.rootly.com/api-reference/alertgroups/list-alert-groups
https://rootly-heroku.s3.amazonaws.com/swagger/v1/swagger.json get /v1/alert_groups
List alert groups
# Retrieves an alert group
Source: https://docs.rootly.com/api-reference/alertgroups/retrieves-an-alert-group
https://rootly-heroku.s3.amazonaws.com/swagger/v1/swagger.json get /v1/alert_groups/{id}
Retrieves a specific alert group by id
# Update an alert group
Source: https://docs.rootly.com/api-reference/alertgroups/update-an-alert-group
https://rootly-heroku.s3.amazonaws.com/swagger/v1/swagger.json patch /v1/alert_groups/{id}
Update a specific alert group by id
# Creates an alert routing rule
Source: https://docs.rootly.com/api-reference/alertroutingrules/creates-an-alert-routing-rule
https://rootly-heroku.s3.amazonaws.com/swagger/v1/swagger.json post /v1/alert_routing_rules
Creates a new alert routing rule from provided data
# Delete an alert routing rule
Source: https://docs.rootly.com/api-reference/alertroutingrules/delete-an-alert-routing-rule
https://rootly-heroku.s3.amazonaws.com/swagger/v1/swagger.json delete /v1/alert_routing_rules/{id}
Delete a specific alert routing rule by id
# List alert routing rules
Source: https://docs.rootly.com/api-reference/alertroutingrules/list-alert-routing-rules
https://rootly-heroku.s3.amazonaws.com/swagger/v1/swagger.json get /v1/alert_routing_rules
List alert routing rules
# Retrieves an alert routing rule
Source: https://docs.rootly.com/api-reference/alertroutingrules/retrieves-an-alert-routing-rule
https://rootly-heroku.s3.amazonaws.com/swagger/v1/swagger.json get /v1/alert_routing_rules/{id}
Retrieves a specific alert routing rule by id
# Update an alert routing rule
Source: https://docs.rootly.com/api-reference/alertroutingrules/update-an-alert-routing-rule
https://rootly-heroku.s3.amazonaws.com/swagger/v1/swagger.json put /v1/alert_routing_rules/{id}
Update a specific alert routing rule by id
# Acknowledges an alert
Source: https://docs.rootly.com/api-reference/alerts/acknowledges-an-alert
https://rootly-heroku.s3.amazonaws.com/swagger/v1/swagger.json post /v1/alerts/{id}/acknowledge
Acknowledges a specific alert by id
# Attach alerts to an incident
Source: https://docs.rootly.com/api-reference/alerts/attach-alerts-to-an-incident
https://rootly-heroku.s3.amazonaws.com/swagger/v1/swagger.json post /v1/incidents/{incident_id}/alerts
Attach alerts to an incident from provided data
# Creates an alert
Source: https://docs.rootly.com/api-reference/alerts/creates-an-alert
https://rootly-heroku.s3.amazonaws.com/swagger/v1/swagger.json post /v1/alerts
Creates a new alert from provided data
# List alerts
Source: https://docs.rootly.com/api-reference/alerts/list-alerts
https://rootly-heroku.s3.amazonaws.com/swagger/v1/swagger.json get /v1/alerts
List alerts
# List Incident alerts
Source: https://docs.rootly.com/api-reference/alerts/list-incident-alerts
https://rootly-heroku.s3.amazonaws.com/swagger/v1/swagger.json get /v1/incidents/{incident_id}/alerts
List incident alerts
# Resolves an alert
Source: https://docs.rootly.com/api-reference/alerts/resolves-an-alert
https://rootly-heroku.s3.amazonaws.com/swagger/v1/swagger.json post /v1/alerts/{id}/resolve
Resolves a specific alert by id
# Retrieves an alert
Source: https://docs.rootly.com/api-reference/alerts/retrieves-an-alert
https://rootly-heroku.s3.amazonaws.com/swagger/v1/swagger.json get /v1/alerts/{id}
Retrieves a specific alert by id
# Update alert
Source: https://docs.rootly.com/api-reference/alerts/update-alert
https://rootly-heroku.s3.amazonaws.com/swagger/v1/swagger.json patch /v1/alerts/{id}
Updates an alert
# Creates an alert source
Source: https://docs.rootly.com/api-reference/alertsources/creates-an-alert-source
https://rootly-heroku.s3.amazonaws.com/swagger/v1/swagger.json post /v1/alert_sources
Creates a new alert source from provided data
# Delete an alert source
Source: https://docs.rootly.com/api-reference/alertsources/delete-an-alert-source
https://rootly-heroku.s3.amazonaws.com/swagger/v1/swagger.json delete /v1/alert_sources/{id}
Delete a specific alert source by id
# List alert sources
Source: https://docs.rootly.com/api-reference/alertsources/list-alert-sources
https://rootly-heroku.s3.amazonaws.com/swagger/v1/swagger.json get /v1/alert_sources
List alert sources
# Retrieves an alert source
Source: https://docs.rootly.com/api-reference/alertsources/retrieves-an-alert-source
https://rootly-heroku.s3.amazonaws.com/swagger/v1/swagger.json get /v1/alert_sources/{id}
Retrieves a specific alert source by id
# Update an alert source
Source: https://docs.rootly.com/api-reference/alertsources/update-an-alert-source
https://rootly-heroku.s3.amazonaws.com/swagger/v1/swagger.json put /v1/alert_sources/{id}
Update a specific alert source by id
# Creates an alert urgency
Source: https://docs.rootly.com/api-reference/alerturgencies/creates-an-alert-urgency
https://rootly-heroku.s3.amazonaws.com/swagger/v1/swagger.json post /v1/alert_urgencies
Creates a new alert urgency from provided data
# Delete an alert urgency
Source: https://docs.rootly.com/api-reference/alerturgencies/delete-an-alert-urgency
https://rootly-heroku.s3.amazonaws.com/swagger/v1/swagger.json delete /v1/alert_urgencies/{id}
Delete a specific alert urgency by id
# List alert urgencies
Source: https://docs.rootly.com/api-reference/alerturgencies/list-alert-urgencies
https://rootly-heroku.s3.amazonaws.com/swagger/v1/swagger.json get /v1/alert_urgencies
List alert urgencies
# Retrieves an alert urgency
Source: https://docs.rootly.com/api-reference/alerturgencies/retrieves-an-alert-urgency
https://rootly-heroku.s3.amazonaws.com/swagger/v1/swagger.json get /v1/alert_urgencies/{id}
Retrieves a specific alert urgency by id
# Update an alert urgency
Source: https://docs.rootly.com/api-reference/alerturgencies/update-an-alert-urgency
https://rootly-heroku.s3.amazonaws.com/swagger/v1/swagger.json put /v1/alert_urgencies/{id}
Update a specific alert urgency by id
# List audits
Source: https://docs.rootly.com/api-reference/audits/list-audits
https://rootly-heroku.s3.amazonaws.com/swagger/v1/swagger.json get /v1/audits
List audits
# Creates an authorization
Source: https://docs.rootly.com/api-reference/authorizations/creates-an-authorization
https://rootly-heroku.s3.amazonaws.com/swagger/v1/swagger.json post /v1/authorizations
Creates a new authorization from provided data
# Delete an authorization
Source: https://docs.rootly.com/api-reference/authorizations/delete-an-authorization
https://rootly-heroku.s3.amazonaws.com/swagger/v1/swagger.json delete /v1/authorizations/{id}
Delete a specific authorization by id
# List authorizations
Source: https://docs.rootly.com/api-reference/authorizations/list-authorizations
https://rootly-heroku.s3.amazonaws.com/swagger/v1/swagger.json get /v1/authorizations
List authorizations
# Retrieves an authorization
Source: https://docs.rootly.com/api-reference/authorizations/retrieves-an-authorization
https://rootly-heroku.s3.amazonaws.com/swagger/v1/swagger.json get /v1/authorizations/{id}
Retrieves a specific authorization by id
# Update an authorization
Source: https://docs.rootly.com/api-reference/authorizations/update-an-authorization
https://rootly-heroku.s3.amazonaws.com/swagger/v1/swagger.json put /v1/authorizations/{id}
Update a specific authorization by id
# Creates a Catalog Entity
Source: https://docs.rootly.com/api-reference/catalogentities/creates-a-catalog-entity
https://rootly-heroku.s3.amazonaws.com/swagger/v1/swagger.json post /v1/catalogs/{catalog_id}/entities
Creates a new Catalog Entity from provided data
# Delete a Catalog Entity
Source: https://docs.rootly.com/api-reference/catalogentities/delete-a-catalog-entity
https://rootly-heroku.s3.amazonaws.com/swagger/v1/swagger.json delete /v1/catalog_entities/{id}
Delete a specific Catalog Entity by id
# List Catalog Entities
Source: https://docs.rootly.com/api-reference/catalogentities/list-catalog-entities
https://rootly-heroku.s3.amazonaws.com/swagger/v1/swagger.json get /v1/catalogs/{catalog_id}/entities
List Catalog Entities
# Retrieves a Catalog Entity
Source: https://docs.rootly.com/api-reference/catalogentities/retrieves-a-catalog-entity
https://rootly-heroku.s3.amazonaws.com/swagger/v1/swagger.json get /v1/catalog_entities/{id}
Retrieves a specific Catalog Entity by id
# Update a catalog_entity
Source: https://docs.rootly.com/api-reference/catalogentities/update-a-catalog_entity
https://rootly-heroku.s3.amazonaws.com/swagger/v1/swagger.json put /v1/catalog_entities/{id}
Update a specific Catalog Entity by id
# Creates a Catalog Entity Property
Source: https://docs.rootly.com/api-reference/catalogentityproperties/creates-a-catalog-entity-property
https://rootly-heroku.s3.amazonaws.com/swagger/v1/swagger.json post /v1/catalog_entities/{catalog_entity_id}/properties
Creates a new Catalog Entity Property from provided data
# Delete a Catalog Entity Property
Source: https://docs.rootly.com/api-reference/catalogentityproperties/delete-a-catalog-entity-property
https://rootly-heroku.s3.amazonaws.com/swagger/v1/swagger.json delete /v1/catalog_entity_properties/{id}
Delete a specific Catalog Entity Property by id
# List catalog properties
Source: https://docs.rootly.com/api-reference/catalogentityproperties/list-catalog-properties
https://rootly-heroku.s3.amazonaws.com/swagger/v1/swagger.json get /v1/catalog_entities/{catalog_entity_id}/properties
List Catalog Entity Properties
# Retrieves a Catalog Entity Property
Source: https://docs.rootly.com/api-reference/catalogentityproperties/retrieves-a-catalog-entity-property
https://rootly-heroku.s3.amazonaws.com/swagger/v1/swagger.json get /v1/catalog_entity_properties/{id}
Retrieves a specific Catalog Entity Property by id
# Update a Catalog Entity Property
Source: https://docs.rootly.com/api-reference/catalogentityproperties/update-a-catalog-entity-property
https://rootly-heroku.s3.amazonaws.com/swagger/v1/swagger.json put /v1/catalog_entity_properties/{id}
Update a specific Catalog Entity Property by id
# Creates a Catalog Field
Source: https://docs.rootly.com/api-reference/catalogfields/creates-a-catalog-field
https://rootly-heroku.s3.amazonaws.com/swagger/v1/swagger.json post /v1/catalogs/{catalog_id}/fields
Creates a new Catalog Field from provided data
# Delete a catalog_field
Source: https://docs.rootly.com/api-reference/catalogfields/delete-a-catalog_field
https://rootly-heroku.s3.amazonaws.com/swagger/v1/swagger.json delete /v1/catalog_fields/{id}
Delete a specific catalog_field by id
# List Catalog Fields
Source: https://docs.rootly.com/api-reference/catalogfields/list-catalog-fields
https://rootly-heroku.s3.amazonaws.com/swagger/v1/swagger.json get /v1/catalogs/{catalog_id}/fields
List Catalog Fields
# Retrieves a Catalog Field
Source: https://docs.rootly.com/api-reference/catalogfields/retrieves-a-catalog-field
https://rootly-heroku.s3.amazonaws.com/swagger/v1/swagger.json get /v1/catalog_fields/{id}
Retrieves a specific Catalog Field by id
# Update a catalog_field
Source: https://docs.rootly.com/api-reference/catalogfields/update-a-catalog_field
https://rootly-heroku.s3.amazonaws.com/swagger/v1/swagger.json put /v1/catalog_fields/{id}
Update a specific catalog_field by id
# Creates a catalog
Source: https://docs.rootly.com/api-reference/catalogs/creates-a-catalog
https://rootly-heroku.s3.amazonaws.com/swagger/v1/swagger.json post /v1/catalogs
Creates a new catalog from provided data
# Delete a catalog
Source: https://docs.rootly.com/api-reference/catalogs/delete-a-catalog
https://rootly-heroku.s3.amazonaws.com/swagger/v1/swagger.json delete /v1/catalogs/{id}
Delete a specific catalog by id
# List catalogs
Source: https://docs.rootly.com/api-reference/catalogs/list-catalogs
https://rootly-heroku.s3.amazonaws.com/swagger/v1/swagger.json get /v1/catalogs
List catalogs
# Retrieves a catalog
Source: https://docs.rootly.com/api-reference/catalogs/retrieves-a-catalog
https://rootly-heroku.s3.amazonaws.com/swagger/v1/swagger.json get /v1/catalogs/{id}
Retrieves a specific catalog by id
# Update a catalog
Source: https://docs.rootly.com/api-reference/catalogs/update-a-catalog
https://rootly-heroku.s3.amazonaws.com/swagger/v1/swagger.json put /v1/catalogs/{id}
Update a specific catalog by id
# Creates a cause
Source: https://docs.rootly.com/api-reference/causes/creates-a-cause
https://rootly-heroku.s3.amazonaws.com/swagger/v1/swagger.json post /v1/causes
Creates a new cause from provided data
# Delete a cause
Source: https://docs.rootly.com/api-reference/causes/delete-a-cause
https://rootly-heroku.s3.amazonaws.com/swagger/v1/swagger.json delete /v1/causes/{id}
Delete a specific cause by id
# List causes
Source: https://docs.rootly.com/api-reference/causes/list-causes
https://rootly-heroku.s3.amazonaws.com/swagger/v1/swagger.json get /v1/causes
List causes
# Retrieves a cause
Source: https://docs.rootly.com/api-reference/causes/retrieves-a-cause
https://rootly-heroku.s3.amazonaws.com/swagger/v1/swagger.json get /v1/causes/{id}
Retrieves a specific cause by id
# Update a cause
Source: https://docs.rootly.com/api-reference/causes/update-a-cause
https://rootly-heroku.s3.amazonaws.com/swagger/v1/swagger.json put /v1/causes/{id}
Update a specific cause by id
# Creates a custom form
Source: https://docs.rootly.com/api-reference/customforms/creates-a-custom-form
https://rootly-heroku.s3.amazonaws.com/swagger/v1/swagger.json post /v1/custom_forms
Creates a new custom form from provided data
# Delete a custom form
Source: https://docs.rootly.com/api-reference/customforms/delete-a-custom-form
https://rootly-heroku.s3.amazonaws.com/swagger/v1/swagger.json delete /v1/custom_forms/{id}
Delete a specific custom form by id
# List custom forms
Source: https://docs.rootly.com/api-reference/customforms/list-custom-forms
https://rootly-heroku.s3.amazonaws.com/swagger/v1/swagger.json get /v1/custom_forms
List custom forms
# Retrieves a custom form
Source: https://docs.rootly.com/api-reference/customforms/retrieves-a-custom-form
https://rootly-heroku.s3.amazonaws.com/swagger/v1/swagger.json get /v1/custom_forms/{id}
Retrieves a specific custom form by id
# Update a custom form
Source: https://docs.rootly.com/api-reference/customforms/update-a-custom-form
https://rootly-heroku.s3.amazonaws.com/swagger/v1/swagger.json put /v1/custom_forms/{id}
Update a specific custom form by id
# Creates a dashboard panel
Source: https://docs.rootly.com/api-reference/dashboardpanels/creates-a-dashboard-panel
https://rootly-heroku.s3.amazonaws.com/swagger/v1/swagger.json post /v1/dashboards/{dashboard_id}/panels
Creates a new dashboard panel from provided data
# Delete a dashboard panel
Source: https://docs.rootly.com/api-reference/dashboardpanels/delete-a-dashboard-panel
https://rootly-heroku.s3.amazonaws.com/swagger/v1/swagger.json delete /v1/dashboard_panels/{id}
Delete a specific dashboard panel by id
# Duplicates a dashboard panel
Source: https://docs.rootly.com/api-reference/dashboardpanels/duplicates-a-dashboard-panel
https://rootly-heroku.s3.amazonaws.com/swagger/v1/swagger.json post /v1/dashboard_panels/{id}/duplicate
Duplicates a dashboard panel
# List dashboard panels
Source: https://docs.rootly.com/api-reference/dashboardpanels/list-dashboard-panels
https://rootly-heroku.s3.amazonaws.com/swagger/v1/swagger.json get /v1/dashboards/{dashboard_id}/panels
List dashboard panels
# Retrieves a dashboard panel
Source: https://docs.rootly.com/api-reference/dashboardpanels/retrieves-a-dashboard-panel
https://rootly-heroku.s3.amazonaws.com/swagger/v1/swagger.json get /v1/dashboard_panels/{id}
Retrieves a specific dashboard panel by id
# Update a dashboard panel
Source: https://docs.rootly.com/api-reference/dashboardpanels/update-a-dashboard-panel
https://rootly-heroku.s3.amazonaws.com/swagger/v1/swagger.json put /v1/dashboard_panels/{id}
Update a specific dashboard panel by id
# Creates a dashboard
Source: https://docs.rootly.com/api-reference/dashboards/creates-a-dashboard
https://rootly-heroku.s3.amazonaws.com/swagger/v1/swagger.json post /v1/dashboards
Creates a new dashboard from provided data
# Delete a dashboard
Source: https://docs.rootly.com/api-reference/dashboards/delete-a-dashboard
https://rootly-heroku.s3.amazonaws.com/swagger/v1/swagger.json delete /v1/dashboards/{id}
Delete a specific dashboard by id
# Duplicates a dashboard
Source: https://docs.rootly.com/api-reference/dashboards/duplicates-a-dashboard
https://rootly-heroku.s3.amazonaws.com/swagger/v1/swagger.json post /v1/dashboards/{id}/duplicate
Duplicates a dashboard
# List dashboards
Source: https://docs.rootly.com/api-reference/dashboards/list-dashboards
https://rootly-heroku.s3.amazonaws.com/swagger/v1/swagger.json get /v1/dashboards
List dashboards
# Retrieves a dashboard
Source: https://docs.rootly.com/api-reference/dashboards/retrieves-a-dashboard
https://rootly-heroku.s3.amazonaws.com/swagger/v1/swagger.json get /v1/dashboards/{id}
Retrieves a specific dashboard by id
# Sets dashboard to user default
Source: https://docs.rootly.com/api-reference/dashboards/sets-dashboard-to-user-default
https://rootly-heroku.s3.amazonaws.com/swagger/v1/swagger.json post /v1/dashboards/{id}/set_default
Sets dashboard to user default
# Update a dashboard
Source: https://docs.rootly.com/api-reference/dashboards/update-a-dashboard
https://rootly-heroku.s3.amazonaws.com/swagger/v1/swagger.json put /v1/dashboards/{id}
Update a specific dashboard by id
# Creates an environment
Source: https://docs.rootly.com/api-reference/environments/creates-an-environment
https://rootly-heroku.s3.amazonaws.com/swagger/v1/swagger.json post /v1/environments
Creates a new environment from provided data
# Delete an environment
Source: https://docs.rootly.com/api-reference/environments/delete-an-environment
https://rootly-heroku.s3.amazonaws.com/swagger/v1/swagger.json delete /v1/environments/{id}
Delete a specific environment by id
# List environments
Source: https://docs.rootly.com/api-reference/environments/list-environments
https://rootly-heroku.s3.amazonaws.com/swagger/v1/swagger.json get /v1/environments
List environments
# Retrieves an environment
Source: https://docs.rootly.com/api-reference/environments/retrieves-an-environment
https://rootly-heroku.s3.amazonaws.com/swagger/v1/swagger.json get /v1/environments/{id}
Retrieves a specific environment by id
# Update an environment
Source: https://docs.rootly.com/api-reference/environments/update-an-environment
https://rootly-heroku.s3.amazonaws.com/swagger/v1/swagger.json put /v1/environments/{id}
Update a specific environment by id
# Delete an escalation level
Source: https://docs.rootly.com/api-reference/escalationlevels/delete-an-escalation-level
https://rootly-heroku.s3.amazonaws.com/swagger/v1/swagger.json delete /v1/escalation_levels/{id}
Delete a specific escalation level by id
# Retrieves an escalation level
Source: https://docs.rootly.com/api-reference/escalationlevels/retrieves-an-escalation-level
https://rootly-heroku.s3.amazonaws.com/swagger/v1/swagger.json get /v1/escalation_levels/{id}
Retrieves a specific escalation level by id
# Update an escalation level
Source: https://docs.rootly.com/api-reference/escalationlevels/update-an-escalation-level
https://rootly-heroku.s3.amazonaws.com/swagger/v1/swagger.json put /v1/escalation_levels/{id}
Update a specific escalation level by id
# Creates an escalation level for an Escalation Path
Source: https://docs.rootly.com/api-reference/escalationlevelspath/creates-an-escalation-level-for-an-escalation-path
https://rootly-heroku.s3.amazonaws.com/swagger/v1/swagger.json post /v1/escalation_paths/{escalation_policy_path_id}/escalation_levels
Creates a new escalation level from provided data
# List escalation levels for an Escalation Path
Source: https://docs.rootly.com/api-reference/escalationlevelspath/list-escalation-levels-for-an-escalation-path
https://rootly-heroku.s3.amazonaws.com/swagger/v1/swagger.json get /v1/escalation_paths/{escalation_policy_path_id}/escalation_levels
List escalation levels
# Creates an escalation level for an Escalation Policy
Source: https://docs.rootly.com/api-reference/escalationlevelspolicies/creates-an-escalation-level-for-an-escalation-policy
https://rootly-heroku.s3.amazonaws.com/swagger/v1/swagger.json post /v1/escalation_policies/{escalation_policy_id}/escalation_levels
Creates a new escalation level from provided data
# List escalation levels for an Escalation Policy
Source: https://docs.rootly.com/api-reference/escalationlevelspolicies/list-escalation-levels-for-an-escalation-policy
https://rootly-heroku.s3.amazonaws.com/swagger/v1/swagger.json get /v1/escalation_policies/{escalation_policy_id}/escalation_levels
List escalation levels
# Creates an escalation path
Source: https://docs.rootly.com/api-reference/escalationpaths/creates-an-escalation-path
https://rootly-heroku.s3.amazonaws.com/swagger/v1/swagger.json post /v1/escalation_policies/{escalation_policy_id}/escalation_paths
Creates a new escalation path from provided data
# Delete an escalation path
Source: https://docs.rootly.com/api-reference/escalationpaths/delete-an-escalation-path
https://rootly-heroku.s3.amazonaws.com/swagger/v1/swagger.json delete /v1/escalation_paths/{id}
Delete a specific escalation path by id
# List escalation paths
Source: https://docs.rootly.com/api-reference/escalationpaths/list-escalation-paths
https://rootly-heroku.s3.amazonaws.com/swagger/v1/swagger.json get /v1/escalation_policies/{escalation_policy_id}/escalation_paths
List escalation paths
# Retrieves an escalation path
Source: https://docs.rootly.com/api-reference/escalationpaths/retrieves-an-escalation-path
https://rootly-heroku.s3.amazonaws.com/swagger/v1/swagger.json get /v1/escalation_paths/{id}
Retrieves a specific escalation path by id
# Update an escalation path
Source: https://docs.rootly.com/api-reference/escalationpaths/update-an-escalation-path
https://rootly-heroku.s3.amazonaws.com/swagger/v1/swagger.json put /v1/escalation_paths/{id}
Update a specific escalation path by id
# Creates an escalation policy
Source: https://docs.rootly.com/api-reference/escalationpolicies/creates-an-escalation-policy
https://rootly-heroku.s3.amazonaws.com/swagger/v1/swagger.json post /v1/escalation_policies
Creates a new escalation policy from provided data
# Delete an escalation policy
Source: https://docs.rootly.com/api-reference/escalationpolicies/delete-an-escalation-policy
https://rootly-heroku.s3.amazonaws.com/swagger/v1/swagger.json delete /v1/escalation_policies/{id}
Delete a specific escalation policy by id
# List escalation policies
Source: https://docs.rootly.com/api-reference/escalationpolicies/list-escalation-policies
https://rootly-heroku.s3.amazonaws.com/swagger/v1/swagger.json get /v1/escalation_policies
List escalation policies
# Retrieves an escalation policy
Source: https://docs.rootly.com/api-reference/escalationpolicies/retrieves-an-escalation-policy
https://rootly-heroku.s3.amazonaws.com/swagger/v1/swagger.json get /v1/escalation_policies/{id}
Retrieves a specific escalation policy by id
# Update an escalation policy
Source: https://docs.rootly.com/api-reference/escalationpolicies/update-an-escalation-policy
https://rootly-heroku.s3.amazonaws.com/swagger/v1/swagger.json put /v1/escalation_policies/{id}
Update a specific escalation policy by id
# Creates FormField Options
Source: https://docs.rootly.com/api-reference/formfieldoptions/creates-formfield-options
https://rootly-heroku.s3.amazonaws.com/swagger/v1/swagger.json post /v1/form_fields/{form_field_id}/options
Creates a new form_field_option from provided data
# Delete FormField Options
Source: https://docs.rootly.com/api-reference/formfieldoptions/delete-formfield-options
https://rootly-heroku.s3.amazonaws.com/swagger/v1/swagger.json delete /v1/form_field_options/{id}
Delete a specific form_field_option by id
# List FormField Options
Source: https://docs.rootly.com/api-reference/formfieldoptions/list-formfield-options
https://rootly-heroku.s3.amazonaws.com/swagger/v1/swagger.json get /v1/form_fields/{form_field_id}/options
List form_field_options
# Retrieves FormField Options
Source: https://docs.rootly.com/api-reference/formfieldoptions/retrieves-formfield-options
https://rootly-heroku.s3.amazonaws.com/swagger/v1/swagger.json get /v1/form_field_options/{id}
Retrieves a specific form_field_option by id
# Update FormField Options
Source: https://docs.rootly.com/api-reference/formfieldoptions/update-formfield-options
https://rootly-heroku.s3.amazonaws.com/swagger/v1/swagger.json put /v1/form_field_options/{id}
Update a specific form_field_option by id
# Creates a Form Set Condition
Source: https://docs.rootly.com/api-reference/formfieldplacementconditions/creates-a-form-set-condition
https://rootly-heroku.s3.amazonaws.com/swagger/v1/swagger.json post /v1/form_field_placements/{form_field_placement_id}/conditions
Creates a new form_field_placement_condition from provided data
# Delete a Form Set Condition
Source: https://docs.rootly.com/api-reference/formfieldplacementconditions/delete-a-form-set-condition
https://rootly-heroku.s3.amazonaws.com/swagger/v1/swagger.json delete /v1/form_field_placement_conditions/{id}
Delete a specific form_field_placement_condition by id
# List Form Set Conditions
Source: https://docs.rootly.com/api-reference/formfieldplacementconditions/list-form-set-conditions
https://rootly-heroku.s3.amazonaws.com/swagger/v1/swagger.json get /v1/form_field_placements/{form_field_placement_id}/conditions
List form_field_placement_conditions
# Retrieves a Form Set Condition
Source: https://docs.rootly.com/api-reference/formfieldplacementconditions/retrieves-a-form-set-condition
https://rootly-heroku.s3.amazonaws.com/swagger/v1/swagger.json get /v1/form_field_placement_conditions/{id}
Retrieves a specific form_field_placement_condition by id
# Update a Form Set Condition
Source: https://docs.rootly.com/api-reference/formfieldplacementconditions/update-a-form-set-condition
https://rootly-heroku.s3.amazonaws.com/swagger/v1/swagger.json put /v1/form_field_placement_conditions/{id}
Update a specific form_field_placement_condition by id
# Creates a Form Field Placement
Source: https://docs.rootly.com/api-reference/formfieldplacements/creates-a-form-field-placement
https://rootly-heroku.s3.amazonaws.com/swagger/v1/swagger.json post /v1/form_fields/{form_field_id}/placements
Creates a new form_field_placement from provided data
# Delete a Form Field Placement
Source: https://docs.rootly.com/api-reference/formfieldplacements/delete-a-form-field-placement
https://rootly-heroku.s3.amazonaws.com/swagger/v1/swagger.json delete /v1/form_field_placements/{id}
Delete a specific form_field_placement by id
# List Form Field Placements
Source: https://docs.rootly.com/api-reference/formfieldplacements/list-form-field-placements
https://rootly-heroku.s3.amazonaws.com/swagger/v1/swagger.json get /v1/form_fields/{form_field_id}/placements
List form_field_placements
# Retrieves a Form Field Placement
Source: https://docs.rootly.com/api-reference/formfieldplacements/retrieves-a-form-field-placement
https://rootly-heroku.s3.amazonaws.com/swagger/v1/swagger.json get /v1/form_field_placements/{id}
Retrieves a specific form_field_placement by id
# Update a Form Field Placement
Source: https://docs.rootly.com/api-reference/formfieldplacements/update-a-form-field-placement
https://rootly-heroku.s3.amazonaws.com/swagger/v1/swagger.json put /v1/form_field_placements/{id}
Update a specific form_field_placement by id
# Creates FormField Positions
Source: https://docs.rootly.com/api-reference/formfieldpositions/creates-formfield-positions
https://rootly-heroku.s3.amazonaws.com/swagger/v1/swagger.json post /v1/form_fields/{form_field_id}/positions
Creates a new form field_position from provided data
# Delete a FormFieldPosition
Source: https://docs.rootly.com/api-reference/formfieldpositions/delete-a-formfieldposition
https://rootly-heroku.s3.amazonaws.com/swagger/v1/swagger.json delete /v1/form_field_positions/{id}
Delete a specific form_field position by id
# List FormField Position
Source: https://docs.rootly.com/api-reference/formfieldpositions/list-formfield-position
https://rootly-heroku.s3.amazonaws.com/swagger/v1/swagger.json get /v1/form_fields/{form_field_id}/positions
List form field positions
# Retrieves a FormFieldPosition
Source: https://docs.rootly.com/api-reference/formfieldpositions/retrieves-a-formfieldposition
https://rootly-heroku.s3.amazonaws.com/swagger/v1/swagger.json get /v1/form_field_positions/{id}
Retrieves a specific form field_position by id
# Update a FormFieldPosition
Source: https://docs.rootly.com/api-reference/formfieldpositions/update-a-formfieldposition
https://rootly-heroku.s3.amazonaws.com/swagger/v1/swagger.json put /v1/form_field_positions/{id}
Update a specific form_field position by id
# Creates a Form Field
Source: https://docs.rootly.com/api-reference/formfields/creates-a-form-field
https://rootly-heroku.s3.amazonaws.com/swagger/v1/swagger.json post /v1/form_fields
Creates a new form_field from provided data
# Delete a Form Field
Source: https://docs.rootly.com/api-reference/formfields/delete-a-form-field
https://rootly-heroku.s3.amazonaws.com/swagger/v1/swagger.json delete /v1/form_fields/{id}
Delete a specific form_field by id
# List Form Fields
Source: https://docs.rootly.com/api-reference/formfields/list-form-fields
https://rootly-heroku.s3.amazonaws.com/swagger/v1/swagger.json get /v1/form_fields
List form_fields
# Retrieves a Form Field
Source: https://docs.rootly.com/api-reference/formfields/retrieves-a-form-field
https://rootly-heroku.s3.amazonaws.com/swagger/v1/swagger.json get /v1/form_fields/{id}
Retrieves a specific form_field by id
# Update a Form Field
Source: https://docs.rootly.com/api-reference/formfields/update-a-form-field
https://rootly-heroku.s3.amazonaws.com/swagger/v1/swagger.json put /v1/form_fields/{id}
Update a specific form_field by id
# Creates a Form Set Condition
Source: https://docs.rootly.com/api-reference/formsetconditions/creates-a-form-set-condition
https://rootly-heroku.s3.amazonaws.com/swagger/v1/swagger.json post /v1/form_sets/{form_set_id}/conditions
Creates a new form_set_condition from provided data
# Delete a Form Set Condition
Source: https://docs.rootly.com/api-reference/formsetconditions/delete-a-form-set-condition
https://rootly-heroku.s3.amazonaws.com/swagger/v1/swagger.json delete /v1/form_set_conditions/{id}
Delete a specific form_set_condition by id
# List Form Set Conditions
Source: https://docs.rootly.com/api-reference/formsetconditions/list-form-set-conditions
https://rootly-heroku.s3.amazonaws.com/swagger/v1/swagger.json get /v1/form_sets/{form_set_id}/conditions
List form_set_conditions
# Retrieves a Form Set Condition
Source: https://docs.rootly.com/api-reference/formsetconditions/retrieves-a-form-set-condition
https://rootly-heroku.s3.amazonaws.com/swagger/v1/swagger.json get /v1/form_set_conditions/{id}
Retrieves a specific form_set_condition by id
# Update a Form Set Condition
Source: https://docs.rootly.com/api-reference/formsetconditions/update-a-form-set-condition
https://rootly-heroku.s3.amazonaws.com/swagger/v1/swagger.json put /v1/form_set_conditions/{id}
Update a specific form_set_condition by id
# Creates a Form Set
Source: https://docs.rootly.com/api-reference/formsets/creates-a-form-set
https://rootly-heroku.s3.amazonaws.com/swagger/v1/swagger.json post /v1/form_sets
Creates a new form_set from provided data
# Delete a Form Set
Source: https://docs.rootly.com/api-reference/formsets/delete-a-form-set
https://rootly-heroku.s3.amazonaws.com/swagger/v1/swagger.json delete /v1/form_sets/{id}
Delete a specific form_set by id
# List Form Sets
Source: https://docs.rootly.com/api-reference/formsets/list-form-sets
https://rootly-heroku.s3.amazonaws.com/swagger/v1/swagger.json get /v1/form_sets
List form_sets
# Retrieves a Form Set
Source: https://docs.rootly.com/api-reference/formsets/retrieves-a-form-set
https://rootly-heroku.s3.amazonaws.com/swagger/v1/swagger.json get /v1/form_sets/{id}
Retrieves a specific form_set by id
# Update a Form Set
Source: https://docs.rootly.com/api-reference/formsets/update-a-form-set
https://rootly-heroku.s3.amazonaws.com/swagger/v1/swagger.json put /v1/form_sets/{id}
Update a specific form_set by id
# Creates a functionality
Source: https://docs.rootly.com/api-reference/functionalities/creates-a-functionality
https://rootly-heroku.s3.amazonaws.com/swagger/v1/swagger.json post /v1/functionalities
Creates a new functionality from provided data
# Delete a functionality
Source: https://docs.rootly.com/api-reference/functionalities/delete-a-functionality
https://rootly-heroku.s3.amazonaws.com/swagger/v1/swagger.json delete /v1/functionalities/{id}
Delete a specific functionality by id
# Get functionality incidents chart
Source: https://docs.rootly.com/api-reference/functionalities/get-functionality-incidents-chart
https://rootly-heroku.s3.amazonaws.com/swagger/v1/swagger.json get /v1/functionalities/{id}/incidents_chart
Get functionality incidents chart
# Get functionality uptime chart
Source: https://docs.rootly.com/api-reference/functionalities/get-functionality-uptime-chart
https://rootly-heroku.s3.amazonaws.com/swagger/v1/swagger.json get /v1/functionalities/{id}/uptime_chart
Get functionality uptime chart
# List functionalities
Source: https://docs.rootly.com/api-reference/functionalities/list-functionalities
https://rootly-heroku.s3.amazonaws.com/swagger/v1/swagger.json get /v1/functionalities
List functionalities
# Retrieves a functionality
Source: https://docs.rootly.com/api-reference/functionalities/retrieves-a-functionality
https://rootly-heroku.s3.amazonaws.com/swagger/v1/swagger.json get /v1/functionalities/{id}
Retrieves a specific functionality by id
# Update a functionality
Source: https://docs.rootly.com/api-reference/functionalities/update-a-functionality
https://rootly-heroku.s3.amazonaws.com/swagger/v1/swagger.json put /v1/functionalities/{id}
Update a specific functionality by id
# Creates a heartbeat
Source: https://docs.rootly.com/api-reference/heartbeats/creates-a-heartbeat
https://rootly-heroku.s3.amazonaws.com/swagger/v1/swagger.json post /v1/heartbeats
Creates a new heartbeat from provided data
# Delete a heartbeat
Source: https://docs.rootly.com/api-reference/heartbeats/delete-a-heartbeat
https://rootly-heroku.s3.amazonaws.com/swagger/v1/swagger.json delete /v1/heartbeats/{id}
Delete a specific heartbeat by id
# List heartbeats
Source: https://docs.rootly.com/api-reference/heartbeats/list-heartbeats
https://rootly-heroku.s3.amazonaws.com/swagger/v1/swagger.json get /v1/heartbeats
List heartbeats
# Ping a heartbeat
Source: https://docs.rootly.com/api-reference/heartbeats/ping-a-heartbeat
https://rootly-heroku.s3.amazonaws.com/swagger/v1/swagger.json post /v1/heartbeats/{heartbeat_id}/ping
Ping a specific heartbeat by id
# Retrieves a heartbeat
Source: https://docs.rootly.com/api-reference/heartbeats/retrieves-a-heartbeat
https://rootly-heroku.s3.amazonaws.com/swagger/v1/swagger.json get /v1/heartbeats/{id}
Retrieves a specific heartbeat by id
# Update a heartbeat
Source: https://docs.rootly.com/api-reference/heartbeats/update-a-heartbeat
https://rootly-heroku.s3.amazonaws.com/swagger/v1/swagger.json put /v1/heartbeats/{id}
Update a specific heartbeat by id
# Creates an incident action item
Source: https://docs.rootly.com/api-reference/incidentactionitems/creates-an-incident-action-item
https://rootly-heroku.s3.amazonaws.com/swagger/v1/swagger.json post /v1/incidents/{incident_id}/action_items
Creates a new action item from provided data
# Delete an incident action item
Source: https://docs.rootly.com/api-reference/incidentactionitems/delete-an-incident-action-item
https://rootly-heroku.s3.amazonaws.com/swagger/v1/swagger.json delete /v1/action_items/{id}
Delete a specific incident action item by id
# List all action items for an organization
Source: https://docs.rootly.com/api-reference/incidentactionitems/list-all-action-items-for-an-organization
https://rootly-heroku.s3.amazonaws.com/swagger/v1/swagger.json get /v1/action_items
List all action items for an organization
# List incident action items
Source: https://docs.rootly.com/api-reference/incidentactionitems/list-incident-action-items
https://rootly-heroku.s3.amazonaws.com/swagger/v1/swagger.json get /v1/incidents/{incident_id}/action_items
List incident action items
# Retrieves an incident action item
Source: https://docs.rootly.com/api-reference/incidentactionitems/retrieves-an-incident-action-item
https://rootly-heroku.s3.amazonaws.com/swagger/v1/swagger.json get /v1/action_items/{id}
Retrieves a specific incident_action_item by id
# Update an incident action item
Source: https://docs.rootly.com/api-reference/incidentactionitems/update-an-incident-action-item
https://rootly-heroku.s3.amazonaws.com/swagger/v1/swagger.json put /v1/action_items/{id}
Update a specific incident action item by id
# Creates an incident event functionality
Source: https://docs.rootly.com/api-reference/incidenteventfunctionalities/creates-an-incident-event-functionality
https://rootly-heroku.s3.amazonaws.com/swagger/v1/swagger.json post /v1/events/{incident_event_id}/functionalities
Creates a new event functionality from provided data
# Delete an incident event functionality
Source: https://docs.rootly.com/api-reference/incidenteventfunctionalities/delete-an-incident-event-functionality
https://rootly-heroku.s3.amazonaws.com/swagger/v1/swagger.json delete /v1/incident_event_functionalities/{id}
Delete a specific incident event functionality by id
# List incident event functionalities
Source: https://docs.rootly.com/api-reference/incidenteventfunctionalities/list-incident-event-functionalities
https://rootly-heroku.s3.amazonaws.com/swagger/v1/swagger.json get /v1/events/{incident_event_id}/functionalities
List incident event functionalities
# Retrieves an incident event functionality
Source: https://docs.rootly.com/api-reference/incidenteventfunctionalities/retrieves-an-incident-event-functionality
https://rootly-heroku.s3.amazonaws.com/swagger/v1/swagger.json get /v1/incident_event_functionalities/{id}
Retrieves a specific incident_event_functionality by id
# Update an incident event
Source: https://docs.rootly.com/api-reference/incidenteventfunctionalities/update-an-incident-event
https://rootly-heroku.s3.amazonaws.com/swagger/v1/swagger.json put /v1/incident_event_functionalities/{id}
Update a specific incident event functionality by id
# Creates an incident event
Source: https://docs.rootly.com/api-reference/incidentevents/creates-an-incident-event
https://rootly-heroku.s3.amazonaws.com/swagger/v1/swagger.json post /v1/incidents/{incident_id}/events
Creates a new event from provided data
# Delete an incident event
Source: https://docs.rootly.com/api-reference/incidentevents/delete-an-incident-event
https://rootly-heroku.s3.amazonaws.com/swagger/v1/swagger.json delete /v1/events/{id}
Delete a specific incident event by id
# List incident events
Source: https://docs.rootly.com/api-reference/incidentevents/list-incident-events
https://rootly-heroku.s3.amazonaws.com/swagger/v1/swagger.json get /v1/incidents/{incident_id}/events
List incident events
# Retrieves an incident event
Source: https://docs.rootly.com/api-reference/incidentevents/retrieves-an-incident-event
https://rootly-heroku.s3.amazonaws.com/swagger/v1/swagger.json get /v1/events/{id}
Retrieves a specific incident_event by id
# Update an incident event
Source: https://docs.rootly.com/api-reference/incidentevents/update-an-incident-event
https://rootly-heroku.s3.amazonaws.com/swagger/v1/swagger.json put /v1/events/{id}
Update a specific incident event by id
# Creates an incident event service
Source: https://docs.rootly.com/api-reference/incidenteventservices/creates-an-incident-event-service
https://rootly-heroku.s3.amazonaws.com/swagger/v1/swagger.json post /v1/events/{incident_event_id}/services
Creates a new event service from provided data
# Delete an incident event functionalitu
Source: https://docs.rootly.com/api-reference/incidenteventservices/delete-an-incident-event-functionalitu
https://rootly-heroku.s3.amazonaws.com/swagger/v1/swagger.json delete /v1/incident_event_services/{id}
Delete a specific incident event service by id
# List incident event services
Source: https://docs.rootly.com/api-reference/incidenteventservices/list-incident-event-services
https://rootly-heroku.s3.amazonaws.com/swagger/v1/swagger.json get /v1/events/{incident_event_id}/services
List incident event services
# Retrieves an incident event service
Source: https://docs.rootly.com/api-reference/incidenteventservices/retrieves-an-incident-event-service
https://rootly-heroku.s3.amazonaws.com/swagger/v1/swagger.json get /v1/incident_event_services/{id}
Retrieves a specific incident_event_service by id
# Update an incident event
Source: https://docs.rootly.com/api-reference/incidenteventservices/update-an-incident-event
https://rootly-heroku.s3.amazonaws.com/swagger/v1/swagger.json put /v1/incident_event_services/{id}
Update a specific incident event service by id
# Creates an incident feedback
Source: https://docs.rootly.com/api-reference/incidentfeedbacks/creates-an-incident-feedback
https://rootly-heroku.s3.amazonaws.com/swagger/v1/swagger.json post /v1/incidents/{incident_id}/feedbacks
Creates a new feedback from provided data
# List incident feedbacks
Source: https://docs.rootly.com/api-reference/incidentfeedbacks/list-incident-feedbacks
https://rootly-heroku.s3.amazonaws.com/swagger/v1/swagger.json get /v1/incidents/{incident_id}/feedbacks
List incident feedbacks
# Retrieves an incident feedback
Source: https://docs.rootly.com/api-reference/incidentfeedbacks/retrieves-an-incident-feedback
https://rootly-heroku.s3.amazonaws.com/swagger/v1/swagger.json get /v1/feedbacks/{id}
Retrieves a specific incident_feedback by id
# Update an incident feedback
Source: https://docs.rootly.com/api-reference/incidentfeedbacks/update-an-incident-feedback
https://rootly-heroku.s3.amazonaws.com/swagger/v1/swagger.json put /v1/feedbacks/{id}
Update a specific incident feedback by id
# Creates an incident form field selection
Source: https://docs.rootly.com/api-reference/incidentformfieldselections/creates-an-incident-form-field-selection
https://rootly-heroku.s3.amazonaws.com/swagger/v1/swagger.json post /v1/incidents/{incident_id}/form_field_selections
Creates a new incident form field selection from provided data
# Delete an incident form field selection
Source: https://docs.rootly.com/api-reference/incidentformfieldselections/delete-an-incident-form-field-selection
https://rootly-heroku.s3.amazonaws.com/swagger/v1/swagger.json delete /v1/incident_form_field_selections/{id}
Delete a specific incident form field selection by id
# List incident form field selections
Source: https://docs.rootly.com/api-reference/incidentformfieldselections/list-incident-form-field-selections
https://rootly-heroku.s3.amazonaws.com/swagger/v1/swagger.json get /v1/incidents/{incident_id}/form_field_selections
List incident form field selections
# Retrieves an incident form field selection
Source: https://docs.rootly.com/api-reference/incidentformfieldselections/retrieves-an-incident-form-field-selection
https://rootly-heroku.s3.amazonaws.com/swagger/v1/swagger.json get /v1/incident_form_field_selections/{id}
Retrieves a specific incident form field selection by id
# Update an incident form field selection
Source: https://docs.rootly.com/api-reference/incidentformfieldselections/update-an-incident-form-field-selection
https://rootly-heroku.s3.amazonaws.com/swagger/v1/swagger.json put /v1/incident_form_field_selections/{id}
Update a specific incident form field selection by id
# Creates an incident_permission_set_boolean
Source: https://docs.rootly.com/api-reference/incidentpermissionsetbooleans/creates-an-incident_permission_set_boolean
https://rootly-heroku.s3.amazonaws.com/swagger/v1/swagger.json post /v1/incident_permission_sets/{incident_permission_set_id}/booleans
Creates a new incident_permission_set_boolean from provided data
# Delete an incident_permission_set_boolean
Source: https://docs.rootly.com/api-reference/incidentpermissionsetbooleans/delete-an-incident_permission_set_boolean
https://rootly-heroku.s3.amazonaws.com/swagger/v1/swagger.json delete /v1/incident_permission_set_booleans/{id}
Delete a specific incident_permission_set_boolean by id
# List incident_permission_set_booleans
Source: https://docs.rootly.com/api-reference/incidentpermissionsetbooleans/list-incident_permission_set_booleans
https://rootly-heroku.s3.amazonaws.com/swagger/v1/swagger.json get /v1/incident_permission_sets/{incident_permission_set_id}/booleans
List incident_permission_set_booleans
# Retrieves an incident_permission_set_boolean
Source: https://docs.rootly.com/api-reference/incidentpermissionsetbooleans/retrieves-an-incident_permission_set_boolean
https://rootly-heroku.s3.amazonaws.com/swagger/v1/swagger.json get /v1/incident_permission_set_booleans/{id}
Retrieves a specific incident_permission_set_boolean by id
# Update an incident_permission_set_boolean
Source: https://docs.rootly.com/api-reference/incidentpermissionsetbooleans/update-an-incident_permission_set_boolean
https://rootly-heroku.s3.amazonaws.com/swagger/v1/swagger.json put /v1/incident_permission_set_booleans/{id}
Update a specific incident_permission_set_boolean by id
# Creates an incident_permission_set_resource
Source: https://docs.rootly.com/api-reference/incidentpermissionsetresources/creates-an-incident_permission_set_resource
https://rootly-heroku.s3.amazonaws.com/swagger/v1/swagger.json post /v1/incident_permission_sets/{incident_permission_set_id}/resources
Creates a new incident_permission_set_resource from provided data
# Delete an incident_permission_set_resource
Source: https://docs.rootly.com/api-reference/incidentpermissionsetresources/delete-an-incident_permission_set_resource
https://rootly-heroku.s3.amazonaws.com/swagger/v1/swagger.json delete /v1/incident_permission_set_resources/{id}
Delete a specific incident_permission_set_resource by id
# List incident_permission_set_resources
Source: https://docs.rootly.com/api-reference/incidentpermissionsetresources/list-incident_permission_set_resources
https://rootly-heroku.s3.amazonaws.com/swagger/v1/swagger.json get /v1/incident_permission_sets/{incident_permission_set_id}/resources
List incident_permission_set_resources
# Retrieves an incident_permission_set_resource
Source: https://docs.rootly.com/api-reference/incidentpermissionsetresources/retrieves-an-incident_permission_set_resource
https://rootly-heroku.s3.amazonaws.com/swagger/v1/swagger.json get /v1/incident_permission_set_resources/{id}
Retrieves a specific incident_permission_set_resource by id
# Update an incident_permission_set_resource
Source: https://docs.rootly.com/api-reference/incidentpermissionsetresources/update-an-incident_permission_set_resource
https://rootly-heroku.s3.amazonaws.com/swagger/v1/swagger.json put /v1/incident_permission_set_resources/{id}
Update a specific incident_permission_set_resource by id
# Creates an incident_permission_set
Source: https://docs.rootly.com/api-reference/incidentpermissionsets/creates-an-incident_permission_set
https://rootly-heroku.s3.amazonaws.com/swagger/v1/swagger.json post /v1/incident_permission_sets
Creates a new incident_permission_set from provided data
# Delete an incident_permission_set
Source: https://docs.rootly.com/api-reference/incidentpermissionsets/delete-an-incident_permission_set
https://rootly-heroku.s3.amazonaws.com/swagger/v1/swagger.json delete /v1/incident_permission_sets/{id}
Delete a specific incident_permission_set by id
# List incident_permission_sets
Source: https://docs.rootly.com/api-reference/incidentpermissionsets/list-incident_permission_sets
https://rootly-heroku.s3.amazonaws.com/swagger/v1/swagger.json get /v1/incident_permission_sets
List incident_permission_sets
# Retrieves an incident_permission_set
Source: https://docs.rootly.com/api-reference/incidentpermissionsets/retrieves-an-incident_permission_set
https://rootly-heroku.s3.amazonaws.com/swagger/v1/swagger.json get /v1/incident_permission_sets/{id}
Retrieves a specific incident_permission_set by id
# Update an incident_permission_set
Source: https://docs.rootly.com/api-reference/incidentpermissionsets/update-an-incident_permission_set
https://rootly-heroku.s3.amazonaws.com/swagger/v1/swagger.json put /v1/incident_permission_sets/{id}
Update a specific incident_permission_set by id
# List incident retrospectives
Source: https://docs.rootly.com/api-reference/incidentretrospectives/list-incident-retrospectives
https://rootly-heroku.s3.amazonaws.com/swagger/v1/swagger.json get /v1/post_mortems
List incident retrospectives
# Retrieves an incident retrospective
Source: https://docs.rootly.com/api-reference/incidentretrospectives/retrieves-an-incident-retrospective
https://rootly-heroku.s3.amazonaws.com/swagger/v1/swagger.json get /v1/post_mortems/{id}
List incidents retrospectives
# Update an incident retrospective
Source: https://docs.rootly.com/api-reference/incidentretrospectives/update-an-incident-retrospective
https://rootly-heroku.s3.amazonaws.com/swagger/v1/swagger.json put /v1/post_mortems/{id}
Update a specific incident retrospective by id
# Retrieves an incident retrospective step
Source: https://docs.rootly.com/api-reference/incidentretrospectivesteps/retrieves-an-incident-retrospective-step
https://rootly-heroku.s3.amazonaws.com/swagger/v1/swagger.json get /v1/incident_retrospective_steps/{id}
Retrieves a specific incident retrospective step by id
# Update an incident retrospective step
Source: https://docs.rootly.com/api-reference/incidentretrospectivesteps/update-an-incident-retrospective-step
https://rootly-heroku.s3.amazonaws.com/swagger/v1/swagger.json put /v1/incident_retrospective_steps/{id}
Update a specific incident retrospective step by id
# Creates an incident role
Source: https://docs.rootly.com/api-reference/incidentroles/creates-an-incident-role
https://rootly-heroku.s3.amazonaws.com/swagger/v1/swagger.json post /v1/incident_roles
Creates a new incident role from provided data
# Delete an incident role
Source: https://docs.rootly.com/api-reference/incidentroles/delete-an-incident-role
https://rootly-heroku.s3.amazonaws.com/swagger/v1/swagger.json delete /v1/incident_roles/{id}
Delete a specific incident_role by id
# List incident roles
Source: https://docs.rootly.com/api-reference/incidentroles/list-incident-roles
https://rootly-heroku.s3.amazonaws.com/swagger/v1/swagger.json get /v1/incident_roles
List incident roles
# Retrieves an incident role
Source: https://docs.rootly.com/api-reference/incidentroles/retrieves-an-incident-role
https://rootly-heroku.s3.amazonaws.com/swagger/v1/swagger.json get /v1/incident_roles/{id}
Retrieves a specific incident_role by id
# Update an incident role
Source: https://docs.rootly.com/api-reference/incidentroles/update-an-incident-role
https://rootly-heroku.s3.amazonaws.com/swagger/v1/swagger.json put /v1/incident_roles/{id}
Update a specific incident_role by id
# Creates an incident role task
Source: https://docs.rootly.com/api-reference/incidentroletasks/creates-an-incident-role-task
https://rootly-heroku.s3.amazonaws.com/swagger/v1/swagger.json post /v1/incident_roles/{incident_role_id}/incident_role_tasks
Creates a new task from provided data
# Delete an incident role task
Source: https://docs.rootly.com/api-reference/incidentroletasks/delete-an-incident-role-task
https://rootly-heroku.s3.amazonaws.com/swagger/v1/swagger.json delete /v1/incident_role_tasks/{id}
Delete a specific incident_role task by id
# List incident role tasks
Source: https://docs.rootly.com/api-reference/incidentroletasks/list-incident-role-tasks
https://rootly-heroku.s3.amazonaws.com/swagger/v1/swagger.json get /v1/incident_roles/{incident_role_id}/incident_role_tasks
List incident_role tasks
# Retrieves an incident role task
Source: https://docs.rootly.com/api-reference/incidentroletasks/retrieves-an-incident-role-task
https://rootly-heroku.s3.amazonaws.com/swagger/v1/swagger.json get /v1/incident_role_tasks/{id}
Retrieves a specific incident_role_task by id
# Update an incident role task
Source: https://docs.rootly.com/api-reference/incidentroletasks/update-an-incident-role-task
https://rootly-heroku.s3.amazonaws.com/swagger/v1/swagger.json put /v1/incident_role_tasks/{id}
Update a specific incident_role task by id
# Add subscribers to incident
Source: https://docs.rootly.com/api-reference/incidents/add-subscribers-to-incident
https://rootly-heroku.s3.amazonaws.com/swagger/v1/swagger.json post /v1/incidents/{id}/add_subscribers
Add subscribers to incident
# Assign user to incident
Source: https://docs.rootly.com/api-reference/incidents/assign-user-to-incident
https://rootly-heroku.s3.amazonaws.com/swagger/v1/swagger.json post /v1/incidents/{id}/assign_role_to_user
Assign user to incident
# Cancel an incident
Source: https://docs.rootly.com/api-reference/incidents/cancel-an-incident
https://rootly-heroku.s3.amazonaws.com/swagger/v1/swagger.json put /v1/incidents/{id}/cancel
Cancel a specific incident by id
# Creates an incident
Source: https://docs.rootly.com/api-reference/incidents/creates-an-incident
https://rootly-heroku.s3.amazonaws.com/swagger/v1/swagger.json post /v1/incidents
Creates a new incident from provided data
# Delete an incident
Source: https://docs.rootly.com/api-reference/incidents/delete-an-incident
https://rootly-heroku.s3.amazonaws.com/swagger/v1/swagger.json delete /v1/incidents/{id}
Delete a specific incident by id
# List incidents
Source: https://docs.rootly.com/api-reference/incidents/list-incidents
https://rootly-heroku.s3.amazonaws.com/swagger/v1/swagger.json get /v1/incidents
List incidents
# Mark an incident as a duplicate
Source: https://docs.rootly.com/api-reference/incidents/mark-an-incident-as-a-duplicate
https://rootly-heroku.s3.amazonaws.com/swagger/v1/swagger.json put /v1/incidents/{id}/duplicate
Mark an incident as a duplicate
# Mitigate an incident
Source: https://docs.rootly.com/api-reference/incidents/mitigate-an-incident
https://rootly-heroku.s3.amazonaws.com/swagger/v1/swagger.json put /v1/incidents/{id}/mitigate
Mitigate a specific incident by id
# Remove assigned user from incident
Source: https://docs.rootly.com/api-reference/incidents/remove-assigned-user-from-incident
https://rootly-heroku.s3.amazonaws.com/swagger/v1/swagger.json delete /v1/incidents/{id}/unassign_role_from_user
Remove assigned user from incident
# Remove subscribers from incident
Source: https://docs.rootly.com/api-reference/incidents/remove-subscribers-from-incident
https://rootly-heroku.s3.amazonaws.com/swagger/v1/swagger.json delete /v1/incidents/{id}/remove_subscribers
Remove subscribers to incident
# Resolve an incident
Source: https://docs.rootly.com/api-reference/incidents/resolve-an-incident
https://rootly-heroku.s3.amazonaws.com/swagger/v1/swagger.json put /v1/incidents/{id}/resolve
Resolve a specific incident by id
# Restart an incident
Source: https://docs.rootly.com/api-reference/incidents/restart-an-incident
https://rootly-heroku.s3.amazonaws.com/swagger/v1/swagger.json put /v1/incidents/{id}/restart
Restart a specific incident by id
# Retrieves an incident
Source: https://docs.rootly.com/api-reference/incidents/retrieves-an-incident
https://rootly-heroku.s3.amazonaws.com/swagger/v1/swagger.json get /v1/incidents/{id}
Retrieves a specific incident by id
# Triage an incident
Source: https://docs.rootly.com/api-reference/incidents/triage-an-incident
https://rootly-heroku.s3.amazonaws.com/swagger/v1/swagger.json put /v1/incidents/{id}/in_triage
Set a specific incident by ID to triage state
# Update an incident
Source: https://docs.rootly.com/api-reference/incidents/update-an-incident
https://rootly-heroku.s3.amazonaws.com/swagger/v1/swagger.json put /v1/incidents/{id}
Update a specific incident by id
# Creates an incident status page event
Source: https://docs.rootly.com/api-reference/incidentstatuspageevents/creates-an-incident-status-page-event
https://rootly-heroku.s3.amazonaws.com/swagger/v1/swagger.json post /v1/incidents/{incident_id}/status-page-events
Creates a new event from provided data
# Delete an incident status page event
Source: https://docs.rootly.com/api-reference/incidentstatuspageevents/delete-an-incident-status-page-event
https://rootly-heroku.s3.amazonaws.com/swagger/v1/swagger.json delete /v1/status-page-events/{id}
Delete a specific incident status page event by id
# List incident status page events
Source: https://docs.rootly.com/api-reference/incidentstatuspageevents/list-incident-status-page-events
https://rootly-heroku.s3.amazonaws.com/swagger/v1/swagger.json get /v1/incidents/{incident_id}/status-page-events
List incident status page events
# Retrieves an incident status page event
Source: https://docs.rootly.com/api-reference/incidentstatuspageevents/retrieves-an-incident-status-page-event
https://rootly-heroku.s3.amazonaws.com/swagger/v1/swagger.json get /v1/status-page-events/{id}
Retrieves a specific incident_status_page_event by id
# Update an incident status page event
Source: https://docs.rootly.com/api-reference/incidentstatuspageevents/update-an-incident-status-page-event
https://rootly-heroku.s3.amazonaws.com/swagger/v1/swagger.json put /v1/status-page-events/{id}
Update a specific incident status page event by id
# Creates a sub-status assignment
Source: https://docs.rootly.com/api-reference/incidentsubstatuses/creates-a-sub-status-assignment
https://rootly-heroku.s3.amazonaws.com/swagger/v1/swagger.json post /v1/incidents/{incident_id}/sub_statuses
Creates a new sub-status assignment from provided data
# Delete an incident_sub_status
Source: https://docs.rootly.com/api-reference/incidentsubstatuses/delete-an-incident_sub_status
https://rootly-heroku.s3.amazonaws.com/swagger/v1/swagger.json delete /v1/incident_sub_statuses/{id}
Delete a specific incident_sub_status by id
# List incident_sub_statuses
Source: https://docs.rootly.com/api-reference/incidentsubstatuses/list-incident_sub_statuses
https://rootly-heroku.s3.amazonaws.com/swagger/v1/swagger.json get /v1/incidents/{incident_id}/sub_statuses
List incident_sub_statuses
# Retrieves incident_sub_status
Source: https://docs.rootly.com/api-reference/incidentsubstatuses/retrieves-incident_sub_status
https://rootly-heroku.s3.amazonaws.com/swagger/v1/swagger.json get /v1/incident_sub_statuses/{id}
Retrieves a specific incident_sub_status by id
# Update incident_sub_status
Source: https://docs.rootly.com/api-reference/incidentsubstatuses/update-incident_sub_status
https://rootly-heroku.s3.amazonaws.com/swagger/v1/swagger.json put /v1/incident_sub_statuses/{id}
Update a specific incident_sub_status by id
# Creates an incident type
Source: https://docs.rootly.com/api-reference/incidenttypes/creates-an-incident-type
https://rootly-heroku.s3.amazonaws.com/swagger/v1/swagger.json post /v1/incident_types
Creates a new incident_type from provided data
# Delete an incident type
Source: https://docs.rootly.com/api-reference/incidenttypes/delete-an-incident-type
https://rootly-heroku.s3.amazonaws.com/swagger/v1/swagger.json delete /v1/incident_types/{id}
Delete a specific incident_type by id
# List incident types
Source: https://docs.rootly.com/api-reference/incidenttypes/list-incident-types
https://rootly-heroku.s3.amazonaws.com/swagger/v1/swagger.json get /v1/incident_types
List incident types
# Retrieves an incident type
Source: https://docs.rootly.com/api-reference/incidenttypes/retrieves-an-incident-type
https://rootly-heroku.s3.amazonaws.com/swagger/v1/swagger.json get /v1/incident_types/{id}
Retrieves a specific incident_type by id
# Update an incident type
Source: https://docs.rootly.com/api-reference/incidenttypes/update-an-incident-type
https://rootly-heroku.s3.amazonaws.com/swagger/v1/swagger.json put /v1/incident_types/{id}
Update a specific incident_type by id
# Retrieves IP ranges
Source: https://docs.rootly.com/api-reference/ipranges/retrieves-ip-ranges
https://rootly-heroku.s3.amazonaws.com/swagger/v1/swagger.json get /v1/ip_ranges
Retrieves the IP ranges for rootly.com services
# Creates a Live Call Router
Source: https://docs.rootly.com/api-reference/livecallrouters/creates-a-live-call-router
https://rootly-heroku.s3.amazonaws.com/swagger/v1/swagger.json post /v1/live_call_routers
Creates a new Live Call Router from provided data
# Delete a Live Call Router
Source: https://docs.rootly.com/api-reference/livecallrouters/delete-a-live-call-router
https://rootly-heroku.s3.amazonaws.com/swagger/v1/swagger.json delete /v1/live_call_routers/{id}
Delete a specific Live Call Router by id
# Generates a phone number for Live Call Router
Source: https://docs.rootly.com/api-reference/livecallrouters/generates-a-phone-number-for-live-call-router
https://rootly-heroku.s3.amazonaws.com/swagger/v1/swagger.json get /v1/live_call_routers/generate_phone_number
Generates a phone number for Live Call Router
# List Live Call Routers
Source: https://docs.rootly.com/api-reference/livecallrouters/list-live-call-routers
https://rootly-heroku.s3.amazonaws.com/swagger/v1/swagger.json get /v1/live_call_routers
List Live Call Routers
# Retrieves a Live Call Router
Source: https://docs.rootly.com/api-reference/livecallrouters/retrieves-a-live-call-router
https://rootly-heroku.s3.amazonaws.com/swagger/v1/swagger.json get /v1/live_call_routers/{id}
Retrieves a specific Live Call Router by id
# Update a Live Call Router
Source: https://docs.rootly.com/api-reference/livecallrouters/update-a-live-call-router
https://rootly-heroku.s3.amazonaws.com/swagger/v1/swagger.json put /v1/live_call_routers/{id}
Update a specific Live Call Router by id
# Creates an On-Call Role
Source: https://docs.rootly.com/api-reference/oncallroles/creates-an-on-call-role
https://rootly-heroku.s3.amazonaws.com/swagger/v1/swagger.json post /v1/on_call_roles
Creates a new On-Call Role from provided data
# Delete an On-Call Role
Source: https://docs.rootly.com/api-reference/oncallroles/delete-an-on-call-role
https://rootly-heroku.s3.amazonaws.com/swagger/v1/swagger.json delete /v1/on_call_roles/{id}
Delete a specific On-Call Role by id
# List On-Call Roles
Source: https://docs.rootly.com/api-reference/oncallroles/list-on-call-roles
https://rootly-heroku.s3.amazonaws.com/swagger/v1/swagger.json get /v1/on_call_roles
List On-Call Roles
# Retrieves an On-Call Role
Source: https://docs.rootly.com/api-reference/oncallroles/retrieves-an-on-call-role
https://rootly-heroku.s3.amazonaws.com/swagger/v1/swagger.json get /v1/on_call_roles/{id}
Retrieves a specific On-Call Role by id
# Update an On-Call Role
Source: https://docs.rootly.com/api-reference/oncallroles/update-an-on-call-role
https://rootly-heroku.s3.amazonaws.com/swagger/v1/swagger.json put /v1/on_call_roles/{id}
Update a specific On-Call Role by id
# creates an shadow configuration
Source: https://docs.rootly.com/api-reference/oncallshadows/creates-an-shadow-configuration
https://rootly-heroku.s3.amazonaws.com/swagger/v1/swagger.json post /v1/schedules/{schedule_id}/on_call_shadows
Creates a new on call shadow configuration from provided data
# List On Call Shadows for Shift
Source: https://docs.rootly.com/api-reference/oncallshadows/list-on-call-shadows-for-shift
https://rootly-heroku.s3.amazonaws.com/swagger/v1/swagger.json get /v1/schedules/{schedule_id}/on_call_shadows
List shadow shifts for schedule
# Retrieves an On Call Shadow configuration by ID
Source: https://docs.rootly.com/api-reference/oncallshadows/retrieves-an-on-call-shadow-configuration-by-id
https://rootly-heroku.s3.amazonaws.com/swagger/v1/swagger.json get /v1/on_call_shadows/{id}
Retrieves a specific On Call Shadow configuration by ID
# Update an On Call Shadow configuration
Source: https://docs.rootly.com/api-reference/oncallshadows/update-an-on-call-shadow-configuration
https://rootly-heroku.s3.amazonaws.com/swagger/v1/swagger.json put /v1/on_call_shadows/{id}
Update a specific on call shadow configuration by id
# creates an override shift
Source: https://docs.rootly.com/api-reference/overrideshifts/creates-an-override-shift
https://rootly-heroku.s3.amazonaws.com/swagger/v1/swagger.json post /v1/schedules/{schedule_id}/override_shifts
Creates a new override shift from provided data
# Delete an on call shadow configuration
Source: https://docs.rootly.com/api-reference/overrideshifts/delete-an-on-call-shadow-configuration
https://rootly-heroku.s3.amazonaws.com/swagger/v1/swagger.json delete /v1/on_call_shadows/{id}
Delete a specific on call shadow configuration by id
# Delete an override shift
Source: https://docs.rootly.com/api-reference/overrideshifts/delete-an-override-shift
https://rootly-heroku.s3.amazonaws.com/swagger/v1/swagger.json delete /v1/override_shifts/{id}
Delete a specific override shift by id
# List override shifts
Source: https://docs.rootly.com/api-reference/overrideshifts/list-override-shifts
https://rootly-heroku.s3.amazonaws.com/swagger/v1/swagger.json get /v1/schedules/{schedule_id}/override_shifts
List override shifts
# Retrieves an override shift
Source: https://docs.rootly.com/api-reference/overrideshifts/retrieves-an-override-shift
https://rootly-heroku.s3.amazonaws.com/swagger/v1/swagger.json get /v1/override_shifts/{id}
Retrieves a specific override shift by id
# Update an override shift
Source: https://docs.rootly.com/api-reference/overrideshifts/update-an-override-shift
https://rootly-heroku.s3.amazonaws.com/swagger/v1/swagger.json put /v1/override_shifts/{id}
Update a specific override shift by id
# Overview
Source: https://docs.rootly.com/api-reference/overview
API Authentication and Request Examples
**Step 4: Configure your own personal nortifcations for** **Audible Notifications and Quiet Notifications** (required)
* For additional information on audible notifications verses quiet notifications setup please visit the [On-Call Notifications](/on-call/on-call-notifications "On-Call Notifications") documentation.
# Overview
Source: https://docs.rootly.com/alerts
Alerts are events created by your observability providers to notify responders a system or customer needs attention.
## Overview
Examples could include:
* A Pagerduty Incident has been created
* A Datadog alert triggered
* A Zendesk ticket has been created
Alerts can be associated with your incidents to add more context for your responders.
Rootly integrates with the following providers allowing the automated logging of alerts:
| | |
| ------------------------------------------------- | --------------------------------------------------- |
| Integration | Trigger |
| [PagerDuty](/integrations/pagerduty "PagerDuty") | - When a PagerDuty Incident is created |
| [Opsgenie](/integrations/opsgenie "Opsgenie") | - When a Opsgenie Incident is created |
| [VictorOps](/integrations/victor-ops "VictorOps") | - When a VictorOps Incident is created |
| [Datadog](/integrations/datadog "Datadog") | - When a Datadog alert is triggered |
| [Zendesk](/integrations/zendesk "Zendesk") | - When a Zendesk ticket is created ( customizable ) |
| [Nobl9](/integrations/nobl9 "Nobl9") | - When a SLO is not satisfied anymore |
| [Sentry](/integrations/sentry "Sentry") | - When a Sentry alert is triggered |
**Don't see your observability provider? Rootly can ingest alerts via** [**generic webhooks**](/integrations/generic-webhook-alert-source "generic webhooks")**.**
# [DEPRECATED] Creates a custom field option
Source: https://docs.rootly.com/api-reference/[deprecated]-customfieldoptions/[deprecated]-creates-a-custom-field-option
https://rootly-heroku.s3.amazonaws.com/swagger/v1/swagger.json post /v1/custom_fields/{custom_field_id}/options
[DEPRECATED] Use form field endpoints instead. Creates a new custom field option from provided data
# [DEPRECATED] Delete a custom field option
Source: https://docs.rootly.com/api-reference/[deprecated]-customfieldoptions/[deprecated]-delete-a-custom-field-option
https://rootly-heroku.s3.amazonaws.com/swagger/v1/swagger.json delete /v1/custom_field_options/{id}
[DEPRECATED] Use form field endpoints instead. Delete a specific Custom Field Option by id
# [DEPRECATED] List custom field options
Source: https://docs.rootly.com/api-reference/[deprecated]-customfieldoptions/[deprecated]-list-custom-field-options
https://rootly-heroku.s3.amazonaws.com/swagger/v1/swagger.json get /v1/custom_fields/{custom_field_id}/options
[DEPRECATED] Use form field endpoints instead. List custom field options
# [DEPRECATED] Retrieves a custom field option
Source: https://docs.rootly.com/api-reference/[deprecated]-customfieldoptions/[deprecated]-retrieves-a-custom-field-option
https://rootly-heroku.s3.amazonaws.com/swagger/v1/swagger.json get /v1/custom_field_options/{id}
[DEPRECATED] Use form field endpoints instead. Retrieves a specific custom field option by id
# [DEPRECATED] Update a custom field option
Source: https://docs.rootly.com/api-reference/[deprecated]-customfieldoptions/[deprecated]-update-a-custom-field-option
https://rootly-heroku.s3.amazonaws.com/swagger/v1/swagger.json put /v1/custom_field_options/{id}
[DEPRECATED] Use form field endpoints instead. Update a specific custom field option by id
# [DEPRECATED] Creates a Custom Field
Source: https://docs.rootly.com/api-reference/[deprecated]-customfields/[deprecated]-creates-a-custom-field
https://rootly-heroku.s3.amazonaws.com/swagger/v1/swagger.json post /v1/custom_fields
[DEPRECATED] Use form field endpoints instead. Creates a new custom field from provided data
# [DEPRECATED] Delete a Custom Field
Source: https://docs.rootly.com/api-reference/[deprecated]-customfields/[deprecated]-delete-a-custom-field
https://rootly-heroku.s3.amazonaws.com/swagger/v1/swagger.json delete /v1/custom_fields/{id}
[DEPRECATED] Use form field endpoints instead. Delete a specific custom field by id
# [DEPRECATED] List Custom Fields
Source: https://docs.rootly.com/api-reference/[deprecated]-customfields/[deprecated]-list-custom-fields
https://rootly-heroku.s3.amazonaws.com/swagger/v1/swagger.json get /v1/custom_fields
[DEPRECATED] Use form field endpoints instead. List Custom fields
# [DEPRECATED] Retrieves a Custom Field
Source: https://docs.rootly.com/api-reference/[deprecated]-customfields/[deprecated]-retrieves-a-custom-field
https://rootly-heroku.s3.amazonaws.com/swagger/v1/swagger.json get /v1/custom_fields/{id}
Retrieves a specific custom_field by id
# [DEPRECATED] Update a Custom Field
Source: https://docs.rootly.com/api-reference/[deprecated]-customfields/[deprecated]-update-a-custom-field
https://rootly-heroku.s3.amazonaws.com/swagger/v1/swagger.json put /v1/custom_fields/{id}
[DEPRECATED] Use form field endpoints instead. Update a specific custom field by id
# [DEPRECATED] Creates an incident custom field selection
Source: https://docs.rootly.com/api-reference/[deprecated]-incidentcustomfieldselections/[deprecated]-creates-an-incident-custom-field-selection
https://rootly-heroku.s3.amazonaws.com/swagger/v1/swagger.json post /v1/incidents/{incident_id}/custom_field_selections
[DEPRECATED] Use form field endpoints instead. Creates a new incident custom field selection from provided data
# [DEPRECATED] Delete an incident custom field selection
Source: https://docs.rootly.com/api-reference/[deprecated]-incidentcustomfieldselections/[deprecated]-delete-an-incident-custom-field-selection
https://rootly-heroku.s3.amazonaws.com/swagger/v1/swagger.json delete /v1/incident_custom_field_selections/{id}
[DEPRECATED] Use form field endpoints instead. Delete a specific incident custom field selection by id
# [DEPRECATED] List incident custom field selections
Source: https://docs.rootly.com/api-reference/[deprecated]-incidentcustomfieldselections/[deprecated]-list-incident-custom-field-selections
https://rootly-heroku.s3.amazonaws.com/swagger/v1/swagger.json get /v1/incidents/{incident_id}/custom_field_selections
[DEPRECATED] Use form field endpoints instead. List incident custom field selections
# [DEPRECATED] Retrieves an incident custom field selection
Source: https://docs.rootly.com/api-reference/[deprecated]-incidentcustomfieldselections/[deprecated]-retrieves-an-incident-custom-field-selection
https://rootly-heroku.s3.amazonaws.com/swagger/v1/swagger.json get /v1/incident_custom_field_selections/{id}
[DEPRECATED] Use form field endpoints instead. Retrieves a specific incident custom field selection by id
# [DEPRECATED] Update an incident custom field selection
Source: https://docs.rootly.com/api-reference/[deprecated]-incidentcustomfieldselections/[deprecated]-update-an-incident-custom-field-selection
https://rootly-heroku.s3.amazonaws.com/swagger/v1/swagger.json put /v1/incident_custom_field_selections/{id}
[DEPRECATED] Use form field endpoints instead. Update a specific incident custom field selection by id
# [DEPRECATED] Creates a workflow custom field selection
Source: https://docs.rootly.com/api-reference/[deprecated]-workflowcustomfieldselections/[deprecated]-creates-a-workflow-custom-field-selection
https://rootly-heroku.s3.amazonaws.com/swagger/v1/swagger.json post /v1/workflows/{workflow_id}/custom_field_selections
[DEPRECATED] Use form field endpoints instead. Creates a new workflow custom field selection from provided data
# [DEPRECATED] Delete a workflow custom field selection
Source: https://docs.rootly.com/api-reference/[deprecated]-workflowcustomfieldselections/[deprecated]-delete-a-workflow-custom-field-selection
https://rootly-heroku.s3.amazonaws.com/swagger/v1/swagger.json delete /v1/workflow_custom_field_selections/{id}
[DEPRECATED] Use form field endpoints instead. Delete a specific workflow custom field selection by id
# [DEPRECATED] List workflow custom field selections
Source: https://docs.rootly.com/api-reference/[deprecated]-workflowcustomfieldselections/[deprecated]-list-workflow-custom-field-selections
https://rootly-heroku.s3.amazonaws.com/swagger/v1/swagger.json get /v1/workflows/{workflow_id}/custom_field_selections
[DEPRECATED] Use form field endpoints instead. List workflow custom field selections
# [DEPRECATED] Retrieves a workflow custom field selection
Source: https://docs.rootly.com/api-reference/[deprecated]-workflowcustomfieldselections/[deprecated]-retrieves-a-workflow-custom-field-selection
https://rootly-heroku.s3.amazonaws.com/swagger/v1/swagger.json get /v1/workflow_custom_field_selections/{id}
[DEPRECATED] Use form field endpoints instead. Retrieves a specific workflow custom field selection by id
# [DEPRECATED] Update a workflow custom field selection
Source: https://docs.rootly.com/api-reference/[deprecated]-workflowcustomfieldselections/[deprecated]-update-a-workflow-custom-field-selection
https://rootly-heroku.s3.amazonaws.com/swagger/v1/swagger.json put /v1/workflow_custom_field_selections/{id}
[DEPRECATED] Use form field endpoints instead. Update a specific workflow custom field selection by id
# Create alert event
Source: https://docs.rootly.com/api-reference/alertevents/create-alert-event
https://rootly-heroku.s3.amazonaws.com/swagger/v1/swagger.json post /v1/alerts/{alert_id}/events
Creates a new alert event
# Delete alert event
Source: https://docs.rootly.com/api-reference/alertevents/delete-alert-event
https://rootly-heroku.s3.amazonaws.com/swagger/v1/swagger.json delete /v1/alert_events/{id}
Deletes a specific alert event
# List alert events
Source: https://docs.rootly.com/api-reference/alertevents/list-alert-events
https://rootly-heroku.s3.amazonaws.com/swagger/v1/swagger.json get /v1/alerts/{alert_id}/events
List alert_events
# Retrieve alert event
Source: https://docs.rootly.com/api-reference/alertevents/retrieve-alert-event
https://rootly-heroku.s3.amazonaws.com/swagger/v1/swagger.json get /v1/alert_events/{id}
Retrieves a specific alert_event by id
# Update alert event
Source: https://docs.rootly.com/api-reference/alertevents/update-alert-event
https://rootly-heroku.s3.amazonaws.com/swagger/v1/swagger.json patch /v1/alert_events/{id}
Updates a specific alert event
# Creates an alert group
Source: https://docs.rootly.com/api-reference/alertgroups/creates-an-alert-group
https://rootly-heroku.s3.amazonaws.com/swagger/v1/swagger.json post /v1/alert_groups
Creates a new alert group
# Delete an alert group
Source: https://docs.rootly.com/api-reference/alertgroups/delete-an-alert-group
https://rootly-heroku.s3.amazonaws.com/swagger/v1/swagger.json delete /v1/alert_groups/{id}
Delete a specific alert group by id
# List alert groups
Source: https://docs.rootly.com/api-reference/alertgroups/list-alert-groups
https://rootly-heroku.s3.amazonaws.com/swagger/v1/swagger.json get /v1/alert_groups
List alert groups
# Retrieves an alert group
Source: https://docs.rootly.com/api-reference/alertgroups/retrieves-an-alert-group
https://rootly-heroku.s3.amazonaws.com/swagger/v1/swagger.json get /v1/alert_groups/{id}
Retrieves a specific alert group by id
# Update an alert group
Source: https://docs.rootly.com/api-reference/alertgroups/update-an-alert-group
https://rootly-heroku.s3.amazonaws.com/swagger/v1/swagger.json patch /v1/alert_groups/{id}
Update a specific alert group by id
# Creates an alert routing rule
Source: https://docs.rootly.com/api-reference/alertroutingrules/creates-an-alert-routing-rule
https://rootly-heroku.s3.amazonaws.com/swagger/v1/swagger.json post /v1/alert_routing_rules
Creates a new alert routing rule from provided data
# Delete an alert routing rule
Source: https://docs.rootly.com/api-reference/alertroutingrules/delete-an-alert-routing-rule
https://rootly-heroku.s3.amazonaws.com/swagger/v1/swagger.json delete /v1/alert_routing_rules/{id}
Delete a specific alert routing rule by id
# List alert routing rules
Source: https://docs.rootly.com/api-reference/alertroutingrules/list-alert-routing-rules
https://rootly-heroku.s3.amazonaws.com/swagger/v1/swagger.json get /v1/alert_routing_rules
List alert routing rules
# Retrieves an alert routing rule
Source: https://docs.rootly.com/api-reference/alertroutingrules/retrieves-an-alert-routing-rule
https://rootly-heroku.s3.amazonaws.com/swagger/v1/swagger.json get /v1/alert_routing_rules/{id}
Retrieves a specific alert routing rule by id
# Update an alert routing rule
Source: https://docs.rootly.com/api-reference/alertroutingrules/update-an-alert-routing-rule
https://rootly-heroku.s3.amazonaws.com/swagger/v1/swagger.json put /v1/alert_routing_rules/{id}
Update a specific alert routing rule by id
# Acknowledges an alert
Source: https://docs.rootly.com/api-reference/alerts/acknowledges-an-alert
https://rootly-heroku.s3.amazonaws.com/swagger/v1/swagger.json post /v1/alerts/{id}/acknowledge
Acknowledges a specific alert by id
# Attach alerts to an incident
Source: https://docs.rootly.com/api-reference/alerts/attach-alerts-to-an-incident
https://rootly-heroku.s3.amazonaws.com/swagger/v1/swagger.json post /v1/incidents/{incident_id}/alerts
Attach alerts to an incident from provided data
# Creates an alert
Source: https://docs.rootly.com/api-reference/alerts/creates-an-alert
https://rootly-heroku.s3.amazonaws.com/swagger/v1/swagger.json post /v1/alerts
Creates a new alert from provided data
# List alerts
Source: https://docs.rootly.com/api-reference/alerts/list-alerts
https://rootly-heroku.s3.amazonaws.com/swagger/v1/swagger.json get /v1/alerts
List alerts
# List Incident alerts
Source: https://docs.rootly.com/api-reference/alerts/list-incident-alerts
https://rootly-heroku.s3.amazonaws.com/swagger/v1/swagger.json get /v1/incidents/{incident_id}/alerts
List incident alerts
# Resolves an alert
Source: https://docs.rootly.com/api-reference/alerts/resolves-an-alert
https://rootly-heroku.s3.amazonaws.com/swagger/v1/swagger.json post /v1/alerts/{id}/resolve
Resolves a specific alert by id
# Retrieves an alert
Source: https://docs.rootly.com/api-reference/alerts/retrieves-an-alert
https://rootly-heroku.s3.amazonaws.com/swagger/v1/swagger.json get /v1/alerts/{id}
Retrieves a specific alert by id
# Update alert
Source: https://docs.rootly.com/api-reference/alerts/update-alert
https://rootly-heroku.s3.amazonaws.com/swagger/v1/swagger.json patch /v1/alerts/{id}
Updates an alert
# Creates an alert source
Source: https://docs.rootly.com/api-reference/alertsources/creates-an-alert-source
https://rootly-heroku.s3.amazonaws.com/swagger/v1/swagger.json post /v1/alert_sources
Creates a new alert source from provided data
# Delete an alert source
Source: https://docs.rootly.com/api-reference/alertsources/delete-an-alert-source
https://rootly-heroku.s3.amazonaws.com/swagger/v1/swagger.json delete /v1/alert_sources/{id}
Delete a specific alert source by id
# List alert sources
Source: https://docs.rootly.com/api-reference/alertsources/list-alert-sources
https://rootly-heroku.s3.amazonaws.com/swagger/v1/swagger.json get /v1/alert_sources
List alert sources
# Retrieves an alert source
Source: https://docs.rootly.com/api-reference/alertsources/retrieves-an-alert-source
https://rootly-heroku.s3.amazonaws.com/swagger/v1/swagger.json get /v1/alert_sources/{id}
Retrieves a specific alert source by id
# Update an alert source
Source: https://docs.rootly.com/api-reference/alertsources/update-an-alert-source
https://rootly-heroku.s3.amazonaws.com/swagger/v1/swagger.json put /v1/alert_sources/{id}
Update a specific alert source by id
# Creates an alert urgency
Source: https://docs.rootly.com/api-reference/alerturgencies/creates-an-alert-urgency
https://rootly-heroku.s3.amazonaws.com/swagger/v1/swagger.json post /v1/alert_urgencies
Creates a new alert urgency from provided data
# Delete an alert urgency
Source: https://docs.rootly.com/api-reference/alerturgencies/delete-an-alert-urgency
https://rootly-heroku.s3.amazonaws.com/swagger/v1/swagger.json delete /v1/alert_urgencies/{id}
Delete a specific alert urgency by id
# List alert urgencies
Source: https://docs.rootly.com/api-reference/alerturgencies/list-alert-urgencies
https://rootly-heroku.s3.amazonaws.com/swagger/v1/swagger.json get /v1/alert_urgencies
List alert urgencies
# Retrieves an alert urgency
Source: https://docs.rootly.com/api-reference/alerturgencies/retrieves-an-alert-urgency
https://rootly-heroku.s3.amazonaws.com/swagger/v1/swagger.json get /v1/alert_urgencies/{id}
Retrieves a specific alert urgency by id
# Update an alert urgency
Source: https://docs.rootly.com/api-reference/alerturgencies/update-an-alert-urgency
https://rootly-heroku.s3.amazonaws.com/swagger/v1/swagger.json put /v1/alert_urgencies/{id}
Update a specific alert urgency by id
# List audits
Source: https://docs.rootly.com/api-reference/audits/list-audits
https://rootly-heroku.s3.amazonaws.com/swagger/v1/swagger.json get /v1/audits
List audits
# Creates an authorization
Source: https://docs.rootly.com/api-reference/authorizations/creates-an-authorization
https://rootly-heroku.s3.amazonaws.com/swagger/v1/swagger.json post /v1/authorizations
Creates a new authorization from provided data
# Delete an authorization
Source: https://docs.rootly.com/api-reference/authorizations/delete-an-authorization
https://rootly-heroku.s3.amazonaws.com/swagger/v1/swagger.json delete /v1/authorizations/{id}
Delete a specific authorization by id
# List authorizations
Source: https://docs.rootly.com/api-reference/authorizations/list-authorizations
https://rootly-heroku.s3.amazonaws.com/swagger/v1/swagger.json get /v1/authorizations
List authorizations
# Retrieves an authorization
Source: https://docs.rootly.com/api-reference/authorizations/retrieves-an-authorization
https://rootly-heroku.s3.amazonaws.com/swagger/v1/swagger.json get /v1/authorizations/{id}
Retrieves a specific authorization by id
# Update an authorization
Source: https://docs.rootly.com/api-reference/authorizations/update-an-authorization
https://rootly-heroku.s3.amazonaws.com/swagger/v1/swagger.json put /v1/authorizations/{id}
Update a specific authorization by id
# Creates a Catalog Entity
Source: https://docs.rootly.com/api-reference/catalogentities/creates-a-catalog-entity
https://rootly-heroku.s3.amazonaws.com/swagger/v1/swagger.json post /v1/catalogs/{catalog_id}/entities
Creates a new Catalog Entity from provided data
# Delete a Catalog Entity
Source: https://docs.rootly.com/api-reference/catalogentities/delete-a-catalog-entity
https://rootly-heroku.s3.amazonaws.com/swagger/v1/swagger.json delete /v1/catalog_entities/{id}
Delete a specific Catalog Entity by id
# List Catalog Entities
Source: https://docs.rootly.com/api-reference/catalogentities/list-catalog-entities
https://rootly-heroku.s3.amazonaws.com/swagger/v1/swagger.json get /v1/catalogs/{catalog_id}/entities
List Catalog Entities
# Retrieves a Catalog Entity
Source: https://docs.rootly.com/api-reference/catalogentities/retrieves-a-catalog-entity
https://rootly-heroku.s3.amazonaws.com/swagger/v1/swagger.json get /v1/catalog_entities/{id}
Retrieves a specific Catalog Entity by id
# Update a catalog_entity
Source: https://docs.rootly.com/api-reference/catalogentities/update-a-catalog_entity
https://rootly-heroku.s3.amazonaws.com/swagger/v1/swagger.json put /v1/catalog_entities/{id}
Update a specific Catalog Entity by id
# Creates a Catalog Entity Property
Source: https://docs.rootly.com/api-reference/catalogentityproperties/creates-a-catalog-entity-property
https://rootly-heroku.s3.amazonaws.com/swagger/v1/swagger.json post /v1/catalog_entities/{catalog_entity_id}/properties
Creates a new Catalog Entity Property from provided data
# Delete a Catalog Entity Property
Source: https://docs.rootly.com/api-reference/catalogentityproperties/delete-a-catalog-entity-property
https://rootly-heroku.s3.amazonaws.com/swagger/v1/swagger.json delete /v1/catalog_entity_properties/{id}
Delete a specific Catalog Entity Property by id
# List catalog properties
Source: https://docs.rootly.com/api-reference/catalogentityproperties/list-catalog-properties
https://rootly-heroku.s3.amazonaws.com/swagger/v1/swagger.json get /v1/catalog_entities/{catalog_entity_id}/properties
List Catalog Entity Properties
# Retrieves a Catalog Entity Property
Source: https://docs.rootly.com/api-reference/catalogentityproperties/retrieves-a-catalog-entity-property
https://rootly-heroku.s3.amazonaws.com/swagger/v1/swagger.json get /v1/catalog_entity_properties/{id}
Retrieves a specific Catalog Entity Property by id
# Update a Catalog Entity Property
Source: https://docs.rootly.com/api-reference/catalogentityproperties/update-a-catalog-entity-property
https://rootly-heroku.s3.amazonaws.com/swagger/v1/swagger.json put /v1/catalog_entity_properties/{id}
Update a specific Catalog Entity Property by id
# Creates a Catalog Field
Source: https://docs.rootly.com/api-reference/catalogfields/creates-a-catalog-field
https://rootly-heroku.s3.amazonaws.com/swagger/v1/swagger.json post /v1/catalogs/{catalog_id}/fields
Creates a new Catalog Field from provided data
# Delete a catalog_field
Source: https://docs.rootly.com/api-reference/catalogfields/delete-a-catalog_field
https://rootly-heroku.s3.amazonaws.com/swagger/v1/swagger.json delete /v1/catalog_fields/{id}
Delete a specific catalog_field by id
# List Catalog Fields
Source: https://docs.rootly.com/api-reference/catalogfields/list-catalog-fields
https://rootly-heroku.s3.amazonaws.com/swagger/v1/swagger.json get /v1/catalogs/{catalog_id}/fields
List Catalog Fields
# Retrieves a Catalog Field
Source: https://docs.rootly.com/api-reference/catalogfields/retrieves-a-catalog-field
https://rootly-heroku.s3.amazonaws.com/swagger/v1/swagger.json get /v1/catalog_fields/{id}
Retrieves a specific Catalog Field by id
# Update a catalog_field
Source: https://docs.rootly.com/api-reference/catalogfields/update-a-catalog_field
https://rootly-heroku.s3.amazonaws.com/swagger/v1/swagger.json put /v1/catalog_fields/{id}
Update a specific catalog_field by id
# Creates a catalog
Source: https://docs.rootly.com/api-reference/catalogs/creates-a-catalog
https://rootly-heroku.s3.amazonaws.com/swagger/v1/swagger.json post /v1/catalogs
Creates a new catalog from provided data
# Delete a catalog
Source: https://docs.rootly.com/api-reference/catalogs/delete-a-catalog
https://rootly-heroku.s3.amazonaws.com/swagger/v1/swagger.json delete /v1/catalogs/{id}
Delete a specific catalog by id
# List catalogs
Source: https://docs.rootly.com/api-reference/catalogs/list-catalogs
https://rootly-heroku.s3.amazonaws.com/swagger/v1/swagger.json get /v1/catalogs
List catalogs
# Retrieves a catalog
Source: https://docs.rootly.com/api-reference/catalogs/retrieves-a-catalog
https://rootly-heroku.s3.amazonaws.com/swagger/v1/swagger.json get /v1/catalogs/{id}
Retrieves a specific catalog by id
# Update a catalog
Source: https://docs.rootly.com/api-reference/catalogs/update-a-catalog
https://rootly-heroku.s3.amazonaws.com/swagger/v1/swagger.json put /v1/catalogs/{id}
Update a specific catalog by id
# Creates a cause
Source: https://docs.rootly.com/api-reference/causes/creates-a-cause
https://rootly-heroku.s3.amazonaws.com/swagger/v1/swagger.json post /v1/causes
Creates a new cause from provided data
# Delete a cause
Source: https://docs.rootly.com/api-reference/causes/delete-a-cause
https://rootly-heroku.s3.amazonaws.com/swagger/v1/swagger.json delete /v1/causes/{id}
Delete a specific cause by id
# List causes
Source: https://docs.rootly.com/api-reference/causes/list-causes
https://rootly-heroku.s3.amazonaws.com/swagger/v1/swagger.json get /v1/causes
List causes
# Retrieves a cause
Source: https://docs.rootly.com/api-reference/causes/retrieves-a-cause
https://rootly-heroku.s3.amazonaws.com/swagger/v1/swagger.json get /v1/causes/{id}
Retrieves a specific cause by id
# Update a cause
Source: https://docs.rootly.com/api-reference/causes/update-a-cause
https://rootly-heroku.s3.amazonaws.com/swagger/v1/swagger.json put /v1/causes/{id}
Update a specific cause by id
# Creates a custom form
Source: https://docs.rootly.com/api-reference/customforms/creates-a-custom-form
https://rootly-heroku.s3.amazonaws.com/swagger/v1/swagger.json post /v1/custom_forms
Creates a new custom form from provided data
# Delete a custom form
Source: https://docs.rootly.com/api-reference/customforms/delete-a-custom-form
https://rootly-heroku.s3.amazonaws.com/swagger/v1/swagger.json delete /v1/custom_forms/{id}
Delete a specific custom form by id
# List custom forms
Source: https://docs.rootly.com/api-reference/customforms/list-custom-forms
https://rootly-heroku.s3.amazonaws.com/swagger/v1/swagger.json get /v1/custom_forms
List custom forms
# Retrieves a custom form
Source: https://docs.rootly.com/api-reference/customforms/retrieves-a-custom-form
https://rootly-heroku.s3.amazonaws.com/swagger/v1/swagger.json get /v1/custom_forms/{id}
Retrieves a specific custom form by id
# Update a custom form
Source: https://docs.rootly.com/api-reference/customforms/update-a-custom-form
https://rootly-heroku.s3.amazonaws.com/swagger/v1/swagger.json put /v1/custom_forms/{id}
Update a specific custom form by id
# Creates a dashboard panel
Source: https://docs.rootly.com/api-reference/dashboardpanels/creates-a-dashboard-panel
https://rootly-heroku.s3.amazonaws.com/swagger/v1/swagger.json post /v1/dashboards/{dashboard_id}/panels
Creates a new dashboard panel from provided data
# Delete a dashboard panel
Source: https://docs.rootly.com/api-reference/dashboardpanels/delete-a-dashboard-panel
https://rootly-heroku.s3.amazonaws.com/swagger/v1/swagger.json delete /v1/dashboard_panels/{id}
Delete a specific dashboard panel by id
# Duplicates a dashboard panel
Source: https://docs.rootly.com/api-reference/dashboardpanels/duplicates-a-dashboard-panel
https://rootly-heroku.s3.amazonaws.com/swagger/v1/swagger.json post /v1/dashboard_panels/{id}/duplicate
Duplicates a dashboard panel
# List dashboard panels
Source: https://docs.rootly.com/api-reference/dashboardpanels/list-dashboard-panels
https://rootly-heroku.s3.amazonaws.com/swagger/v1/swagger.json get /v1/dashboards/{dashboard_id}/panels
List dashboard panels
# Retrieves a dashboard panel
Source: https://docs.rootly.com/api-reference/dashboardpanels/retrieves-a-dashboard-panel
https://rootly-heroku.s3.amazonaws.com/swagger/v1/swagger.json get /v1/dashboard_panels/{id}
Retrieves a specific dashboard panel by id
# Update a dashboard panel
Source: https://docs.rootly.com/api-reference/dashboardpanels/update-a-dashboard-panel
https://rootly-heroku.s3.amazonaws.com/swagger/v1/swagger.json put /v1/dashboard_panels/{id}
Update a specific dashboard panel by id
# Creates a dashboard
Source: https://docs.rootly.com/api-reference/dashboards/creates-a-dashboard
https://rootly-heroku.s3.amazonaws.com/swagger/v1/swagger.json post /v1/dashboards
Creates a new dashboard from provided data
# Delete a dashboard
Source: https://docs.rootly.com/api-reference/dashboards/delete-a-dashboard
https://rootly-heroku.s3.amazonaws.com/swagger/v1/swagger.json delete /v1/dashboards/{id}
Delete a specific dashboard by id
# Duplicates a dashboard
Source: https://docs.rootly.com/api-reference/dashboards/duplicates-a-dashboard
https://rootly-heroku.s3.amazonaws.com/swagger/v1/swagger.json post /v1/dashboards/{id}/duplicate
Duplicates a dashboard
# List dashboards
Source: https://docs.rootly.com/api-reference/dashboards/list-dashboards
https://rootly-heroku.s3.amazonaws.com/swagger/v1/swagger.json get /v1/dashboards
List dashboards
# Retrieves a dashboard
Source: https://docs.rootly.com/api-reference/dashboards/retrieves-a-dashboard
https://rootly-heroku.s3.amazonaws.com/swagger/v1/swagger.json get /v1/dashboards/{id}
Retrieves a specific dashboard by id
# Sets dashboard to user default
Source: https://docs.rootly.com/api-reference/dashboards/sets-dashboard-to-user-default
https://rootly-heroku.s3.amazonaws.com/swagger/v1/swagger.json post /v1/dashboards/{id}/set_default
Sets dashboard to user default
# Update a dashboard
Source: https://docs.rootly.com/api-reference/dashboards/update-a-dashboard
https://rootly-heroku.s3.amazonaws.com/swagger/v1/swagger.json put /v1/dashboards/{id}
Update a specific dashboard by id
# Creates an environment
Source: https://docs.rootly.com/api-reference/environments/creates-an-environment
https://rootly-heroku.s3.amazonaws.com/swagger/v1/swagger.json post /v1/environments
Creates a new environment from provided data
# Delete an environment
Source: https://docs.rootly.com/api-reference/environments/delete-an-environment
https://rootly-heroku.s3.amazonaws.com/swagger/v1/swagger.json delete /v1/environments/{id}
Delete a specific environment by id
# List environments
Source: https://docs.rootly.com/api-reference/environments/list-environments
https://rootly-heroku.s3.amazonaws.com/swagger/v1/swagger.json get /v1/environments
List environments
# Retrieves an environment
Source: https://docs.rootly.com/api-reference/environments/retrieves-an-environment
https://rootly-heroku.s3.amazonaws.com/swagger/v1/swagger.json get /v1/environments/{id}
Retrieves a specific environment by id
# Update an environment
Source: https://docs.rootly.com/api-reference/environments/update-an-environment
https://rootly-heroku.s3.amazonaws.com/swagger/v1/swagger.json put /v1/environments/{id}
Update a specific environment by id
# Delete an escalation level
Source: https://docs.rootly.com/api-reference/escalationlevels/delete-an-escalation-level
https://rootly-heroku.s3.amazonaws.com/swagger/v1/swagger.json delete /v1/escalation_levels/{id}
Delete a specific escalation level by id
# Retrieves an escalation level
Source: https://docs.rootly.com/api-reference/escalationlevels/retrieves-an-escalation-level
https://rootly-heroku.s3.amazonaws.com/swagger/v1/swagger.json get /v1/escalation_levels/{id}
Retrieves a specific escalation level by id
# Update an escalation level
Source: https://docs.rootly.com/api-reference/escalationlevels/update-an-escalation-level
https://rootly-heroku.s3.amazonaws.com/swagger/v1/swagger.json put /v1/escalation_levels/{id}
Update a specific escalation level by id
# Creates an escalation level for an Escalation Path
Source: https://docs.rootly.com/api-reference/escalationlevelspath/creates-an-escalation-level-for-an-escalation-path
https://rootly-heroku.s3.amazonaws.com/swagger/v1/swagger.json post /v1/escalation_paths/{escalation_policy_path_id}/escalation_levels
Creates a new escalation level from provided data
# List escalation levels for an Escalation Path
Source: https://docs.rootly.com/api-reference/escalationlevelspath/list-escalation-levels-for-an-escalation-path
https://rootly-heroku.s3.amazonaws.com/swagger/v1/swagger.json get /v1/escalation_paths/{escalation_policy_path_id}/escalation_levels
List escalation levels
# Creates an escalation level for an Escalation Policy
Source: https://docs.rootly.com/api-reference/escalationlevelspolicies/creates-an-escalation-level-for-an-escalation-policy
https://rootly-heroku.s3.amazonaws.com/swagger/v1/swagger.json post /v1/escalation_policies/{escalation_policy_id}/escalation_levels
Creates a new escalation level from provided data
# List escalation levels for an Escalation Policy
Source: https://docs.rootly.com/api-reference/escalationlevelspolicies/list-escalation-levels-for-an-escalation-policy
https://rootly-heroku.s3.amazonaws.com/swagger/v1/swagger.json get /v1/escalation_policies/{escalation_policy_id}/escalation_levels
List escalation levels
# Creates an escalation path
Source: https://docs.rootly.com/api-reference/escalationpaths/creates-an-escalation-path
https://rootly-heroku.s3.amazonaws.com/swagger/v1/swagger.json post /v1/escalation_policies/{escalation_policy_id}/escalation_paths
Creates a new escalation path from provided data
# Delete an escalation path
Source: https://docs.rootly.com/api-reference/escalationpaths/delete-an-escalation-path
https://rootly-heroku.s3.amazonaws.com/swagger/v1/swagger.json delete /v1/escalation_paths/{id}
Delete a specific escalation path by id
# List escalation paths
Source: https://docs.rootly.com/api-reference/escalationpaths/list-escalation-paths
https://rootly-heroku.s3.amazonaws.com/swagger/v1/swagger.json get /v1/escalation_policies/{escalation_policy_id}/escalation_paths
List escalation paths
# Retrieves an escalation path
Source: https://docs.rootly.com/api-reference/escalationpaths/retrieves-an-escalation-path
https://rootly-heroku.s3.amazonaws.com/swagger/v1/swagger.json get /v1/escalation_paths/{id}
Retrieves a specific escalation path by id
# Update an escalation path
Source: https://docs.rootly.com/api-reference/escalationpaths/update-an-escalation-path
https://rootly-heroku.s3.amazonaws.com/swagger/v1/swagger.json put /v1/escalation_paths/{id}
Update a specific escalation path by id
# Creates an escalation policy
Source: https://docs.rootly.com/api-reference/escalationpolicies/creates-an-escalation-policy
https://rootly-heroku.s3.amazonaws.com/swagger/v1/swagger.json post /v1/escalation_policies
Creates a new escalation policy from provided data
# Delete an escalation policy
Source: https://docs.rootly.com/api-reference/escalationpolicies/delete-an-escalation-policy
https://rootly-heroku.s3.amazonaws.com/swagger/v1/swagger.json delete /v1/escalation_policies/{id}
Delete a specific escalation policy by id
# List escalation policies
Source: https://docs.rootly.com/api-reference/escalationpolicies/list-escalation-policies
https://rootly-heroku.s3.amazonaws.com/swagger/v1/swagger.json get /v1/escalation_policies
List escalation policies
# Retrieves an escalation policy
Source: https://docs.rootly.com/api-reference/escalationpolicies/retrieves-an-escalation-policy
https://rootly-heroku.s3.amazonaws.com/swagger/v1/swagger.json get /v1/escalation_policies/{id}
Retrieves a specific escalation policy by id
# Update an escalation policy
Source: https://docs.rootly.com/api-reference/escalationpolicies/update-an-escalation-policy
https://rootly-heroku.s3.amazonaws.com/swagger/v1/swagger.json put /v1/escalation_policies/{id}
Update a specific escalation policy by id
# Creates FormField Options
Source: https://docs.rootly.com/api-reference/formfieldoptions/creates-formfield-options
https://rootly-heroku.s3.amazonaws.com/swagger/v1/swagger.json post /v1/form_fields/{form_field_id}/options
Creates a new form_field_option from provided data
# Delete FormField Options
Source: https://docs.rootly.com/api-reference/formfieldoptions/delete-formfield-options
https://rootly-heroku.s3.amazonaws.com/swagger/v1/swagger.json delete /v1/form_field_options/{id}
Delete a specific form_field_option by id
# List FormField Options
Source: https://docs.rootly.com/api-reference/formfieldoptions/list-formfield-options
https://rootly-heroku.s3.amazonaws.com/swagger/v1/swagger.json get /v1/form_fields/{form_field_id}/options
List form_field_options
# Retrieves FormField Options
Source: https://docs.rootly.com/api-reference/formfieldoptions/retrieves-formfield-options
https://rootly-heroku.s3.amazonaws.com/swagger/v1/swagger.json get /v1/form_field_options/{id}
Retrieves a specific form_field_option by id
# Update FormField Options
Source: https://docs.rootly.com/api-reference/formfieldoptions/update-formfield-options
https://rootly-heroku.s3.amazonaws.com/swagger/v1/swagger.json put /v1/form_field_options/{id}
Update a specific form_field_option by id
# Creates a Form Set Condition
Source: https://docs.rootly.com/api-reference/formfieldplacementconditions/creates-a-form-set-condition
https://rootly-heroku.s3.amazonaws.com/swagger/v1/swagger.json post /v1/form_field_placements/{form_field_placement_id}/conditions
Creates a new form_field_placement_condition from provided data
# Delete a Form Set Condition
Source: https://docs.rootly.com/api-reference/formfieldplacementconditions/delete-a-form-set-condition
https://rootly-heroku.s3.amazonaws.com/swagger/v1/swagger.json delete /v1/form_field_placement_conditions/{id}
Delete a specific form_field_placement_condition by id
# List Form Set Conditions
Source: https://docs.rootly.com/api-reference/formfieldplacementconditions/list-form-set-conditions
https://rootly-heroku.s3.amazonaws.com/swagger/v1/swagger.json get /v1/form_field_placements/{form_field_placement_id}/conditions
List form_field_placement_conditions
# Retrieves a Form Set Condition
Source: https://docs.rootly.com/api-reference/formfieldplacementconditions/retrieves-a-form-set-condition
https://rootly-heroku.s3.amazonaws.com/swagger/v1/swagger.json get /v1/form_field_placement_conditions/{id}
Retrieves a specific form_field_placement_condition by id
# Update a Form Set Condition
Source: https://docs.rootly.com/api-reference/formfieldplacementconditions/update-a-form-set-condition
https://rootly-heroku.s3.amazonaws.com/swagger/v1/swagger.json put /v1/form_field_placement_conditions/{id}
Update a specific form_field_placement_condition by id
# Creates a Form Field Placement
Source: https://docs.rootly.com/api-reference/formfieldplacements/creates-a-form-field-placement
https://rootly-heroku.s3.amazonaws.com/swagger/v1/swagger.json post /v1/form_fields/{form_field_id}/placements
Creates a new form_field_placement from provided data
# Delete a Form Field Placement
Source: https://docs.rootly.com/api-reference/formfieldplacements/delete-a-form-field-placement
https://rootly-heroku.s3.amazonaws.com/swagger/v1/swagger.json delete /v1/form_field_placements/{id}
Delete a specific form_field_placement by id
# List Form Field Placements
Source: https://docs.rootly.com/api-reference/formfieldplacements/list-form-field-placements
https://rootly-heroku.s3.amazonaws.com/swagger/v1/swagger.json get /v1/form_fields/{form_field_id}/placements
List form_field_placements
# Retrieves a Form Field Placement
Source: https://docs.rootly.com/api-reference/formfieldplacements/retrieves-a-form-field-placement
https://rootly-heroku.s3.amazonaws.com/swagger/v1/swagger.json get /v1/form_field_placements/{id}
Retrieves a specific form_field_placement by id
# Update a Form Field Placement
Source: https://docs.rootly.com/api-reference/formfieldplacements/update-a-form-field-placement
https://rootly-heroku.s3.amazonaws.com/swagger/v1/swagger.json put /v1/form_field_placements/{id}
Update a specific form_field_placement by id
# Creates FormField Positions
Source: https://docs.rootly.com/api-reference/formfieldpositions/creates-formfield-positions
https://rootly-heroku.s3.amazonaws.com/swagger/v1/swagger.json post /v1/form_fields/{form_field_id}/positions
Creates a new form field_position from provided data
# Delete a FormFieldPosition
Source: https://docs.rootly.com/api-reference/formfieldpositions/delete-a-formfieldposition
https://rootly-heroku.s3.amazonaws.com/swagger/v1/swagger.json delete /v1/form_field_positions/{id}
Delete a specific form_field position by id
# List FormField Position
Source: https://docs.rootly.com/api-reference/formfieldpositions/list-formfield-position
https://rootly-heroku.s3.amazonaws.com/swagger/v1/swagger.json get /v1/form_fields/{form_field_id}/positions
List form field positions
# Retrieves a FormFieldPosition
Source: https://docs.rootly.com/api-reference/formfieldpositions/retrieves-a-formfieldposition
https://rootly-heroku.s3.amazonaws.com/swagger/v1/swagger.json get /v1/form_field_positions/{id}
Retrieves a specific form field_position by id
# Update a FormFieldPosition
Source: https://docs.rootly.com/api-reference/formfieldpositions/update-a-formfieldposition
https://rootly-heroku.s3.amazonaws.com/swagger/v1/swagger.json put /v1/form_field_positions/{id}
Update a specific form_field position by id
# Creates a Form Field
Source: https://docs.rootly.com/api-reference/formfields/creates-a-form-field
https://rootly-heroku.s3.amazonaws.com/swagger/v1/swagger.json post /v1/form_fields
Creates a new form_field from provided data
# Delete a Form Field
Source: https://docs.rootly.com/api-reference/formfields/delete-a-form-field
https://rootly-heroku.s3.amazonaws.com/swagger/v1/swagger.json delete /v1/form_fields/{id}
Delete a specific form_field by id
# List Form Fields
Source: https://docs.rootly.com/api-reference/formfields/list-form-fields
https://rootly-heroku.s3.amazonaws.com/swagger/v1/swagger.json get /v1/form_fields
List form_fields
# Retrieves a Form Field
Source: https://docs.rootly.com/api-reference/formfields/retrieves-a-form-field
https://rootly-heroku.s3.amazonaws.com/swagger/v1/swagger.json get /v1/form_fields/{id}
Retrieves a specific form_field by id
# Update a Form Field
Source: https://docs.rootly.com/api-reference/formfields/update-a-form-field
https://rootly-heroku.s3.amazonaws.com/swagger/v1/swagger.json put /v1/form_fields/{id}
Update a specific form_field by id
# Creates a Form Set Condition
Source: https://docs.rootly.com/api-reference/formsetconditions/creates-a-form-set-condition
https://rootly-heroku.s3.amazonaws.com/swagger/v1/swagger.json post /v1/form_sets/{form_set_id}/conditions
Creates a new form_set_condition from provided data
# Delete a Form Set Condition
Source: https://docs.rootly.com/api-reference/formsetconditions/delete-a-form-set-condition
https://rootly-heroku.s3.amazonaws.com/swagger/v1/swagger.json delete /v1/form_set_conditions/{id}
Delete a specific form_set_condition by id
# List Form Set Conditions
Source: https://docs.rootly.com/api-reference/formsetconditions/list-form-set-conditions
https://rootly-heroku.s3.amazonaws.com/swagger/v1/swagger.json get /v1/form_sets/{form_set_id}/conditions
List form_set_conditions
# Retrieves a Form Set Condition
Source: https://docs.rootly.com/api-reference/formsetconditions/retrieves-a-form-set-condition
https://rootly-heroku.s3.amazonaws.com/swagger/v1/swagger.json get /v1/form_set_conditions/{id}
Retrieves a specific form_set_condition by id
# Update a Form Set Condition
Source: https://docs.rootly.com/api-reference/formsetconditions/update-a-form-set-condition
https://rootly-heroku.s3.amazonaws.com/swagger/v1/swagger.json put /v1/form_set_conditions/{id}
Update a specific form_set_condition by id
# Creates a Form Set
Source: https://docs.rootly.com/api-reference/formsets/creates-a-form-set
https://rootly-heroku.s3.amazonaws.com/swagger/v1/swagger.json post /v1/form_sets
Creates a new form_set from provided data
# Delete a Form Set
Source: https://docs.rootly.com/api-reference/formsets/delete-a-form-set
https://rootly-heroku.s3.amazonaws.com/swagger/v1/swagger.json delete /v1/form_sets/{id}
Delete a specific form_set by id
# List Form Sets
Source: https://docs.rootly.com/api-reference/formsets/list-form-sets
https://rootly-heroku.s3.amazonaws.com/swagger/v1/swagger.json get /v1/form_sets
List form_sets
# Retrieves a Form Set
Source: https://docs.rootly.com/api-reference/formsets/retrieves-a-form-set
https://rootly-heroku.s3.amazonaws.com/swagger/v1/swagger.json get /v1/form_sets/{id}
Retrieves a specific form_set by id
# Update a Form Set
Source: https://docs.rootly.com/api-reference/formsets/update-a-form-set
https://rootly-heroku.s3.amazonaws.com/swagger/v1/swagger.json put /v1/form_sets/{id}
Update a specific form_set by id
# Creates a functionality
Source: https://docs.rootly.com/api-reference/functionalities/creates-a-functionality
https://rootly-heroku.s3.amazonaws.com/swagger/v1/swagger.json post /v1/functionalities
Creates a new functionality from provided data
# Delete a functionality
Source: https://docs.rootly.com/api-reference/functionalities/delete-a-functionality
https://rootly-heroku.s3.amazonaws.com/swagger/v1/swagger.json delete /v1/functionalities/{id}
Delete a specific functionality by id
# Get functionality incidents chart
Source: https://docs.rootly.com/api-reference/functionalities/get-functionality-incidents-chart
https://rootly-heroku.s3.amazonaws.com/swagger/v1/swagger.json get /v1/functionalities/{id}/incidents_chart
Get functionality incidents chart
# Get functionality uptime chart
Source: https://docs.rootly.com/api-reference/functionalities/get-functionality-uptime-chart
https://rootly-heroku.s3.amazonaws.com/swagger/v1/swagger.json get /v1/functionalities/{id}/uptime_chart
Get functionality uptime chart
# List functionalities
Source: https://docs.rootly.com/api-reference/functionalities/list-functionalities
https://rootly-heroku.s3.amazonaws.com/swagger/v1/swagger.json get /v1/functionalities
List functionalities
# Retrieves a functionality
Source: https://docs.rootly.com/api-reference/functionalities/retrieves-a-functionality
https://rootly-heroku.s3.amazonaws.com/swagger/v1/swagger.json get /v1/functionalities/{id}
Retrieves a specific functionality by id
# Update a functionality
Source: https://docs.rootly.com/api-reference/functionalities/update-a-functionality
https://rootly-heroku.s3.amazonaws.com/swagger/v1/swagger.json put /v1/functionalities/{id}
Update a specific functionality by id
# Creates a heartbeat
Source: https://docs.rootly.com/api-reference/heartbeats/creates-a-heartbeat
https://rootly-heroku.s3.amazonaws.com/swagger/v1/swagger.json post /v1/heartbeats
Creates a new heartbeat from provided data
# Delete a heartbeat
Source: https://docs.rootly.com/api-reference/heartbeats/delete-a-heartbeat
https://rootly-heroku.s3.amazonaws.com/swagger/v1/swagger.json delete /v1/heartbeats/{id}
Delete a specific heartbeat by id
# List heartbeats
Source: https://docs.rootly.com/api-reference/heartbeats/list-heartbeats
https://rootly-heroku.s3.amazonaws.com/swagger/v1/swagger.json get /v1/heartbeats
List heartbeats
# Ping a heartbeat
Source: https://docs.rootly.com/api-reference/heartbeats/ping-a-heartbeat
https://rootly-heroku.s3.amazonaws.com/swagger/v1/swagger.json post /v1/heartbeats/{heartbeat_id}/ping
Ping a specific heartbeat by id
# Retrieves a heartbeat
Source: https://docs.rootly.com/api-reference/heartbeats/retrieves-a-heartbeat
https://rootly-heroku.s3.amazonaws.com/swagger/v1/swagger.json get /v1/heartbeats/{id}
Retrieves a specific heartbeat by id
# Update a heartbeat
Source: https://docs.rootly.com/api-reference/heartbeats/update-a-heartbeat
https://rootly-heroku.s3.amazonaws.com/swagger/v1/swagger.json put /v1/heartbeats/{id}
Update a specific heartbeat by id
# Creates an incident action item
Source: https://docs.rootly.com/api-reference/incidentactionitems/creates-an-incident-action-item
https://rootly-heroku.s3.amazonaws.com/swagger/v1/swagger.json post /v1/incidents/{incident_id}/action_items
Creates a new action item from provided data
# Delete an incident action item
Source: https://docs.rootly.com/api-reference/incidentactionitems/delete-an-incident-action-item
https://rootly-heroku.s3.amazonaws.com/swagger/v1/swagger.json delete /v1/action_items/{id}
Delete a specific incident action item by id
# List all action items for an organization
Source: https://docs.rootly.com/api-reference/incidentactionitems/list-all-action-items-for-an-organization
https://rootly-heroku.s3.amazonaws.com/swagger/v1/swagger.json get /v1/action_items
List all action items for an organization
# List incident action items
Source: https://docs.rootly.com/api-reference/incidentactionitems/list-incident-action-items
https://rootly-heroku.s3.amazonaws.com/swagger/v1/swagger.json get /v1/incidents/{incident_id}/action_items
List incident action items
# Retrieves an incident action item
Source: https://docs.rootly.com/api-reference/incidentactionitems/retrieves-an-incident-action-item
https://rootly-heroku.s3.amazonaws.com/swagger/v1/swagger.json get /v1/action_items/{id}
Retrieves a specific incident_action_item by id
# Update an incident action item
Source: https://docs.rootly.com/api-reference/incidentactionitems/update-an-incident-action-item
https://rootly-heroku.s3.amazonaws.com/swagger/v1/swagger.json put /v1/action_items/{id}
Update a specific incident action item by id
# Creates an incident event functionality
Source: https://docs.rootly.com/api-reference/incidenteventfunctionalities/creates-an-incident-event-functionality
https://rootly-heroku.s3.amazonaws.com/swagger/v1/swagger.json post /v1/events/{incident_event_id}/functionalities
Creates a new event functionality from provided data
# Delete an incident event functionality
Source: https://docs.rootly.com/api-reference/incidenteventfunctionalities/delete-an-incident-event-functionality
https://rootly-heroku.s3.amazonaws.com/swagger/v1/swagger.json delete /v1/incident_event_functionalities/{id}
Delete a specific incident event functionality by id
# List incident event functionalities
Source: https://docs.rootly.com/api-reference/incidenteventfunctionalities/list-incident-event-functionalities
https://rootly-heroku.s3.amazonaws.com/swagger/v1/swagger.json get /v1/events/{incident_event_id}/functionalities
List incident event functionalities
# Retrieves an incident event functionality
Source: https://docs.rootly.com/api-reference/incidenteventfunctionalities/retrieves-an-incident-event-functionality
https://rootly-heroku.s3.amazonaws.com/swagger/v1/swagger.json get /v1/incident_event_functionalities/{id}
Retrieves a specific incident_event_functionality by id
# Update an incident event
Source: https://docs.rootly.com/api-reference/incidenteventfunctionalities/update-an-incident-event
https://rootly-heroku.s3.amazonaws.com/swagger/v1/swagger.json put /v1/incident_event_functionalities/{id}
Update a specific incident event functionality by id
# Creates an incident event
Source: https://docs.rootly.com/api-reference/incidentevents/creates-an-incident-event
https://rootly-heroku.s3.amazonaws.com/swagger/v1/swagger.json post /v1/incidents/{incident_id}/events
Creates a new event from provided data
# Delete an incident event
Source: https://docs.rootly.com/api-reference/incidentevents/delete-an-incident-event
https://rootly-heroku.s3.amazonaws.com/swagger/v1/swagger.json delete /v1/events/{id}
Delete a specific incident event by id
# List incident events
Source: https://docs.rootly.com/api-reference/incidentevents/list-incident-events
https://rootly-heroku.s3.amazonaws.com/swagger/v1/swagger.json get /v1/incidents/{incident_id}/events
List incident events
# Retrieves an incident event
Source: https://docs.rootly.com/api-reference/incidentevents/retrieves-an-incident-event
https://rootly-heroku.s3.amazonaws.com/swagger/v1/swagger.json get /v1/events/{id}
Retrieves a specific incident_event by id
# Update an incident event
Source: https://docs.rootly.com/api-reference/incidentevents/update-an-incident-event
https://rootly-heroku.s3.amazonaws.com/swagger/v1/swagger.json put /v1/events/{id}
Update a specific incident event by id
# Creates an incident event service
Source: https://docs.rootly.com/api-reference/incidenteventservices/creates-an-incident-event-service
https://rootly-heroku.s3.amazonaws.com/swagger/v1/swagger.json post /v1/events/{incident_event_id}/services
Creates a new event service from provided data
# Delete an incident event functionalitu
Source: https://docs.rootly.com/api-reference/incidenteventservices/delete-an-incident-event-functionalitu
https://rootly-heroku.s3.amazonaws.com/swagger/v1/swagger.json delete /v1/incident_event_services/{id}
Delete a specific incident event service by id
# List incident event services
Source: https://docs.rootly.com/api-reference/incidenteventservices/list-incident-event-services
https://rootly-heroku.s3.amazonaws.com/swagger/v1/swagger.json get /v1/events/{incident_event_id}/services
List incident event services
# Retrieves an incident event service
Source: https://docs.rootly.com/api-reference/incidenteventservices/retrieves-an-incident-event-service
https://rootly-heroku.s3.amazonaws.com/swagger/v1/swagger.json get /v1/incident_event_services/{id}
Retrieves a specific incident_event_service by id
# Update an incident event
Source: https://docs.rootly.com/api-reference/incidenteventservices/update-an-incident-event
https://rootly-heroku.s3.amazonaws.com/swagger/v1/swagger.json put /v1/incident_event_services/{id}
Update a specific incident event service by id
# Creates an incident feedback
Source: https://docs.rootly.com/api-reference/incidentfeedbacks/creates-an-incident-feedback
https://rootly-heroku.s3.amazonaws.com/swagger/v1/swagger.json post /v1/incidents/{incident_id}/feedbacks
Creates a new feedback from provided data
# List incident feedbacks
Source: https://docs.rootly.com/api-reference/incidentfeedbacks/list-incident-feedbacks
https://rootly-heroku.s3.amazonaws.com/swagger/v1/swagger.json get /v1/incidents/{incident_id}/feedbacks
List incident feedbacks
# Retrieves an incident feedback
Source: https://docs.rootly.com/api-reference/incidentfeedbacks/retrieves-an-incident-feedback
https://rootly-heroku.s3.amazonaws.com/swagger/v1/swagger.json get /v1/feedbacks/{id}
Retrieves a specific incident_feedback by id
# Update an incident feedback
Source: https://docs.rootly.com/api-reference/incidentfeedbacks/update-an-incident-feedback
https://rootly-heroku.s3.amazonaws.com/swagger/v1/swagger.json put /v1/feedbacks/{id}
Update a specific incident feedback by id
# Creates an incident form field selection
Source: https://docs.rootly.com/api-reference/incidentformfieldselections/creates-an-incident-form-field-selection
https://rootly-heroku.s3.amazonaws.com/swagger/v1/swagger.json post /v1/incidents/{incident_id}/form_field_selections
Creates a new incident form field selection from provided data
# Delete an incident form field selection
Source: https://docs.rootly.com/api-reference/incidentformfieldselections/delete-an-incident-form-field-selection
https://rootly-heroku.s3.amazonaws.com/swagger/v1/swagger.json delete /v1/incident_form_field_selections/{id}
Delete a specific incident form field selection by id
# List incident form field selections
Source: https://docs.rootly.com/api-reference/incidentformfieldselections/list-incident-form-field-selections
https://rootly-heroku.s3.amazonaws.com/swagger/v1/swagger.json get /v1/incidents/{incident_id}/form_field_selections
List incident form field selections
# Retrieves an incident form field selection
Source: https://docs.rootly.com/api-reference/incidentformfieldselections/retrieves-an-incident-form-field-selection
https://rootly-heroku.s3.amazonaws.com/swagger/v1/swagger.json get /v1/incident_form_field_selections/{id}
Retrieves a specific incident form field selection by id
# Update an incident form field selection
Source: https://docs.rootly.com/api-reference/incidentformfieldselections/update-an-incident-form-field-selection
https://rootly-heroku.s3.amazonaws.com/swagger/v1/swagger.json put /v1/incident_form_field_selections/{id}
Update a specific incident form field selection by id
# Creates an incident_permission_set_boolean
Source: https://docs.rootly.com/api-reference/incidentpermissionsetbooleans/creates-an-incident_permission_set_boolean
https://rootly-heroku.s3.amazonaws.com/swagger/v1/swagger.json post /v1/incident_permission_sets/{incident_permission_set_id}/booleans
Creates a new incident_permission_set_boolean from provided data
# Delete an incident_permission_set_boolean
Source: https://docs.rootly.com/api-reference/incidentpermissionsetbooleans/delete-an-incident_permission_set_boolean
https://rootly-heroku.s3.amazonaws.com/swagger/v1/swagger.json delete /v1/incident_permission_set_booleans/{id}
Delete a specific incident_permission_set_boolean by id
# List incident_permission_set_booleans
Source: https://docs.rootly.com/api-reference/incidentpermissionsetbooleans/list-incident_permission_set_booleans
https://rootly-heroku.s3.amazonaws.com/swagger/v1/swagger.json get /v1/incident_permission_sets/{incident_permission_set_id}/booleans
List incident_permission_set_booleans
# Retrieves an incident_permission_set_boolean
Source: https://docs.rootly.com/api-reference/incidentpermissionsetbooleans/retrieves-an-incident_permission_set_boolean
https://rootly-heroku.s3.amazonaws.com/swagger/v1/swagger.json get /v1/incident_permission_set_booleans/{id}
Retrieves a specific incident_permission_set_boolean by id
# Update an incident_permission_set_boolean
Source: https://docs.rootly.com/api-reference/incidentpermissionsetbooleans/update-an-incident_permission_set_boolean
https://rootly-heroku.s3.amazonaws.com/swagger/v1/swagger.json put /v1/incident_permission_set_booleans/{id}
Update a specific incident_permission_set_boolean by id
# Creates an incident_permission_set_resource
Source: https://docs.rootly.com/api-reference/incidentpermissionsetresources/creates-an-incident_permission_set_resource
https://rootly-heroku.s3.amazonaws.com/swagger/v1/swagger.json post /v1/incident_permission_sets/{incident_permission_set_id}/resources
Creates a new incident_permission_set_resource from provided data
# Delete an incident_permission_set_resource
Source: https://docs.rootly.com/api-reference/incidentpermissionsetresources/delete-an-incident_permission_set_resource
https://rootly-heroku.s3.amazonaws.com/swagger/v1/swagger.json delete /v1/incident_permission_set_resources/{id}
Delete a specific incident_permission_set_resource by id
# List incident_permission_set_resources
Source: https://docs.rootly.com/api-reference/incidentpermissionsetresources/list-incident_permission_set_resources
https://rootly-heroku.s3.amazonaws.com/swagger/v1/swagger.json get /v1/incident_permission_sets/{incident_permission_set_id}/resources
List incident_permission_set_resources
# Retrieves an incident_permission_set_resource
Source: https://docs.rootly.com/api-reference/incidentpermissionsetresources/retrieves-an-incident_permission_set_resource
https://rootly-heroku.s3.amazonaws.com/swagger/v1/swagger.json get /v1/incident_permission_set_resources/{id}
Retrieves a specific incident_permission_set_resource by id
# Update an incident_permission_set_resource
Source: https://docs.rootly.com/api-reference/incidentpermissionsetresources/update-an-incident_permission_set_resource
https://rootly-heroku.s3.amazonaws.com/swagger/v1/swagger.json put /v1/incident_permission_set_resources/{id}
Update a specific incident_permission_set_resource by id
# Creates an incident_permission_set
Source: https://docs.rootly.com/api-reference/incidentpermissionsets/creates-an-incident_permission_set
https://rootly-heroku.s3.amazonaws.com/swagger/v1/swagger.json post /v1/incident_permission_sets
Creates a new incident_permission_set from provided data
# Delete an incident_permission_set
Source: https://docs.rootly.com/api-reference/incidentpermissionsets/delete-an-incident_permission_set
https://rootly-heroku.s3.amazonaws.com/swagger/v1/swagger.json delete /v1/incident_permission_sets/{id}
Delete a specific incident_permission_set by id
# List incident_permission_sets
Source: https://docs.rootly.com/api-reference/incidentpermissionsets/list-incident_permission_sets
https://rootly-heroku.s3.amazonaws.com/swagger/v1/swagger.json get /v1/incident_permission_sets
List incident_permission_sets
# Retrieves an incident_permission_set
Source: https://docs.rootly.com/api-reference/incidentpermissionsets/retrieves-an-incident_permission_set
https://rootly-heroku.s3.amazonaws.com/swagger/v1/swagger.json get /v1/incident_permission_sets/{id}
Retrieves a specific incident_permission_set by id
# Update an incident_permission_set
Source: https://docs.rootly.com/api-reference/incidentpermissionsets/update-an-incident_permission_set
https://rootly-heroku.s3.amazonaws.com/swagger/v1/swagger.json put /v1/incident_permission_sets/{id}
Update a specific incident_permission_set by id
# List incident retrospectives
Source: https://docs.rootly.com/api-reference/incidentretrospectives/list-incident-retrospectives
https://rootly-heroku.s3.amazonaws.com/swagger/v1/swagger.json get /v1/post_mortems
List incident retrospectives
# Retrieves an incident retrospective
Source: https://docs.rootly.com/api-reference/incidentretrospectives/retrieves-an-incident-retrospective
https://rootly-heroku.s3.amazonaws.com/swagger/v1/swagger.json get /v1/post_mortems/{id}
List incidents retrospectives
# Update an incident retrospective
Source: https://docs.rootly.com/api-reference/incidentretrospectives/update-an-incident-retrospective
https://rootly-heroku.s3.amazonaws.com/swagger/v1/swagger.json put /v1/post_mortems/{id}
Update a specific incident retrospective by id
# Retrieves an incident retrospective step
Source: https://docs.rootly.com/api-reference/incidentretrospectivesteps/retrieves-an-incident-retrospective-step
https://rootly-heroku.s3.amazonaws.com/swagger/v1/swagger.json get /v1/incident_retrospective_steps/{id}
Retrieves a specific incident retrospective step by id
# Update an incident retrospective step
Source: https://docs.rootly.com/api-reference/incidentretrospectivesteps/update-an-incident-retrospective-step
https://rootly-heroku.s3.amazonaws.com/swagger/v1/swagger.json put /v1/incident_retrospective_steps/{id}
Update a specific incident retrospective step by id
# Creates an incident role
Source: https://docs.rootly.com/api-reference/incidentroles/creates-an-incident-role
https://rootly-heroku.s3.amazonaws.com/swagger/v1/swagger.json post /v1/incident_roles
Creates a new incident role from provided data
# Delete an incident role
Source: https://docs.rootly.com/api-reference/incidentroles/delete-an-incident-role
https://rootly-heroku.s3.amazonaws.com/swagger/v1/swagger.json delete /v1/incident_roles/{id}
Delete a specific incident_role by id
# List incident roles
Source: https://docs.rootly.com/api-reference/incidentroles/list-incident-roles
https://rootly-heroku.s3.amazonaws.com/swagger/v1/swagger.json get /v1/incident_roles
List incident roles
# Retrieves an incident role
Source: https://docs.rootly.com/api-reference/incidentroles/retrieves-an-incident-role
https://rootly-heroku.s3.amazonaws.com/swagger/v1/swagger.json get /v1/incident_roles/{id}
Retrieves a specific incident_role by id
# Update an incident role
Source: https://docs.rootly.com/api-reference/incidentroles/update-an-incident-role
https://rootly-heroku.s3.amazonaws.com/swagger/v1/swagger.json put /v1/incident_roles/{id}
Update a specific incident_role by id
# Creates an incident role task
Source: https://docs.rootly.com/api-reference/incidentroletasks/creates-an-incident-role-task
https://rootly-heroku.s3.amazonaws.com/swagger/v1/swagger.json post /v1/incident_roles/{incident_role_id}/incident_role_tasks
Creates a new task from provided data
# Delete an incident role task
Source: https://docs.rootly.com/api-reference/incidentroletasks/delete-an-incident-role-task
https://rootly-heroku.s3.amazonaws.com/swagger/v1/swagger.json delete /v1/incident_role_tasks/{id}
Delete a specific incident_role task by id
# List incident role tasks
Source: https://docs.rootly.com/api-reference/incidentroletasks/list-incident-role-tasks
https://rootly-heroku.s3.amazonaws.com/swagger/v1/swagger.json get /v1/incident_roles/{incident_role_id}/incident_role_tasks
List incident_role tasks
# Retrieves an incident role task
Source: https://docs.rootly.com/api-reference/incidentroletasks/retrieves-an-incident-role-task
https://rootly-heroku.s3.amazonaws.com/swagger/v1/swagger.json get /v1/incident_role_tasks/{id}
Retrieves a specific incident_role_task by id
# Update an incident role task
Source: https://docs.rootly.com/api-reference/incidentroletasks/update-an-incident-role-task
https://rootly-heroku.s3.amazonaws.com/swagger/v1/swagger.json put /v1/incident_role_tasks/{id}
Update a specific incident_role task by id
# Add subscribers to incident
Source: https://docs.rootly.com/api-reference/incidents/add-subscribers-to-incident
https://rootly-heroku.s3.amazonaws.com/swagger/v1/swagger.json post /v1/incidents/{id}/add_subscribers
Add subscribers to incident
# Assign user to incident
Source: https://docs.rootly.com/api-reference/incidents/assign-user-to-incident
https://rootly-heroku.s3.amazonaws.com/swagger/v1/swagger.json post /v1/incidents/{id}/assign_role_to_user
Assign user to incident
# Cancel an incident
Source: https://docs.rootly.com/api-reference/incidents/cancel-an-incident
https://rootly-heroku.s3.amazonaws.com/swagger/v1/swagger.json put /v1/incidents/{id}/cancel
Cancel a specific incident by id
# Creates an incident
Source: https://docs.rootly.com/api-reference/incidents/creates-an-incident
https://rootly-heroku.s3.amazonaws.com/swagger/v1/swagger.json post /v1/incidents
Creates a new incident from provided data
# Delete an incident
Source: https://docs.rootly.com/api-reference/incidents/delete-an-incident
https://rootly-heroku.s3.amazonaws.com/swagger/v1/swagger.json delete /v1/incidents/{id}
Delete a specific incident by id
# List incidents
Source: https://docs.rootly.com/api-reference/incidents/list-incidents
https://rootly-heroku.s3.amazonaws.com/swagger/v1/swagger.json get /v1/incidents
List incidents
# Mark an incident as a duplicate
Source: https://docs.rootly.com/api-reference/incidents/mark-an-incident-as-a-duplicate
https://rootly-heroku.s3.amazonaws.com/swagger/v1/swagger.json put /v1/incidents/{id}/duplicate
Mark an incident as a duplicate
# Mitigate an incident
Source: https://docs.rootly.com/api-reference/incidents/mitigate-an-incident
https://rootly-heroku.s3.amazonaws.com/swagger/v1/swagger.json put /v1/incidents/{id}/mitigate
Mitigate a specific incident by id
# Remove assigned user from incident
Source: https://docs.rootly.com/api-reference/incidents/remove-assigned-user-from-incident
https://rootly-heroku.s3.amazonaws.com/swagger/v1/swagger.json delete /v1/incidents/{id}/unassign_role_from_user
Remove assigned user from incident
# Remove subscribers from incident
Source: https://docs.rootly.com/api-reference/incidents/remove-subscribers-from-incident
https://rootly-heroku.s3.amazonaws.com/swagger/v1/swagger.json delete /v1/incidents/{id}/remove_subscribers
Remove subscribers to incident
# Resolve an incident
Source: https://docs.rootly.com/api-reference/incidents/resolve-an-incident
https://rootly-heroku.s3.amazonaws.com/swagger/v1/swagger.json put /v1/incidents/{id}/resolve
Resolve a specific incident by id
# Restart an incident
Source: https://docs.rootly.com/api-reference/incidents/restart-an-incident
https://rootly-heroku.s3.amazonaws.com/swagger/v1/swagger.json put /v1/incidents/{id}/restart
Restart a specific incident by id
# Retrieves an incident
Source: https://docs.rootly.com/api-reference/incidents/retrieves-an-incident
https://rootly-heroku.s3.amazonaws.com/swagger/v1/swagger.json get /v1/incidents/{id}
Retrieves a specific incident by id
# Triage an incident
Source: https://docs.rootly.com/api-reference/incidents/triage-an-incident
https://rootly-heroku.s3.amazonaws.com/swagger/v1/swagger.json put /v1/incidents/{id}/in_triage
Set a specific incident by ID to triage state
# Update an incident
Source: https://docs.rootly.com/api-reference/incidents/update-an-incident
https://rootly-heroku.s3.amazonaws.com/swagger/v1/swagger.json put /v1/incidents/{id}
Update a specific incident by id
# Creates an incident status page event
Source: https://docs.rootly.com/api-reference/incidentstatuspageevents/creates-an-incident-status-page-event
https://rootly-heroku.s3.amazonaws.com/swagger/v1/swagger.json post /v1/incidents/{incident_id}/status-page-events
Creates a new event from provided data
# Delete an incident status page event
Source: https://docs.rootly.com/api-reference/incidentstatuspageevents/delete-an-incident-status-page-event
https://rootly-heroku.s3.amazonaws.com/swagger/v1/swagger.json delete /v1/status-page-events/{id}
Delete a specific incident status page event by id
# List incident status page events
Source: https://docs.rootly.com/api-reference/incidentstatuspageevents/list-incident-status-page-events
https://rootly-heroku.s3.amazonaws.com/swagger/v1/swagger.json get /v1/incidents/{incident_id}/status-page-events
List incident status page events
# Retrieves an incident status page event
Source: https://docs.rootly.com/api-reference/incidentstatuspageevents/retrieves-an-incident-status-page-event
https://rootly-heroku.s3.amazonaws.com/swagger/v1/swagger.json get /v1/status-page-events/{id}
Retrieves a specific incident_status_page_event by id
# Update an incident status page event
Source: https://docs.rootly.com/api-reference/incidentstatuspageevents/update-an-incident-status-page-event
https://rootly-heroku.s3.amazonaws.com/swagger/v1/swagger.json put /v1/status-page-events/{id}
Update a specific incident status page event by id
# Creates a sub-status assignment
Source: https://docs.rootly.com/api-reference/incidentsubstatuses/creates-a-sub-status-assignment
https://rootly-heroku.s3.amazonaws.com/swagger/v1/swagger.json post /v1/incidents/{incident_id}/sub_statuses
Creates a new sub-status assignment from provided data
# Delete an incident_sub_status
Source: https://docs.rootly.com/api-reference/incidentsubstatuses/delete-an-incident_sub_status
https://rootly-heroku.s3.amazonaws.com/swagger/v1/swagger.json delete /v1/incident_sub_statuses/{id}
Delete a specific incident_sub_status by id
# List incident_sub_statuses
Source: https://docs.rootly.com/api-reference/incidentsubstatuses/list-incident_sub_statuses
https://rootly-heroku.s3.amazonaws.com/swagger/v1/swagger.json get /v1/incidents/{incident_id}/sub_statuses
List incident_sub_statuses
# Retrieves incident_sub_status
Source: https://docs.rootly.com/api-reference/incidentsubstatuses/retrieves-incident_sub_status
https://rootly-heroku.s3.amazonaws.com/swagger/v1/swagger.json get /v1/incident_sub_statuses/{id}
Retrieves a specific incident_sub_status by id
# Update incident_sub_status
Source: https://docs.rootly.com/api-reference/incidentsubstatuses/update-incident_sub_status
https://rootly-heroku.s3.amazonaws.com/swagger/v1/swagger.json put /v1/incident_sub_statuses/{id}
Update a specific incident_sub_status by id
# Creates an incident type
Source: https://docs.rootly.com/api-reference/incidenttypes/creates-an-incident-type
https://rootly-heroku.s3.amazonaws.com/swagger/v1/swagger.json post /v1/incident_types
Creates a new incident_type from provided data
# Delete an incident type
Source: https://docs.rootly.com/api-reference/incidenttypes/delete-an-incident-type
https://rootly-heroku.s3.amazonaws.com/swagger/v1/swagger.json delete /v1/incident_types/{id}
Delete a specific incident_type by id
# List incident types
Source: https://docs.rootly.com/api-reference/incidenttypes/list-incident-types
https://rootly-heroku.s3.amazonaws.com/swagger/v1/swagger.json get /v1/incident_types
List incident types
# Retrieves an incident type
Source: https://docs.rootly.com/api-reference/incidenttypes/retrieves-an-incident-type
https://rootly-heroku.s3.amazonaws.com/swagger/v1/swagger.json get /v1/incident_types/{id}
Retrieves a specific incident_type by id
# Update an incident type
Source: https://docs.rootly.com/api-reference/incidenttypes/update-an-incident-type
https://rootly-heroku.s3.amazonaws.com/swagger/v1/swagger.json put /v1/incident_types/{id}
Update a specific incident_type by id
# Retrieves IP ranges
Source: https://docs.rootly.com/api-reference/ipranges/retrieves-ip-ranges
https://rootly-heroku.s3.amazonaws.com/swagger/v1/swagger.json get /v1/ip_ranges
Retrieves the IP ranges for rootly.com services
# Creates a Live Call Router
Source: https://docs.rootly.com/api-reference/livecallrouters/creates-a-live-call-router
https://rootly-heroku.s3.amazonaws.com/swagger/v1/swagger.json post /v1/live_call_routers
Creates a new Live Call Router from provided data
# Delete a Live Call Router
Source: https://docs.rootly.com/api-reference/livecallrouters/delete-a-live-call-router
https://rootly-heroku.s3.amazonaws.com/swagger/v1/swagger.json delete /v1/live_call_routers/{id}
Delete a specific Live Call Router by id
# Generates a phone number for Live Call Router
Source: https://docs.rootly.com/api-reference/livecallrouters/generates-a-phone-number-for-live-call-router
https://rootly-heroku.s3.amazonaws.com/swagger/v1/swagger.json get /v1/live_call_routers/generate_phone_number
Generates a phone number for Live Call Router
# List Live Call Routers
Source: https://docs.rootly.com/api-reference/livecallrouters/list-live-call-routers
https://rootly-heroku.s3.amazonaws.com/swagger/v1/swagger.json get /v1/live_call_routers
List Live Call Routers
# Retrieves a Live Call Router
Source: https://docs.rootly.com/api-reference/livecallrouters/retrieves-a-live-call-router
https://rootly-heroku.s3.amazonaws.com/swagger/v1/swagger.json get /v1/live_call_routers/{id}
Retrieves a specific Live Call Router by id
# Update a Live Call Router
Source: https://docs.rootly.com/api-reference/livecallrouters/update-a-live-call-router
https://rootly-heroku.s3.amazonaws.com/swagger/v1/swagger.json put /v1/live_call_routers/{id}
Update a specific Live Call Router by id
# Creates an On-Call Role
Source: https://docs.rootly.com/api-reference/oncallroles/creates-an-on-call-role
https://rootly-heroku.s3.amazonaws.com/swagger/v1/swagger.json post /v1/on_call_roles
Creates a new On-Call Role from provided data
# Delete an On-Call Role
Source: https://docs.rootly.com/api-reference/oncallroles/delete-an-on-call-role
https://rootly-heroku.s3.amazonaws.com/swagger/v1/swagger.json delete /v1/on_call_roles/{id}
Delete a specific On-Call Role by id
# List On-Call Roles
Source: https://docs.rootly.com/api-reference/oncallroles/list-on-call-roles
https://rootly-heroku.s3.amazonaws.com/swagger/v1/swagger.json get /v1/on_call_roles
List On-Call Roles
# Retrieves an On-Call Role
Source: https://docs.rootly.com/api-reference/oncallroles/retrieves-an-on-call-role
https://rootly-heroku.s3.amazonaws.com/swagger/v1/swagger.json get /v1/on_call_roles/{id}
Retrieves a specific On-Call Role by id
# Update an On-Call Role
Source: https://docs.rootly.com/api-reference/oncallroles/update-an-on-call-role
https://rootly-heroku.s3.amazonaws.com/swagger/v1/swagger.json put /v1/on_call_roles/{id}
Update a specific On-Call Role by id
# creates an shadow configuration
Source: https://docs.rootly.com/api-reference/oncallshadows/creates-an-shadow-configuration
https://rootly-heroku.s3.amazonaws.com/swagger/v1/swagger.json post /v1/schedules/{schedule_id}/on_call_shadows
Creates a new on call shadow configuration from provided data
# List On Call Shadows for Shift
Source: https://docs.rootly.com/api-reference/oncallshadows/list-on-call-shadows-for-shift
https://rootly-heroku.s3.amazonaws.com/swagger/v1/swagger.json get /v1/schedules/{schedule_id}/on_call_shadows
List shadow shifts for schedule
# Retrieves an On Call Shadow configuration by ID
Source: https://docs.rootly.com/api-reference/oncallshadows/retrieves-an-on-call-shadow-configuration-by-id
https://rootly-heroku.s3.amazonaws.com/swagger/v1/swagger.json get /v1/on_call_shadows/{id}
Retrieves a specific On Call Shadow configuration by ID
# Update an On Call Shadow configuration
Source: https://docs.rootly.com/api-reference/oncallshadows/update-an-on-call-shadow-configuration
https://rootly-heroku.s3.amazonaws.com/swagger/v1/swagger.json put /v1/on_call_shadows/{id}
Update a specific on call shadow configuration by id
# creates an override shift
Source: https://docs.rootly.com/api-reference/overrideshifts/creates-an-override-shift
https://rootly-heroku.s3.amazonaws.com/swagger/v1/swagger.json post /v1/schedules/{schedule_id}/override_shifts
Creates a new override shift from provided data
# Delete an on call shadow configuration
Source: https://docs.rootly.com/api-reference/overrideshifts/delete-an-on-call-shadow-configuration
https://rootly-heroku.s3.amazonaws.com/swagger/v1/swagger.json delete /v1/on_call_shadows/{id}
Delete a specific on call shadow configuration by id
# Delete an override shift
Source: https://docs.rootly.com/api-reference/overrideshifts/delete-an-override-shift
https://rootly-heroku.s3.amazonaws.com/swagger/v1/swagger.json delete /v1/override_shifts/{id}
Delete a specific override shift by id
# List override shifts
Source: https://docs.rootly.com/api-reference/overrideshifts/list-override-shifts
https://rootly-heroku.s3.amazonaws.com/swagger/v1/swagger.json get /v1/schedules/{schedule_id}/override_shifts
List override shifts
# Retrieves an override shift
Source: https://docs.rootly.com/api-reference/overrideshifts/retrieves-an-override-shift
https://rootly-heroku.s3.amazonaws.com/swagger/v1/swagger.json get /v1/override_shifts/{id}
Retrieves a specific override shift by id
# Update an override shift
Source: https://docs.rootly.com/api-reference/overrideshifts/update-an-override-shift
https://rootly-heroku.s3.amazonaws.com/swagger/v1/swagger.json put /v1/override_shifts/{id}
Update a specific override shift by id
# Overview
Source: https://docs.rootly.com/api-reference/overview
API Authentication and Request Examples
{{incident.created_at | date: \"%Y-%m-%d\"}} - {{incident.title}}
\nLeadup
\nDescribe the circumstances that led to this incident
\n
Fault
\nDescribe what failed to work as expected
\n
Detection
\nDescribe how the incident was detected
\n
Root causes
\nRun a 5-whys analysis to understand the true causes of the incident
\n
Mitigation and resolution
\nWhat steps did you take to resolve this incident?
\n
Lessons learnt
\nWhat went well? What could have gone better? What else did you learn?
", "published_at": null, "started_at": "2022-11-27T19:36:00.000-08:00", "mitigated_at": "2022-11-27T19:44:32.156-08:00", "resolved_at": "2022-11-27T19:44:32.156-08:00", "cancelled_at": null, "show_timeline": true, "show_timeline_starred_only": false, "show_timeline_genius": true, "show_timeline_trail": true, "show_timeline_tasks": true, "show_timeline_action_items": true, "show_functionalities_impacted": true, "show_services_impacted": true, "show_groups_impacted": true, "show_action_items": true, "created_at": "2022-11-27T19:36:49.779-08:00", "updated_at": "2022-11-27T19:44:32.177-08:00" } } ``` ## pulse.\* ```json JSON { "event: : { "id": "9839c4ca-5e7b-416d-ad95-d09ae0c8eead", "type": "pulse.created", "issued_at": "2022-11-27T19:15:30.995-08:00", }, "data": { "id": "aa1cab03-00e7-4578-b1ae-72ad9ae417c6", "team_id": 1, "pulse_trail_id": "b59bfcb7-89ed-4641-b288-5ce1bb3dd801", "summary": "Deployed to Kubernetes", "labels": [ { "key": "label1", "value": "value1" }, { "key": "label2", "value": "value2" } ], "data": { "hello": "world" }, "external_id": null, "started_at": "2022-11-27T19:15:30.995-08:00", "ended_at": null, "deleted_at": null, "created_at": "2022-11-27T19:15:30.995-08:00", "updated_at": "2022-11-27T19:15:30.995-08:00", "webhook_type": null, "webhook_id": null, "webhook_idempotency_key": null, "external_url": null, "source": "k8s", "refs": [ { "key": "image", "value": "registry.rootly.com/rootly/my-service:cd6214" } ] } } ``` # Example Usage With Incidents Source: https://docs.rootly.com/configuration/example-usage-with-incidents Let's show how we can append a playbook to a newly created incident. If I was in slack for example I would do this by clicking the "Update" button (Seen below).  Let's say this was a security related incident. Once I append "Security" to the types field that would then automatically attach the related playbooks that were associated with the "Security" types.  As you can see below the action items has increased from 3 to 6 as we have appended the Security type related action items. Clicking the Action Items button gives us a full list of all the item actions.   You can also modify incidents in the Rootly UI as well by navigating to the Incidents tab and clicking edit on the appropriate incident. Modifying incidents in the UI will also automatically attach any relevant playbooks associated with the changes.  # Overview Source: https://docs.rootly.com/configuration/forms-and-fields Rootly's Form page serves as a central hub for managing incident forms and incident property fields. Not everyone has the same incident response process and requirements, Rootly enables teams to create, customize, and organize incident forms and property fields specific to their unique requirements. You can access the Forms & Fields page by navigating to **Configurations >** [**Forms**](https://rootly.com/account/forms). In this page, you can customize built-in forms or create your own for a fully customized experience.  # **Built-In Forms** Rootly comes with a series of built-in forms that cannot be deleted. However, they can be edited to collect different incident data properties specifically to your procedural needs. To learn about how to customize built-in forms, please see the [Built-In Forms](/configuration/built-in-forms) page. # **Custom Forms** If additional forms are required, Rootly allows teams to define their own forms that can be triggered either by Slack command or Slack block buttons. To learn about how to create and manage custom forms, please see the [Custom Forms](/configuration/custom-forms) page. # **Built-In Fields** Rootly comes with a series of built-in incident properties that are typically collected during incident responses. To learn about what can be customized and how to customize built-in fields, please see the [Built-In Fields](/configuration/built-in-fields) page. # **Custom Fields** If the built-in properties are not enough to address your requirements, Rootly offers the ability to create custom incident properties in various data types. To learn about how to create custom fields, please see the [Custom Fields](/configuration/custom-fields) page. # **Support** If you need help or more information about this page, please contact [support@rootly.com](mailto:support@rootly.com) or start a chat by navigating to **Help > Chat with Us**. # Functionalities Source: https://docs.rootly.com/configuration/functionalities # Overview[](#_tHiw) *Functionality* allows you to specify the impacted features during an incident. This can help you with identifying which responders to bring in, which on-call to page, which customers to inform, etc. Individual functionalities can be mapped to your status pages.  # Field Type[](#uCTSC) *Functionality* can be customized to be either a **select** or **multi-select** field type. This means you can configure it to allow only one functionalities value to be selected per incident or allow multiple functionality values to be selected for a single incident.  # Attributes[](#6AaFi) *Functionalities* can be configured with the following attributes. Each functionality attribute can be referenced via Liquid syntax.
Submitting a request through Slack is the quickest way to surface your demands to our team.  **2. Fill out the modal with details regarding your request/bug**  # Getting Help Source: https://docs.rootly.com/getting-help To learn more about the features in Rootly, check out our [product walkthrough](https://docs.rootly.com/introduction-to-rootly) or [book a demo](https://rootly.com/demo) for a more personalized tour. You can share feedback and submit questions to our support team by emailing [support@rootly.com](mailto:support@rootly.com) or using the slash command **/rootly support** in Slack. # Overview Source: https://docs.rootly.com/help-and-documentation Welcome to Rootly's Help and Support site. This is the place to come find the information you need and answer your questions about using and configuring Rootly. You can use the navigation bar to the left to quickly jump to pages you want to view. If you're not sure what you're looking for, try the search bar at the top of the page. If you can't find what you need in the docs, see our [Help and Support](https://rootly.com/help "Help and Support") page for how to get more information when you need it.

To learn more about the features available to you in Rootly.

Up and running in about 15 minutes!

Incident management is at the heart of how Rootly works.

Timelines track everything that happens during an incident in an easy to follow format.
If not resolved, `now - {{ incident.started_at }}` | # Web Creating A Sub Incident Source: https://docs.rootly.com/incidents/web-creating-a-sub-incident **How** 1. In any incident clicking the dropdown arrow for the incident status button will show an option to create a sub incident. This option will not show for incidents that are already sub incidents.  2\. Clicking the option will bring up an incident creation form. Upon completing the form a new sub incident will be created from the incident you proc'ed the Sub incident option from.  # Web Marking As Duplicate Source: https://docs.rootly.com/incidents/web-marking-as-duplicate
 Create an Oauth Application at [https://airtable.com/create/oauth](https://airtable.com/create/oauth "https://airtable.com/create/oauth")
 With as callback url: `https://rootly.com/auth/airtable/callback`
 ## Permissions
Check the following scopes:
## Permissions
Check the following scopes:
 ## Settings
Copy your `client_id` and `client_secret` into rootly
## Settings
Copy your `client_id` and `client_secret` into rootly
 ## Fields mapping[](#7z98s)
You can configure column mapping using our custom variables [Incident Variables](/liquid/incident-variables).
```json
{
"Name": "{{incident.title}}",
"Notes": "{{incident.summary}}",
"Started At": "{{incident.started_at | date: '%FT%T%:z' }}",
"Link": "{{incident.url}}"
}
```
## Uninstall
You can **uninstall** this integration in the integrations panel by clicking **Configure > Delete**
## Support
If you need help or more information about this integration, please contact [support@rootly.com](mailto:support@rootly.com) or use the **lower right chat widget** to get connected with an engineer.
# Prometheus Alertmanager
Source: https://docs.rootly.com/integrations/alertmanager-integration
## Why
Prometheus [Alertmanager](https://github.com/prometheus/alertmanager "Alertmanager") will let you send a webhook to Rootly as an incoming alert. The incoming alert can then be used to either create an incident, notify channels, or page on-call targets.
## Installation
Locate **Alertmanager** on the [Integrations catalogue](https://rootly.com/account/integrations "Integrations catalogue") and select `Setup`. You will be presented with the following pop-up.
## Fields mapping[](#7z98s)
You can configure column mapping using our custom variables [Incident Variables](/liquid/incident-variables).
```json
{
"Name": "{{incident.title}}",
"Notes": "{{incident.summary}}",
"Started At": "{{incident.started_at | date: '%FT%T%:z' }}",
"Link": "{{incident.url}}"
}
```
## Uninstall
You can **uninstall** this integration in the integrations panel by clicking **Configure > Delete**
## Support
If you need help or more information about this integration, please contact [support@rootly.com](mailto:support@rootly.com) or use the **lower right chat widget** to get connected with an engineer.
# Prometheus Alertmanager
Source: https://docs.rootly.com/integrations/alertmanager-integration
## Why
Prometheus [Alertmanager](https://github.com/prometheus/alertmanager "Alertmanager") will let you send a webhook to Rootly as an incoming alert. The incoming alert can then be used to either create an incident, notify channels, or page on-call targets.
## Installation
Locate **Alertmanager** on the [Integrations catalogue](https://rootly.com/account/integrations "Integrations catalogue") and select `Setup`. You will be presented with the following pop-up.
 ### Receiving General Alerts
In order to send general (non-paging) alerts to Rootly, you'll need to modify the `alert-manager.yml` configuration file as shown below:
```YAML
route:
receiver: default
group_by:
- job
routes:
- receiver: rootly
match:
alertname: Rootly
repeat_interval: 1m
receivers:
- name: rootly
webhook_configs:
- url: 'https://webhooks.rootly.com/webhooks/incoming/alertmanager_webhooks'
send_resolved: true
http_config:
authorization:
type: Bearer
credentials: a0b9fcad1aae0689cfa05c17df497b2bc5c56d26d3e253503438864dbd6697ee
```
Copy the *Webhook URL* field and *secret* from the pop-up above, and set it as the `url` and `credentials` parameters, respectively.
### Receiving General Alerts
In order to send general (non-paging) alerts to Rootly, you'll need to modify the `alert-manager.yml` configuration file as shown below:
```YAML
route:
receiver: default
group_by:
- job
routes:
- receiver: rootly
match:
alertname: Rootly
repeat_interval: 1m
receivers:
- name: rootly
webhook_configs:
- url: 'https://webhooks.rootly.com/webhooks/incoming/alertmanager_webhooks'
send_resolved: true
http_config:
authorization:
type: Bearer
credentials: a0b9fcad1aae0689cfa05c17df497b2bc5c56d26d3e253503438864dbd6697ee
```
Copy the *Webhook URL* field and *secret* from the pop-up above, and set it as the `url` and `credentials` parameters, respectively.
 ## API Reference
Read the complete [API Reference documentation](https://rootly.com/api "API Reference documentation").
## Support
If you need help or more information about this integration, please contact [support@rootly.com](mailto:support@rootly.com) or use the **lower right chat widget** to get connected with an engineer.
# Installation
Source: https://docs.rootly.com/integrations/asana/installation
## Why
**Asana** Integration allows you to:
* Creating an incident in **Rootly** will create a task in **Asana** if you choose to.
* Creating an action item in **Rootly** will create a task in **Asana** if you choose to. Attached as **subtasks** if incident has been created in **Asana** as well.
* **Changing** incident **title, description,** **status** in **Rootly** will update the task in **Asana.**
* **Changing** action item **title, description,** **status** in **Rootly** will update the task in **Asana.**
* **Changing** Asana incident issue attributes **will not** update incident attributes in **Rootly**.
* **Changing** Asana action item issue status **will not** update action item status in **Rootly**. ( Coming soon )
## Installation
You can setup this integration as a **logged in admin user** in the integrations page:
## API Reference
Read the complete [API Reference documentation](https://rootly.com/api "API Reference documentation").
## Support
If you need help or more information about this integration, please contact [support@rootly.com](mailto:support@rootly.com) or use the **lower right chat widget** to get connected with an engineer.
# Installation
Source: https://docs.rootly.com/integrations/asana/installation
## Why
**Asana** Integration allows you to:
* Creating an incident in **Rootly** will create a task in **Asana** if you choose to.
* Creating an action item in **Rootly** will create a task in **Asana** if you choose to. Attached as **subtasks** if incident has been created in **Asana** as well.
* **Changing** incident **title, description,** **status** in **Rootly** will update the task in **Asana.**
* **Changing** action item **title, description,** **status** in **Rootly** will update the task in **Asana.**
* **Changing** Asana incident issue attributes **will not** update incident attributes in **Rootly**.
* **Changing** Asana action item issue status **will not** update action item status in **Rootly**. ( Coming soon )
## Installation
You can setup this integration as a **logged in admin user** in the integrations page:

 ## Uninstall
You can **uninstall** this integration in the integrations panel by clicking **Configure > Delete**
## Support
If you need help or more information about this integration, please contact [support@rootly.com](mailto:support@rootly.com) or use the **lower right chat widget** to get connected with an engineer.
# Workflows
Source: https://docs.rootly.com/integrations/asana/workflows
## Create a Asana Task
## Uninstall
You can **uninstall** this integration in the integrations panel by clicking **Configure > Delete**
## Support
If you need help or more information about this integration, please contact [support@rootly.com](mailto:support@rootly.com) or use the **lower right chat widget** to get connected with an engineer.
# Workflows
Source: https://docs.rootly.com/integrations/asana/workflows
## Create a Asana Task
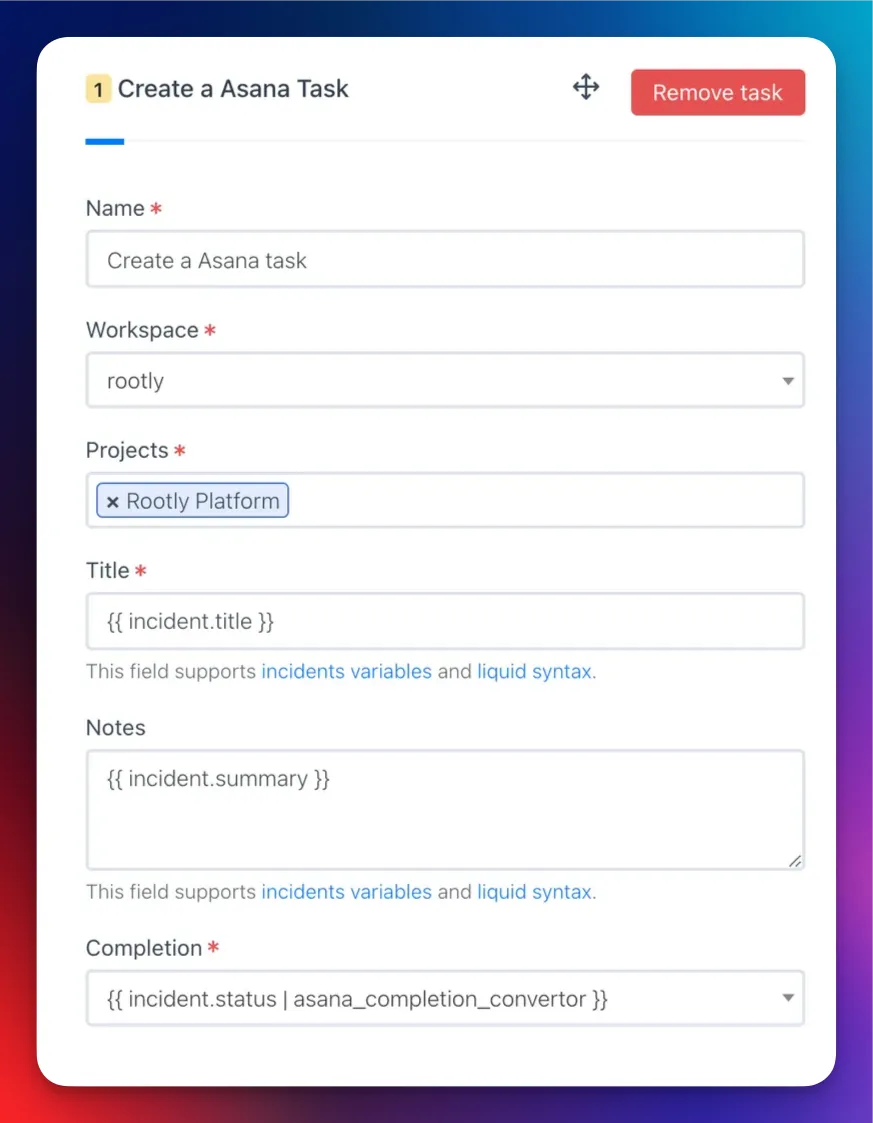 ## Create a Asana Subtask
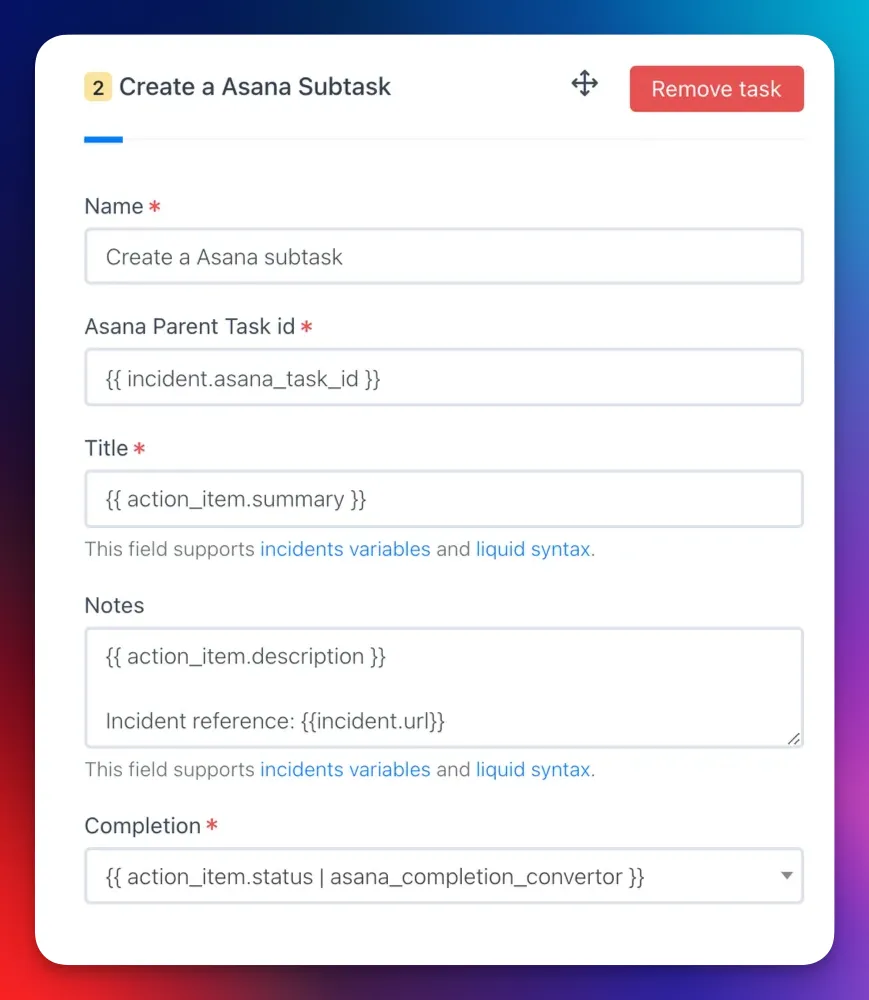 ## Update a Asana Task
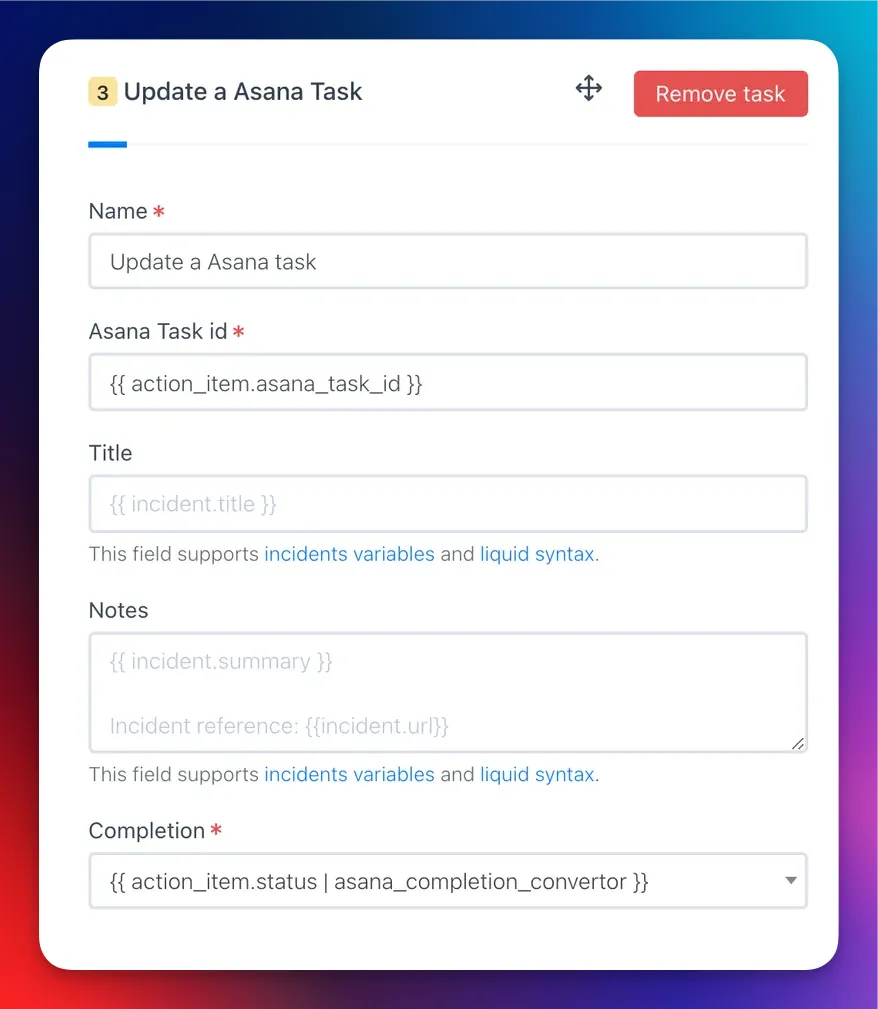 ## Custom fields
```JSON
"custom_fields": {
"4578152156": "Not Started", // For textfield type
"5678904321": "On Hold", // For textfield type
"5678904322": "1004598149" // For single enum type
"5678904322": ["459021796", "1004598149"] // For multi enum type
},
"custom_fields": {
"4578152156": "{{ incident.severity }}", // For textfield type
"5678904321": "{{ incident.status }}", // For textfield type
},
"custom_fields": {
"4578152156": "{{ incident.severity }}", // For textfield type
// For single enum type
{% if incident.severity == "sev0" %}
"5678904322": "1004598149" // Custom Field ID <=> Enum ID
{% elsif incident.severity == "sev1" %}
"5678904322": "1004598149" // Custom Field ID <=> Enum ID
{% endif %}
},
```
# AWS Elastic Beanstalk
Source: https://docs.rootly.com/integrations/aws-elastic-beanstalk
## Installation
* Create a `.ebextensions/rootly.config` file. (The name does not have to be 'rootly'.)
* Put this content into the file (Adapt for your use case)
```Shell Shell
files:
"/opt/elasticbeanstalk/hooks/appdeploy/pre/01rootly.sh" :
mode: "000775"
owner: root
group: users
content: |
#!/bin/bash
rootly_api_key="$(/opt/elasticbeanstalk/bin/get-config container -k rootly_api_key)";
environment="$(/opt/elasticbeanstalk/bin/get-config container -k environment)";
service="$(/opt/elasticbeanstalk/bin/get-config container -k service)";
labels="key=value,key2=value2"
# install rootly cli
curl -fsSL https://raw.githubusercontent.com/rootly-io/cli/main/install.sh | sh
# log a pulse
rootly pulse --api-key "${rootly_api_key}" --quiet --environments "${environment}" --services "${service}" --labels "${labels}" Deploy in progress...
```
## Support
If you need help or more information about this integration, please contact [support@rootly.com](mailto:support@rootly.com) or use the **lower right chat widget** to get connected with an engineer.
# Backstage
Source: https://docs.rootly.com/integrations/backstage/installation
## Rootly plugin for Backstage
Cf. [https://github.com/rootlyhq/backstage-plugin](https://github.com/rootlyhq/backstage-plugin "https://github.com/rootlyhq/backstage-plugin")
## License
This library is under the MIT license.
## Support
If you need help or more information about this integration, please contact [support@rootly.com](mailto:support@rootly.com) or use the **lower right chat widget** to get connected with an engineer.
# Installation
Source: https://docs.rootly.com/integrations/clickup/installation
## Why
**ClickUp** Integration allows you to:
* Creating an incident in **ClickUp** will create a task in **ClickUp** if you choose to.
* Creating an action item in **ClickUp** will create a task in **ClickUp** if you choose to. Attached as **subtasks** if incident has been created in **ClickUp** as well.
* **Changing** task **title, description,** **status** in **Rootly** will update the task in **ClickUp.**
* **Changing** action item **title, description,** **status** in **Rootly** will update the task in **ClickUp.**
## Installation
Locate **ClickUp** on on the [Integrations catalogue](https://rootly.com/account/integrations "Integrations catalogue") and select Setup.
## Custom fields
```JSON
"custom_fields": {
"4578152156": "Not Started", // For textfield type
"5678904321": "On Hold", // For textfield type
"5678904322": "1004598149" // For single enum type
"5678904322": ["459021796", "1004598149"] // For multi enum type
},
"custom_fields": {
"4578152156": "{{ incident.severity }}", // For textfield type
"5678904321": "{{ incident.status }}", // For textfield type
},
"custom_fields": {
"4578152156": "{{ incident.severity }}", // For textfield type
// For single enum type
{% if incident.severity == "sev0" %}
"5678904322": "1004598149" // Custom Field ID <=> Enum ID
{% elsif incident.severity == "sev1" %}
"5678904322": "1004598149" // Custom Field ID <=> Enum ID
{% endif %}
},
```
# AWS Elastic Beanstalk
Source: https://docs.rootly.com/integrations/aws-elastic-beanstalk
## Installation
* Create a `.ebextensions/rootly.config` file. (The name does not have to be 'rootly'.)
* Put this content into the file (Adapt for your use case)
```Shell Shell
files:
"/opt/elasticbeanstalk/hooks/appdeploy/pre/01rootly.sh" :
mode: "000775"
owner: root
group: users
content: |
#!/bin/bash
rootly_api_key="$(/opt/elasticbeanstalk/bin/get-config container -k rootly_api_key)";
environment="$(/opt/elasticbeanstalk/bin/get-config container -k environment)";
service="$(/opt/elasticbeanstalk/bin/get-config container -k service)";
labels="key=value,key2=value2"
# install rootly cli
curl -fsSL https://raw.githubusercontent.com/rootly-io/cli/main/install.sh | sh
# log a pulse
rootly pulse --api-key "${rootly_api_key}" --quiet --environments "${environment}" --services "${service}" --labels "${labels}" Deploy in progress...
```
## Support
If you need help or more information about this integration, please contact [support@rootly.com](mailto:support@rootly.com) or use the **lower right chat widget** to get connected with an engineer.
# Backstage
Source: https://docs.rootly.com/integrations/backstage/installation
## Rootly plugin for Backstage
Cf. [https://github.com/rootlyhq/backstage-plugin](https://github.com/rootlyhq/backstage-plugin "https://github.com/rootlyhq/backstage-plugin")
## License
This library is under the MIT license.
## Support
If you need help or more information about this integration, please contact [support@rootly.com](mailto:support@rootly.com) or use the **lower right chat widget** to get connected with an engineer.
# Installation
Source: https://docs.rootly.com/integrations/clickup/installation
## Why
**ClickUp** Integration allows you to:
* Creating an incident in **ClickUp** will create a task in **ClickUp** if you choose to.
* Creating an action item in **ClickUp** will create a task in **ClickUp** if you choose to. Attached as **subtasks** if incident has been created in **ClickUp** as well.
* **Changing** task **title, description,** **status** in **Rootly** will update the task in **ClickUp.**
* **Changing** action item **title, description,** **status** in **Rootly** will update the task in **ClickUp.**
## Installation
Locate **ClickUp** on on the [Integrations catalogue](https://rootly.com/account/integrations "Integrations catalogue") and select Setup.
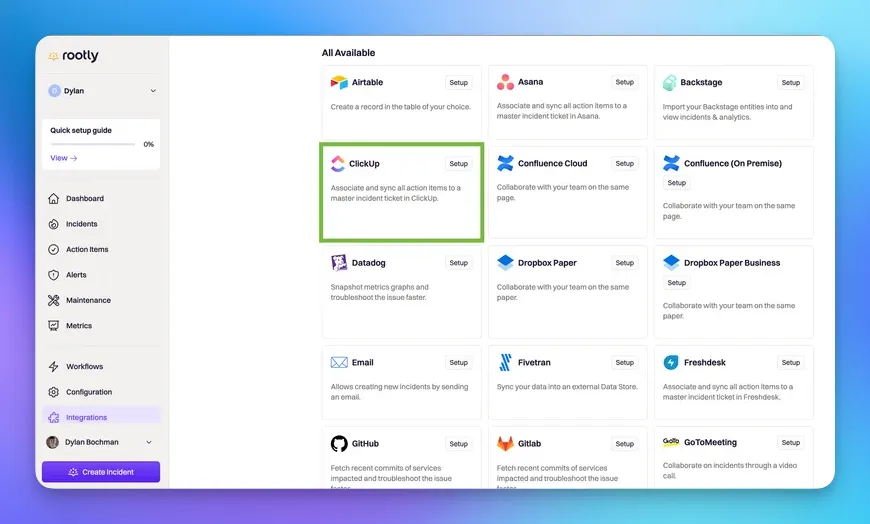 You'll be presented with the following installation page. Please generate a [ClickUp API Token](https://clickup.com/api/developer-portal/authentication/#generate-your-personal-api-token "ClickUp API Token") and paste it into the API Key field before you confirm the installation by selecting `Connect`.
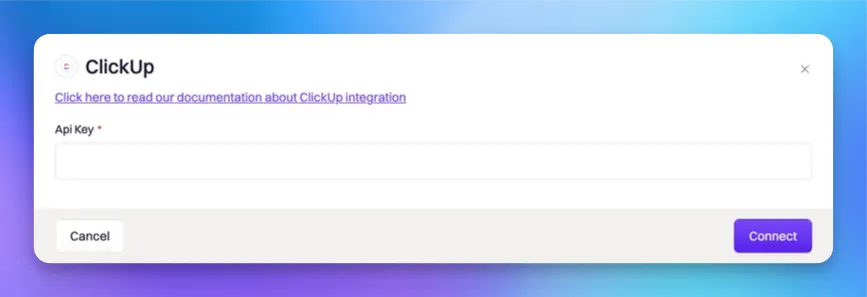 ## Uninstall
You can **uninstall** this integration in the integrations panel by clicking **Configure > Delete**
## Support
If you need help or more information about this integration, please contact [support@rootly.com](mailto:support@rootly.com) or use the **lower right chat widget** to get connected with an engineer.
# Workflows
Source: https://docs.rootly.com/integrations/clickup/workflows
## Uninstall
You can **uninstall** this integration in the integrations panel by clicking **Configure > Delete**
## Support
If you need help or more information about this integration, please contact [support@rootly.com](mailto:support@rootly.com) or use the **lower right chat widget** to get connected with an engineer.
# Workflows
Source: https://docs.rootly.com/integrations/clickup/workflows
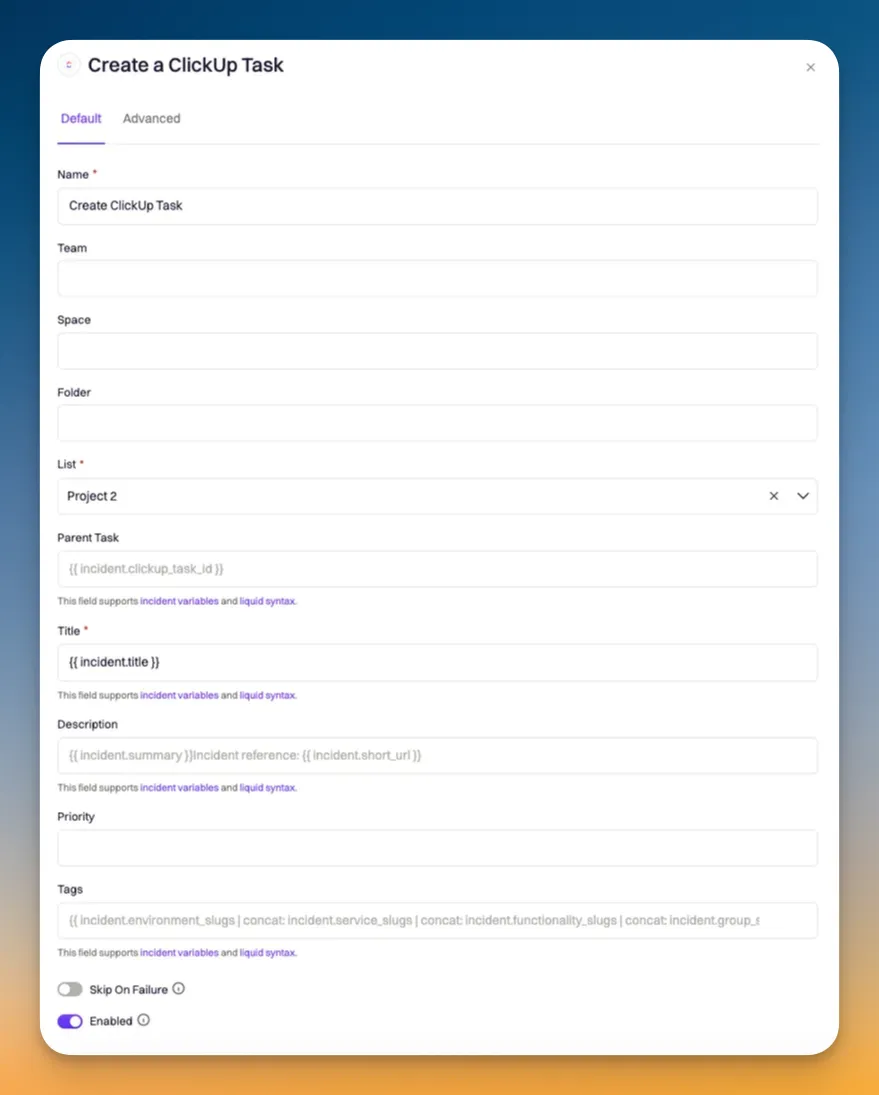 ### Create a ClickUp Subtask for Action Item
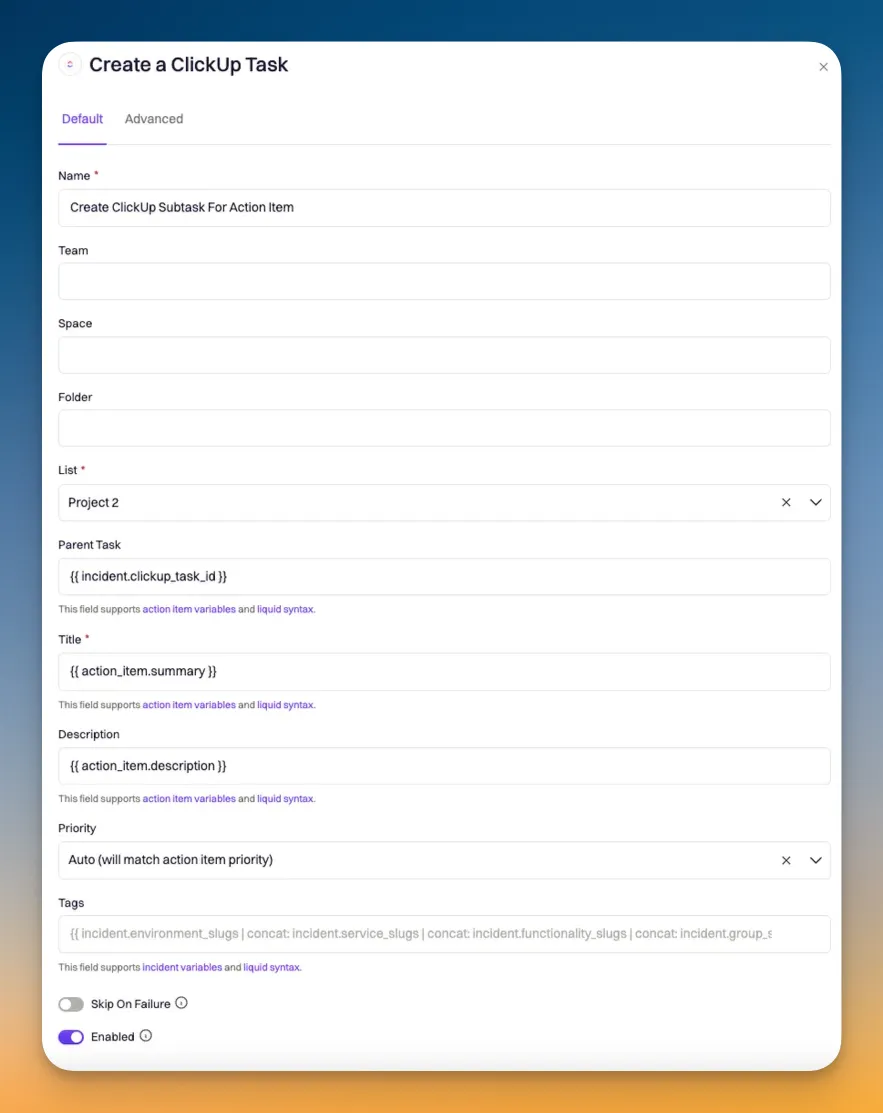 ### Update a ClickUp Task
### Update a ClickUp Subtask
### Update a ClickUp Task
### Update a ClickUp Subtask
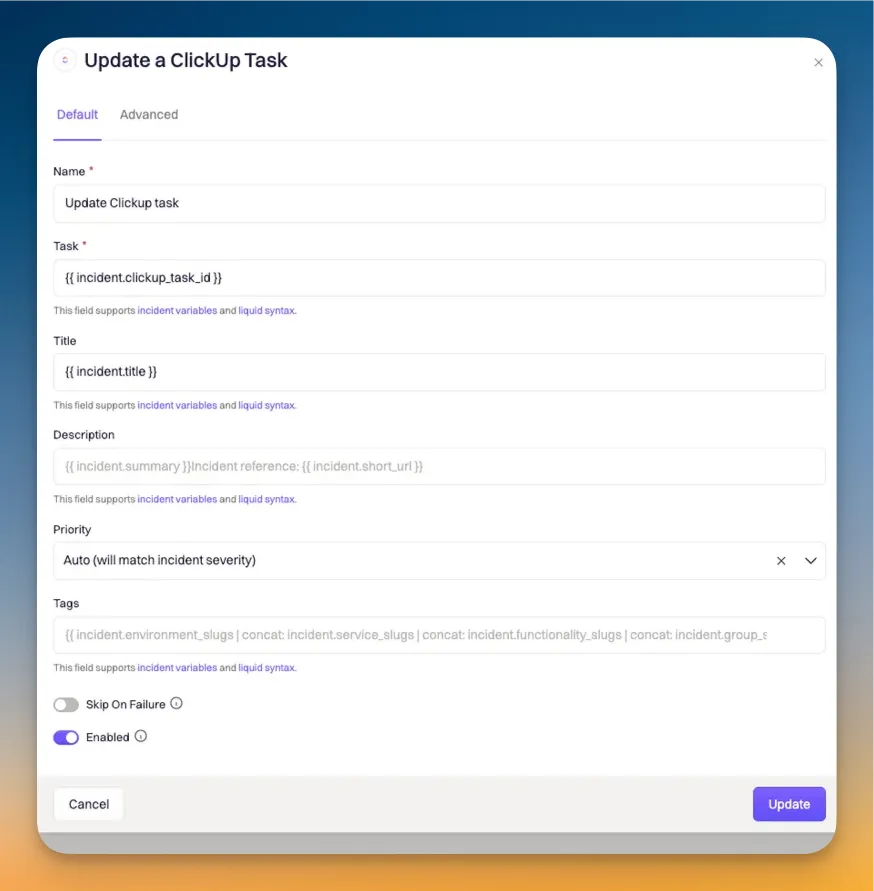 ### Update a ClickUp Subtask
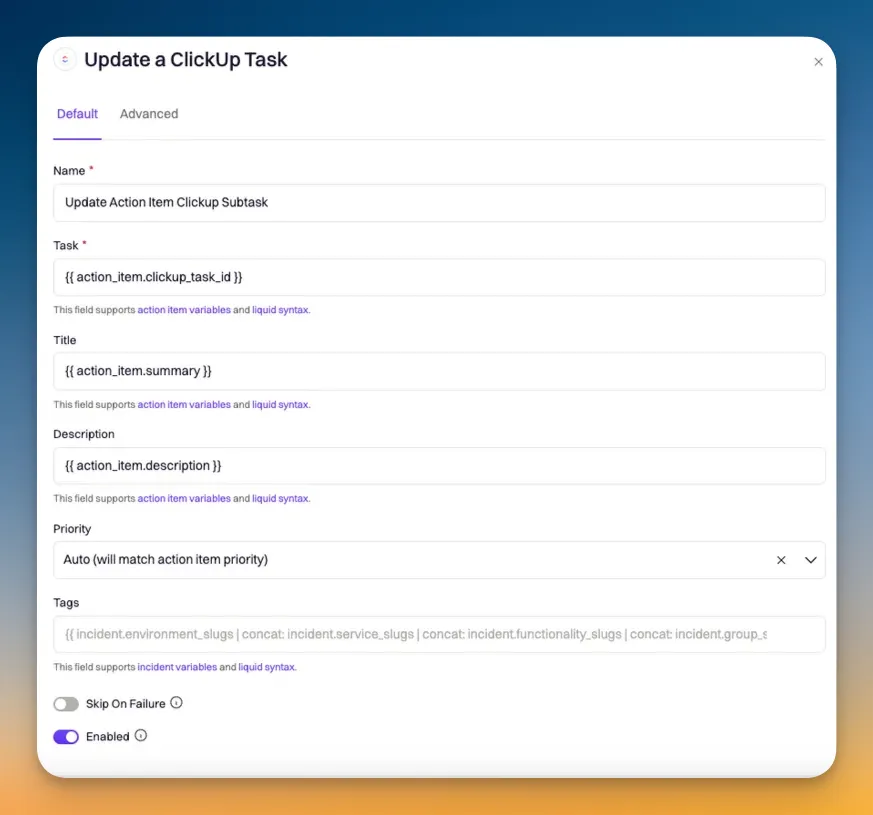 ## ClickUp --> Rooly Workflows
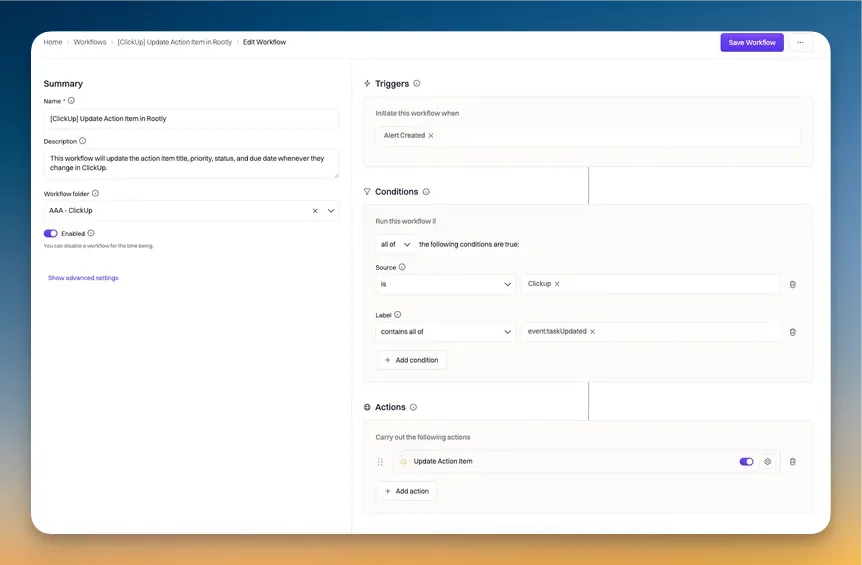
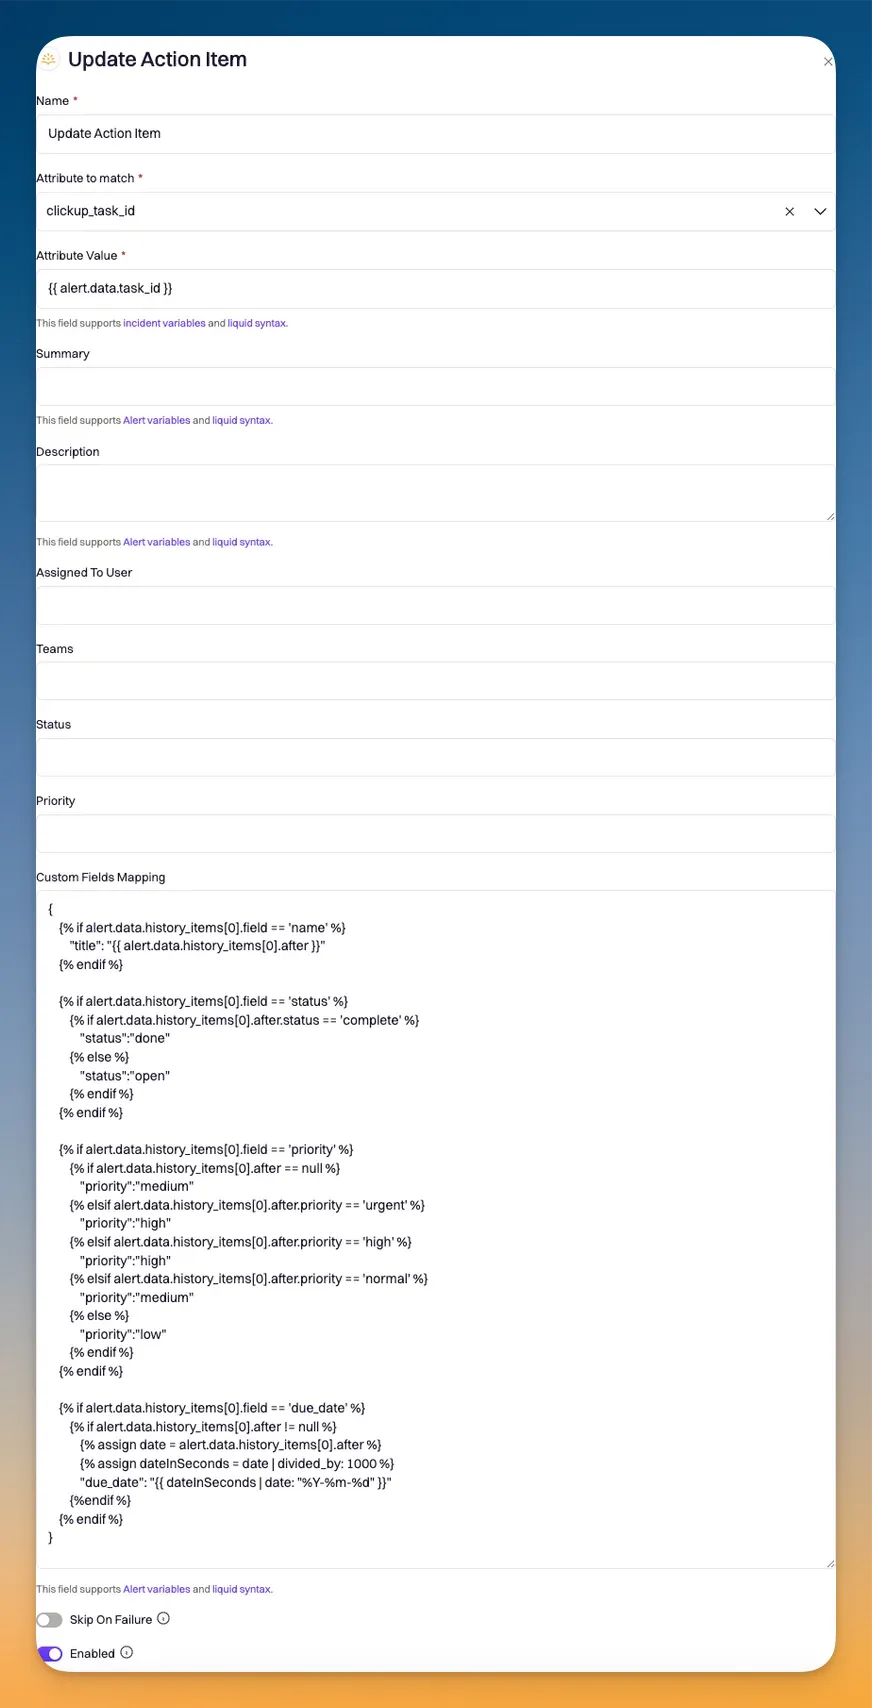 ### Data Mapping Syntax
```JSON
{
{% if alert.data.history_items[0].field == 'name' %}
"title": "{{ alert.data.history_items[0].after }}"
{% endif %}
{% if alert.data.history_items[0].field == 'status' %}
{% if alert.data.history_items[0].after.status == 'complete' %}
"status":"done"
{% else %}
"status":"open"
{% endif %}
{% endif %}
{% if alert.data.history_items[0].field == 'priority' %}
{% if alert.data.history_items[0].after == null %}
"priority":"medium"
{% elsif alert.data.history_items[0].after.priority == 'urgent' %}
"priority":"high"
{% elsif alert.data.history_items[0].after.priority == 'high' %}
"priority":"high"
{% elsif alert.data.history_items[0].after.priority == 'normal' %}
"priority":"medium"
{% else %}
"priority":"low"
{% endif %}
{% endif %}
{% if alert.data.history_items[0].field == 'due_date' %}
{% if alert.data.history_items[0].after != null %}
{% assign date = alert.data.history_items[0].after %}
{% assign dateInSeconds = date | divided_by: 1000 %}
"due_date": "{{ dateInSeconds | date: "%Y-%m-%d" }}"
{%endif %}
{% endif %}
}
```
# Confluence
Source: https://docs.rootly.com/integrations/confluence/confluence
## Overview
Rooty's Confluence integration helps streamline the process of completing incident retrospectives. By leveraging pre-built templates and workflows, teams can automate their retrospective creation - saving hours of manual work, per incident.
Some key features of this integration includes:
1. **Customizable templates**
* Rootly enables teams to pre-define retrospective templates in both Rootly and Confluence. If you're looking for a semi-custom retrospective that follows industry best practices, you can simply define the retrospective body in Rootly and we will take care of the rest. If you want a fully customized retrospective, you can build your template in Confluence and we will generate the retrospective accordingly.
2. **Liquid variable support**
* Liquid variables can be referenced in both templates created in Rootly or Confluence.
3. **Timeline Visualization:**
* Incident timelines are automatically generated for templates created in Rootly.
* [Custom Liquid syntax](/liquid/incident-variables) can be used to generate timelines for templates created in Confluence
4. **Action Item Tracking:**
* Follow-ups are automatically recorded when Rootly-hosted templates are used.
* [Custom Liquid syntax](/liquid/incident-variables "Custom Liquid syntax") can be used to list out follow-ups in templates hosted on Confluence.
## Installation
Please see the [**Installation** page](/integrations/confluence/installation "Installation") to get started with your Confluence integration.
## Workflows
Rootly relies on workflows to automate interactions with Confluence. The [**Workflows** page](/integrations/confluence/workflows "Workflows") will walk you through how to set up commonly used workflows involving Confluence.
## Support
If you need help or more information about this integration, please contact [support@rootly.com](mailto:support@rootly.com) or start a chat by navigating to **Help > Chat with Us**.
# Installation
Source: https://docs.rootly.com/integrations/confluence/installation
## Installing Confluence on Rootly
### Data Mapping Syntax
```JSON
{
{% if alert.data.history_items[0].field == 'name' %}
"title": "{{ alert.data.history_items[0].after }}"
{% endif %}
{% if alert.data.history_items[0].field == 'status' %}
{% if alert.data.history_items[0].after.status == 'complete' %}
"status":"done"
{% else %}
"status":"open"
{% endif %}
{% endif %}
{% if alert.data.history_items[0].field == 'priority' %}
{% if alert.data.history_items[0].after == null %}
"priority":"medium"
{% elsif alert.data.history_items[0].after.priority == 'urgent' %}
"priority":"high"
{% elsif alert.data.history_items[0].after.priority == 'high' %}
"priority":"high"
{% elsif alert.data.history_items[0].after.priority == 'normal' %}
"priority":"medium"
{% else %}
"priority":"low"
{% endif %}
{% endif %}
{% if alert.data.history_items[0].field == 'due_date' %}
{% if alert.data.history_items[0].after != null %}
{% assign date = alert.data.history_items[0].after %}
{% assign dateInSeconds = date | divided_by: 1000 %}
"due_date": "{{ dateInSeconds | date: "%Y-%m-%d" }}"
{%endif %}
{% endif %}
}
```
# Confluence
Source: https://docs.rootly.com/integrations/confluence/confluence
## Overview
Rooty's Confluence integration helps streamline the process of completing incident retrospectives. By leveraging pre-built templates and workflows, teams can automate their retrospective creation - saving hours of manual work, per incident.
Some key features of this integration includes:
1. **Customizable templates**
* Rootly enables teams to pre-define retrospective templates in both Rootly and Confluence. If you're looking for a semi-custom retrospective that follows industry best practices, you can simply define the retrospective body in Rootly and we will take care of the rest. If you want a fully customized retrospective, you can build your template in Confluence and we will generate the retrospective accordingly.
2. **Liquid variable support**
* Liquid variables can be referenced in both templates created in Rootly or Confluence.
3. **Timeline Visualization:**
* Incident timelines are automatically generated for templates created in Rootly.
* [Custom Liquid syntax](/liquid/incident-variables) can be used to generate timelines for templates created in Confluence
4. **Action Item Tracking:**
* Follow-ups are automatically recorded when Rootly-hosted templates are used.
* [Custom Liquid syntax](/liquid/incident-variables "Custom Liquid syntax") can be used to list out follow-ups in templates hosted on Confluence.
## Installation
Please see the [**Installation** page](/integrations/confluence/installation "Installation") to get started with your Confluence integration.
## Workflows
Rootly relies on workflows to automate interactions with Confluence. The [**Workflows** page](/integrations/confluence/workflows "Workflows") will walk you through how to set up commonly used workflows involving Confluence.
## Support
If you need help or more information about this integration, please contact [support@rootly.com](mailto:support@rootly.com) or start a chat by navigating to **Help > Chat with Us**.
# Installation
Source: https://docs.rootly.com/integrations/confluence/installation
## Installing Confluence on Rootly
 You'll be prompted to grant Rootly permission to integrate with your Confluence account. Once confirmed, the installation is considered complete!
 ## Setting Up Retro Templates in Confluence
Once logged into Confluence, select the ***Space*** in which you want to create the retrospective template in.
## Setting Up Retro Templates in Confluence
Once logged into Confluence, select the ***Space*** in which you want to create the retrospective template in.
 Select ***Space Settings***.
 Select ***Templates*** under Look and Feel.
Click on `Create New Template`.
Select ***Templates*** under Look and Feel.
Click on `Create New Template`.
 Now you can build out your custom template! Liquid syntax is supported.
 # Support
If you need help or more information about this integration, please contact [support@rootly.com](mailto:support@rootly.com) or start a chat by navigating to **Help > Chat with Us**.
# Uninstall
You can **uninstall** this integration in the integrations panel by clicking **Configure > Delete.**
# Workflows
Source: https://docs.rootly.com/integrations/confluence/workflows
## Overview
Our Confluence Cloud integration leverages workflows to automatically generate retrospective pages in Confluence. If you are unfamiliar with how Workflows function please visit our [Workflows](/workflows "Workflows") documentation first.
# Support
If you need help or more information about this integration, please contact [support@rootly.com](mailto:support@rootly.com) or start a chat by navigating to **Help > Chat with Us**.
# Uninstall
You can **uninstall** this integration in the integrations panel by clicking **Configure > Delete.**
# Workflows
Source: https://docs.rootly.com/integrations/confluence/workflows
## Overview
Our Confluence Cloud integration leverages workflows to automatically generate retrospective pages in Confluence. If you are unfamiliar with how Workflows function please visit our [Workflows](/workflows "Workflows") documentation first.
 ## Available Workflow Actions
### Create a Confluence Page
This action allows you to create an incident retrospective into a Confluence Page.
## Available Workflow Actions
### Create a Confluence Page
This action allows you to create an incident retrospective into a Confluence Page.
 #### Name
This field is automatically set for you. You can rename this field to whatever best describes your action. The value in this field does not affect how the workflow action behaves.
#### Space Key
This field allows you to enter the Confluence `Space Key` in which the retrospective will be created into.
To find the key for your Confluence Space, you'll need to go to **Space Settings > Space Details** in your Confluence instance.
#### Name
This field is automatically set for you. You can rename this field to whatever best describes your action. The value in this field does not affect how the workflow action behaves.
#### Space Key
This field allows you to enter the Confluence `Space Key` in which the retrospective will be created into.
To find the key for your Confluence Space, you'll need to go to **Space Settings > Space Details** in your Confluence instance.
 #### Ancestor
This field allows you to enter the Confluence `Page Key` in which the retrospective will be created under. To learn how to obtain a `Page Key`, please see instructions [here](https://confluence.atlassian.com/confkb/how-to-get-confluence-page-id-648380445.html "here").
#### Title
This field allows you to define the title of the Confluence page. You can use `{{ incident.title }}` to match the title of your incident. This field supports Liquid syntax.
#### Ancestor
This field allows you to enter the Confluence `Page Key` in which the retrospective will be created under. To learn how to obtain a `Page Key`, please see instructions [here](https://confluence.atlassian.com/confkb/how-to-get-confluence-page-id-648380445.html "here").
#### Title
This field allows you to define the title of the Confluence page. You can use `{{ incident.title }}` to match the title of your incident. This field supports Liquid syntax.
 # Support
If you need help or more information about this integration, please contact [support@rootly.com](mailto:support@rootly.com) or start a chat by navigating to **Help > Chat with Us**.
# Cortex
Source: https://docs.rootly.com/integrations/cortex
Cortex is an Internal Developer Portal.
The Rootly + Cortex integration allows you to manage and organize incidents with efficiency and ease.
The unique combination of Cortex's **in-depth service insights** and Rootly's **automated incident management** eliminates the friction of context-switching and ensures your teams have the right information at the right time.
### Features and Benefits
**Trigger an incident directly from Cortex** - Identify service issues and escalate them to Rootly without switching tools, keeping response times low.
**Automated Incident Routing** - Ensure incident alerts immediately reach the right team via Cortex's automated service ownership data, eliminating delays and guesswork.
**View incident data on entity pages in Cortex** - View real-time service ownership, dependencies, and operational insights from Cortex directly within Rootly's incident workflow.
**Create Scorecards** - Create Scorecard rules and write CQL queries based on Rootly incidents.
**Comprehensive Post-Incident Analysis** - Leverage Rootly's automated retrospectives alongside Cortex's full historical service data to enhance post-incident learning and future preparedness.
**Minimize Context-Switching** - Reduce tool-hopping and keep your teams focused by consolidating incident management into one streamlined workflow.
**Unique Incident Catalog Support** - Unlike Cortex, Rootly provides built-in support for incidents within the catalog list, making it the only integration that ensures a unified view of active incidents alongside service ownership and operational data.
### **Requirements**
* Cortex admin
* Rootly admin or owner
### **Installation**
[Cortex integration setup](https://docs.cortex.io/docs/reference/integrations/rootly)
### **Support**
The Cortex team built this integration and actively manages it. For help, email [help@cortex.io](mailto:help@cortex.io).
# Alerts
Source: https://docs.rootly.com/integrations/datadog/alerts
## Overview
Datadog can be configured to send events into Rootly as alerts. The alerts received on Rootly can then be routed to a Slack channel or used to initiate incidents.
## Configure Webhook in Datadog
# Support
If you need help or more information about this integration, please contact [support@rootly.com](mailto:support@rootly.com) or start a chat by navigating to **Help > Chat with Us**.
# Cortex
Source: https://docs.rootly.com/integrations/cortex
Cortex is an Internal Developer Portal.
The Rootly + Cortex integration allows you to manage and organize incidents with efficiency and ease.
The unique combination of Cortex's **in-depth service insights** and Rootly's **automated incident management** eliminates the friction of context-switching and ensures your teams have the right information at the right time.
### Features and Benefits
**Trigger an incident directly from Cortex** - Identify service issues and escalate them to Rootly without switching tools, keeping response times low.
**Automated Incident Routing** - Ensure incident alerts immediately reach the right team via Cortex's automated service ownership data, eliminating delays and guesswork.
**View incident data on entity pages in Cortex** - View real-time service ownership, dependencies, and operational insights from Cortex directly within Rootly's incident workflow.
**Create Scorecards** - Create Scorecard rules and write CQL queries based on Rootly incidents.
**Comprehensive Post-Incident Analysis** - Leverage Rootly's automated retrospectives alongside Cortex's full historical service data to enhance post-incident learning and future preparedness.
**Minimize Context-Switching** - Reduce tool-hopping and keep your teams focused by consolidating incident management into one streamlined workflow.
**Unique Incident Catalog Support** - Unlike Cortex, Rootly provides built-in support for incidents within the catalog list, making it the only integration that ensures a unified view of active incidents alongside service ownership and operational data.
### **Requirements**
* Cortex admin
* Rootly admin or owner
### **Installation**
[Cortex integration setup](https://docs.cortex.io/docs/reference/integrations/rootly)
### **Support**
The Cortex team built this integration and actively manages it. For help, email [help@cortex.io](mailto:help@cortex.io).
# Alerts
Source: https://docs.rootly.com/integrations/datadog/alerts
## Overview
Datadog can be configured to send events into Rootly as alerts. The alerts received on Rootly can then be routed to a Slack channel or used to initiate incidents.
## Configure Webhook in Datadog
 You'll be asked to configure a webhook. Now, select `+ New` in Webhooks section (lower left corner of the modal).
 Once we have located the Webhook within Datadog, we would need to configure the Webhook to point to the following URL:
```txt URL
https://webhooks.rootly.com/webhooks/incoming/datadog_webhooks
```
You'll be promoted to enter the following details for the webhook.
Once we have located the Webhook within Datadog, we would need to configure the Webhook to point to the following URL:
```txt URL
https://webhooks.rootly.com/webhooks/incoming/datadog_webhooks
```
You'll be promoted to enter the following details for the webhook.
 ### Name
Give your webhook a representative name.
### URL
The webhook URL can be obtained from your Datadog integration page in Rootly (**Integrations** > **Datadog** > **Configure**).
### Name
Give your webhook a representative name.
### URL
The webhook URL can be obtained from your Datadog integration page in Rootly (**Integrations** > **Datadog** > **Configure**).
 ### Payload
#### General Alert
Copy the following code and paste it into the `Payload` field. This will result in a regular (non-paging) alert.
```json
{
"id":"$ID",
"body":"$EVENT_MSG",
"last_updated":"$LAST_UPDATED",
"event_type":"$EVENT_TYPE",
"title":"$EVENT_TITLE",
"alert_id":"$ALERT_ID",
"alert_metric":"$ALERT_METRIC",
"alert_priority":"$ALERT_PRIORITY",
"alert_query":"$ALERT_QUERY",
"alert_scope":"$ALERT_SCOPE",
"alert_status":"$ALERT_STATUS",
"alert_title":"$ALERT_TITLE",
"alert_transition":"$ALERT_TRANSITION",
"alert_type":"$ALERT_TYPE",
"date":"$DATE",
"org":{"id":"$ORG_ID","name":"$ORG_NAME"}
}
```
#### Paging Rootly On-Call
Paging through Rootly On-Call also relies on webhook alerts. The main difference being the inclusion of a `notification_target` object.
```json
"rootly": {
"notification_target": {
"type": "Service",
"id": "00acba53-b07e-455d-add6-73263209a610"
}
}
```
* `type` - this defines the Rootly resource type that will be used for paging.
* The following are the available values: `User` | `Group` (Team) | `EscalationPolicy` | `Service`
* `id` - this specifies the exact resource that will be targeted for the page.
* The `id` of the resource can be found when editing each resource.
### Payload
#### General Alert
Copy the following code and paste it into the `Payload` field. This will result in a regular (non-paging) alert.
```json
{
"id":"$ID",
"body":"$EVENT_MSG",
"last_updated":"$LAST_UPDATED",
"event_type":"$EVENT_TYPE",
"title":"$EVENT_TITLE",
"alert_id":"$ALERT_ID",
"alert_metric":"$ALERT_METRIC",
"alert_priority":"$ALERT_PRIORITY",
"alert_query":"$ALERT_QUERY",
"alert_scope":"$ALERT_SCOPE",
"alert_status":"$ALERT_STATUS",
"alert_title":"$ALERT_TITLE",
"alert_transition":"$ALERT_TRANSITION",
"alert_type":"$ALERT_TYPE",
"date":"$DATE",
"org":{"id":"$ORG_ID","name":"$ORG_NAME"}
}
```
#### Paging Rootly On-Call
Paging through Rootly On-Call also relies on webhook alerts. The main difference being the inclusion of a `notification_target` object.
```json
"rootly": {
"notification_target": {
"type": "Service",
"id": "00acba53-b07e-455d-add6-73263209a610"
}
}
```
* `type` - this defines the Rootly resource type that will be used for paging.
* The following are the available values: `User` | `Group` (Team) | `EscalationPolicy` | `Service`
* `id` - this specifies the exact resource that will be targeted for the page.
* The `id` of the resource can be found when editing each resource.
 Copy the following code and paste it into the `Payload` field. This will result in both the alert appearing in Rootly and the targeted resource being paged.
```json
{
"id":"$ID",
"body":"$EVENT_MSG",
"last_updated":"$LAST_UPDATED",
"event_type": "composite_monitor",
"title":"Datadog webhook alert",
"alert_id":"$ALERT_ID",
"alert_metric":"$ALERT_METRIC",
"alert_priority":"$ALERT_PRIORITY",
"alert_query":"$ALERT_QUERY",
"alert_scope":"$ALERT_SCOPE",
"alert_status":"$ALERT_STATUS",
"alert_title":"$ALERT_TITLE",
"alert_transition":"$ALERT_TRANSITION",
"alert_type":"$ALERT_TYPE",
"date":"$DATE",
"org":{"id":"$ORG_ID","name":"$ORG_NAME"},
"rootly": {
"notification_target": {
"type": "Service",
"id": "00acba53-b07e-455d-add6-73263209a610"
}
}
}
```
### Custom Header
Check the `Custom Header` checkbox and paste the following code into the text area.
```json
{"secret":"a04d2feb4286150731a718acba564198605675ec191ef9ae7956c6e15af54edf"}
```
Replace the `secret` value with the one found in your Datadog integration in Rootly (**Integrations** > **Datadog** > **Configure**).
Copy the following code and paste it into the `Payload` field. This will result in both the alert appearing in Rootly and the targeted resource being paged.
```json
{
"id":"$ID",
"body":"$EVENT_MSG",
"last_updated":"$LAST_UPDATED",
"event_type": "composite_monitor",
"title":"Datadog webhook alert",
"alert_id":"$ALERT_ID",
"alert_metric":"$ALERT_METRIC",
"alert_priority":"$ALERT_PRIORITY",
"alert_query":"$ALERT_QUERY",
"alert_scope":"$ALERT_SCOPE",
"alert_status":"$ALERT_STATUS",
"alert_title":"$ALERT_TITLE",
"alert_transition":"$ALERT_TRANSITION",
"alert_type":"$ALERT_TYPE",
"date":"$DATE",
"org":{"id":"$ORG_ID","name":"$ORG_NAME"},
"rootly": {
"notification_target": {
"type": "Service",
"id": "00acba53-b07e-455d-add6-73263209a610"
}
}
}
```
### Custom Header
Check the `Custom Header` checkbox and paste the following code into the text area.
```json
{"secret":"a04d2feb4286150731a718acba564198605675ec191ef9ae7956c6e15af54edf"}
```
Replace the `secret` value with the one found in your Datadog integration in Rootly (**Integrations** > **Datadog** > **Configure**).
 Once completed, go ahead and select `Save` to create your webhook.
## Attach Webhook to Monitor
Once your webhook is created, you need to attach it to a Datadog monitor. A monitor contains the firing logic that determines when alerts will be sent out.
Navigate to **Monitor** > **New Monitor** > **Event** to create a new monitor.
Once completed, go ahead and select `Save` to create your webhook.
## Attach Webhook to Monitor
Once your webhook is created, you need to attach it to a Datadog monitor. A monitor contains the firing logic that determines when alerts will be sent out.
Navigate to **Monitor** > **New Monitor** > **Event** to create a new monitor.
 Now, you can configure your monitor to your desired firing logic. The main action to ensure that you do is **select your webhook** in the **Notify your team** section.
 Once ready, you can select `Test Notifications` to test out your monitor and webhook. You should see a test alert appear from Datadog on your [Rootly Alerts page](https://rootly.com/account/alerts "Rootly Alerts page").
 Finally, **save your monitor**. The resulting product should look something like this:
 # Support[](#3bjMA)
If you need help or more information about this integration, please contact [support@rootly.com](mailto:support@rootly.com) or start a chat by navigating to **Help > Chat with Us**.
# Datadog
Source: https://docs.rootly.com/integrations/datadog/datadog
Datadog is a SaaS based monitoring tool for engineering teams.
Integrating with Datadog allows you to:
* **Create Datadog notebooks** through workflows.
* **Retrieve Datadog graph snapshots** through workflows.
* **Retrieve Datadog dashboards** through workflows.
* **Receive Datadog alerts** to auto create incidents.
### **Requirements**
* Datadog Admin role
* Rootly Owner or Admin
### Installation
Please see the [Installation page](/integrations/datadog/installation) to get started with your Datadog integration.
### Alerts
Rootly can ingest alerts from Datadog webhooks. The [**Alerts page**](/integrations/datadog/alerts) will walk you through how to set up Datadog to send alerts to Rootly and commonly used workflows involving Datadog alerts.
### Support
The Rootly team manages this integration. For help, use the slash command **/rootly help** in Slack or email [support@rootly.com](mailto:support@rootly.com).
# Installation
Source: https://docs.rootly.com/integrations/datadog/installation
## Installing Datadog on Rootly
# Support[](#3bjMA)
If you need help or more information about this integration, please contact [support@rootly.com](mailto:support@rootly.com) or start a chat by navigating to **Help > Chat with Us**.
# Datadog
Source: https://docs.rootly.com/integrations/datadog/datadog
Datadog is a SaaS based monitoring tool for engineering teams.
Integrating with Datadog allows you to:
* **Create Datadog notebooks** through workflows.
* **Retrieve Datadog graph snapshots** through workflows.
* **Retrieve Datadog dashboards** through workflows.
* **Receive Datadog alerts** to auto create incidents.
### **Requirements**
* Datadog Admin role
* Rootly Owner or Admin
### Installation
Please see the [Installation page](/integrations/datadog/installation) to get started with your Datadog integration.
### Alerts
Rootly can ingest alerts from Datadog webhooks. The [**Alerts page**](/integrations/datadog/alerts) will walk you through how to set up Datadog to send alerts to Rootly and commonly used workflows involving Datadog alerts.
### Support
The Rootly team manages this integration. For help, use the slash command **/rootly help** in Slack or email [support@rootly.com](mailto:support@rootly.com).
# Installation
Source: https://docs.rootly.com/integrations/datadog/installation
## Installing Datadog on Rootly
 You'll be prompted to grant Rootly permission to integrate with your Dropbox Paper account. Once confirmed, the installation is considered complete!
## Support
If you need help or more information about this integration, please contact [support@rootly.com](mailto:support@rootly.com) or start a chat by navigating to **Help > Chat with Us**.
## Uninstall
You can **uninstall** this integration in the integrations panel by clicking **Configure > Delete**
# Workflows
Source: https://docs.rootly.com/integrations/dropbox-paper/workflows
## Overview
Our Dropbox Paper integration leverages workflows to automatically generate retrospective documents in Dropbox Paper. If you are unfamiliar with how Workflows function please visit our [Workflows](/workflows "Workflows") documentation first.
You'll be prompted to grant Rootly permission to integrate with your Dropbox Paper account. Once confirmed, the installation is considered complete!
## Support
If you need help or more information about this integration, please contact [support@rootly.com](mailto:support@rootly.com) or start a chat by navigating to **Help > Chat with Us**.
## Uninstall
You can **uninstall** this integration in the integrations panel by clicking **Configure > Delete**
# Workflows
Source: https://docs.rootly.com/integrations/dropbox-paper/workflows
## Overview
Our Dropbox Paper integration leverages workflows to automatically generate retrospective documents in Dropbox Paper. If you are unfamiliar with how Workflows function please visit our [Workflows](/workflows "Workflows") documentation first.
 ## Available Workflow Actions
### Create a Dropbox Paper
This action allows you to create a retrospective document into a Dropbox Paper folder.
## Available Workflow Actions
### Create a Dropbox Paper
This action allows you to create a retrospective document into a Dropbox Paper folder.
 #### Name
This field is automatically set for you. You can rename this field to whatever best describes your action. The value in this field does not affect how the workflow action behaves.
#### Namespace
This field is **only available if you integrated with Dropbox Paper Business**. This field allows you to select the team folder in which the `Parent Folder` will be selected from.
#### Parent Folder
This field allows you to define which folder to create the Paper document in. The list of folders shown in the dropdown are determined by whether if you integrated with Dropbox Paper or Dropbox Paper Business.
* If you integrated with **Dropbox Paper**, then the list of folders will be restricted to your personal folders.
* If you integrated with **Dropbox Paper Business**, then the list of folders will be dependent on the folder selected in the `Namespace` field.
#### Title
This field allows you to define the title of the Paper document. It is defaulted to match the title ( `{{ incident.title }}` ) of your incident. This field supports Liquid syntax.
#### Name
This field is automatically set for you. You can rename this field to whatever best describes your action. The value in this field does not affect how the workflow action behaves.
#### Namespace
This field is **only available if you integrated with Dropbox Paper Business**. This field allows you to select the team folder in which the `Parent Folder` will be selected from.
#### Parent Folder
This field allows you to define which folder to create the Paper document in. The list of folders shown in the dropdown are determined by whether if you integrated with Dropbox Paper or Dropbox Paper Business.
* If you integrated with **Dropbox Paper**, then the list of folders will be restricted to your personal folders.
* If you integrated with **Dropbox Paper Business**, then the list of folders will be dependent on the folder selected in the `Namespace` field.
#### Title
This field allows you to define the title of the Paper document. It is defaulted to match the title ( `{{ incident.title }}` ) of your incident. This field supports Liquid syntax.
 ## Create an incident
Now you should have a generated **email alias** tied to your team.
## Create an incident
Now you should have a generated **email alias** tied to your team.

 Let's send our email!
 ## Specify a severity
Rootly will **automatically detect** the incident **severity** in the mail **subject** and map accordingly:
For example:
* *\[SEV0] Shopping cart is showing empty items* **will be mapped** to severity **SEV0** (if exist in your configuration).
* *\[SEV1] Shopping cart is showing empty items* **will be mapped** to severity **SEV1** (if exist in your configuration).
* *Shopping cart is showing empty items \[SEV0]* **will be mapped** to severity **SEV0** (if exist in your configuration).
* *Shopping cart is showing empty items, this is a sev1* **will be mapped** to severity **SEV1** (if exist in your configuration).
* *Shopping cart is showing empty items* **won't be mapped** to any severity.
## Add emails to the timeline
You can respond to an incident email and we will add it to your timeline for you !
## Specify a severity
Rootly will **automatically detect** the incident **severity** in the mail **subject** and map accordingly:
For example:
* *\[SEV0] Shopping cart is showing empty items* **will be mapped** to severity **SEV0** (if exist in your configuration).
* *\[SEV1] Shopping cart is showing empty items* **will be mapped** to severity **SEV1** (if exist in your configuration).
* *Shopping cart is showing empty items \[SEV0]* **will be mapped** to severity **SEV0** (if exist in your configuration).
* *Shopping cart is showing empty items, this is a sev1* **will be mapped** to severity **SEV1** (if exist in your configuration).
* *Shopping cart is showing empty items* **won't be mapped** to any severity.
## Add emails to the timeline
You can respond to an incident email and we will add it to your timeline for you !
 ## Support
If you need help or more information about this integration, please contact [support@rootly.com](mailto:support@rootly.com) or use the **lower right chat widget** to get connected with an engineer.
# FiveTran
Source: https://docs.rootly.com/integrations/fivetran
Fivetran is a no-code data movement platform that allows you to automatically transform data and then send it to your data warehouse.
Rootly provides plenty of built-in, customizable metrics right in the web platform, but if you want to dive even deeper into the data, the Fivetran integration will pull your Rootly data right into your centralized data location.
Fivetran imports these fields:
* Audit
* Cause
* Form fields
* Incidents
* Roles
* Workflows
### Requirements
Fivetran user
Rootly admin or owner
### Installation
[Fivetran's Rootly (Lite) integration guide](https://fivetran.com/docs/connectors/applications/rootly/setup-guide)
### Support
This integration was built by and is actively managed by the Fivetran team. If you have an issue with the data received via the integration, please contact [Fivetran](https://support.fivetran.com/hc/en-us/requests/new) for help.
# Installation
Source: https://docs.rootly.com/integrations/freshdesk/installation
## Why
**Freshdesk** Integration allows you to:
* Creating an incident in **Rootly** will create a ticket or task in **Freshdesk** if you choose to.
* Creating an action item in **Rootly** will create a ticket or task in **Freshdesk** if you choose to.
## Installation
You can setup this integration as a **logged in admin user** in the integrations page:
## Support
If you need help or more information about this integration, please contact [support@rootly.com](mailto:support@rootly.com) or use the **lower right chat widget** to get connected with an engineer.
# FiveTran
Source: https://docs.rootly.com/integrations/fivetran
Fivetran is a no-code data movement platform that allows you to automatically transform data and then send it to your data warehouse.
Rootly provides plenty of built-in, customizable metrics right in the web platform, but if you want to dive even deeper into the data, the Fivetran integration will pull your Rootly data right into your centralized data location.
Fivetran imports these fields:
* Audit
* Cause
* Form fields
* Incidents
* Roles
* Workflows
### Requirements
Fivetran user
Rootly admin or owner
### Installation
[Fivetran's Rootly (Lite) integration guide](https://fivetran.com/docs/connectors/applications/rootly/setup-guide)
### Support
This integration was built by and is actively managed by the Fivetran team. If you have an issue with the data received via the integration, please contact [Fivetran](https://support.fivetran.com/hc/en-us/requests/new) for help.
# Installation
Source: https://docs.rootly.com/integrations/freshdesk/installation
## Why
**Freshdesk** Integration allows you to:
* Creating an incident in **Rootly** will create a ticket or task in **Freshdesk** if you choose to.
* Creating an action item in **Rootly** will create a ticket or task in **Freshdesk** if you choose to.
## Installation
You can setup this integration as a **logged in admin user** in the integrations page:

 You can specify the **api key** and which **domain** you want to create tasks in
 ## Uninstall
You can **uninstall** this integration in the integrations panel by clicking **Configure > Delete**
## Support
If you need help or more information about this integration, please contact [support@rootly.com](mailto:support@rootly.com) or use the **lower right chat widget** to get connected with an engineer.
# Workflows
Source: https://docs.rootly.com/integrations/freshdesk/workflows
## Uninstall
You can **uninstall** this integration in the integrations panel by clicking **Configure > Delete**
## Support
If you need help or more information about this integration, please contact [support@rootly.com](mailto:support@rootly.com) or use the **lower right chat widget** to get connected with an engineer.
# Workflows
Source: https://docs.rootly.com/integrations/freshdesk/workflows
 You'll be **prompted name your source**.
 Follow the instructions present on the Generic webhook creation page to complete setup.
### Note on setting the team, escalation policy or service
There are several options for specifying how an alert can be associated with a service, escalation policy or team.
#### Using the webhook URL
This is the most simple option, allowing for a single service, team or escalation policy to be associated with an alert.
1. Set the `type` and `id` in the webhook url following the default instructions in 'Step 1' to indicate on a per webhook basis what type (`service`, `group` (team) or `escalationPolicy`) and the correct id of service, team or escalation policy.
2.
Follow the instructions present on the Generic webhook creation page to complete setup.
### Note on setting the team, escalation policy or service
There are several options for specifying how an alert can be associated with a service, escalation policy or team.
#### Using the webhook URL
This is the most simple option, allowing for a single service, team or escalation policy to be associated with an alert.
1. Set the `type` and `id` in the webhook url following the default instructions in 'Step 1' to indicate on a per webhook basis what type (`service`, `group` (team) or `escalationPolicy`) and the correct id of service, team or escalation policy.
2.
 3. Set the required field 'notification name' in Step 2.
4. Click 'save' then 'I finished this step' buttons
**Note**: *if `type` and `id` are set in the url of Step 1, indicating the `type` and `id` can be skipped in Step 2.*
#### Using the response payload
Alternately, the `type` and `id` can best set after the call is made, by parsing the response payload from your observability provider. *This is a more flexible option allowing multiple types and id's to be set with a single webhook but requires modification of the observability providers payload*.
1. Follow Step 1 instructions, but do not include the type and id in the webhook url ([https://webhooks.rootly.com/webhooks/incoming/generic\_webhooks/notify/](https://webhooks.rootly.com/webhooks/incoming/generic_webhooks/notify/))
2. In your observability provider, update the response payload to include the type (`service`, `group` (team) or `escalationPolicy`) and id (found on each respective objects rootly index page).
1. Example: `{... type: service, type:
3. Set the required field 'notification name' in Step 2.
4. Click 'save' then 'I finished this step' buttons
**Note**: *if `type` and `id` are set in the url of Step 1, indicating the `type` and `id` can be skipped in Step 2.*
#### Using the response payload
Alternately, the `type` and `id` can best set after the call is made, by parsing the response payload from your observability provider. *This is a more flexible option allowing multiple types and id's to be set with a single webhook but requires modification of the observability providers payload*.
1. Follow Step 1 instructions, but do not include the type and id in the webhook url ([https://webhooks.rootly.com/webhooks/incoming/generic\_webhooks/notify/](https://webhooks.rootly.com/webhooks/incoming/generic_webhooks/notify/))
2. In your observability provider, update the response payload to include the type (`service`, `group` (team) or `escalationPolicy`) and id (found on each respective objects rootly index page).
1. Example: `{... type: service, type:  ## Support
If you need help or more information about this integration, please contact [support@rootly.com](mailto:support@rootly.com) or start a chat by navigating to **Help > Chat with Us**.
# Functionalities
Source: https://docs.rootly.com/integrations/github/functionalities
## Attaching PRs to Incidents
Rootly will automatically detect a PR link and attach it to the incident when an engineer sends the URL in Slack. As the PR is approved and merged, Rootly will automatically communicate the status update in Slack and add an event to the incident's timeline.
## Fetch recent commits
Now a new task is available in your **Genius workflows:**
## Support
If you need help or more information about this integration, please contact [support@rootly.com](mailto:support@rootly.com) or start a chat by navigating to **Help > Chat with Us**.
# Functionalities
Source: https://docs.rootly.com/integrations/github/functionalities
## Attaching PRs to Incidents
Rootly will automatically detect a PR link and attach it to the incident when an engineer sends the URL in Slack. As the PR is approved and merged, Rootly will automatically communicate the status update in Slack and add an event to the incident's timeline.
## Fetch recent commits
Now a new task is available in your **Genius workflows:**
 ## Pulses
Rootly will automatically add the following GitHub events as pulses:
* Push to any repositories
* Merged pull requests
* More to come...
## Pulses
Rootly will automatically add the following GitHub events as pulses:
* Push to any repositories
* Merged pull requests
* More to come...
 ## About GitHub secret scanning
GitHub secret scanning protects users by searching repositories for known types of secrets. By identifying and flagging these secrets, our scans help prevent data leaks and fraud.
GitHub partnered with [Rootly](https://rootly.com/ "Rootly") to scan for our tokens and help secure our mutual users on public repositories. Rootly tokens allow users to authenticate against our API to create incidents programmatically for example. GitHub will forward access tokens found in public repositories to Rootly who will notify workspace owners and let them revoke tokens within few a seconds.
GitHub Advanced Security customers can also scan for Rootly tokens and block them from entering their private and public repositories with [push protection](https://github.blog/changelog/2022-04-04-secret-scanning-prevents-secret-leaks-with-protection-on-push/ "push protection").
* [Learn more about secret scanning](https://docs.github.com/en/github/administering-a-repository/about-secret-scanning "Learn more about secret scanning")
* [Partner with GitHub on secret scanning](https://docs.github.com/en/developers/overview/secret-scanning/ "Partner with GitHub on secret scanning")
# GitHub
Source: https://docs.rootly.com/integrations/github/github
## Why
**GitHub** Integration allows you to:
* Fetch recent GitHub commits through workflows.
* Create and update GitHub issues for incidents and action items
* Track code deployment events such as pull requests, approvals, commits, etc. in Pulses.
* Enrich GitHub Prs links you copy into your incident Slack channel and track PR's statuses.
## Permissions
The following permissions are required for this integration:
* **READ** access to checks, code, deployments, metadata, and pull requests.
* **READ** and **WRITE** access to issues.
## Installation
## About GitHub secret scanning
GitHub secret scanning protects users by searching repositories for known types of secrets. By identifying and flagging these secrets, our scans help prevent data leaks and fraud.
GitHub partnered with [Rootly](https://rootly.com/ "Rootly") to scan for our tokens and help secure our mutual users on public repositories. Rootly tokens allow users to authenticate against our API to create incidents programmatically for example. GitHub will forward access tokens found in public repositories to Rootly who will notify workspace owners and let them revoke tokens within few a seconds.
GitHub Advanced Security customers can also scan for Rootly tokens and block them from entering their private and public repositories with [push protection](https://github.blog/changelog/2022-04-04-secret-scanning-prevents-secret-leaks-with-protection-on-push/ "push protection").
* [Learn more about secret scanning](https://docs.github.com/en/github/administering-a-repository/about-secret-scanning "Learn more about secret scanning")
* [Partner with GitHub on secret scanning](https://docs.github.com/en/developers/overview/secret-scanning/ "Partner with GitHub on secret scanning")
# GitHub
Source: https://docs.rootly.com/integrations/github/github
## Why
**GitHub** Integration allows you to:
* Fetch recent GitHub commits through workflows.
* Create and update GitHub issues for incidents and action items
* Track code deployment events such as pull requests, approvals, commits, etc. in Pulses.
* Enrich GitHub Prs links you copy into your incident Slack channel and track PR's statuses.
## Permissions
The following permissions are required for this integration:
* **READ** access to checks, code, deployments, metadata, and pull requests.
* **READ** and **WRITE** access to issues.
## Installation
 Click on the `GitHub Marketplace` button.
 2️⃣ Search for "*rootly*" and click on the **Rootly** app.
 Go ahead and click on the `Add` button to begin the installation process.
 3️⃣ If you're in multiple GitHub organizations, make sure you **select the correct organization** and then click `Install it for free`.
 Double check that you've **selected the correct organization**. Check the `Allow my billing information to be linked with this organization` and click `Save`.
 When ready, click on `Complete order and begin installation`.
 4️⃣ Select the desired **scope of access** and click `Install`.
 5️⃣ Log out of your GitHub account. We will need to re-establish a connection from Rootly in the next step.

6️⃣ Now, let's switch to your Rootly account to complete the installation. Navigate to the **Integrations** page in Rootly via this [link](https://rootly.com/account/integrations "link") and search for "*github*".
6️⃣ Now, let's switch to your Rootly account to complete the installation. Navigate to the **Integrations** page in Rootly via this [link](https://rootly.com/account/integrations "link") and search for "*github*".
 7️⃣ You'll be prompted to sign in to GitHub to establish a connection to the correct GitHub organization.
 8️⃣ Click on the `Save` button and you're all set!
 ## Uninstall
If you wish to uninstall the integration, make sure that not only GitHub is uninstalled from Rootly, but rootlyhq app is uninstalled in your GitHub account as well.
1️⃣ `Delete` GitHub integration from Rootly by navigating to the GitHub integration modal on the **Integrations** page in Rootly.
## Uninstall
If you wish to uninstall the integration, make sure that not only GitHub is uninstalled from Rootly, but rootlyhq app is uninstalled in your GitHub account as well.
1️⃣ `Delete` GitHub integration from Rootly by navigating to the GitHub integration modal on the **Integrations** page in Rootly.
 2️⃣ `Uninstall` the **rootlyhq** app from your organization's **GitHub Apps** page.
 ## Support
If you need help or more information about this integration, please contact [support@rootly.com](mailto:support@rootly.com) or start a chat by navigating to **Help > Chat with Us**.
# GitLab
Source: https://docs.rootly.com/integrations/gitlab
## Why
**GitLab** Integration allows you to:
* Fetch recent **GitLab** commits through **Genius** Workflows
* Track pulses events
* Enrich GitLab Prs links you copy into your incident Slack channel and track PR's statuses.
## Installation
You can setup this integration as a **logged in admin user** in the integrations page:
## Support
If you need help or more information about this integration, please contact [support@rootly.com](mailto:support@rootly.com) or start a chat by navigating to **Help > Chat with Us**.
# GitLab
Source: https://docs.rootly.com/integrations/gitlab
## Why
**GitLab** Integration allows you to:
* Fetch recent **GitLab** commits through **Genius** Workflows
* Track pulses events
* Enrich GitLab Prs links you copy into your incident Slack channel and track PR's statuses.
## Installation
You can setup this integration as a **logged in admin user** in the integrations page:
 Let's create an OAuth2 application:
 Enter the following information:
* **redirect\_uri**: [https://rootly.com/auth/gitlab/callback](https://rootly.com/auth/gitlab/callback)
* **scopes**: `api` or `read_api`
Enter the following information:
* **redirect\_uri**: [https://rootly.com/auth/gitlab/callback](https://rootly.com/auth/gitlab/callback)
* **scopes**: `api` or `read_api`
 Copy **Application ID** and **secret** into Rootly:
 And you are all set!
## Fetch recent commits
Now a new task is available in your **Genius workflows:**
### Pulses
Rootly will automatically add the following Gitlab events as pulses:
* Push to any repositories
* Merged pull requests
* More to come...
## Uninstall
You can **uninstall** this integration in the integrations panel by clicking **Configure > Delete**
## Support
If you need help or more information about this integration, please contact [support@rootly.com](mailto:support@rootly.com) or use the **lower right chat widget** to get connected with an engineer.
# Installation
Source: https://docs.rootly.com/integrations/google-calendar/installation
## Installing Google Calendar on Rootly
And you are all set!
## Fetch recent commits
Now a new task is available in your **Genius workflows:**
### Pulses
Rootly will automatically add the following Gitlab events as pulses:
* Push to any repositories
* Merged pull requests
* More to come...
## Uninstall
You can **uninstall** this integration in the integrations panel by clicking **Configure > Delete**
## Support
If you need help or more information about this integration, please contact [support@rootly.com](mailto:support@rootly.com) or use the **lower right chat widget** to get connected with an engineer.
# Installation
Source: https://docs.rootly.com/integrations/google-calendar/installation
## Installing Google Calendar on Rootly
 You'll be prompted to **choose a connection method** to your Google Meet:
* Connect through OAuth credentials
* Connect through JSON file credentials
You'll be prompted to **choose a connection method** to your Google Meet:
* Connect through OAuth credentials
* Connect through JSON file credentials
 ### Integrating via OAuth
 After selecting a Google account, you'll be prompted to **grant Rootly permission** to integrate with your Google account.
 Select `Allow` and you'll be redirected back to Rootly and the installation is considered complete!
 ### Integrating via GCP Service Account
 Next, navigate to `Service Accounts` and create a new service account by clicking on `Create Service Account`.
 Fill in the Service account details, your `Service Account ID` will be automatically generated. Click on `Done` when you have completed the form.

Next, Navigate to the `Keys` tab and click on `Add a Key`.
Next, Navigate to the `Keys` tab and click on `Add a Key`.
 Create a key and download the JSON format.
 Next, navigate back to the Rootly integration page and upload the JSON file.
 Now in [https://admin.google.com](https://admin.google.com/ "https://admin.google.com") > Security > [Api Controls](https://admin.google.com/ac/owl "Api Controls") > [Domain Wide Delegation](https://admin.google.com/ac/owl/domainwidedelegation "Domain Wide Delegation")
Select your service account and add the scope below:
* [https://www.googleapis.com/auth/calendar.readonly](https://www.googleapis.com/auth/calendar.readonly "https://www.googleapis.com/auth/calendar.readonly")
* [https://www.googleapis.com/auth/calendar.events](https://www.googleapis.com/auth/calendar.events "https://www.googleapis.com/auth/calendar.events")
Now in [https://admin.google.com](https://admin.google.com/ "https://admin.google.com") > Security > [Api Controls](https://admin.google.com/ac/owl "Api Controls") > [Domain Wide Delegation](https://admin.google.com/ac/owl/domainwidedelegation "Domain Wide Delegation")
Select your service account and add the scope below:
* [https://www.googleapis.com/auth/calendar.readonly](https://www.googleapis.com/auth/calendar.readonly "https://www.googleapis.com/auth/calendar.readonly")
* [https://www.googleapis.com/auth/calendar.events](https://www.googleapis.com/auth/calendar.events "https://www.googleapis.com/auth/calendar.events")
 Now in [https://admin.google.com](https://admin.google.com/ "https://admin.google.com") > Google Workspace > [Core Google Workspace.](https://admin.google.com/ac/appslist/core "Core Google Workspace.")
Select Google Calendar.
* Configure External sharing options for primary calendar like below:
Now in [https://admin.google.com](https://admin.google.com/ "https://admin.google.com") > Google Workspace > [Core Google Workspace.](https://admin.google.com/ac/appslist/core "Core Google Workspace.")
Select Google Calendar.
* Configure External sharing options for primary calendar like below:
 * Configure Internal sharing options for primary calendar like below:
 Now go in your own calendar > Settings and share your calendar with the service account email with **make changes to events** permission.
 Make sure to enter the email of the user you want to schedule meetings as in the Rootly integration:
 Click `Save` and you should be all set!
## Uninstall
You can **uninstall** this integration in the integrations panel by clicking **Configure > Delete.**
## Support
If you need help or more information about this integration, please contact [support@rootly.com](mailto:support@rootly.com) or start a chat by navigating to **Help > Chat with Us**.
# Workflows
Source: https://docs.rootly.com/integrations/google-calendar/workflows
## Overview
Our Google Meet integration leverages workflows to automatically schedule Google Calendar events. If you are unfamiliar with how Workflows function please visit our [Workflows](/workflows "Workflows") documentation first.
Click `Save` and you should be all set!
## Uninstall
You can **uninstall** this integration in the integrations panel by clicking **Configure > Delete.**
## Support
If you need help or more information about this integration, please contact [support@rootly.com](mailto:support@rootly.com) or start a chat by navigating to **Help > Chat with Us**.
# Workflows
Source: https://docs.rootly.com/integrations/google-calendar/workflows
## Overview
Our Google Meet integration leverages workflows to automatically schedule Google Calendar events. If you are unfamiliar with how Workflows function please visit our [Workflows](/workflows "Workflows") documentation first.
 ## Available Workflow Actions
### Create a Google Calendar Event
This action allows you to **schedule a Google Meet meeting** on Google Calendar.
## Available Workflow Actions
### Create a Google Calendar Event
This action allows you to **schedule a Google Meet meeting** on Google Calendar.
 #### Name
This field is automatically set for you. You can rename this field to whatever best describes your action. The value in this field does not affect how the workflow action behaves.
#### Summary
This field allows you to define the title of the Google Calendar event. The default value is `{{ incident.title }}` to match the title of your incident. This field supports Liquid syntax.
#### Name
This field is automatically set for you. You can rename this field to whatever best describes your action. The value in this field does not affect how the workflow action behaves.
#### Summary
This field allows you to define the title of the Google Calendar event. The default value is `{{ incident.title }}` to match the title of your incident. This field supports Liquid syntax.
 #### Conference Type
This field allows you to select a conference type to attach a video meeting to your Google Calendar event using the selected option. Ensure that you select `Hangout`.
#### Time Zone
This field allows you to select a timezone for scheduling your Google Calendar event.
#### Days Until Meeting
This field allows you to specify the date of the Google Calendar event by providing the number of days left until the event.
#### Meeting Duration
This field allows you to define the duration of your Google Calendar event. This field supports Liquid syntax.
#### Conference Type
This field allows you to select a conference type to attach a video meeting to your Google Calendar event using the selected option. Ensure that you select `Hangout`.
#### Time Zone
This field allows you to select a timezone for scheduling your Google Calendar event.
#### Days Until Meeting
This field allows you to specify the date of the Google Calendar event by providing the number of days left until the event.
#### Meeting Duration
This field allows you to define the duration of your Google Calendar event. This field supports Liquid syntax.
 #### Name
This field is automatically set for you. You can rename this field to whatever best describes your action. The value in this field does not affect how the workflow action behaves.
#### Event
This field allows you to specify the Google Calendar Event ID of the event you want to update. The default is set to `{{ incident.google_calendar_event_id }}` to match the event ID of your incident. This field supports Liquid syntax.
#### Name
This field is automatically set for you. You can rename this field to whatever best describes your action. The value in this field does not affect how the workflow action behaves.
#### Event
This field allows you to specify the Google Calendar Event ID of the event you want to update. The default is set to `{{ incident.google_calendar_event_id }}` to match the event ID of your incident. This field supports Liquid syntax.
 #### Adjustment
This field is a dropdown that allows you to specify the type of date-and-time adjustment you want to perform on your Google Calendar event, if any.
#### Adjustment
This field is a dropdown that allows you to specify the type of date-and-time adjustment you want to perform on your Google Calendar event, if any.
 #### Adjustment Days
This field is a dropdown that allows you to specify the number of days by which you want to adjust your Google Calendar event, if any.
#### Meeting Duration
This field allows you to define the duration of your Google Calendar event. This field supports Liquid syntax.
#### Adjustment Days
This field is a dropdown that allows you to specify the number of days by which you want to adjust your Google Calendar event, if any.
#### Meeting Duration
This field allows you to define the duration of your Google Calendar event. This field supports Liquid syntax.
 In the left pane, find and select the **Observability** category, then choose **Monitoring**.
 In the **Monitoring** section, select **Alerting** from the left pane and click on the **EDIT NOTIFICATION CHANNELS** button at the top.
 Find the **Webhooks** channel and click on the **ADD NEW** button next to it.
 Fill in the form with the required details:
`**Display Name**` - give your webhook a description name
Check the `**Use HTTP Basic Auth**` checkbox.
Enter the following URL into the `**Endpoint URL**` field.
Fill in the form with the required details:
`**Display Name**` - give your webhook a description name
Check the `**Use HTTP Basic Auth**` checkbox.
Enter the following URL into the `**Endpoint URL**` field.
 Copy your organization-specific `**Auth Password**` from the 5th step.
 Click on the **TEST CONNECTION** button to verify the webhook configuration. A successful test will enable the **SAVE** button.
Once the connection test is successful, click the **SAVE** button to finalize the webhook setup.
## Support
If you need help or more information about this integration, please contact [support@rootly.com](mailto:support@rootly.com) or start a chat by navigating to **Help > Chat with Us**.
# Installation
Source: https://docs.rootly.com/integrations/google-docs/installation
## Installing Google Docs on Rootly
Click on the **TEST CONNECTION** button to verify the webhook configuration. A successful test will enable the **SAVE** button.
Once the connection test is successful, click the **SAVE** button to finalize the webhook setup.
## Support
If you need help or more information about this integration, please contact [support@rootly.com](mailto:support@rootly.com) or start a chat by navigating to **Help > Chat with Us**.
# Installation
Source: https://docs.rootly.com/integrations/google-docs/installation
## Installing Google Docs on Rootly
 You'll be prompted to choose a connection method to your Google account: `Connect through OAuth credentials` or `Connect through JSON file credentials`.
 ### Integrating via OAuth (non-GCP service account)
Click on `Setup` to start the integration process. You'll be prompted to select a Google account.
### Integrating via OAuth (non-GCP service account)
Click on `Setup` to start the integration process. You'll be prompted to select a Google account.
 After selecting a Google account, you'll be prompted to grant Rootly permission to integrate with your Google account.
 Once confirmed, you'll be redirected back to Rootly and the installation is considered complete!
 ### Integrating via GCP service account
Navigate to your [Google Cloud](https://console.cloud.google.com/ "Google Cloud") Console, and click on `IAM & Admin`.
### Integrating via GCP service account
Navigate to your [Google Cloud](https://console.cloud.google.com/ "Google Cloud") Console, and click on `IAM & Admin`.
 Next, navigate to `Service Accounts` and create a new service account by clicking on `Create Service Account`.
 Fill in the Service account details, your `Service Account ID` will be automatically generated. Click on `Done` when you have completed the form.
 Next, Navigate to the `Keys` tab and click on `Add a Key`.
 Create a key and download the JSON format.
 Next, go back to the Rootly integration page and upload the JSON key.
 Finally, navigate to [https://admin.google.com](https://admin.google.com/ "https://admin.google.com") > Security > [Api Controls](https://admin.google.com/ac/owl "Api Controls") > [Domain Wide Delegation](https://admin.google.com/ac/owl/domainwidedelegation "Domain Wide Delegation") and select your service account.
Add the following scopes and click on Authorize:
* [https://www.googleapis.com/auth/drive.file](https://www.googleapis.com/auth/drive.file), [https://www.googleapis.com/auth/drive.appdata](https://www.googleapis.com/auth/drive.appdata)
Finally, navigate to [https://admin.google.com](https://admin.google.com/ "https://admin.google.com") > Security > [Api Controls](https://admin.google.com/ac/owl "Api Controls") > [Domain Wide Delegation](https://admin.google.com/ac/owl/domainwidedelegation "Domain Wide Delegation") and select your service account.
Add the following scopes and click on Authorize:
* [https://www.googleapis.com/auth/drive.file](https://www.googleapis.com/auth/drive.file), [https://www.googleapis.com/auth/drive.appdata](https://www.googleapis.com/auth/drive.appdata)
 The integration process is now complete!
## Setting Up Retro Template in Google Docs
Retrospective templates can be set up in Rootly or Google Docs. For details on how to create templates in Rootly, please refer to [this page](/retrospectives/configuring-templates "this page").
To set up templates in Google Doc, simply open a new Doc in Google Drive and built out the document as you would with any document. For any incident values that you'd like to dynamically reference, you can do so using [Liquid syntax](/liquid "Liquid syntax").
The integration process is now complete!
## Setting Up Retro Template in Google Docs
Retrospective templates can be set up in Rootly or Google Docs. For details on how to create templates in Rootly, please refer to [this page](/retrospectives/configuring-templates "this page").
To set up templates in Google Doc, simply open a new Doc in Google Drive and built out the document as you would with any document. For any incident values that you'd like to dynamically reference, you can do so using [Liquid syntax](/liquid "Liquid syntax").
 ## Available Workflow Actions
### Create a Google Doc
This action allows you to create an incident retrospective into a Google Doc.
## Available Workflow Actions
### Create a Google Doc
This action allows you to create an incident retrospective into a Google Doc.
 #### Name
This field is automatically set for you. You can rename this field to whatever best describes your action. The value in this field does not affect how the workflow action behaves.
#### Parent Folder
This field allows you to select a folder in your Google Drive in which your Google Doc will be created into. If you don't specify a folder, we will use the folder path specified in the `Title` field.
#### Title
This field allows you to define the title of the retrospective document. Liquid syntax is supported in this field.
If you wish to dynamically create folders to nest your document in, you can do so by separating each folder with a `/`. For example, if you enter the following text as the title:
`{{ incident.created_at | date: '%Y' }}/{{ incident.created_at | date: '%B' }}/{{ incident.title }}`
The storage path will be:
**\[Folder] year of incident creation > \[Folder] month of incident creation > \[Doc] Incident Title**
#### Custom Retrospective Template
This field allows you to define the body content of the retrospective. Liquid syntax is supported in this field.
#### Name
This field is automatically set for you. You can rename this field to whatever best describes your action. The value in this field does not affect how the workflow action behaves.
#### Parent Folder
This field allows you to select a folder in your Google Drive in which your Google Doc will be created into. If you don't specify a folder, we will use the folder path specified in the `Title` field.
#### Title
This field allows you to define the title of the retrospective document. Liquid syntax is supported in this field.
If you wish to dynamically create folders to nest your document in, you can do so by separating each folder with a `/`. For example, if you enter the following text as the title:
`{{ incident.created_at | date: '%Y' }}/{{ incident.created_at | date: '%B' }}/{{ incident.title }}`
The storage path will be:
**\[Folder] year of incident creation > \[Folder] month of incident creation > \[Doc] Incident Title**
#### Custom Retrospective Template
This field allows you to define the body content of the retrospective. Liquid syntax is supported in this field.
 #### Name
This field is automatically set for you. You can rename this field to whatever best describes your action. The value in this field does not affect how the workflow action behaves.
#### File
This field allows you to specify the id of the document in your Google Drive that you want to update. The default is set to `{{ incident.google\_drive\_id }}`. Liquid syntax is supported in this field.
#### Title
This field allows you to update the title of the Google Doc. Liquid syntax is supported in this field.
#### Custom Retrospective Template
This field allows you to update the body content of the Google Doc. Liquid syntax is supported in this field.
#### Retrospective Template
This field allows you to use a predefined retrospective template to update the body content of the Google Doc.
#### Name
This field is automatically set for you. You can rename this field to whatever best describes your action. The value in this field does not affect how the workflow action behaves.
#### File
This field allows you to specify the id of the document in your Google Drive that you want to update. The default is set to `{{ incident.google\_drive\_id }}`. Liquid syntax is supported in this field.
#### Title
This field allows you to update the title of the Google Doc. Liquid syntax is supported in this field.
#### Custom Retrospective Template
This field allows you to update the body content of the Google Doc. Liquid syntax is supported in this field.
#### Retrospective Template
This field allows you to use a predefined retrospective template to update the body content of the Google Doc.
 #### Name
This field is automatically set for you. You can rename this field to whatever best describes your action. The value in this field does not affect how the workflow action behaves.
#### File
This field allows you to specify the id of the file in your Google Drive that you want to create permissions for. The default is set to `{{ incident.google_drive_id }}`. Liquid syntax is supported in this field.
#### Define Sharing Permissions
You can customize permissions like shown below:
```json
[
{
"type": "user",
"role": "writer",
"email_address": "user@example.com"
},
{
"type": "user",
"role": "owner",
"transferOwnership": true,
"email_address": "user@example.com"
},
{
"type": "domain",
"role": "writer",
"domain": "example.com"
}
]
```
#### Send Email Notification
You can optionally notify the users who are granted permission by email.
#### Email Message
You can optionally provide a message to be sent with the email notification. The message will be sent only if the `Send Email Notification` box is checked.
### Remove Google Doc Permissions
This action allows you to revoke existing user permissions to a retrospective document.
#### Name
This field is automatically set for you. You can rename this field to whatever best describes your action. The value in this field does not affect how the workflow action behaves.
#### File
This field allows you to specify the id of the file in your Google Drive that you want to create permissions for. The default is set to `{{ incident.google_drive_id }}`. Liquid syntax is supported in this field.
#### Define Sharing Permissions
You can customize permissions like shown below:
```json
[
{
"type": "user",
"role": "writer",
"email_address": "user@example.com"
},
{
"type": "user",
"role": "owner",
"transferOwnership": true,
"email_address": "user@example.com"
},
{
"type": "domain",
"role": "writer",
"domain": "example.com"
}
]
```
#### Send Email Notification
You can optionally notify the users who are granted permission by email.
#### Email Message
You can optionally provide a message to be sent with the email notification. The message will be sent only if the `Send Email Notification` box is checked.
### Remove Google Doc Permissions
This action allows you to revoke existing user permissions to a retrospective document.
 #### Name
This field is automatically set for you. You can rename this field to whatever best describes your action. The value in this field does not affect how the workflow action behaves.
#### File
This filed allows you to specify the id of the file in your Google Drive that you want to revoke permissions from. The default is set to `{{ incident.google_drive_id }}`. Liquid syntax is supported in this field.
#### Attribute to Query By
This field allows you to select an attribute by which you want to revoke permissions for. There are three options:
1. `Type`: Can be `User` , `Group` or `Domain`.
2. `Role`: Can be `Owner`, `Viewer`, `Editor`, `Writer`, `Commenter`, or `None`.
3. `Email Address` (default): The email address of the user from whom you want to revoke permissions.
#### Name
This field is automatically set for you. You can rename this field to whatever best describes your action. The value in this field does not affect how the workflow action behaves.
#### File
This filed allows you to specify the id of the file in your Google Drive that you want to revoke permissions from. The default is set to `{{ incident.google_drive_id }}`. Liquid syntax is supported in this field.
#### Attribute to Query By
This field allows you to select an attribute by which you want to revoke permissions for. There are three options:
1. `Type`: Can be `User` , `Group` or `Domain`.
2. `Role`: Can be `Owner`, `Viewer`, `Editor`, `Writer`, `Commenter`, or `None`.
3. `Email Address` (default): The email address of the user from whom you want to revoke permissions.
 #### Value
This field allows you to specify the value of the attribute that was selected in the previous field, `Attribute to Query By`. Liquid syntax is supported in this field.
Example 1:
* If,
* `Attribute to Query By` = `Role`
* `Value` = `Writer`
* Then,
* Every user with the `Writer` role will have their permissions revoked
Example 2:
#### Value
This field allows you to specify the value of the attribute that was selected in the previous field, `Attribute to Query By`. Liquid syntax is supported in this field.
Example 1:
* If,
* `Attribute to Query By` = `Role`
* `Value` = `Writer`
* Then,
* Every user with the `Writer` role will have their permissions revoked
Example 2:
 ## Installation
Please see the [**Installation** page](/integrations/google-meet/installation "Installation") to get started with your Google Meet integration.
## Workflows
Rootly relies on workflows to automate interactions with Google Meet. The [**Workflows** page](/integrations/google-meet/workflows "Workflows") will walk you through how to set up commonly used workflows involving Google Meet.
## Support
If you need help or more information about this integration, please contact [support@rootly.com](mailto:support@rootly.com) or start a chat by navigating to **Help > Chat with Us**.
# Installation
Source: https://docs.rootly.com/integrations/google-meet/installation
## Installing Google Meet on Rootly
## Installation
Please see the [**Installation** page](/integrations/google-meet/installation "Installation") to get started with your Google Meet integration.
## Workflows
Rootly relies on workflows to automate interactions with Google Meet. The [**Workflows** page](/integrations/google-meet/workflows "Workflows") will walk you through how to set up commonly used workflows involving Google Meet.
## Support
If you need help or more information about this integration, please contact [support@rootly.com](mailto:support@rootly.com) or start a chat by navigating to **Help > Chat with Us**.
# Installation
Source: https://docs.rootly.com/integrations/google-meet/installation
## Installing Google Meet on Rootly
 You'll be prompted to **choose a connection method** to your Google Meet:
* Connect through OAuth credentials
* Connect through JSON file credentials
You'll be prompted to **choose a connection method** to your Google Meet:
* Connect through OAuth credentials
* Connect through JSON file credentials
 ### Integrating via OAuth
 After selecting a Google account, you'll be prompted to **grant Rootly permission** to integrate with your Google account.
 Select `Allow` and you'll be redirected back to Rootly and the installation is considered complete!
 ### Integrating via GCP Service Account
 Next, navigate to `Service Accounts` and create a new service account by clicking on `Create Service Account`.
 Fill in the Service account details, your `Service Account ID` will be automatically generated. Click on `Done` when you have completed the form.
 Next, Navigate to the `Keys` tab and click on `Add a Key`.
 Create a key and download the JSON format.
 Next, navigate back to the Rootly integration page and upload the JSON file.
 Now in [https://admin.google.com](https://admin.google.com/ "https://admin.google.com") > Security > [Api Controls](https://admin.google.com/ac/owl "Api Controls") > [Domain Wide Delegation](https://admin.google.com/ac/owl/domainwidedelegation "Domain Wide Delegation")
Select your service account and add the scope below:
* [https://www.googleapis.com/auth/meetings.space.created](https://www.googleapis.com/auth/meetings.space.created "https://www.googleapis.com/auth/meetings.space.created")
Now in [https://admin.google.com](https://admin.google.com/ "https://admin.google.com") > Security > [Api Controls](https://admin.google.com/ac/owl "Api Controls") > [Domain Wide Delegation](https://admin.google.com/ac/owl/domainwidedelegation "Domain Wide Delegation")
Select your service account and add the scope below:
* [https://www.googleapis.com/auth/meetings.space.created](https://www.googleapis.com/auth/meetings.space.created "https://www.googleapis.com/auth/meetings.space.created")
 ## Uninstall
You can **uninstall** this integration in the integrations panel by clicking **Configure > Delete.**
## Support
If you need help or more information about this integration, please contact [support@rootly.com](mailto:support@rootly.com) or start a chat by navigating to **Help > Chat with Us**.
# Workflows
Source: https://docs.rootly.com/integrations/google-meet/workflows
## Overview
Our Google Meet integration leverages workflows to automatically create Google Meet rooms. If you are unfamiliar with how Workflows function please visit our [Workflows](/workflows "Workflows") documentation first.
## Uninstall
You can **uninstall** this integration in the integrations panel by clicking **Configure > Delete.**
## Support
If you need help or more information about this integration, please contact [support@rootly.com](mailto:support@rootly.com) or start a chat by navigating to **Help > Chat with Us**.
# Workflows
Source: https://docs.rootly.com/integrations/google-meet/workflows
## Overview
Our Google Meet integration leverages workflows to automatically create Google Meet rooms. If you are unfamiliar with how Workflows function please visit our [Workflows](/workflows "Workflows") documentation first.
 ## Available Workflow Actions
### Create a Google Meet Room
This action allows you to **create a Google Meet link** for an incident, and each incident will receive its own separate Google Meet room. This applies to sub-incidents as well.
## Available Workflow Actions
### Create a Google Meet Room
This action allows you to **create a Google Meet link** for an incident, and each incident will receive its own separate Google Meet room. This applies to sub-incidents as well.
 #### Name
This field is automatically set for you. You can rename this field to whatever best describes your action. The value in this field does not affect how the workflow action behaves.
#### Meeting Name - Deprecated
This field allows you to define the title of the Google Meet meeting. The default is set to `{{ incident.title }}` to match the title of your incident. This field supports Liquid syntax.
#### Name
This field is automatically set for you. You can rename this field to whatever best describes your action. The value in this field does not affect how the workflow action behaves.
#### Meeting Name - Deprecated
This field allows you to define the title of the Google Meet meeting. The default is set to `{{ incident.title }}` to match the title of your incident. This field supports Liquid syntax.
 Select `+ Add contact point`.
 You'll be prompted to enter the following details for the contact point.
 ### Name
Give your contact point a representative name.
### Integration
Select Webhook.
### URL
#### For General Alert
Grafana requires the *webhook URL* and *secret* to be included in the `URL` field. This will result in a regular (non-paging) alert.
The webhook URL and secret can be obtained from your Grafana integration page in Rootly (**Integrations** > **Grafana** > **Configure**). Enter the webhook URL and secret in the following format in the URL field:
`https://webhooks.rootly.com/webhooks/incoming/grafana\_webhooks/?secret=
### Name
Give your contact point a representative name.
### Integration
Select Webhook.
### URL
#### For General Alert
Grafana requires the *webhook URL* and *secret* to be included in the `URL` field. This will result in a regular (non-paging) alert.
The webhook URL and secret can be obtained from your Grafana integration page in Rootly (**Integrations** > **Grafana** > **Configure**). Enter the webhook URL and secret in the following format in the URL field:
`https://webhooks.rootly.com/webhooks/incoming/grafana\_webhooks/?secret= #### To Page Rootly On-Call
Paging through Rootly On-Call also relies on webhook alerts. The main difference being the inclusion of a notification target in the query parameter.
The notification target consists of the following:
* `resource_type` - this defines the Rootly resource type that will be used for paging.
* The following are the available values: `User` | `Group` (Team) | `EscalationPolicy` | `Service`
* `resource_id` - this specifies the exact resource that will be targeted for the page.
* The id of the resource can be found when editing each resource.
Enter the webhook URL and secret in the following format in the URL field:
`https://webhooks.rootly.com/webhooks/incoming/grafana\_webhooks/notify/
#### To Page Rootly On-Call
Paging through Rootly On-Call also relies on webhook alerts. The main difference being the inclusion of a notification target in the query parameter.
The notification target consists of the following:
* `resource_type` - this defines the Rootly resource type that will be used for paging.
* The following are the available values: `User` | `Group` (Team) | `EscalationPolicy` | `Service`
* `resource_id` - this specifies the exact resource that will be targeted for the page.
* The id of the resource can be found when editing each resource.
Enter the webhook URL and secret in the following format in the URL field:
`https://webhooks.rootly.com/webhooks/incoming/grafana\_webhooks/notify/ ### HTTP Method
Select `POST`.
Once ready, you can select the `Test` button to test out your contact point. You should see a test alert appear from Grafana on your [Rootly Alerts page](https://rootly.com/account/alerts "Rootly Alerts page").
### HTTP Method
Select `POST`.
Once ready, you can select the `Test` button to test out your contact point. You should see a test alert appear from Grafana on your [Rootly Alerts page](https://rootly.com/account/alerts "Rootly Alerts page").
 Finally, **save contact point**.
## Attach Contact Point to Alert Rules
Once your contact point is created, you need to attach it to a Grafana alert rule. An alert rule contains the firing logic that determines when alerts will be sent out.
Navigate to **Alert rules** and select `+ New Alert rule`.
Finally, **save contact point**.
## Attach Contact Point to Alert Rules
Once your contact point is created, you need to attach it to a Grafana alert rule. An alert rule contains the firing logic that determines when alerts will be sent out.
Navigate to **Alert rules** and select `+ New Alert rule`.
 You'll be prompted to define a rule set. The key is to set the `Contact point` to the one you created above. ***Note:*** *You can also add the contact point to your existing alert rules.*
 # Support
If you need help or more information about this integration, please contact [support@rootly.com](mailto:support@rootly.com) or start a chat by navigating to **Help > Chat with Us**.
# Grafana
Source: https://docs.rootly.com/integrations/grafana/grafana
## Why
**Grafana** Integration allows you to:
* Snapshot dashboards through **Genius** Workflows
## Installation
You can setup this integration as a **logged in admin user** in the integrations page:
# Support
If you need help or more information about this integration, please contact [support@rootly.com](mailto:support@rootly.com) or start a chat by navigating to **Help > Chat with Us**.
# Grafana
Source: https://docs.rootly.com/integrations/grafana/grafana
## Why
**Grafana** Integration allows you to:
* Snapshot dashboards through **Genius** Workflows
## Installation
You can setup this integration as a **logged in admin user** in the integrations page:
 Go in your Grafana instance and let's create an **Api Key**:

 Copy your **instance url** and **api key** into Rootly:
 All set!
## Snapshot dashboards
Now a new task is available in your **Genius workflows.**
## Uninstall
You can **uninstall** this integration in the integrations panel by clicking **Configure > Delete**
## Support
If you need help or more information about this integration, please contact [support@rootly.com](mailto:support@rootly.com) or use the **lower right chat widget** to get connected with an engineer.
# HashiCorp Vault
Source: https://docs.rootly.com/integrations/hashicorp-vault
## Introduction
**HashiCorp Vault** Integration allows you to:
* **Read** secrets from your Vault cluster and use your secrets in workflows securely.
All set!
## Snapshot dashboards
Now a new task is available in your **Genius workflows.**
## Uninstall
You can **uninstall** this integration in the integrations panel by clicking **Configure > Delete**
## Support
If you need help or more information about this integration, please contact [support@rootly.com](mailto:support@rootly.com) or use the **lower right chat widget** to get connected with an engineer.
# HashiCorp Vault
Source: https://docs.rootly.com/integrations/hashicorp-vault
## Introduction
**HashiCorp Vault** Integration allows you to:
* **Read** secrets from your Vault cluster and use your secrets in workflows securely.
 ## Configure
* Auth methods are currently done through `app role` + `app secret`. Need another way to authenticate? Contact us at [support@rootly.com](mailto:support@rootly.com).
## Configure
* Auth methods are currently done through `app role` + `app secret`. Need another way to authenticate? Contact us at [support@rootly.com](mailto:support@rootly.com).
 ## Define a secret
 ## How to use it
You can use our **liquid markup** in any of our workflow tasks:
Give the following secret in Vault:
```JSON
{
"first-secret": "Vault Is The Way",
"nested-secret": {
"foo": "bar"
}
}
```
You can now read secrets:
```JSON
{{ secrets.my_secret.first-secret }} // Will resolve to "Vault Is The Way"
{{ secrets.my_secret.nested-secret.foo }} // Will resolve to "bar"
```
## Support
If you need help or more information about this integration, please contact [support@rootly.com](mailto:support@rootly.com) or use the **lower right chat widget** to get connected with an engineer.
## Uninstall
You can **uninstall** this integration in the integrations panel by clicking **Configure > Delete**
# Heroku
Source: https://docs.rootly.com/integrations/heroku
## Why
Heroku will **automatically** add the following Heroku events as pulses:
* A build starts
* A build ends ( Failed or succeeded )
* A release is deployed
* More to come...
## How to use it
You can use our **liquid markup** in any of our workflow tasks:
Give the following secret in Vault:
```JSON
{
"first-secret": "Vault Is The Way",
"nested-secret": {
"foo": "bar"
}
}
```
You can now read secrets:
```JSON
{{ secrets.my_secret.first-secret }} // Will resolve to "Vault Is The Way"
{{ secrets.my_secret.nested-secret.foo }} // Will resolve to "bar"
```
## Support
If you need help or more information about this integration, please contact [support@rootly.com](mailto:support@rootly.com) or use the **lower right chat widget** to get connected with an engineer.
## Uninstall
You can **uninstall** this integration in the integrations panel by clicking **Configure > Delete**
# Heroku
Source: https://docs.rootly.com/integrations/heroku
## Why
Heroku will **automatically** add the following Heroku events as pulses:
* A build starts
* A build ends ( Failed or succeeded )
* A release is deployed
* More to come...
 ## Installation
You can setup this integration as a **logged in admin user** in the integrations page:
## Installation
You can setup this integration as a **logged in admin user** in the integrations page:

 Then, select the **API Keys** tab > **Configuration** > **Create Configuration API Key**.
 In the **Create API Key** modal, enter a description `Name` and check **any of the permissions**. Once complete, go ahead and save the API key.
 Now, copy your newly generated API key from Honeycomb and **paste it into the Honeycomb integration modal in Rootly** and select **Connect**.
 A successful integration will give you the **webhook URL** + **secret** combination needed to configure webhooks in your Honeycomb account.
 ### Create a Webhook
Now that you have your organization specific **webhook URL** + **secret** combination, let's go to your Honeycomb account to create a webhook.
Once logged in, navigate to the **Team settings** page.
### Create a Webhook
Now that you have your organization specific **webhook URL** + **secret** combination, let's go to your Honeycomb account to create a webhook.
Once logged in, navigate to the **Team settings** page.
 Then select the **Integrations** tab and click on **Add Integration**.
 In the Add Integration modal, set the `Provider` to `Webhook` and give it a description `Name` (e.g. Page Engineering On-Call, Page Infrastructure Team, Rootly Alerts, etc.).
 The value you put in the `Webhook URL` field will depend on what type of alert you want this particular webhook to send to Rootly.
**For General Alert (aka. Non-Paging Alert)**
Non-paging alerts will arrive in Rootly's [Alerts page](https://rootly.com/account/alerts "Alerts page") but will not page anyone.
Honeycomb requires the *Webhook URL* and *secret* from Rootly to be included in the Webhook URL field in the following format:
```txt Webhook URL
https://webhooks.rootly.com/webhooks/incoming/honeycomb\_webhooks?secret=
The value you put in the `Webhook URL` field will depend on what type of alert you want this particular webhook to send to Rootly.
**For General Alert (aka. Non-Paging Alert)**
Non-paging alerts will arrive in Rootly's [Alerts page](https://rootly.com/account/alerts "Alerts page") but will not page anyone.
Honeycomb requires the *Webhook URL* and *secret* from Rootly to be included in the Webhook URL field in the following format:
```txt Webhook URL
https://webhooks.rootly.com/webhooks/incoming/honeycomb\_webhooks?secret=

 Ensure that you delete your webhooks in Honeycomb as well. Deleting the integration in Rootly will NOT stop Honeycomb from sending Rootly alert events.
## Support
If you need help or more information about this integration, please contact [support@rootly.com](mailto:support@rootly.com) or start a chat by navigating to **Help > Chat with Us**.
# Jira (On-Premise)
Source: https://docs.rootly.com/integrations/jira-on-premise
## Installation
If you are using Atlassian Data Center (on-premise), you can follow the same instructions as [Jira Cloud installation](/integrations/jira "Jira Cloud installation"), except you'll need to authenticate using **url** + **username** + **password**.
## IP's whitelist
* If your server is in a private cloud. You will need to whitelist our IP so we can access your instance.
Ensure that you delete your webhooks in Honeycomb as well. Deleting the integration in Rootly will NOT stop Honeycomb from sending Rootly alert events.
## Support
If you need help or more information about this integration, please contact [support@rootly.com](mailto:support@rootly.com) or start a chat by navigating to **Help > Chat with Us**.
# Jira (On-Premise)
Source: https://docs.rootly.com/integrations/jira-on-premise
## Installation
If you are using Atlassian Data Center (on-premise), you can follow the same instructions as [Jira Cloud installation](/integrations/jira "Jira Cloud installation"), except you'll need to authenticate using **url** + **username** + **password**.
## IP's whitelist
* If your server is in a private cloud. You will need to whitelist our IP so we can access your instance.
 You'll be presented with the following installation page. Double check that you're installing the correct instance before you confirm the installation by selecting `Accept`.
 That's it! You're all set to begin automating Jira workflows now.
 ## Installing Additional Instances
If your organization leverages mutliple Jira Cloud instances, you can install additional instances using the same procedure above.
## Installing Additional Instances
If your organization leverages mutliple Jira Cloud instances, you can install additional instances using the same procedure above.

 The ensuing steps are the same as installing the first instance.
 Give the webhook an easy to identify `Name` (e.g. Rootly Webhook Listener) and copy the webhook URL from your Rootly platform.
Ensure the webhook's `Status` is `Enabled`.
Give the webhook an easy to identify `Name` (e.g. Rootly Webhook Listener) and copy the webhook URL from your Rootly platform.
Ensure the webhook's `Status` is `Enabled`.
 Copy the webhook URL from the Rootly integrations page into the `URL` field in Jira.

 If you do not want all your Jira projects to send events to Rootly, you can filter for them in the Issue related events JQL query.
 Select the specific events you'd like to listen for.
 Finally, ensure that you DO NOT check the `Exclude body` checkbox. Sometimes, Jira webhooks will have this checked by default.
 Once all of the above fields are entered, select `Create` to save the webhook configuration.
Now you'll be able to see Jira events appear in the [Alerts page](https://rootly.com/account/alerts "Alerts page") on your Rootly platform. You can test this by creating or update a test ticket in Jira. If the event appears on the Alerts page then you'll know the webhook is working.
## Uninstall
You can uninstall your Jira Cloud instance on Rootly by can navigating to **Integrations > Jira** on and selecting `Delete`.
Once all of the above fields are entered, select `Create` to save the webhook configuration.
Now you'll be able to see Jira events appear in the [Alerts page](https://rootly.com/account/alerts "Alerts page") on your Rootly platform. You can test this by creating or update a test ticket in Jira. If the event appears on the Alerts page then you'll know the webhook is working.
## Uninstall
You can uninstall your Jira Cloud instance on Rootly by can navigating to **Integrations > Jira** on and selecting `Delete`.
 ## Support
If you need help or more information about this integration, please contact [support@rootly.com](mailto:support@rootly.com) or start a chat by navigating to **Help > Chat with Us**.
# Jira
Source: https://docs.rootly.com/integrations/jira/jira
## Intended Use
Integrating with Jira allows you to:
* Automatically **create a Jira issue** for each incident declared on Rootly.
* Automatically **update a Jira issue** for each update made to an incident on Rootly.
* Automatically **create a Jira issue or subtask** in Jira when an action item is created on Rootly.
* Automatically **declare an incident on Rootly** when an issue is created in Jira. Webhook setup required in Jira.
* Automatically **update an incident on Rootly** when an issue is updated in Jira. Wehook setup required in Jira.
## Smart Defaults
Rootly's Jira integration comes with a set of commonly used default settings. See [Smart Defaults](/integrations/jira/smart-defaults) page for details.
## Rootly to Jira Sync
Rootly to Jira workflows allow you to automatically create/update a Jira issue whenever an incident or action item in Rootly is created/updated.
See [Rootly to Jira Sync](/integrations/jira/rootly-to-jira-sync "Rootly to Jira Sync") page for detailed configuration instructions.
## Jira to Rootly Sync
Jira to Rootly workflows allow you to automatically create/update an incident or action item in Rootly whenever a Jira issue or subtask is created/updated.
See [Jira to Rootly Sync](/integrations/jira/jira-to-rootly-sync "Jira to Rootly Sync") page for detailed configuration instructions.
## Support
If you need help or more information about this integration, please contact [support@rootly.com](mailto:support@rootly.com) or start a chat by navigating to **Help > Chat with Us**.
# Jira to Rootly Sync
Source: https://docs.rootly.com/integrations/jira/jira-to-rootly-sync
## Support
If you need help or more information about this integration, please contact [support@rootly.com](mailto:support@rootly.com) or start a chat by navigating to **Help > Chat with Us**.
# Jira
Source: https://docs.rootly.com/integrations/jira/jira
## Intended Use
Integrating with Jira allows you to:
* Automatically **create a Jira issue** for each incident declared on Rootly.
* Automatically **update a Jira issue** for each update made to an incident on Rootly.
* Automatically **create a Jira issue or subtask** in Jira when an action item is created on Rootly.
* Automatically **declare an incident on Rootly** when an issue is created in Jira. Webhook setup required in Jira.
* Automatically **update an incident on Rootly** when an issue is updated in Jira. Wehook setup required in Jira.
## Smart Defaults
Rootly's Jira integration comes with a set of commonly used default settings. See [Smart Defaults](/integrations/jira/smart-defaults) page for details.
## Rootly to Jira Sync
Rootly to Jira workflows allow you to automatically create/update a Jira issue whenever an incident or action item in Rootly is created/updated.
See [Rootly to Jira Sync](/integrations/jira/rootly-to-jira-sync "Rootly to Jira Sync") page for detailed configuration instructions.
## Jira to Rootly Sync
Jira to Rootly workflows allow you to automatically create/update an incident or action item in Rootly whenever a Jira issue or subtask is created/updated.
See [Jira to Rootly Sync](/integrations/jira/jira-to-rootly-sync "Jira to Rootly Sync") page for detailed configuration instructions.
## Support
If you need help or more information about this integration, please contact [support@rootly.com](mailto:support@rootly.com) or start a chat by navigating to **Help > Chat with Us**.
# Jira to Rootly Sync
Source: https://docs.rootly.com/integrations/jira/jira-to-rootly-sync
 Select workflow **triggers**. `Alert Created` will be the only option to select here. This means the workflow will initialize whenever a new alert is created in Rootly.
 Configure **run conditions**. Set up your workflow to only run if...
* The alert `source` is from `Jira`
* The alert `labels`:
* **Option 1:** `contains all of` the following `labels` (this is if you want to respond to a new Jira issue being created)
* `event:jira:issue_created`
* `project_key:RD1` (this label is optional - only include this if you want to respond to issues from a specific Jira project)
* **Option 2:** `contains all of` the following `labels` (this is if you want to respond to an existing Jira issue being updated)
* `event:jira:issue_updated`
* `project_key:RD1` (this label is optional - only include this if you want to respond to issues from a specific Jira project)
* The alert `payload` has the `$.object.specific_fied` equals to `/specific_value/i`
* **JSON path syntax** is used to filter for a specific field from the alert payload (e.g. \$.issue.fields.issuetype.name). You can preview your syntax on [JSON Path Explorer](https://rootly.com/account/help/json-path-explorer "JSON Path Explorer").
* **Ruby regular expression** can be used to specify what value to match to. You can test your regexp on this [Rubular tool](https://rubular.com/ "Rubular tool").
Currently, only a **single payload field** can be filtered on. So, try to configure your run conditions to filter by Label as much as you can before resorting to filtering by `Payload`.
We will be exploring the possibility of supporting filtering by multiple payload fields in the future.
Configure **run conditions**. Set up your workflow to only run if...
* The alert `source` is from `Jira`
* The alert `labels`:
* **Option 1:** `contains all of` the following `labels` (this is if you want to respond to a new Jira issue being created)
* `event:jira:issue_created`
* `project_key:RD1` (this label is optional - only include this if you want to respond to issues from a specific Jira project)
* **Option 2:** `contains all of` the following `labels` (this is if you want to respond to an existing Jira issue being updated)
* `event:jira:issue_updated`
* `project_key:RD1` (this label is optional - only include this if you want to respond to issues from a specific Jira project)
* The alert `payload` has the `$.object.specific_fied` equals to `/specific_value/i`
* **JSON path syntax** is used to filter for a specific field from the alert payload (e.g. \$.issue.fields.issuetype.name). You can preview your syntax on [JSON Path Explorer](https://rootly.com/account/help/json-path-explorer "JSON Path Explorer").
* **Ruby regular expression** can be used to specify what value to match to. You can test your regexp on this [Rubular tool](https://rubular.com/ "Rubular tool").
Currently, only a **single payload field** can be filtered on. So, try to configure your run conditions to filter by Label as much as you can before resorting to filtering by `Payload`.
We will be exploring the possibility of supporting filtering by multiple payload fields in the future.
 ### Create Incident[](#DW5Rk)
The **Create Incident** action is used to declare an incident in Rootly. Since this action will be referencing alert data, the dynamic fields will be `{{ alert.properties }}`.
Rootly does NOT automatically link alerts to the incident. You'll need to include the following custom mapping in order to link the Jira ticket to the newly declared Rootly incident.
```json
{
"jira_issue_id": "{{ alert.data.issue.id }}",
"jira_issue_url": "https://your-jira-instance.atlassian.net/browse/{{alert.data.issue.key}}"
}
```
### Create Incident[](#DW5Rk)
The **Create Incident** action is used to declare an incident in Rootly. Since this action will be referencing alert data, the dynamic fields will be `{{ alert.properties }}`.
Rootly does NOT automatically link alerts to the incident. You'll need to include the following custom mapping in order to link the Jira ticket to the newly declared Rootly incident.
```json
{
"jira_issue_id": "{{ alert.data.issue.id }}",
"jira_issue_url": "https://your-jira-instance.atlassian.net/browse/{{alert.data.issue.key}}"
}
```
 ### Update Incident
The **Update Incident** action is used to update an existing incident in Rootly. Ensure that you set Attribute to Match field to `jira_issue_id` and `Attribute Value` to `{{ alert.data.issue.id }}`. These fields are required for Rootly to know which incident to update.
### Update Incident
The **Update Incident** action is used to update an existing incident in Rootly. Ensure that you set Attribute to Match field to `jira_issue_id` and `Attribute Value` to `{{ alert.data.issue.id }}`. These fields are required for Rootly to know which incident to update.
 ### Custom Fields Mapping
If you require more dynamic mapping of Rootly incident properties, you can input the following syntax into the `Custom Fields Mapping` field.
Dynamically set Rootly incident **severity**.
```json
{
{% if alert.data.issue.fields.priority.name == 'Highest' %}
"severity_id": "SEV0"
{% elsif alert.data.issue.fields.priority.name == 'High' %}
"severity_id": "SEV1"
{% elsif alert.data.issue.fields.priority.name == 'Medium' %}
"severity_id": "SEV2"
{% else %}
"severity_id": "SEV3"
{% endif %}
}
```
Dynamically set Rootly incident **status**.
```json
{
{% if alert.data.issue.fields.status.name == '
### Custom Fields Mapping
If you require more dynamic mapping of Rootly incident properties, you can input the following syntax into the `Custom Fields Mapping` field.
Dynamically set Rootly incident **severity**.
```json
{
{% if alert.data.issue.fields.priority.name == 'Highest' %}
"severity_id": "SEV0"
{% elsif alert.data.issue.fields.priority.name == 'High' %}
"severity_id": "SEV1"
{% elsif alert.data.issue.fields.priority.name == 'Medium' %}
"severity_id": "SEV2"
{% else %}
"severity_id": "SEV3"
{% endif %}
}
```
Dynamically set Rootly incident **status**.
```json
{
{% if alert.data.issue.fields.status.name == 'This means the specified incident property you're trying to set is not an attribute you can set or the syntax is incorrect.
**How to fix...**
Ensure that the field you're attempting to set is enabled to be set via workflow and that your syntax is correct. | | `unexpected token at '{ "incident_property": }'` | **Reason for error...**
Your custom mapping syntax is incorrect.
**How to fix...**
Correct your mapping syntax. | # Support If you need help or more information about this integration, please contact [support@rootly.com](mailto:support@rootly.com) or start a chat by navigating to **Help > Chat with Us**. # Rootly to Jira Sync Source: https://docs.rootly.com/integrations/jira/rootly-to-jira-sync
 ### Update Jira Issue
The **Update Jira Issue** action is used to update an existing ticket in Jira. In order to update an existing issue in Jira, you must reference it in the `Jira Issue to Update` field using the `{{ incident.jira_issue_id }}` variable.
### Update Jira Issue
The **Update Jira Issue** action is used to update an existing ticket in Jira. In order to update an existing issue in Jira, you must reference it in the `Jira Issue to Update` field using the `{{ incident.jira_issue_id }}` variable.
 ### Create Jira Subtask
The **Create Jira Subtask** action is used to create a subtask under an existing Jira issue. In order to create a subtask for an existing Jira issue, you must you must reference the original Jira issue in the `Parent Jira Issue` field using the `{{ incident.jira_issue_id }}` variable. The `Project Key` entered here must be the same as the one used in the original Create Jira Issue action.
This workflow action is intended to be used for **action items** or **sub-incidents**.
### Create Jira Subtask
The **Create Jira Subtask** action is used to create a subtask under an existing Jira issue. In order to create a subtask for an existing Jira issue, you must you must reference the original Jira issue in the `Parent Jira Issue` field using the `{{ incident.jira_issue_id }}` variable. The `Project Key` entered here must be the same as the one used in the original Create Jira Issue action.
This workflow action is intended to be used for **action items** or **sub-incidents**.
 ### Jira Native Field Mapping
#### Labels
Jira has a native field called Labels. The syntax to set this field is different than the one used to set a custom field of the labels type.
### Jira Native Field Mapping
#### Labels
Jira has a native field called Labels. The syntax to set this field is different than the one used to set a custom field of the labels type.
 ```json
//Rootly native multi-select to Jira native Labels
"customfield_12345": {{ incident.service_slugs | join: ","}}
//Rootly custom multi-select to Jira native Labels
"customfield_10033": {{ incident.custom_fields | find: 'custom_field.slug', 'your_custom_field_slug' | get: 'selected_options' | map: 'value' | join: "," }}
//Rootly custom labels to Jira labels
//Coming soon!
```
#### Team
Jira has a native field called `Team`, but it's stored as a "custom field". In addition, it only allows a single team to be selected. To map to this field in Jira, you'll need to use the following syntax format:
```json
//Format to map to Jira native Team field
{
"customfield_10001": "
```json
//Rootly native multi-select to Jira native Labels
"customfield_12345": {{ incident.service_slugs | join: ","}}
//Rootly custom multi-select to Jira native Labels
"customfield_10033": {{ incident.custom_fields | find: 'custom_field.slug', 'your_custom_field_slug' | get: 'selected_options' | map: 'value' | join: "," }}
//Rootly custom labels to Jira labels
//Coming soon!
```
#### Team
Jira has a native field called `Team`, but it's stored as a "custom field". In addition, it only allows a single team to be selected. To map to this field in Jira, you'll need to use the following syntax format:
```json
//Format to map to Jira native Team field
{
"customfield_10001": " #### Custom Fields Mapping
It is highly likely that your Jira projects contain custom fields. The default tab in the above workflow actions will not be sufficient in mapping to these custom fields. You will need to input the custom snytax in the `Custom Fields Mapping` field in the `Advance` configuration tab.
In order to map to custom fields in Jira you would need to know the following information:
* The **custom field id** in Jira
* The **field type** in Jira
* The **incident property** that you would like to map from
#### Custom Fields Mapping
It is highly likely that your Jira projects contain custom fields. The default tab in the above workflow actions will not be sufficient in mapping to these custom fields. You will need to input the custom snytax in the `Custom Fields Mapping` field in the `Advance` configuration tab.
In order to map to custom fields in Jira you would need to know the following information:
* The **custom field id** in Jira
* The **field type** in Jira
* The **incident property** that you would like to map from
This often happens on Update Jira Issue action. This means the reference Jira issue you're attempting to update does not exist.
**How to fix...**
Ensure your workflow does not run until AFTER a Jira issue has already been created and linked to the incident. | | `"customfield_12345": "Custom Field is required."` | **Reason for error...**
This means the specified custom field is configured as a required field in the Jira project and your workflow isn't passing it any value.
**How to fix...**
You can either add custom fields mapping to map to the specific field or configure the Jira project to make the field optional. | | `unexpected token at '{ "customfield_10032": }'` | **Reason for error...**
Your custom mapping syntax is incorrect.
**How to fix...**
Correct your mapping syntax. | | `Specify a valid project ID or key` | **Reason for error...**
This means the Jira Project Key you've selected in the action is not available in the selected Jira instance.
**How to fix...**
Reselect the Jira Instance and then reselect the Project Key. | | `The issue type selected is invalid.` | **Reason for error...**
This means the Jira Issue Type you've selected in the action is not available in the selected Jira project.
**How to fix...**
Reselect the Project Key and then reselect the Issue Type. | # Support If you need help or more information about this integration, please contact [support@rootly.com](mailto:support@rootly.com) or start a chat by navigating to **Help > Chat with Us**. # Smart Defaults Source: https://docs.rootly.com/integrations/jira/smart-defaults ## Overview Traditionally, Rootly has strictly relied on [workflow](/integrations/slack/workflows " workflow") configurations to automate Jira actions. While it offered the flexibility required to meet complex incident response procedures, it did require some initial effort to set up. Understanding that not all customers adopt super complex procedures, we've introduced Smart Defaults to our Jira integration to help simplify the configuration process. New customers on Rootly will have Smart Defaults automatically turned on as soon as they install Jira. They will be able to interact with Jira out-of-box! Existing customers will have Smart Defaults turned off to avoid interrupting the workflows that have already been set up. To get started with Jira Smart Defaults, you'll want to first navigate to **Integrations > Jira (Configuration)**. ## Webhook This URL is used to set up your Jira webhook. Please see [Setting Up Jira Webhook](/integrations/jira/installation) for detailed steps.
 ## Jira Ticket for Incidents
This section is for configuring the creation of Jira tickets from Rootly.
## Jira Ticket for Incidents
This section is for configuring the creation of Jira tickets from Rootly.
 ### Create Jira ticket for all new incidents
This flag will allow Rootly to automatically create a Jira ticket into the specified project as soon as an incident is declared on Rootly.
### Project Key
This field allows you to select which project to create the Jira ticket into. If you need to create Jira tickets to different projects, you can disable this and configure through [workflows](/integrations/jira/rootly-to-jira-sync "workflows").
### Issue Type
This field allows you to select an issue type for your Jira ticket. The options are pulled directly from the project you've specified in the previous `Project Key` field.
### Issue Status
This field allows you to select the status to create the ticket into.The options are pulled directly from the project and issue type you've specified in the previous `Project Key` and `Issue Type` fields.
### Title / Summary
This field allows you to define the `Summary` field of your Jira ticket. By default it is set to `{{ incident.title }}` to match the title of your incident. This field supports Liquid syntax.
### Description
This field allows you to define the Description field of your Jira ticket. By default it is set to `{{ incident.summary }}` to match the summary of your incident. This field supports Liquid syntax.
### Default Assignee
This flag allows you to assign the Jira ticket to someone by providing an email address. If no email address is provided, the ticket will be assigned to the creator of the incident. This field supports Liquid syntax.
### Auto-bookmark Jira ticket in Slack
This flag allows you to enable automatic creation of a bookmark to the Jira ticket in the incident Slack channel. Slack’s channel bookmarks let you save and highlight your most important information in a project, letting you quickly find and interact with key information.
### Update Jira ticket when incident is updated
This flag allows you to enable automatic update of the matching Jira ticket whenever an incident is updated. This is a one-way update, meaning only updates from incidents flow into Jira and not the other way around.
## Jira Ticket For Action Items
This section is for configuring the creation of Jira subtasks for action items created on Rootly.
### Create Jira ticket for all new incidents
This flag will allow Rootly to automatically create a Jira ticket into the specified project as soon as an incident is declared on Rootly.
### Project Key
This field allows you to select which project to create the Jira ticket into. If you need to create Jira tickets to different projects, you can disable this and configure through [workflows](/integrations/jira/rootly-to-jira-sync "workflows").
### Issue Type
This field allows you to select an issue type for your Jira ticket. The options are pulled directly from the project you've specified in the previous `Project Key` field.
### Issue Status
This field allows you to select the status to create the ticket into.The options are pulled directly from the project and issue type you've specified in the previous `Project Key` and `Issue Type` fields.
### Title / Summary
This field allows you to define the `Summary` field of your Jira ticket. By default it is set to `{{ incident.title }}` to match the title of your incident. This field supports Liquid syntax.
### Description
This field allows you to define the Description field of your Jira ticket. By default it is set to `{{ incident.summary }}` to match the summary of your incident. This field supports Liquid syntax.
### Default Assignee
This flag allows you to assign the Jira ticket to someone by providing an email address. If no email address is provided, the ticket will be assigned to the creator of the incident. This field supports Liquid syntax.
### Auto-bookmark Jira ticket in Slack
This flag allows you to enable automatic creation of a bookmark to the Jira ticket in the incident Slack channel. Slack’s channel bookmarks let you save and highlight your most important information in a project, letting you quickly find and interact with key information.
### Update Jira ticket when incident is updated
This flag allows you to enable automatic update of the matching Jira ticket whenever an incident is updated. This is a one-way update, meaning only updates from incidents flow into Jira and not the other way around.
## Jira Ticket For Action Items
This section is for configuring the creation of Jira subtasks for action items created on Rootly.
 ### Create Jira subtask ticket for action items
This flag will allow Rootly to automatically create a Jira subtask under the parent Jira ticket every time a new action item is created in Rootly.
### Subtask Type
### Create Jira subtask ticket for action items
This flag will allow Rootly to automatically create a Jira subtask under the parent Jira ticket every time a new action item is created in Rootly.
### Subtask Type
 ## Kubewatch
An example ConfigMap is available at: [https://github.com/robusta-dev/kubewatch/blob/master/examples/conf/kubewatch.conf.webhook.yaml](https://github.com/robusta-dev/kubewatch/blob/master/examples/conf/kubewatch.conf.webhook.yaml "https://github.com/robusta-dev/kubewatch/blob/master/examples/conf/kubewatch.conf.webhook.yaml")
You only need the webhook handler to integrate with Rootly.
**Webhook url will be displayed and need to be replaced after your create this integration**
## Support
If you need help or more information about this integration, please contact [support@rootly.com](mailto:support@rootly.com) or use the **lower right chat widget** to get connected with an engineer.
# Installation
Source: https://docs.rootly.com/integrations/linear/installation
## About
By integrating with **Linear** you will be able to the following Workflow tasks:
* Create a Linear **issue** when a new incident is created
* Update a Linear **issue** to Done when an incident is resolved
* Create a Linear **sub-issue** when an action item is created in Rootly
## Installation
You can set up this integration as a **logged-in Admin user** on the integrations page:
## Kubewatch
An example ConfigMap is available at: [https://github.com/robusta-dev/kubewatch/blob/master/examples/conf/kubewatch.conf.webhook.yaml](https://github.com/robusta-dev/kubewatch/blob/master/examples/conf/kubewatch.conf.webhook.yaml "https://github.com/robusta-dev/kubewatch/blob/master/examples/conf/kubewatch.conf.webhook.yaml")
You only need the webhook handler to integrate with Rootly.
**Webhook url will be displayed and need to be replaced after your create this integration**
## Support
If you need help or more information about this integration, please contact [support@rootly.com](mailto:support@rootly.com) or use the **lower right chat widget** to get connected with an engineer.
# Installation
Source: https://docs.rootly.com/integrations/linear/installation
## About
By integrating with **Linear** you will be able to the following Workflow tasks:
* Create a Linear **issue** when a new incident is created
* Update a Linear **issue** to Done when an incident is resolved
* Create a Linear **sub-issue** when an action item is created in Rootly
## Installation
You can set up this integration as a **logged-in Admin user** on the integrations page:

 Follow the on-screen prompts to connect to your Linear account. Once you are redirected back to Rootly, click **Save Settings**.
 ## Configuration
To set up the appropriate Workflows as described in About, please follow: [/integrations/linear/workflows](/integrations/linear/workflows "/integrations/linear/workflows")
## Uninstall
You can **uninstall** this integration in the integrations panel by clicking **Linear > Configure > Delete**
## Configuration
To set up the appropriate Workflows as described in About, please follow: [/integrations/linear/workflows](/integrations/linear/workflows "/integrations/linear/workflows")
## Uninstall
You can **uninstall** this integration in the integrations panel by clicking **Linear > Configure > Delete**
 ## Support
If you need help or more information about this integration, please contact [support@rootly.com](mailto:support@rootly.com "support@rootly.com") or use the **lower right chat widget** to get connected with an engineer.
# Triage Responsibility
Source: https://docs.rootly.com/integrations/linear/triage-responsibility
Use Linear's [Triage responsibility](https://linear.app/docs/triage#triage-responsibility) feature with your Rootly On-Call Schedules to ensure your Linear triage queue stays organized.
When a new issue is created and set to triage, the issue will automatically be assigned to the current person who's on-call. This allows your on-call responders to be the point person for all urgent matters associated with your teams, products, and services across Rootly and Linear.
## Sync a Schedule with your Linear team
### In Rootly
To begin automatically assigning tickets in triage to your on-call responder:
1. In Rootly, navigate to Schedules and edit the schedule you want to sync with Linear.
2. Open the 'Integrations' tab and toggle on 'Sync with Linear'.
## Support
If you need help or more information about this integration, please contact [support@rootly.com](mailto:support@rootly.com "support@rootly.com") or use the **lower right chat widget** to get connected with an engineer.
# Triage Responsibility
Source: https://docs.rootly.com/integrations/linear/triage-responsibility
Use Linear's [Triage responsibility](https://linear.app/docs/triage#triage-responsibility) feature with your Rootly On-Call Schedules to ensure your Linear triage queue stays organized.
When a new issue is created and set to triage, the issue will automatically be assigned to the current person who's on-call. This allows your on-call responders to be the point person for all urgent matters associated with your teams, products, and services across Rootly and Linear.
## Sync a Schedule with your Linear team
### In Rootly
To begin automatically assigning tickets in triage to your on-call responder:
1. In Rootly, navigate to Schedules and edit the schedule you want to sync with Linear.
2. Open the 'Integrations' tab and toggle on 'Sync with Linear'.
 ### In Linear
1. Navigate to your Team Settings and select 'Triage' under 'Workflows'.
2. Under 'Triage responsibility', select 'Use schedule' at the bottom right corner of the table.
3. Select your Rootly schedule.
### In Linear
1. Navigate to your Team Settings and select 'Triage' under 'Workflows'.
2. Under 'Triage responsibility', select 'Use schedule' at the bottom right corner of the table.
3. Select your Rootly schedule.
 # Installation
Source: https://docs.rootly.com/integrations/linear/workflows
# Installation
Source: https://docs.rootly.com/integrations/linear/workflows
 Fill in the following fields
 * **Name** - Create a Linear Issue
* **Team** - Select your corresponding team in Linear you'd like this issue created for
* **State** - Select from Linear states
* **Title** - Name of the Linear issue, using `{{ incident.title }}` will default to the title of the incident
* **Description** - By default your description will be a summary of the incident `{{ incident.summary }}`
* **Priority** - The priority of your Linear issue, select from:
* Auto - This will automatically convert your incident severity to a corresponding Linear severity
## Update a Linear Issue
* **Name** - Create a Linear Issue
* **Team** - Select your corresponding team in Linear you'd like this issue created for
* **State** - Select from Linear states
* **Title** - Name of the Linear issue, using `{{ incident.title }}` will default to the title of the incident
* **Description** - By default your description will be a summary of the incident `{{ incident.summary }}`
* **Priority** - The priority of your Linear issue, select from:
* Auto - This will automatically convert your incident severity to a corresponding Linear severity
## Update a Linear Issue
 Then go in your looker instance under Users:
 Select an User and add a new api Key:

 All set!
## Snapshot graphs
Now a new task is available in your **Genius workflows:**
All set!
## Snapshot graphs
Now a new task is available in your **Genius workflows:**
 ## Uninstall
You can **uninstall** this integration in the integrations panel by clicking **Configure > Delete**
## Support
If you need help or more information about this integration, please contact [support@rootly.com](mailto:support@rootly.com) or use the **lower right chat widget** to get connected with an engineer
# Installation
Source: https://docs.rootly.com/integrations/mattermost
## Introduction
**Mattermost** Integration allows you to:
* **Create** and track an **incident** right from Mattermost.
## Installation
Let's create an Oauth2 client
## Uninstall
You can **uninstall** this integration in the integrations panel by clicking **Configure > Delete**
## Support
If you need help or more information about this integration, please contact [support@rootly.com](mailto:support@rootly.com) or use the **lower right chat widget** to get connected with an engineer
# Installation
Source: https://docs.rootly.com/integrations/mattermost
## Introduction
**Mattermost** Integration allows you to:
* **Create** and track an **incident** right from Mattermost.
## Installation
Let's create an Oauth2 client


 `https://rootly.com/auth/mattermost/callback`
`https://rootly.com/auth/sign_in_mattermost/callback`
And finally copy `client_id` and `client_secret` into Rootly configuration
`https://rootly.com/auth/mattermost/callback`
`https://rootly.com/auth/sign_in_mattermost/callback`
And finally copy `client_id` and `client_secret` into Rootly configuration
 ## Support
If you need help or more information about this integration, please contact [support@rootly.com](mailto:support@rootly.com "support@rootly.com") or use the **lower right chat widget** to get connected with an engineer.
## Uninstall
You can **uninstall** this integration in the integrations panel by clicking **Configure > Delete**
# Microsoft Teams
Source: https://docs.rootly.com/integrations/microsoft-teams
## Why
**Microsoft Teams** Integration allows you to:
* **Create** a Microsoft Teams **channel** associated to an incident.
* **Create** a Microsoft Teams **tab** linked to the incident in the associated Microsoft Teams channel.
## Installation in Rootly ( required)
You can setup this integration as a **logged in admin user** in the integrations page.
## Support
If you need help or more information about this integration, please contact [support@rootly.com](mailto:support@rootly.com "support@rootly.com") or use the **lower right chat widget** to get connected with an engineer.
## Uninstall
You can **uninstall** this integration in the integrations panel by clicking **Configure > Delete**
# Microsoft Teams
Source: https://docs.rootly.com/integrations/microsoft-teams
## Why
**Microsoft Teams** Integration allows you to:
* **Create** a Microsoft Teams **channel** associated to an incident.
* **Create** a Microsoft Teams **tab** linked to the incident in the associated Microsoft Teams channel.
## Installation in Rootly ( required)
You can setup this integration as a **logged in admin user** in the integrations page.
 ## Oauth Permissions
Your selected workspace needs the following oauth permissions:
* **offline\_access**
* This permission is needed for to perform OAuth authentication.
* **User.Read**
* Allows Rootly to have user information about who integrated the account. This permission is needed for our OAuth strategy.
* **Team.ReadBasic.All**
* Read the names and descriptions of teams, on behalf of the signed-in user.
* **ChatMessage.Send**
* Allows an app to send channel messages in Microsoft Teams, on behalf of the signed-in user.
* **Channel.Create**
* Create channels in any team, on behalf of the signed-in user.
* **Channel.ReadBasic.All**
* Read channel names and channel descriptions, on behalf of the signed-in user.
* **ChannelMessage.Send**
* Allows an app to send channel messages in Microsoft Teams, on behalf of the signed-in user.
* **ChannelMessage.ReadWrite**
* Allows the app to read and write channel messages, on behalf of the signed-in user.
* **ChannelSettings.ReadWrite.All**
* Add and remove members from channels, on behalf of the signed-in user.
* **ChannelMember.ReadWrite.All**
* Read and write the names, descriptions, and settings of all channels, on behalf of the signed-in user.
* **TeamsTab.ReadWriteSelfForChat**
* Allows a Teams app to read, install, upgrade, and uninstall its own tabs in chats the signed-in user can access.
* **TeamsTab.ReadWriteSelfForTeam**
* Allows a Teams app to read, install, upgrade, and uninstall its own tabs to teams the signed-in user can access.
* **TeamsAppInstallation.ReadWriteSelfForTeam**
* Allows a Teams app to read, install, upgrade, and uninstall itself to teams the signed-in user can access.
## Installation in Microsoft Teams ( required )
1. After authorizing the integration on Rootly, switch to Microsoft Teams. On the left-hand side, go to "+ Apps" search for Rootly in the store and click "Add".
2. On this screen. click the dropdown next to "Add" and choose a primary channel for the Team you'd like to install the bot
## Oauth Permissions
Your selected workspace needs the following oauth permissions:
* **offline\_access**
* This permission is needed for to perform OAuth authentication.
* **User.Read**
* Allows Rootly to have user information about who integrated the account. This permission is needed for our OAuth strategy.
* **Team.ReadBasic.All**
* Read the names and descriptions of teams, on behalf of the signed-in user.
* **ChatMessage.Send**
* Allows an app to send channel messages in Microsoft Teams, on behalf of the signed-in user.
* **Channel.Create**
* Create channels in any team, on behalf of the signed-in user.
* **Channel.ReadBasic.All**
* Read channel names and channel descriptions, on behalf of the signed-in user.
* **ChannelMessage.Send**
* Allows an app to send channel messages in Microsoft Teams, on behalf of the signed-in user.
* **ChannelMessage.ReadWrite**
* Allows the app to read and write channel messages, on behalf of the signed-in user.
* **ChannelSettings.ReadWrite.All**
* Add and remove members from channels, on behalf of the signed-in user.
* **ChannelMember.ReadWrite.All**
* Read and write the names, descriptions, and settings of all channels, on behalf of the signed-in user.
* **TeamsTab.ReadWriteSelfForChat**
* Allows a Teams app to read, install, upgrade, and uninstall its own tabs in chats the signed-in user can access.
* **TeamsTab.ReadWriteSelfForTeam**
* Allows a Teams app to read, install, upgrade, and uninstall its own tabs to teams the signed-in user can access.
* **TeamsAppInstallation.ReadWriteSelfForTeam**
* Allows a Teams app to read, install, upgrade, and uninstall itself to teams the signed-in user can access.
## Installation in Microsoft Teams ( required )
1. After authorizing the integration on Rootly, switch to Microsoft Teams. On the left-hand side, go to "+ Apps" search for Rootly in the store and click "Add".
2. On this screen. click the dropdown next to "Add" and choose a primary channel for the Team you'd like to install the bot
 1. Click the dropdown next to "Add" and choose "Add to a team." Select a team and a primary channel (we recommend the General channel) to install both the bot and the Rootly tab. Then, click "Set Up." Note: You will need to install the bot for each team that requires access to the Rootly tab for tasks such as creating and managing incidents.
2. After clicking "Set Up," a confirmation modal will appear, guiding you to press "Save" to finalize the app installation. Optionally, you can also post a message to the channel announcing the new Rootly tab.
## Uninstall
1. Login to your **Microsoft Teams** account.
2. Click **Manage > Installed Apps** or search for the **Rootly** App.
3. Click the **Rootly** app.
4. Click **Uninstall**.
## Support
If you need help or more information about this integration, please contact [support@rootly.com](mailto:support@rootly.com) or use the **lower right chat widget** to get connected with an engineer.
# Microsoft Teams Meeting
Source: https://docs.rootly.com/integrations/microsoft-teams-meeting
## Why
**Microsoft Teams Meeting** Integration allows you to:
* **Create** or **join** a Microsoft Teams meeting associated to an incident.
* Get Microsoft Teams **link** into your Slack notification.
## Installation
You can setup this integration as a **logged in admin user** in the integrations page.
1. Click the dropdown next to "Add" and choose "Add to a team." Select a team and a primary channel (we recommend the General channel) to install both the bot and the Rootly tab. Then, click "Set Up." Note: You will need to install the bot for each team that requires access to the Rootly tab for tasks such as creating and managing incidents.
2. After clicking "Set Up," a confirmation modal will appear, guiding you to press "Save" to finalize the app installation. Optionally, you can also post a message to the channel announcing the new Rootly tab.
## Uninstall
1. Login to your **Microsoft Teams** account.
2. Click **Manage > Installed Apps** or search for the **Rootly** App.
3. Click the **Rootly** app.
4. Click **Uninstall**.
## Support
If you need help or more information about this integration, please contact [support@rootly.com](mailto:support@rootly.com) or use the **lower right chat widget** to get connected with an engineer.
# Microsoft Teams Meeting
Source: https://docs.rootly.com/integrations/microsoft-teams-meeting
## Why
**Microsoft Teams Meeting** Integration allows you to:
* **Create** or **join** a Microsoft Teams meeting associated to an incident.
* Get Microsoft Teams **link** into your Slack notification.
## Installation
You can setup this integration as a **logged in admin user** in the integrations page.
 Create a rootly webhook like shown below with

 url: [https://rootly.com/webhooks/incoming/new\_relic\_webhooks](https://rootly.com/webhooks/incoming/new_relic_webhooks "https://rootly.com/webhooks/incoming/new_relic_webhooks"). With Bearer token the token shown in your integration page:
 That's how the configuration should look end to end:
## Test
Click `Test Notification` to test your webhook and you should see something similar to the image below in [https://rootly.com/account/alerts](https://rootly.com/account/alerts "https://rootly.com/account/alerts")
That's how the configuration should look end to end:
## Test
Click `Test Notification` to test your webhook and you should see something similar to the image below in [https://rootly.com/account/alerts](https://rootly.com/account/alerts "https://rootly.com/account/alerts")
 All set!
# Installation
Source: https://docs.rootly.com/integrations/new-relic/installation
## Why
**New Relic** Integration allows you to:
* Snapshot graphs metrics through **Genius** Workflows
## Installation
You can setup this integration as a **logged in admin user** in the integrations page:
All set!
# Installation
Source: https://docs.rootly.com/integrations/new-relic/installation
## Why
**New Relic** Integration allows you to:
* Snapshot graphs metrics through **Genius** Workflows
## Installation
You can setup this integration as a **logged in admin user** in the integrations page:
 Let's now go in New Relic website to enter api keys:

 Generate and copy the **Api Key:**

 ## Snapshot graphs
Now a new task is available in your **Genius workflows:**
## Snapshot graphs
Now a new task is available in your **Genius workflows:**
 ## Uninstall
You can **uninstall** this integration in the integrations panel by clicking **Configure > Delete**
## Support
If you need help or more information about this integration, please contact [support@rootly.com](mailto:support@rootly.com) or use the **lower right chat widget** to get connected with an engineer.
# Nobl9
Source: https://docs.rootly.com/integrations/nobl9
## Why
**Nobl9** Integration allows you to:
* Creating an alert in **Rootly** when an alert is triggered in **Nobl9**.
## Installation
You can setup this integration as a **logged in admin user** in the integrations page:
## Uninstall
You can **uninstall** this integration in the integrations panel by clicking **Configure > Delete**
## Support
If you need help or more information about this integration, please contact [support@rootly.com](mailto:support@rootly.com) or use the **lower right chat widget** to get connected with an engineer.
# Nobl9
Source: https://docs.rootly.com/integrations/nobl9
## Why
**Nobl9** Integration allows you to:
* Creating an alert in **Rootly** when an alert is triggered in **Nobl9**.
## Installation
You can setup this integration as a **logged in admin user** in the integrations page:
 This will generate a **webhook url** you need to configure in **Nobl9**
 Let's do it!
Nobl9 > Integrations
Let's do it!
Nobl9 > Integrations
 Click on Alert methods and create a new alert
 Select **webhook** type
 Copy the webhook url from rootly in there:
 That's it! Now you you connect this alert method to any alert policies ! Enjoy.
## Uninstall
You can **uninstall** this integration in the integrations panel by clicking **Configure > Delete**
## Support
If you need help or more information about this integration, please contact [support@rootly.com](mailto:support@rootly.com) or use the **lower right chat widget** to get connected with an engineer.
# Workflows
Source: https://docs.rootly.com/integrations/notion/workflows
## Overview
Rootly's Notion integration leverages workflows to automatically generate and update Notion docs ?? and their permissions ?? If you are unfamiliar with how Workflows function please visit our [Workflows](/workflows "Workflows") documentation first.
That's it! Now you you connect this alert method to any alert policies ! Enjoy.
## Uninstall
You can **uninstall** this integration in the integrations panel by clicking **Configure > Delete**
## Support
If you need help or more information about this integration, please contact [support@rootly.com](mailto:support@rootly.com) or use the **lower right chat widget** to get connected with an engineer.
# Workflows
Source: https://docs.rootly.com/integrations/notion/workflows
## Overview
Rootly's Notion integration leverages workflows to automatically generate and update Notion docs ?? and their permissions ?? If you are unfamiliar with how Workflows function please visit our [Workflows](/workflows "Workflows") documentation first.
 ## Available Workflow Actions
### Create a Notion Doc
This action allows you to create an incident retrospective into a Notion doc.
## Available Workflow Actions
### Create a Notion Doc
This action allows you to create an incident retrospective into a Notion doc.
 #### Name
This field is automatically set for you. You can rename this field to whatever best describes your action. The value in this field does not affect how the workflow action behaves.
#### Drive
This field allows you to select which drive your Google Drive to create the retrospective in. Leave this empty if you want to create it in your `My Drive`. If you are to create it in a shared drive, ensure that the account you used to integrate Google Docs has access to this drive.
#### Parent Folder
This field allows you to select a folder in your Google Drive in which your Google Doc will be created into. If you don't specify a folder, we will use the folder path specified in the `Title` field.
#### Title
This field allows you to define the title of the retrospective document. Liquid syntax is supported in this field.
If you wish to dynamically create folders to nest your document in, you can do so by separating each folder with a `/`. For example, if you enter the following text as the title:
`{{ incident.created\_at | date: '%Y' }}/{{ incident.created\_at | date: '%B' }}/{{ incident.title }}`
The storage path will be:
**\[Folder] year of incident creation > \[Folder] month of incident creation > \[Doc] Incident Title**
#### Custom Retrospective Template
This field allows you to define the body content of the retrospective. Liquid syntax is supported in this field.
#### Name
This field is automatically set for you. You can rename this field to whatever best describes your action. The value in this field does not affect how the workflow action behaves.
#### Drive
This field allows you to select which drive your Google Drive to create the retrospective in. Leave this empty if you want to create it in your `My Drive`. If you are to create it in a shared drive, ensure that the account you used to integrate Google Docs has access to this drive.
#### Parent Folder
This field allows you to select a folder in your Google Drive in which your Google Doc will be created into. If you don't specify a folder, we will use the folder path specified in the `Title` field.
#### Title
This field allows you to define the title of the retrospective document. Liquid syntax is supported in this field.
If you wish to dynamically create folders to nest your document in, you can do so by separating each folder with a `/`. For example, if you enter the following text as the title:
`{{ incident.created\_at | date: '%Y' }}/{{ incident.created\_at | date: '%B' }}/{{ incident.title }}`
The storage path will be:
**\[Folder] year of incident creation > \[Folder] month of incident creation > \[Doc] Incident Title**
#### Custom Retrospective Template
This field allows you to define the body content of the retrospective. Liquid syntax is supported in this field.
 #### Name
This field is automatically set for you. You can rename this field to whatever best describes your action. The value in this field does not affect how the workflow action behaves.
#### File
This field allows you to specify the id of the document in your Google Drive that you want to update. The default is set to `{{ incident.google_drive_id }}`. Liquid syntax is supported in this field.
#### Title
This field allows you to update the title of the Google Doc. Liquid syntax is supported in this field.
#### Custom Retrospective Template
This field allows you to update the body content of the Google Doc. Liquid syntax is supported in this field.
#### Retrospective Template
This field allows you to use a predefined retrospective template to update the body content of the Google Doc.
#### Name
This field is automatically set for you. You can rename this field to whatever best describes your action. The value in this field does not affect how the workflow action behaves.
#### File
This field allows you to specify the id of the document in your Google Drive that you want to update. The default is set to `{{ incident.google_drive_id }}`. Liquid syntax is supported in this field.
#### Title
This field allows you to update the title of the Google Doc. Liquid syntax is supported in this field.
#### Custom Retrospective Template
This field allows you to update the body content of the Google Doc. Liquid syntax is supported in this field.
#### Retrospective Template
This field allows you to use a predefined retrospective template to update the body content of the Google Doc.
 #### Name
This field is automatically set for you. You can rename this field to whatever best describes your action. The value in this field does not affect how the workflow action behaves.
#### File
This field allows you to specify the id of the file in your Google Drive that you want to create permissions for. The default is set to `{{ incident.google_drive_id }}`. Liquid syntax is supported in this field.
#### Define Sharing Permissions
You can customize permissions like shown below:
```json
[
{
"type": "user",
"role": "writer",
"email_address": "user@example.com"
},
{
"type": "user",
"role": "owner",
"transferOwnership": true,
"email_address": "user@example.com"
},
{
"type": "domain",
"role": "writer",
"domain": "example.com"
}
]
```
#### Send Email Notification
You can optionally notify the users who are granted permission by email.
#### Email Message
You can optionally provide a message to be sent with the email notification. The message will be sent only if the `Send Email Notification` box is checked.
### Remove Google Doc Permissions
This action allows you to revoke existing user permissions to a retrospective document.
#### Name
This field is automatically set for you. You can rename this field to whatever best describes your action. The value in this field does not affect how the workflow action behaves.
#### File
This field allows you to specify the id of the file in your Google Drive that you want to create permissions for. The default is set to `{{ incident.google_drive_id }}`. Liquid syntax is supported in this field.
#### Define Sharing Permissions
You can customize permissions like shown below:
```json
[
{
"type": "user",
"role": "writer",
"email_address": "user@example.com"
},
{
"type": "user",
"role": "owner",
"transferOwnership": true,
"email_address": "user@example.com"
},
{
"type": "domain",
"role": "writer",
"domain": "example.com"
}
]
```
#### Send Email Notification
You can optionally notify the users who are granted permission by email.
#### Email Message
You can optionally provide a message to be sent with the email notification. The message will be sent only if the `Send Email Notification` box is checked.
### Remove Google Doc Permissions
This action allows you to revoke existing user permissions to a retrospective document.
 #### Name
This field is automatically set for you. You can rename this field to whatever best describes your action. The value in this field does not affect how the workflow action behaves.
#### File
This filed allows you to specify the id of the file in your Google Drive that you want to revoke permissions from. The default is set to `{{ incident.google_drive_id }}`. Liquid syntax is supported in this field.
#### Attribute to Query By
This field allows you to select an attribute by which you want to revoke permissions for. There are three options:
1. `Type`: Can be `User`, `Group` or `Domain`.
2. `Role`: Can be `Owner`, `Viewer`, `Editor`, `Writer`, `Commenter`, or `None`.
3. `Email Address` (default): The email address of the user from whom you want to revoke permissions.
#### Name
This field is automatically set for you. You can rename this field to whatever best describes your action. The value in this field does not affect how the workflow action behaves.
#### File
This filed allows you to specify the id of the file in your Google Drive that you want to revoke permissions from. The default is set to `{{ incident.google_drive_id }}`. Liquid syntax is supported in this field.
#### Attribute to Query By
This field allows you to select an attribute by which you want to revoke permissions for. There are three options:
1. `Type`: Can be `User`, `Group` or `Domain`.
2. `Role`: Can be `Owner`, `Viewer`, `Editor`, `Writer`, `Commenter`, or `None`.
3. `Email Address` (default): The email address of the user from whom you want to revoke permissions.
 #### Value
This field allows you to specify the value of the attribute that was selected in the previous field, Attribute to Query By. Liquid syntax is supported in this field.
Example 1:
* If,
* `Attribute to Query By` = `Role`
* `Value` = `Writer`
* Then,
* Every user with the `Writer` role will have their permissions revoked
Example 2:
#### Value
This field allows you to specify the value of the attribute that was selected in the previous field, Attribute to Query By. Liquid syntax is supported in this field.
Example 1:
* If,
* `Attribute to Query By` = `Role`
* `Value` = `Writer`
* Then,
* Every user with the `Writer` role will have their permissions revoked
Example 2:
 ## Support
If you need help or more information about this integration, please contact [support@rootly.com](mailto:support@rootly.com) or use the **lower right chat widget** to get connected with an engineer.
# Opsgenie
Source: https://docs.rootly.com/integrations/opsgenie
## Support
If you need help or more information about this integration, please contact [support@rootly.com](mailto:support@rootly.com) or use the **lower right chat widget** to get connected with an engineer.
# Opsgenie
Source: https://docs.rootly.com/integrations/opsgenie

 ## Configuration
Log into your Opsgenie account then navigate to Settings > Integrations > New Integration
## Configuration
Log into your Opsgenie account then navigate to Settings > Integrations > New Integration
 Select the API integration tile
 **Access Rights** needs to be: **Read, Create and Update, Configuration Access**
**Note:** The API Key would need to be a **Global** key and can not be scoped to a Team.
**Access Rights** needs to be: **Read, Create and Update, Configuration Access**
**Note:** The API Key would need to be a **Global** key and can not be scoped to a Team.
 Copy the API integration key back into Rootly
 Let's now configure webhooks:

 Add webhook as below:
 All done !
## Auto Assign On-calls to Incident Roles
If you'd like to automatically assign on-calls of a given Opsgenie Schedule to an Incident Role (e.g. Commander), please follow the instructions on the [PagerDuty integration page](/integrations/pagerduty).
## Paging Automatically via Genius Workflows
Set up automated workflows to page various on-call schedules and escalation policies based on the condition of an incident (e.g SEV1 or greater pages Infrastructure).
## Paging
You can page Opsgenie teams right from Slack using our integration.
All done !
## Auto Assign On-calls to Incident Roles
If you'd like to automatically assign on-calls of a given Opsgenie Schedule to an Incident Role (e.g. Commander), please follow the instructions on the [PagerDuty integration page](/integrations/pagerduty).
## Paging Automatically via Genius Workflows
Set up automated workflows to page various on-call schedules and escalation policies based on the condition of an incident (e.g SEV1 or greater pages Infrastructure).
## Paging
You can page Opsgenie teams right from Slack using our integration.
 ## Support
If you need help or more information about this integration, please contact [support@rootly.com](mailto:support@rootly.com) or use the **lower right chat widget** to get connected with an engineer.
# Opslevel
Source: https://docs.rootly.com/integrations/opslevel
## Support
If you need help or more information about this integration, please contact [support@rootly.com](mailto:support@rootly.com) or use the **lower right chat widget** to get connected with an engineer.
# Opslevel
Source: https://docs.rootly.com/integrations/opslevel
 Select the `Setup` to begin installation. You'll be asked to accept the request to install.
 ## Configuration
Rootly's Outlook integration relies on workflows to automate the scheduling of events. The most common setup is to run the **Create an Outlook Event** when an incident resolves.
## Configuration
Rootly's Outlook integration relies on workflows to automate the scheduling of events. The most common setup is to run the **Create an Outlook Event** when an incident resolves.
 ### Name
This field is automatically set for you. You can rename this field to whatever best describes your action. The value in this field does not affect how the workflow action behaves.
### Calendar
Pick the calendar that you would like to schedule the event to.
### Summary
Enter the title of your scheduled event. This field accepts Liquid syntax.
### Description
Enter a more detailed description of your scheduled event.
### Attendees
Enter the emails of the attendees you'd like to invite. This field accepts Liquid syntax.
### Time Zone
Enter the timezone in which you'd like the meeting to be booked in. The value you select later in the `Time of Meeting` field will be in the timezone selected here.
### Days Until Meeting
Enter the number of days you'd like to schedule the event into. Rootly starts counting from the time when the workflow is run. For example, if the value set in this field is `3` and the workflow was run on January 1st, the event will be scheduled 3 days from January 1st.
### Meeting Duration
Enter the length of the event you'd like to schedule. This field accepts Liquid syntax.
### Time of Meeting
This is the time in which the event will be scheduled at. The time entered here will be in the timezone specified in the `Time Zone` field.
### Exclude Weekends
Checking this option will not include weekends in the count for `Days Until Meeting`.
### Post to Incident Timeline
Checking this option will post the workflow run to the incident timeline.
## Uninstall
1. Login to your **Microsoft Teams Meeting** account.
2. Click **Manage > Installed Apps** or search for the **Rootly** App.
3. Click the **Rootly** app.
4. Click **Uninstall**.
## Support
If you need help or more information about this integration, please contact [support@rootly.com](mailto:support@rootly.com) or use the **lower right chat widget** to get connected with an engineer.
# Overview
Source: https://docs.rootly.com/integrations/overview
An integration is either a third-party software service, or custom tooling and software built in-house by your organization that integrates with Rootly to extend the functionality and features of both.
## What's an Integration?
Rootly has dozens of integrations available, including popular SaaS products like [PagerDuty](https://rootly.com/docs/pagerduty-integration "PagerDuty"), [Jira](https://rootly.com/docs/jira-integration "Jira"), [Zoom](https://rootly.com/docs/zoom-integration "Zoom"), [Kubernetes](https://rootly.com/docs/kubernetes-integration "Kubernetes"), and [Github](https://rootly.com/docs/github-integration "Github"). To see all of the integrations currently available when using Rootly, check out the nav bar on the left of this documentation screen.
If you have a custom integration you'd like to create using your own in-house software, see our [API Documentation](https://rootly.com/api "API Documentation") for full information on all the details you'll need to create your own.
## Security
* Integration keys are encrypted at rest using AES 256-bit encryption and protected by TLS in transit.
* Key management is in place for encryption keys for production services
## IP's whitelist
* All integrations will use the following outbound IP's
> - 34.232.217.139
>
> - 18.213.181.255
# PagerTree
Source: https://docs.rootly.com/integrations/pager-tree
## Webhooks
[https://pagertree.com/docs/integration-guides/outgoing-webhook](https://pagertree.com/docs/integration-guides/outgoing-webhook)
# Alerts
Source: https://docs.rootly.com/integrations/pagerduty/alerts
### Name
This field is automatically set for you. You can rename this field to whatever best describes your action. The value in this field does not affect how the workflow action behaves.
### Calendar
Pick the calendar that you would like to schedule the event to.
### Summary
Enter the title of your scheduled event. This field accepts Liquid syntax.
### Description
Enter a more detailed description of your scheduled event.
### Attendees
Enter the emails of the attendees you'd like to invite. This field accepts Liquid syntax.
### Time Zone
Enter the timezone in which you'd like the meeting to be booked in. The value you select later in the `Time of Meeting` field will be in the timezone selected here.
### Days Until Meeting
Enter the number of days you'd like to schedule the event into. Rootly starts counting from the time when the workflow is run. For example, if the value set in this field is `3` and the workflow was run on January 1st, the event will be scheduled 3 days from January 1st.
### Meeting Duration
Enter the length of the event you'd like to schedule. This field accepts Liquid syntax.
### Time of Meeting
This is the time in which the event will be scheduled at. The time entered here will be in the timezone specified in the `Time Zone` field.
### Exclude Weekends
Checking this option will not include weekends in the count for `Days Until Meeting`.
### Post to Incident Timeline
Checking this option will post the workflow run to the incident timeline.
## Uninstall
1. Login to your **Microsoft Teams Meeting** account.
2. Click **Manage > Installed Apps** or search for the **Rootly** App.
3. Click the **Rootly** app.
4. Click **Uninstall**.
## Support
If you need help or more information about this integration, please contact [support@rootly.com](mailto:support@rootly.com) or use the **lower right chat widget** to get connected with an engineer.
# Overview
Source: https://docs.rootly.com/integrations/overview
An integration is either a third-party software service, or custom tooling and software built in-house by your organization that integrates with Rootly to extend the functionality and features of both.
## What's an Integration?
Rootly has dozens of integrations available, including popular SaaS products like [PagerDuty](https://rootly.com/docs/pagerduty-integration "PagerDuty"), [Jira](https://rootly.com/docs/jira-integration "Jira"), [Zoom](https://rootly.com/docs/zoom-integration "Zoom"), [Kubernetes](https://rootly.com/docs/kubernetes-integration "Kubernetes"), and [Github](https://rootly.com/docs/github-integration "Github"). To see all of the integrations currently available when using Rootly, check out the nav bar on the left of this documentation screen.
If you have a custom integration you'd like to create using your own in-house software, see our [API Documentation](https://rootly.com/api "API Documentation") for full information on all the details you'll need to create your own.
## Security
* Integration keys are encrypted at rest using AES 256-bit encryption and protected by TLS in transit.
* Key management is in place for encryption keys for production services
## IP's whitelist
* All integrations will use the following outbound IP's
> - 34.232.217.139
>
> - 18.213.181.255
# PagerTree
Source: https://docs.rootly.com/integrations/pager-tree
## Webhooks
[https://pagertree.com/docs/integration-guides/outgoing-webhook](https://pagertree.com/docs/integration-guides/outgoing-webhook)
# Alerts
Source: https://docs.rootly.com/integrations/pagerduty/alerts
 Select workflow **triggers**. `Alert Created` will be the only option to select here. This means the workflow will initialize whenever a new alert is created in Rootly.
 Configure run conditions. Set up your workflow to only run if...
* The alert `source` is from `Pagerduty`
* The alert `labels`:
* **Option 1:** `contains all of` the following `labels` (this is if you want to respond to a new PagerDuty incident being triggered)
* `action:incident.triggered`
* `service_id:PLVWMVW` (this label is optional - only include this if you want to respond to alerts from a specific PagerDuty service)
* **Option 2:** `contains all of` the following `labels` (this is if you want to respond to an existing PagerDuty incident being acknowledged)
* `action:incident.acknowledged`
* `service_id:PLVWMVW` (this label is optional - only include this if you want to respond to alerts from a specific PagerDuty service)
* **Option 3:** `contains all of` the following `labels` (this is if you want to respond to an existing PagerDuty incident being resolved)
* `action:incident.resolved`
* `service_id:PLVWMVW` (this label is optional - only include this if you want to respond to alerts from a specific PagerDuty service)
* **Option 4:** `contains all of` the following `labels` (this is if you want to respond to a responder being added to an existing PagerDuty incident)
* action:incident.responder.added
* The alert `payload` has the `$.object.specific_fied` equals to `/specific_value/i`
* **JSON path syntax** is used to filter for a specific field from the alert payload (e.g. \$.issue.fields.issuetype.name). You can preview your syntax on [JSON Path Explorer](https://rootly.com/account/help/json-path-explorer).
* **Ruby regular expression** can be used to specify what value to match to. You can test your regexp on this [Rubular tool](https://rubular.com/).
Configure run conditions. Set up your workflow to only run if...
* The alert `source` is from `Pagerduty`
* The alert `labels`:
* **Option 1:** `contains all of` the following `labels` (this is if you want to respond to a new PagerDuty incident being triggered)
* `action:incident.triggered`
* `service_id:PLVWMVW` (this label is optional - only include this if you want to respond to alerts from a specific PagerDuty service)
* **Option 2:** `contains all of` the following `labels` (this is if you want to respond to an existing PagerDuty incident being acknowledged)
* `action:incident.acknowledged`
* `service_id:PLVWMVW` (this label is optional - only include this if you want to respond to alerts from a specific PagerDuty service)
* **Option 3:** `contains all of` the following `labels` (this is if you want to respond to an existing PagerDuty incident being resolved)
* `action:incident.resolved`
* `service_id:PLVWMVW` (this label is optional - only include this if you want to respond to alerts from a specific PagerDuty service)
* **Option 4:** `contains all of` the following `labels` (this is if you want to respond to a responder being added to an existing PagerDuty incident)
* action:incident.responder.added
* The alert `payload` has the `$.object.specific_fied` equals to `/specific_value/i`
* **JSON path syntax** is used to filter for a specific field from the alert payload (e.g. \$.issue.fields.issuetype.name). You can preview your syntax on [JSON Path Explorer](https://rootly.com/account/help/json-path-explorer).
* **Ruby regular expression** can be used to specify what value to match to. You can test your regexp on this [Rubular tool](https://rubular.com/).
 ### Create Incident
The **Create Incident** action is used to declare an incident in Rootly. Since this action will be referencing alert data, the dynamic fields will be `{{ alert.
### Create Incident
The **Create Incident** action is used to declare an incident in Rootly. Since this action will be referencing alert data, the dynamic fields will be `{{ alert. ### Update Incident
The **Update Incident** action is used to update an existing incident in Rootly. Ensure that you set `Attribute to Match` field to `pagerduty_incident_id` and `Attribute Value` to `{{ alert.data.data.id }}`. These fields are required for Rootly to know which incident to update.
### Update Incident
The **Update Incident** action is used to update an existing incident in Rootly. Ensure that you set `Attribute to Match` field to `pagerduty_incident_id` and `Attribute Value` to `{{ alert.data.data.id }}`. These fields are required for Rootly to know which incident to update.
 ### Custom Fields Mapping
If you require more dynamic mapping of Rootly incident properties, you can input the following syntax into the `Custom Fields Mapping` field.
Automatically **log acknowledgement time**.
### Custom Fields Mapping
If you require more dynamic mapping of Rootly incident properties, you can input the following syntax into the `Custom Fields Mapping` field.
Automatically **log acknowledgement time**.
This means the specified incident property you're trying to set is not an attribute you can set or the syntax is incorrect.
**How to fix...**
Ensure that the field you're attempting to set is enabled to be set via workflow and that your syntax is correct. | | `unexpected token at '{ "incident_property": }'` | **Reason for error...**
Your custom mapping syntax is incorrect.
**How to fix...**
Correct your mapping syntax. | ## Support If you need help or more information about this integration, please contact [support@rootly.com](mailto:support@rootly.com) or start a chat by navigating to **Help > Chat with Us**. # Installation Source: https://docs.rootly.com/integrations/pagerduty/installation ## PagerDuty Permissions PagerDuty scopes are tied to the integrating user's permissions. The authenticated user will only be able to read and write to objects that they have access to. As part of the installation, Rootly will auto create a service account user in PagerDuty.
 ## Installing PagerDuty on Rootly
Locate **PagerDuty** on the [Integrations catalog](https://rootly.com/account/integrations " Integrations catalog") and select *Setup*.
## Installing PagerDuty on Rootly
Locate **PagerDuty** on the [Integrations catalog](https://rootly.com/account/integrations " Integrations catalog") and select *Setup*.
 You'll be **prompted to sign in or create a new PagerDuty account**.
 After signing in, you'll be prompted to **grant Rootly permission** to integrate with your PagerDuty account.
 Once confirmed, the **installation is complete**!
 ## Setting Up PagerDuty Webhook[](#_Eh5w)
### Via PagerDuty Web UI[](#MNXlh)
## Setting Up PagerDuty Webhook[](#_Eh5w)
### Via PagerDuty Web UI[](#MNXlh)
 Select **+ New Webhook** to open up the creation form.
 Enter the following information into the **New Webhook form**.
**Webhook URL:** `https://webhooks.rootly.com/webhooks/incoming/pagerduty\_webhooks`
**Scope Type:** You can select from any of the following 3 options:
* `Service` - Selecting this option will result in only events relating the selected service to be sent to Rootly.
* `Team` - Selecting this option will result in only events relating to the selected team to be sent to Rootly.
* `Account` - Selecting this option will result in events across the entire PagerDuty account to be sent to Rootly.
**Description:** Give your webhook a description. This field is optional.
**Event Subscription:** Select the events you'd like PagerDuty to send to Rootly. We recommend you select all available options.
**Custom Header Name:** `secret`
**Custom Header Value:** `
Enter the following information into the **New Webhook form**.
**Webhook URL:** `https://webhooks.rootly.com/webhooks/incoming/pagerduty\_webhooks`
**Scope Type:** You can select from any of the following 3 options:
* `Service` - Selecting this option will result in only events relating the selected service to be sent to Rootly.
* `Team` - Selecting this option will result in only events relating to the selected team to be sent to Rootly.
* `Account` - Selecting this option will result in events across the entire PagerDuty account to be sent to Rootly.
**Description:** Give your webhook a description. This field is optional.
**Event Subscription:** Select the events you'd like PagerDuty to send to Rootly. We recommend you select all available options.
**Custom Header Name:** `secret`
**Custom Header Value:** ` The Webhook URL is universal across all Rootly accounts. The Secret is unique to each Rootly account.
 Once the form is completed, select **Add Webhook**. You'll be prompted with a confirmation message containing a PagerDuty-generated webhook secret. You will not need this value for your Rootly integration. Simply click **OK** to complete setup.
 ### Via PagerDuty API[](#imU7u)
PagerDuty webhooks can also be set via API ([https://developer.pagerduty.com/api-reference/ec247c8767c6d-create-a-webhook-subscription)](https://developer.pagerduty.com/api-reference/ec247c8767c6d-create-a-webhook-subscription "https://developer.pagerduty.com/api-reference/ec247c8767c6d-create-a-webhook-subscription)").
**URL**: `https://rootly.com/webhooks/incoming/pagerduty\_webhooks`
**Header**: `secret:
### Via PagerDuty API[](#imU7u)
PagerDuty webhooks can also be set via API ([https://developer.pagerduty.com/api-reference/ec247c8767c6d-create-a-webhook-subscription)](https://developer.pagerduty.com/api-reference/ec247c8767c6d-create-a-webhook-subscription "https://developer.pagerduty.com/api-reference/ec247c8767c6d-create-a-webhook-subscription)").
**URL**: `https://rootly.com/webhooks/incoming/pagerduty\_webhooks`
**Header**: `secret:  # Installation
Please see the [Installation page](/integrations/pagerduty/installation) to get started with your PageDuty integration.
# Smart Defaults
Rootly's PagerDuty integration comes with a set of commonly used default settings. See [Smart Defaults](/integrations/pagerduty/smart-defaults) page for details.
# Workflows
Rootly relies on workflows to automate interactions with PagerDuty. The [Workflows page](/integrations/pagerduty/workflows) will walk you through how to set up commonly used workflows involving PagerDuty.
# Alerts
Rootly can ingest incoming PagerDuty events as alerts to automate auto incident creation and updates. The [Alerts page](/integrations/pagerduty/alerts) will walk you through how to set up
# Support
If you need help or more information about this integration, please contact [support@rootly.com](mailto:support@rootly.com) or start a chat by navigating to **Help > Chat with Us**.
# FAQs
**Q: PagerDuty has some incident management capabilities, how is this different?**
A: When it comes to incident management capabilities, there is some overlap between Rootly and PagerDuty. However, Rootly provides a more complete and centralized incident management platform and [on call solution](https://rootly.com/on-call "on call solution").
**Q: Should I keep paying for PagerDuty or does Rootly replace it?**
A: With the release of Rootly On-Call, Rootly can serve as a wholesale replacement for PagerDuty. [Check out how they compare](https://rootly.com/comparisons/pagerduty-vs-rootly-on-call "Check out how they compare").
*Note: Rootly will continue to support integrated paging solutions like PagerDuty.*
**Q: I don't use PagerDuty, is that okay?**
A: Robust incident management practices generally leverage an on-call provider. Rootly does not require an on-call provider if your use case does not require it.
**Q: I'm getting a** ***Failed to authenticate. Reason: Invalid Credentials*** **message when I try to authenticate my PagerDuty account. What is happening?**
A: Chances are you are trying to authenticate with a Trial PagerDuty account that has expired. Check your PD account to make sure it is still active. If that's not the case, contact us at [support@rootly.com](mailto:support@rootly.com) or start a chat by navigating to **Help > Chat with Us**.
# Smart Defaults
Source: https://docs.rootly.com/integrations/pagerduty/smart-defaults
## Overview
Traditionally, Rootly has strictly relied on [workflow](/integrations/slack/workflows) configurations to automate PagerDuty actions. While it offered the flexibility required to meet complex incident response procedures, it did require some initial effort to set up. Understanding that not all customers adopt super complex procedures, we've introduced Smart Defaults to our PagerDuty integration to help simplify the configuration process.
New customers on Rootly will have Smart Defaults automatically turned on as soon as they install PagerDuty. They will be able to start managing incidents out-of-box.
Existing customers will have Smart Defaults turned off to avoid interrupting the workflows that have already been set up.
To get started with PagerDuty Smart Defaults, you'll want to first navigate to **Integrations > PagerDuty (Configuration).**
## Rootly to PagerDuty
The first section of Smart Defaults covers quicksets for actions going from Rootly to PagerDuty.
# Installation
Please see the [Installation page](/integrations/pagerduty/installation) to get started with your PageDuty integration.
# Smart Defaults
Rootly's PagerDuty integration comes with a set of commonly used default settings. See [Smart Defaults](/integrations/pagerduty/smart-defaults) page for details.
# Workflows
Rootly relies on workflows to automate interactions with PagerDuty. The [Workflows page](/integrations/pagerduty/workflows) will walk you through how to set up commonly used workflows involving PagerDuty.
# Alerts
Rootly can ingest incoming PagerDuty events as alerts to automate auto incident creation and updates. The [Alerts page](/integrations/pagerduty/alerts) will walk you through how to set up
# Support
If you need help or more information about this integration, please contact [support@rootly.com](mailto:support@rootly.com) or start a chat by navigating to **Help > Chat with Us**.
# FAQs
**Q: PagerDuty has some incident management capabilities, how is this different?**
A: When it comes to incident management capabilities, there is some overlap between Rootly and PagerDuty. However, Rootly provides a more complete and centralized incident management platform and [on call solution](https://rootly.com/on-call "on call solution").
**Q: Should I keep paying for PagerDuty or does Rootly replace it?**
A: With the release of Rootly On-Call, Rootly can serve as a wholesale replacement for PagerDuty. [Check out how they compare](https://rootly.com/comparisons/pagerduty-vs-rootly-on-call "Check out how they compare").
*Note: Rootly will continue to support integrated paging solutions like PagerDuty.*
**Q: I don't use PagerDuty, is that okay?**
A: Robust incident management practices generally leverage an on-call provider. Rootly does not require an on-call provider if your use case does not require it.
**Q: I'm getting a** ***Failed to authenticate. Reason: Invalid Credentials*** **message when I try to authenticate my PagerDuty account. What is happening?**
A: Chances are you are trying to authenticate with a Trial PagerDuty account that has expired. Check your PD account to make sure it is still active. If that's not the case, contact us at [support@rootly.com](mailto:support@rootly.com) or start a chat by navigating to **Help > Chat with Us**.
# Smart Defaults
Source: https://docs.rootly.com/integrations/pagerduty/smart-defaults
## Overview
Traditionally, Rootly has strictly relied on [workflow](/integrations/slack/workflows) configurations to automate PagerDuty actions. While it offered the flexibility required to meet complex incident response procedures, it did require some initial effort to set up. Understanding that not all customers adopt super complex procedures, we've introduced Smart Defaults to our PagerDuty integration to help simplify the configuration process.
New customers on Rootly will have Smart Defaults automatically turned on as soon as they install PagerDuty. They will be able to start managing incidents out-of-box.
Existing customers will have Smart Defaults turned off to avoid interrupting the workflows that have already been set up.
To get started with PagerDuty Smart Defaults, you'll want to first navigate to **Integrations > PagerDuty (Configuration).**
## Rootly to PagerDuty
The first section of Smart Defaults covers quicksets for actions going from Rootly to PagerDuty.
 ### Auto-page on-call responder when an incident is created
This flag allows you to notify on-call responders on PagerDuty when an incident is created in Rootly. The on-call is determined based on the selected PagerDuty Services or Escalation Policy. Any selected Escalation Policy will override the Escalation Policy linked to the selected Service.
The Services and Escalation Policies available in the dropdowns are imported from your PagerDuty workspace.
### Auto-invite on-call responder to new incident Slack channel
This flag allows you to invite on-call responders on PagerDuty to a slack channel when an incident is created in Rootly. The responders are determined based on the selected PagerDuty Services or Escalation Policies. Any selected Escalation Policy will override the Escalation Policy linked to the selected Service.
The Services and Escalation Policies available in the dropdowns are imported from your PagerDuty workspace.
### Auto-resolve PagerDuty incident
This flag allows you to auto resolve the linked PagerDuty incident whenever the Rootly incident is resolved. This is a one-way synchronization only, meaning incident resolutions on Rootly will cause the PagerDuty incident to resolve, but not the other way around. If you are looking to enable the reverse, where resolution on PagerDuty results in incident resolution on Rootly, please see the [PagerDuty > Alerts](/integrations/pagerduty/alerts) page to find out how.
## PagerDuty to Rootly
The second section of Smart Defaults covers quicksets for actions going from PagerDuty to Rootly.
### Auto-page on-call responder when an incident is created
This flag allows you to notify on-call responders on PagerDuty when an incident is created in Rootly. The on-call is determined based on the selected PagerDuty Services or Escalation Policy. Any selected Escalation Policy will override the Escalation Policy linked to the selected Service.
The Services and Escalation Policies available in the dropdowns are imported from your PagerDuty workspace.
### Auto-invite on-call responder to new incident Slack channel
This flag allows you to invite on-call responders on PagerDuty to a slack channel when an incident is created in Rootly. The responders are determined based on the selected PagerDuty Services or Escalation Policies. Any selected Escalation Policy will override the Escalation Policy linked to the selected Service.
The Services and Escalation Policies available in the dropdowns are imported from your PagerDuty workspace.
### Auto-resolve PagerDuty incident
This flag allows you to auto resolve the linked PagerDuty incident whenever the Rootly incident is resolved. This is a one-way synchronization only, meaning incident resolutions on Rootly will cause the PagerDuty incident to resolve, but not the other way around. If you are looking to enable the reverse, where resolution on PagerDuty results in incident resolution on Rootly, please see the [PagerDuty > Alerts](/integrations/pagerduty/alerts) page to find out how.
## PagerDuty to Rootly
The second section of Smart Defaults covers quicksets for actions going from PagerDuty to Rootly.
 ### Send PagerDuty alerts to Rootly
This flag allows you to automatically create alerts in Rootly whenever a PagerDuty event occurs. This process is enabled through webhooks, which are user-defined HTTP callbacks that are triggered by specific events and allow you to automate the sending of PagerDuty events to a destination URL. To complete the setup of this flag, you'll need to configure a webhook in PagerDuty as instructed on the [PagerDuty > Installation](/integrations/pagerduty/installation) page.
### Notify Slack channel of new PagerDuty alerts
This flag allows you to send PagerDuty alert messages to a selected Slack channel from your Slack Workspace. You can test if this integration is set up correctly by clicking on the `Send Test` button.
Rootly refreshes channels on a daily basis. If you don't see your channel in the dropdown, click on the `Refresh channels` button to force a refresh.
If the channel you're attempting to set is a **private channel**, please ensure that the Rootly Slack Bot is added to the channel first. To add the bot to a channel, simply send *@Rootly* as a message in the channel. That will prompt you to add the Rootly Slack Bot to the channel.
### Automatically create incidents in Rootly from PagerDuty alerts
This flag allows you to automatically create corresponding incidents in Rootly whenever a PagerDuty incident is created.
## Support
If you need help or more information about this integration, please contact [support@rootly.com](mailto:support@rootly.com) or start a chat by navigating to **Help > Chat with Us**.
# Workflows
Source: https://docs.rootly.com/integrations/pagerduty/workflows
## Overview
Rootly's PagerDuty integration leverages workflows to automatically create/update PagerDuty incidents and invite/assign on-calls to incidents. If you are unfamiliar with how Workflows function please visit our [Workflows](/workflows) documentation first.
### Send PagerDuty alerts to Rootly
This flag allows you to automatically create alerts in Rootly whenever a PagerDuty event occurs. This process is enabled through webhooks, which are user-defined HTTP callbacks that are triggered by specific events and allow you to automate the sending of PagerDuty events to a destination URL. To complete the setup of this flag, you'll need to configure a webhook in PagerDuty as instructed on the [PagerDuty > Installation](/integrations/pagerduty/installation) page.
### Notify Slack channel of new PagerDuty alerts
This flag allows you to send PagerDuty alert messages to a selected Slack channel from your Slack Workspace. You can test if this integration is set up correctly by clicking on the `Send Test` button.
Rootly refreshes channels on a daily basis. If you don't see your channel in the dropdown, click on the `Refresh channels` button to force a refresh.
If the channel you're attempting to set is a **private channel**, please ensure that the Rootly Slack Bot is added to the channel first. To add the bot to a channel, simply send *@Rootly* as a message in the channel. That will prompt you to add the Rootly Slack Bot to the channel.
### Automatically create incidents in Rootly from PagerDuty alerts
This flag allows you to automatically create corresponding incidents in Rootly whenever a PagerDuty incident is created.
## Support
If you need help or more information about this integration, please contact [support@rootly.com](mailto:support@rootly.com) or start a chat by navigating to **Help > Chat with Us**.
# Workflows
Source: https://docs.rootly.com/integrations/pagerduty/workflows
## Overview
Rootly's PagerDuty integration leverages workflows to automatically create/update PagerDuty incidents and invite/assign on-calls to incidents. If you are unfamiliar with how Workflows function please visit our [Workflows](/workflows) documentation first.
 ## Available Workflow Actions
### Page PagerDuty On-Call
This action allows you to page an on-call via PagerDuty. This results in the creation of a PagerDuty incident.
## Available Workflow Actions
### Page PagerDuty On-Call
This action allows you to page an on-call via PagerDuty. This results in the creation of a PagerDuty incident.
 #### Name
This field is automatically set for you. You can rename this field to whatever best describes your action. The value in this field does not affect how the workflow action behaves.
#### Service
This field is used to specify the PagerDuty service you'd like to page. If you have **imported your PagerDuty services** into Rootly, you can dynamically reference them by selecting the `{{ incident.service }}` option from this dropdown.
#### Name
This field is automatically set for you. You can rename this field to whatever best describes your action. The value in this field does not affect how the workflow action behaves.
#### Service
This field is used to specify the PagerDuty service you'd like to page. If you have **imported your PagerDuty services** into Rootly, you can dynamically reference them by selecting the `{{ incident.service }}` option from this dropdown.
 #### Name
This field is automatically set for you. You can rename this field to whatever best describes your action. The value in this field does not affect how the workflow action behaves.
#### Incident Role
This field is used to specify which incident role to assign. Click [here](/managing-teams/incident-roles) to learn more about incident roles.
#### Service
If this field is set, the on-call schedule associated with the selected PagerDuty service will be used to assign the incident role. If you have **imported your PagerDuty services** into Rootly, you can dynamically reference them by selecting the `{{ incident.service }}` option from this dropdown.
The value set in this field will override the escalation policy & schedule selected below.
#### Escalation Policy
This field allows you to specify an existing Escalation Policy from PagerDuty. You do not need to set any value in this field if you'd like the role assignment to follow the default escalation policy for the selected `service`. This field is only used if you'd like the role assignment to follow a different escalation policy from the default that's associated with the service.
#### Name
This field is automatically set for you. You can rename this field to whatever best describes your action. The value in this field does not affect how the workflow action behaves.
#### Incident Role
This field is used to specify which incident role to assign. Click [here](/managing-teams/incident-roles) to learn more about incident roles.
#### Service
If this field is set, the on-call schedule associated with the selected PagerDuty service will be used to assign the incident role. If you have **imported your PagerDuty services** into Rootly, you can dynamically reference them by selecting the `{{ incident.service }}` option from this dropdown.
The value set in this field will override the escalation policy & schedule selected below.
#### Escalation Policy
This field allows you to specify an existing Escalation Policy from PagerDuty. You do not need to set any value in this field if you'd like the role assignment to follow the default escalation policy for the selected `service`. This field is only used if you'd like the role assignment to follow a different escalation policy from the default that's associated with the service.
 #### Name
This field is automatically set for you. You can rename this field to whatever best describes your action. The value in this field does not affect how the workflow action behaves.
#### Service
If this field is set, the on-call schedule associated with the selected PagerDuty service will be invited to the Slack channels. If you have **imported your PagerDuty services** into Rootly, you can dynamically reference them by selecting the `{{ incident.service }}` option from this dropdown.
The value set in this field will override the escalation policy & schedule selected below.
#### Channels
This field allows you to select one or more Slack channels from your Slack Workspace, where PagerDuty on-call users will be invited to.
You can use `{{ incident.slack_channel_id }}` or `{{ parent_incident.slack_channel_id }}` to specify your incident channel or the parent incident channel, respectively.
#### Escalation Policy
This field allows you to specify an existing escalation policy from PagerDuty. You do not need to set any value in this field if you'd like the invitation to follow the default escalation policy for the selected service. This field is only used if you'd like the invitation to follow a different escalation policy from the default that's associated with the service.
#### Name
This field is automatically set for you. You can rename this field to whatever best describes your action. The value in this field does not affect how the workflow action behaves.
#### Service
If this field is set, the on-call schedule associated with the selected PagerDuty service will be invited to the Slack channels. If you have **imported your PagerDuty services** into Rootly, you can dynamically reference them by selecting the `{{ incident.service }}` option from this dropdown.
The value set in this field will override the escalation policy & schedule selected below.
#### Channels
This field allows you to select one or more Slack channels from your Slack Workspace, where PagerDuty on-call users will be invited to.
You can use `{{ incident.slack_channel_id }}` or `{{ parent_incident.slack_channel_id }}` to specify your incident channel or the parent incident channel, respectively.
#### Escalation Policy
This field allows you to specify an existing escalation policy from PagerDuty. You do not need to set any value in this field if you'd like the invitation to follow the default escalation policy for the selected service. This field is only used if you'd like the invitation to follow a different escalation policy from the default that's associated with the service.
 #### Name
This field is automatically set for you. You can rename this field to whatever best describes your action. The value in this field does not affect how the workflow action behaves.
#### PagerDuty Incident ID
This field allows you to specify the ID of the PagerDuty incident that you want to update. This field supports Liquid syntax.
Set this field to `{{ incident.pagerduty\_incident\_id }}` to reference the existing PagerDuty incident that is linked to the Rootly incident.
#### Title
This field allows you to update the title of the PagerDuty incident. This field supports Liquid syntax.
Set this field to `{{ incident.title }}` if you want the PagerDuty incident title to match the title of your Rootly incident.
#### Status
This field allows you to update the status of the PagerDuty incident.
#### Resolution Message
This field allows you to add a resolution message when resolving a PagerDuty incident. This field supports Liquid syntax.
#### Escalation Level
This field allows you to update the escalation level of the PagerDuty incident.
#### Urgency
This field allows you to update the urgency level of the PagerDuty incident.
### Create PagerDuty Status Update
This field allows you to add a message to the Notes section in the PagerDuty incident.
#### Name
This field is automatically set for you. You can rename this field to whatever best describes your action. The value in this field does not affect how the workflow action behaves.
#### PagerDuty Incident ID
This field allows you to specify the ID of the PagerDuty incident that you want to update. This field supports Liquid syntax.
Set this field to `{{ incident.pagerduty\_incident\_id }}` to reference the existing PagerDuty incident that is linked to the Rootly incident.
#### Title
This field allows you to update the title of the PagerDuty incident. This field supports Liquid syntax.
Set this field to `{{ incident.title }}` if you want the PagerDuty incident title to match the title of your Rootly incident.
#### Status
This field allows you to update the status of the PagerDuty incident.
#### Resolution Message
This field allows you to add a resolution message when resolving a PagerDuty incident. This field supports Liquid syntax.
#### Escalation Level
This field allows you to update the escalation level of the PagerDuty incident.
#### Urgency
This field allows you to update the urgency level of the PagerDuty incident.
### Create PagerDuty Status Update
This field allows you to add a message to the Notes section in the PagerDuty incident.
 #### Name
This field is automatically set for you. You can rename this field to whatever best describes your action. The value in this field does not affect how the workflow action behaves.
#### Pagerduty Incident ID
This field allows you to specify the ID of the PagerDuty incident that you want to add a message to. This field supports Liquid syntax.
Set this field to `{{ incident.pagerduty_incident_id }}` to reference the existing PagerDuty incident that is linked to the Rootly incident.
#### Message
This field allows you to set the message to be added to the Notes section of the PagerDuty incident. This field supports Liquid syntax.
Set this field to `{{ incident.events | where: 'kind', 'event' | last | get: 'event' }}` to log the latest event that happened to the Rootly incident.
## Support
If you need help or more information about this integration, please contact [support@rootly.com](mailto:support@rootly.com) or start a chat by navigating to **Help > Chat with Us**.
# Pulumi
Source: https://docs.rootly.com/integrations/pulumi
Our Pulumi provider is available at:
[https://www.pulumi.com/registry/packages/rootly/installation-configuration/](https://www.pulumi.com/registry/packages/rootly/installation-configuration/ "https://www.pulumi.com/registry/packages/rootly/installation-configuration/")
## Installing
This package is available for several languages/platforms:
### Node.js (JavaScript/TypeScript)
[](https://www.npmjs.com/package/@rootly/pulumi "https://www.npmjs.com/package/@rootly/pulumi")[https://www.npmjs.com/package/@rootly/pulumi](https://www.npmjs.com/package/@rootly/pulumi "https://www.npmjs.com/package/@rootly/pulumi")
To use from JavaScript or TypeScript in Node.js, install using either npm:
```js
npm install @rootly/pulumi
```
or yarn:
```js
yarn add @rootly/pulumi
```
### Python, Go, & .NET
*TBA*
## Creating resources
```js
const rootly = require("@rootly/pulumi")
new rootly.Severity("sev0", {
name: "SEV0",
color: "#FF0000"
})
new rootly.Service("elasticsearch_prod", {
name: "elasticsearch-prod",
color: "#800080"
})
new rootly.Functionality("add_items_to_card", {
name: "Add items to card",
color: "#FFFFFF"
})
```
## Syncing resources
Run the regular `pulumi up` command.
# Quip
Source: https://docs.rootly.com/integrations/quip
## Why
**Quip** Integration allows you to:
* Create a a quip page postmortem
## Installation
You can setup this integration as a **logged in admin user** in the integrations page
#### Name
This field is automatically set for you. You can rename this field to whatever best describes your action. The value in this field does not affect how the workflow action behaves.
#### Pagerduty Incident ID
This field allows you to specify the ID of the PagerDuty incident that you want to add a message to. This field supports Liquid syntax.
Set this field to `{{ incident.pagerduty_incident_id }}` to reference the existing PagerDuty incident that is linked to the Rootly incident.
#### Message
This field allows you to set the message to be added to the Notes section of the PagerDuty incident. This field supports Liquid syntax.
Set this field to `{{ incident.events | where: 'kind', 'event' | last | get: 'event' }}` to log the latest event that happened to the Rootly incident.
## Support
If you need help or more information about this integration, please contact [support@rootly.com](mailto:support@rootly.com) or start a chat by navigating to **Help > Chat with Us**.
# Pulumi
Source: https://docs.rootly.com/integrations/pulumi
Our Pulumi provider is available at:
[https://www.pulumi.com/registry/packages/rootly/installation-configuration/](https://www.pulumi.com/registry/packages/rootly/installation-configuration/ "https://www.pulumi.com/registry/packages/rootly/installation-configuration/")
## Installing
This package is available for several languages/platforms:
### Node.js (JavaScript/TypeScript)
[](https://www.npmjs.com/package/@rootly/pulumi "https://www.npmjs.com/package/@rootly/pulumi")[https://www.npmjs.com/package/@rootly/pulumi](https://www.npmjs.com/package/@rootly/pulumi "https://www.npmjs.com/package/@rootly/pulumi")
To use from JavaScript or TypeScript in Node.js, install using either npm:
```js
npm install @rootly/pulumi
```
or yarn:
```js
yarn add @rootly/pulumi
```
### Python, Go, & .NET
*TBA*
## Creating resources
```js
const rootly = require("@rootly/pulumi")
new rootly.Severity("sev0", {
name: "SEV0",
color: "#FF0000"
})
new rootly.Service("elasticsearch_prod", {
name: "elasticsearch-prod",
color: "#800080"
})
new rootly.Functionality("add_items_to_card", {
name: "Add items to card",
color: "#FFFFFF"
})
```
## Syncing resources
Run the regular `pulumi up` command.
# Quip
Source: https://docs.rootly.com/integrations/quip
## Why
**Quip** Integration allows you to:
* Create a a quip page postmortem
## Installation
You can setup this integration as a **logged in admin user** in the integrations page
 ## Create an API KEY
Visit [admin.quip.com](https://admin.quip.com "admin.quip.com") and go to **Settings > Integrations**
## Create an API KEY
Visit [admin.quip.com](https://admin.quip.com "admin.quip.com") and go to **Settings > Integrations**
 Create an API KEY with the following parameters:
* Permissions `USER_READ` and `USER_WRITE`
* Redirect URI: [https://rootly.com/auth/quip/callback](https://rootly.com/auth/quip/callback "https://rootly.com/auth/quip/callback")
Create an API KEY with the following parameters:
* Permissions `USER_READ` and `USER_WRITE`
* Redirect URI: [https://rootly.com/auth/quip/callback](https://rootly.com/auth/quip/callback "https://rootly.com/auth/quip/callback")
 Enter Client ID and Client Secret generated into Rootly:
 You are all set! Go under workflow to configure your new task!
## Support
If you need help or more information about this integration, please contact [support@rootly.com](mailto:support@rootly.com) or use the **lower right chat widget** to get connected with an engineer.
# Rollbar
Source: https://docs.rootly.com/integrations/rollbar
## Why
**Rollbar** Integration allows you to:
* Ingest issues as alerts
* Create an incident if alerts > count ( you can specify )
## Installation
As an admin, go to `https://rollbar.com/
You are all set! Go under workflow to configure your new task!
## Support
If you need help or more information about this integration, please contact [support@rootly.com](mailto:support@rootly.com) or use the **lower right chat widget** to get connected with an engineer.
# Rollbar
Source: https://docs.rootly.com/integrations/rollbar
## Why
**Rollbar** Integration allows you to:
* Ingest issues as alerts
* Create an incident if alerts > count ( you can specify )
## Installation
As an admin, go to `https://rollbar.com/ Select Webhook
 Configure URL you see in Rootly

 Configure rules you want to enabled ( We support all of them except deploys ) and you are good to go!
## Alerts
Now everytime a new issue is declared, they will be ingested as alerts as shown below. Use it in workflow with fetch alerts task to automatically linked recent alerts to your incident.
Configure rules you want to enabled ( We support all of them except deploys ) and you are good to go!
## Alerts
Now everytime a new issue is declared, they will be ingested as alerts as shown below. Use it in workflow with fetch alerts task to automatically linked recent alerts to your incident.
 ## Uninstall
You can **uninstall** this integration in the integrations panel by clicking **Configure > Delete**
## Support
If you need help or more information about this integration, please contact [support@rootly.com](mailto:support@rootly.com) or use the **lower right chat widget** to get connected with an engineer.
# SCIM
Source: https://docs.rootly.com/integrations/scim
## Uninstall
You can **uninstall** this integration in the integrations panel by clicking **Configure > Delete**
## Support
If you need help or more information about this integration, please contact [support@rootly.com](mailto:support@rootly.com) or use the **lower right chat widget** to get connected with an engineer.
# SCIM
Source: https://docs.rootly.com/integrations/scim
 ## Features
The following features are supported by Rootly:
* **Create users**. Users in Okta assigned to the Rootly application in Okta will be automatically added as members of your organization in Rootly.
* **Deactivate users**. Users in Okta unassigned from the Rootly application in Okta will be automatically removed as members of your organization in Rootly.
* **Import users**. Users in Okta can be imported at once into Rootly.
* **Update User Attributes**. Users attributes updated in Okta will be updated in Rootly ( As firstname, lastname etc. )
## Requirements
Make sure you setup [SSO](/integrations/sso) first.
**Rootly Tenant URL Endpoint:** `https://rootly.com/scim`
**Note**: The endpoint will only resolve in the application after SSO setup has been completed first as noted above.
## Okta
### Enable SCIM provisioning functionality in Okta
1. In Okta, navigate to **Applications > Rootly**
2. Click on the **Provisioning** tab in the application. Under the **Settings** panel on the left-hand side, click the **Integrations** link. Then click **Configure API Integration**.
3. Enter your API Token, you will find it under `Rootly > Integrations > SSO` under `SCIM Token`.
## Features
The following features are supported by Rootly:
* **Create users**. Users in Okta assigned to the Rootly application in Okta will be automatically added as members of your organization in Rootly.
* **Deactivate users**. Users in Okta unassigned from the Rootly application in Okta will be automatically removed as members of your organization in Rootly.
* **Import users**. Users in Okta can be imported at once into Rootly.
* **Update User Attributes**. Users attributes updated in Okta will be updated in Rootly ( As firstname, lastname etc. )
## Requirements
Make sure you setup [SSO](/integrations/sso) first.
**Rootly Tenant URL Endpoint:** `https://rootly.com/scim`
**Note**: The endpoint will only resolve in the application after SSO setup has been completed first as noted above.
## Okta
### Enable SCIM provisioning functionality in Okta
1. In Okta, navigate to **Applications > Rootly**
2. Click on the **Provisioning** tab in the application. Under the **Settings** panel on the left-hand side, click the **Integrations** link. Then click **Configure API Integration**.
3. Enter your API Token, you will find it under `Rootly > Integrations > SSO` under `SCIM Token`.
 ### Enable “create users” and “Deactivate users” functionalities in Okta[](#sKgme)
1. In Okta, navigate to **Applications > Rootly**
2. Click on the **Provisioning** tab in the application. Under the **Settings** panel on the left-hand side, click the **To App** link.
3. Click the **Edit** button at the top right. Check the **Enable** box next to **Create users** and **Deactivate users** to automatically provision/deprovision users in Rootly when they are assigned/unassigned to the Rootly app in Okta.
4. Ensure the **Default username** used to create accounts in Okta is set to **email**. If it’s not, update this value by going to the **Sign on** tab of the Rootly application in Okta, click **Edit**, then set the **Application username** format to **email** under the **Credentials settings** section.
### Provision Users via Push Groups
**Creat a Group**
1. In Okta, navigate to **Directory > Groups** on the left navigation pane.
2. Click on **+Add Group**.
3. Give the Group a `name` and an optional `description`.
4. Now you have a Group which you can add Users to and provision the entire Group to a Rootly Role.
**Provision a Group**
1. In Okta, navigate to **Applications > Rootly**
2. Click on the **Push Groups** tab
3. Click on **+Push Groups** button to find the Group you'd like to provision.
1. Click on the Group you'd like to provision from the dropdpwn.
4. Switch from **Create Group** to **Link Group**.
5. Click **Save**.
6. Navigate to your Rootly UI and select **Integrations > SSO**.
7. Under the **Role Assignment** section, select which **Rootly Role** you'd like to assign to the **Okta Group**.
8. You're all set! Now, every time you add a user to that Okta Group, they will be provisioned to Rootly in the associated Rootly Role.
## Microsoft Entra
### Enabled SCIM provisioning functionality in Microsoft Entra
[https://learn.microsoft.com/en-us/entra/identity/saas-apps/rootly-provisioning-tutorial](https://learn.microsoft.com/en-us/entra/identity/saas-apps/rootly-provisioning-tutorial "https://learn.microsoft.com/en-us/entra/identity/saas-apps/rootly-provisioning-tutorial")
## Google Workspace
### Enabled SCIM provisioning functionality in Google Workspace[](#Kpp0A)
Google Workspace only supports SCIM for a few apps for reasons we aren't aware about. Fortunately enough we can take advantage of those to make it work with rootly.
* Add a new Web and Mobile apps
### Enable “create users” and “Deactivate users” functionalities in Okta[](#sKgme)
1. In Okta, navigate to **Applications > Rootly**
2. Click on the **Provisioning** tab in the application. Under the **Settings** panel on the left-hand side, click the **To App** link.
3. Click the **Edit** button at the top right. Check the **Enable** box next to **Create users** and **Deactivate users** to automatically provision/deprovision users in Rootly when they are assigned/unassigned to the Rootly app in Okta.
4. Ensure the **Default username** used to create accounts in Okta is set to **email**. If it’s not, update this value by going to the **Sign on** tab of the Rootly application in Okta, click **Edit**, then set the **Application username** format to **email** under the **Credentials settings** section.
### Provision Users via Push Groups
**Creat a Group**
1. In Okta, navigate to **Directory > Groups** on the left navigation pane.
2. Click on **+Add Group**.
3. Give the Group a `name` and an optional `description`.
4. Now you have a Group which you can add Users to and provision the entire Group to a Rootly Role.
**Provision a Group**
1. In Okta, navigate to **Applications > Rootly**
2. Click on the **Push Groups** tab
3. Click on **+Push Groups** button to find the Group you'd like to provision.
1. Click on the Group you'd like to provision from the dropdpwn.
4. Switch from **Create Group** to **Link Group**.
5. Click **Save**.
6. Navigate to your Rootly UI and select **Integrations > SSO**.
7. Under the **Role Assignment** section, select which **Rootly Role** you'd like to assign to the **Okta Group**.
8. You're all set! Now, every time you add a user to that Okta Group, they will be provisioned to Rootly in the associated Rootly Role.
## Microsoft Entra
### Enabled SCIM provisioning functionality in Microsoft Entra
[https://learn.microsoft.com/en-us/entra/identity/saas-apps/rootly-provisioning-tutorial](https://learn.microsoft.com/en-us/entra/identity/saas-apps/rootly-provisioning-tutorial "https://learn.microsoft.com/en-us/entra/identity/saas-apps/rootly-provisioning-tutorial")
## Google Workspace
### Enabled SCIM provisioning functionality in Google Workspace[](#Kpp0A)
Google Workspace only supports SCIM for a few apps for reasons we aren't aware about. Fortunately enough we can take advantage of those to make it work with rootly.
* Add a new Web and Mobile apps
 * Then add Adobe App
 * In the next form fill out all fields with
* [https://dummy.com/saml](https://dummy.com/saml)
* When it comes to configure auto-provisioning, copy the SCIM token you can find under Rootly > Integrations > SSO.
* Endpoint url to configure is [https://rootly.com/scim](https://rootly.com/scim "https://rootly.com/scim")
* Select a group of user you want to import into rootly or leave empty.
* Finally enabled the application. The sync should kick in shortly.
## Troubleshooting
If you encounter any questions or difficulties with SSO or SCIM provisioning with Okta, please contact Rootly support via [support@rootly.com](mailto:support@rootly.com).
# SendGrid
Source: https://docs.rootly.com/integrations/sendgrid
## Why
**SendGrid** Integration allows you to:
* Send email with a custom domain name
## Installation
You can setup this integration as a **logged in admin user** in the integrations page.
Create an API Key with restricted access and scopes:
* `mail.send`
* In the next form fill out all fields with
* [https://dummy.com/saml](https://dummy.com/saml)
* When it comes to configure auto-provisioning, copy the SCIM token you can find under Rootly > Integrations > SSO.
* Endpoint url to configure is [https://rootly.com/scim](https://rootly.com/scim "https://rootly.com/scim")
* Select a group of user you want to import into rootly or leave empty.
* Finally enabled the application. The sync should kick in shortly.
## Troubleshooting
If you encounter any questions or difficulties with SSO or SCIM provisioning with Okta, please contact Rootly support via [support@rootly.com](mailto:support@rootly.com).
# SendGrid
Source: https://docs.rootly.com/integrations/sendgrid
## Why
**SendGrid** Integration allows you to:
* Send email with a custom domain name
## Installation
You can setup this integration as a **logged in admin user** in the integrations page.
Create an API Key with restricted access and scopes:
* `mail.send`
 ## Support
If you need help or more information about this integration, please contact [support@rootly.com](mailto:support@rootly.com) or use the **lower right chat widget** to get connected with an engineer.
# Sentry
Source: https://docs.rootly.com/integrations/sentry
## Why
**Sentry** Integration allows you to:
* Ingest issues as alerts
* Create an incident if alerts > count ( you can specify )
## Installation
As an admin, go to [https://sentry.io/orgredirect/settings/:orgslug/sentry-apps/rootly/](https://sentry.io/orgredirect/settings/:orgslug/sentry-apps/rootly/ "https://sentry.io/orgredirect/settings/:orgslug/sentry-apps/rootly/")
## Support
If you need help or more information about this integration, please contact [support@rootly.com](mailto:support@rootly.com) or use the **lower right chat widget** to get connected with an engineer.
# Sentry
Source: https://docs.rootly.com/integrations/sentry
## Why
**Sentry** Integration allows you to:
* Ingest issues as alerts
* Create an incident if alerts > count ( you can specify )
## Installation
As an admin, go to [https://sentry.io/orgredirect/settings/:orgslug/sentry-apps/rootly/](https://sentry.io/orgredirect/settings/:orgslug/sentry-apps/rootly/ "https://sentry.io/orgredirect/settings/:orgslug/sentry-apps/rootly/")
 Make sure you are logged in as an admin in Rootly and click on the Rootly app.
## Alerts
Create an Sentry alert and select Rootly as destination.
Make sure you are logged in as an admin in Rootly and click on the Rootly app.
## Alerts
Create an Sentry alert and select Rootly as destination.
 Now your alerts conditions matched, they will be ingested as alerts as shown below. Use it in workflow with fetch alerts task to automatically linked recent alerts to your incident.
[/alert-workflows](/workflows/alert-workflows "/alert-workflows")
**Configure Alert Rules in Sentry:**
* Go to your project in Sentry.
* Navigate to **Alerts** > **Rules**.
* Create a new alert rule or edit an existing one.
* Set the conditions that should trigger an alert (e.g., when a new issue is created or an error frequency increases).
* In the **Actions** section, select **Send a notification via the Rootly integration**.
* Save the alert rule.
**Set Up Alert Workflows in Rootly:**
* In Rootly, navigate to **Workflows** > **Create Workflow**.
* Choose the **Alert** workflow type.
* **Trigger Event:** Select **Alert Created**.
* **Run Conditions:** Define conditions to filter alerts from Sentry, such as:
* **Source:** Set to **Sentry**.
* **Labels:** Specify any relevant labels.
* **Payload:** Use JSON Path to filter specific fields if necessary.
* **Actions:** Add the **Create Incident** action to automatically declare an incident in Rootly when the workflow conditions are met.
* Save the workflow.
**Test the Integration:**
* Trigger an alert in Sentry that meets the conditions you've set.
* Verify that an incident is automatically created in Rootly as configured.
By following these steps, Sentry alerts will seamlessly initiate incidents in Rootly, ensuring prompt attention to critical issues.
[https://docs.sentry.io/organization/integrations/notification-incidents/rootly/](https://docs.sentry.io/organization/integrations/notification-incidents/rootly/ "https://docs.sentry.io/organization/integrations/notification-incidents/rootly/")
Now your alerts conditions matched, they will be ingested as alerts as shown below. Use it in workflow with fetch alerts task to automatically linked recent alerts to your incident.
[/alert-workflows](/workflows/alert-workflows "/alert-workflows")
**Configure Alert Rules in Sentry:**
* Go to your project in Sentry.
* Navigate to **Alerts** > **Rules**.
* Create a new alert rule or edit an existing one.
* Set the conditions that should trigger an alert (e.g., when a new issue is created or an error frequency increases).
* In the **Actions** section, select **Send a notification via the Rootly integration**.
* Save the alert rule.
**Set Up Alert Workflows in Rootly:**
* In Rootly, navigate to **Workflows** > **Create Workflow**.
* Choose the **Alert** workflow type.
* **Trigger Event:** Select **Alert Created**.
* **Run Conditions:** Define conditions to filter alerts from Sentry, such as:
* **Source:** Set to **Sentry**.
* **Labels:** Specify any relevant labels.
* **Payload:** Use JSON Path to filter specific fields if necessary.
* **Actions:** Add the **Create Incident** action to automatically declare an incident in Rootly when the workflow conditions are met.
* Save the workflow.
**Test the Integration:**
* Trigger an alert in Sentry that meets the conditions you've set.
* Verify that an incident is automatically created in Rootly as configured.
By following these steps, Sentry alerts will seamlessly initiate incidents in Rootly, ensuring prompt attention to critical issues.
[https://docs.sentry.io/organization/integrations/notification-incidents/rootly/](https://docs.sentry.io/organization/integrations/notification-incidents/rootly/ "https://docs.sentry.io/organization/integrations/notification-incidents/rootly/")
 ## Uninstall
You can **uninstall** this integration in the integrations panel by clicking **Configure > Delete**
## Support
If you need help or more information about this integration, please contact [support@rootly.com](mailto:support@rootly.com) or use the **lower right chat widget** to get connected with an engineer.
# Installation
Source: https://docs.rootly.com/integrations/service-now/installation
**ServiceNow** Integration allows you to:
* Creating an incident in **Rootly** will create an incident in **ServiceNow** if you choose to.
* **Changing** incident **title, description,** **status** in **Rootly** will update the incident in **ServiceNow.**
## Installation
You can setup this integration as a **logged in admin user** in the integrations page:
## Uninstall
You can **uninstall** this integration in the integrations panel by clicking **Configure > Delete**
## Support
If you need help or more information about this integration, please contact [support@rootly.com](mailto:support@rootly.com) or use the **lower right chat widget** to get connected with an engineer.
# Installation
Source: https://docs.rootly.com/integrations/service-now/installation
**ServiceNow** Integration allows you to:
* Creating an incident in **Rootly** will create an incident in **ServiceNow** if you choose to.
* **Changing** incident **title, description,** **status** in **Rootly** will update the incident in **ServiceNow.**
## Installation
You can setup this integration as a **logged in admin user** in the integrations page:
 ## Configuration
First login to your service now instance and let's create an OAuth application:
1. Click on **System OAuth > Application Registry** as shown below:
## Configuration
First login to your service now instance and let's create an OAuth application:
1. Click on **System OAuth > Application Registry** as shown below:
 2. Click on **New** as shown below:
 3. Click on Create an **OAuth API endpoint for external clients** as shown below:
 4. Fill out and as shown below:
**Name:** `Rootly`
**Redirect URL:** `https://rootly.com/auth/service_now/callback`
4. Fill out and as shown below:
**Name:** `Rootly`
**Redirect URL:** `https://rootly.com/auth/service_now/callback`
 5. Copy your **instance url** and **client Id** and **client secret** generated:
 You are all set!
## Webhooks
1. In your ServiceNow instance, go to **System Definition > Business Rules**.
2. Select **New**.
3. Give your new Business Rule a descriptive name, choose what table you want it to trigger on, and check the **Advanced** box.
4. Next, choose **After** for when you want it to run. You may also choose to add filter conditions, but we want it to trigger for all incident tickets in this example. Also, for this example, we want to select **Insert** because we want it to trigger when a new incident ticket is created.
5. Navigate to the **Advanced** tab. In the Script editor, add the following code. Make sure to replace `
You are all set!
## Webhooks
1. In your ServiceNow instance, go to **System Definition > Business Rules**.
2. Select **New**.
3. Give your new Business Rule a descriptive name, choose what table you want it to trigger on, and check the **Advanced** box.
4. Next, choose **After** for when you want it to run. You may also choose to add filter conditions, but we want it to trigger for all incident tickets in this example. Also, for this example, we want to select **Insert** because we want it to trigger when a new incident ticket is created.
5. Navigate to the **Advanced** tab. In the Script editor, add the following code. Make sure to replace ` ### Update a ServiceNow Incident
This workflow action updates the data properties of an existing record from the `Incident` table (e.g. `INC0010001`).
### Update a ServiceNow Incident
This workflow action updates the data properties of an existing record from the `Incident` table (e.g. `INC0010001`).
 ## Common Custom Fields
### Major Incident
```js
// Example create major incident (make sure acts_as_user is set) and ACL good (Cf. https://community.servicenow.com/community?id=community_question&sys_id=fae73aeb1b7370900b8a9979b04bcb1a)
{
"assignment_group": "3De45d9ebc3b333200fe02c9bb34efc434",
"major_incident_state": "proposed"
}
```
### Work Notes
Work notes are internal comments that can be added to a ServiceNow incident. Work notes cannot be seen by customers.
```js
{
"work_notes": "{{ incident.events[0].event_raw }}"
}
```
### Comment
Comments can be added to a ServiceNow incident and it can be seen by customers.
```js
{
"comments": "{{ incident.events[0].event_raw }}"
}
```
## Add Configuration Item (CI) to Incident
Adding a confuration item (CI) to an incident is an awkard action due technical limitations of ServiceNow APIs. To facilitate this action we will need to utilize Rootly's HTTP Client workflow action to consolidate mutiple ServiceNow API calls into a single action.
The ServiceNow API we will use to add CIs to an incident is the [Table API](https://docs.servicenow.com/bundle/xanadu-api-reference/page/integrate/inbound-rest/concept/c_TableAPI.html#title_table-POST "Table API").
```curl
curl -X POST \
'https://
## Common Custom Fields
### Major Incident
```js
// Example create major incident (make sure acts_as_user is set) and ACL good (Cf. https://community.servicenow.com/community?id=community_question&sys_id=fae73aeb1b7370900b8a9979b04bcb1a)
{
"assignment_group": "3De45d9ebc3b333200fe02c9bb34efc434",
"major_incident_state": "proposed"
}
```
### Work Notes
Work notes are internal comments that can be added to a ServiceNow incident. Work notes cannot be seen by customers.
```js
{
"work_notes": "{{ incident.events[0].event_raw }}"
}
```
### Comment
Comments can be added to a ServiceNow incident and it can be seen by customers.
```js
{
"comments": "{{ incident.events[0].event_raw }}"
}
```
## Add Configuration Item (CI) to Incident
Adding a confuration item (CI) to an incident is an awkard action due technical limitations of ServiceNow APIs. To facilitate this action we will need to utilize Rootly's HTTP Client workflow action to consolidate mutiple ServiceNow API calls into a single action.
The ServiceNow API we will use to add CIs to an incident is the [Table API](https://docs.servicenow.com/bundle/xanadu-api-reference/page/integrate/inbound-rest/concept/c_TableAPI.html#title_table-POST "Table API").
```curl
curl -X POST \
'https:// ### Name
This field is automatically set for you. You can rename this field to whatever best describes your action. The value in this field does not affect how the workflow action behaves.
### URL
This is the endpoint of the ServiceNow Batch API. The value should be in the following format: `https://
### Name
This field is automatically set for you. You can rename this field to whatever best describes your action. The value in this field does not affect how the workflow action behaves.
### URL
This is the endpoint of the ServiceNow Batch API. The value should be in the following format: `https:// Create an **api key** on Shortcut and fill our integration api key input:
 ## Settings
You custom specify which **project** you want to create stories in
## Uninstall
You can **uninstall** this integration in the integrations panel by clicking **Configure > Delete**
## Support
If you need help or more information about this integration, please contact [support@rootly.com](mailto:support@rootly.com) or use the **lower right chat widget** to get connected with an engineer.
# Commands
Source: https://docs.rootly.com/integrations/slack/commands
## Overview
One of the key advantages of managing incidents on Slack is that you have the ability to run Slack commands to quickly trigger actions. Rootly has a series of pre-defined commands that connected users can initate.
## Settings
You custom specify which **project** you want to create stories in
## Uninstall
You can **uninstall** this integration in the integrations panel by clicking **Configure > Delete**
## Support
If you need help or more information about this integration, please contact [support@rootly.com](mailto:support@rootly.com) or use the **lower right chat widget** to get connected with an engineer.
# Commands
Source: https://docs.rootly.com/integrations/slack/commands
## Overview
One of the key advantages of managing incidents on Slack is that you have the ability to run Slack commands to quickly trigger actions. Rootly has a series of pre-defined commands that connected users can initate.
After you have completed the guided onboarding for Slack integration and are ready to grant permission to Rootly to access your Slack account.
**Where can I use this?**
You can use this command in any Slack channel.
**What will I see?**
You'll see a message in Slack asking you to connect. | ## On-call | Command | Purpose | | ---------------- | ---------------------------------------------------------------------------------------------------------------------------------------------------------------------------------------------------------------------------------------------------------------------------------------------------------------------------------------------------------------------------------------------------------------------------------------------------------------- | | `/rootly alerts` | **When do I use it?**
To view a list of all alerts.
**Where can I use this?**
You can use this command in any Slack channel.
**What will I see?**
You'll see a pop-up modal instructing you to populate the details for the incident you're about to create. | | `/rootly oncall` | **When do I use it?**
To view schedules of Rootly On-call or another integrated paging provider.
**Where can I use this?**
You can use this command in any Slack channel.
**What will I see?**
You'll see a modal pop up showing a dropdown of possible schedules to view. For Rootly On-call customers, using this command in a schedule's associated Slack channel will pull up the schedule's current on-call responder. | | `/rootly page` | **When do I use it?**
Whenever you need to page a schedule, team, escalation policy or service through Rootly On-call.
**Where can I use this?**
You can use this command in any Slack channel if Rootly On-call is enabled, but only in incident channels if not.
**What will I see?**
You'll see a modal pop up with an alert summary, a drop down to specify who to notify and an optional escalation note. | ## Incident Management | Command | Purpose | | ------------------------------------------ | ----------------------------------------------------------------------------------------------------------------------------------------------------------------------------------------------------------------------------------------------------------------------------------------------------------------------------------------------------------------------------------------------------------------------------------------------------------------------------------------------------------------------------------------------------------------------------------------------------------------------------------- | | `/rootly new` | **When do I use it?**
Whenever you need to manually declare a new incident and spin up a dedicated Slack channel.
**Where can I use this?**
You can use this command in any Slack channel.
**What will I see?**
You'll see a pop-up modal instructing you to populate the details for the incident you're about to create. | | `/rootly overview` | **When do I use it?**
Whenever you need to manually declare a new incident and spin up a dedicated Slack channel.
**Where can I use this?**
You must be in an incident Slack channel in order to use this command.
**What will I see?**
You'll see a modal pop up showing the summary of the specific incident. | | `/rootly update` | **When do I use it?**
Whenever you need to manually update an incident.
**Where can I use this?**
You must be in an incident Slack channel in order to use this command.
**What will I see?**
You'll see a modal pop up showing all of the fields that can be updated. | | `/rootly summary` | **When do I use it?**
Whenever you need to manually add or edit the Summary field of an incident.
**Where can I use this?**
You must be in an incident Slack channel in order to use this command.
**What will I see?**
You'll see a pop-up modal with the Summary field in edit mode. If you haven't defined the summary, you will see ghost text prompting you to do so. If you have previously defined the summary, you will be able to edit it. | | `/rootly catchup` | **When do I use it?**
New incident responders can rapidly get up to speed by requesting an update powered by Rootly's AI offering.
**Where can I use this?**
You must be in an incident Slack channel in order to use this command.
**What will I see?**
Rootly AI will return a summary of the current incident based on any data it has available. | | `/rootly action items` or `/rootly action` | **When do I use it?**
Whenever you need to pull up the list of action items assigned to you in a specific incident.
**Where can I use this?**
You must be in an incident Slack channel in order to use this command.
**What will I see?**
You'll see a modal pop up showing the list of tasks assigned to you. | | `/rootly list` | **When do I use it?**
Whenever you want a quick list view of your team's active incidents. NOTE: The maximum number of active incidents displayed is 10.
**Where can I use this?**
You can use this command in any Slack channel.
**What will I see?**
You'll see the active incidents listed along with their titles and statuses. The results will only be visible to you. | | `/rootly escalate` | **When do I use it?**
Whenever you need to escalate an incident.
**Where can I use this?**
You must be in an incident Slack channel in order to use this command.
**What will I see?**
You'll see a pop-up modal that lets you escalate the incident to Rootly On-call, PagerDuty, Opsgenie, or VictorOps. | | `/rootly test` | **When do I use it?**
Whenever you want to create a test incident. This incident will not be broadcasted publicly - it is used for training purposes.
**Where can I use this?**
You can use this command in any Slack channel.
**What will I see?**
You'll see a pop-up modal instructing you to populate the details for the test incident you're about to create. | | `/rootly maintenance` | **When do I use it?**
Whenever you want to schedule a maintenance. The scheduled maintenance will only be viewable through Rootly web UI.
**Where can I use this?**
You can use this command in any Slack channel.
**What will I see?**
You'll see a pop-up modal instructing you to populate the details for the maintenance incident you're about to schedule. | | `/rootly convert` | **When do I use it?**
Whenever you want to convert an existing Slack channel into an incident channel.
**Where can I use this?**
You must be in a non-incident Slack channel in order to use this command.
**What will I see?**
The channel you're in will be converted into an incident channel. | | `/rootly timeline` | **When do I use it?**
Whenever you want to add an entry to the events logged on the incident timeline.
**Where can I use this?**
You must be in an incident Slack channel in order to use this command.
**What will I see?**
You'll see a modal pop up prompting you to detail the event that you would like to be logged in the timeline of the incident in context. | | `/rootly add alert` | **When do I use it?**
Whenever you want to associate an alert to a specific incident. An incident can be used to address one or more alerts. This command is typically used for record keeping purposes.
**Where can I use this?**
You must be in an incident Slack channel in order to use this command.
**What will I see?**
You'll see a modal pop up prompting you to associate alerts to the incident in context. | | `/rootly add team` | **When do I use it?**
Whenever you want to attach a team to an incident. You can define teams in Rootly and designated Slack channels for each team. When a team is attached to an incident, an announcement of the incident will be made in their associated Slack channel.
**Where can I use this?**
You must be in an incident Slack channel in order to use this command.
**What will I see?**
You'll see a modal pop up prompting you to add teams to the incident in context. | | `/rootly add service` | **When do I use it?**
Whenever you want to call out the services impacted by an incident. Your application might be made up of many services. Calling out the impacted services will provide insight into your overall application health.
**Where can I use this?**
You must be in an incident Slack channel in order to use this command.
**What will I see?**
You'll see a modal pop up prompting you to call out the services that are impacted by the incident in context. | | `/rootly add functionality` | **When do I use it?**
Whenever you want to call out the functionalities impacted by an incident. Rootly defines a functionality as a group of services. Calling out the impacted functionality will provide insight into your overall application health.
**Where can I use this?**
You must be in an incident Slack channel in order to use this command.
**What will I see?**
You'll see a modal pop up prompting you to call out the functionalities that are impacted by the incident in context. | | `/rootly task` | **When do I use it?**
Whenever you want to add a task that needs to be completed for a specific incident.
**Where can I use this?**
You must be in an incident Slack channel in order to use this command.
**What will I see?**
You'll see a modal pop-up displaying an action item creation form with the type prefilled to be task. | | `/rootly followup` | **When do I use it?**
Whenever you want to add a follow-up that needs to be completed for a specific incident.
**Where can I use this?**
You must be in an incident Slack channel in order to use this command.
**What will I see?**
You'll see a modal pop-up displaying an action item creation form with the type prefilled to be follow-up. | | `/rootly add action item` | **When do I use it?**
Whenever you want to add an action item that needs to be completed for a specific incident.
**Where can I use this?**
You must be in an incident Slack channel in order to use this command.
**What will I see?**
You'll see a modal pop-up displaying an action item creation form. The type field will not be prefilled. | | `/rootly manage fields` | **When do I use it?**
Whenever you want to set the values for any custom field variables that you've defined for an incident. Rootly allows you to define custom incident data variables for added customization.
**Where can I use this?**
You must be in an incident Slack channel in order to use this command.
**What will I see?**
You'll see a pop-up modal displaying the list of custom fields that you've defined for incidents. You will be able to set the value for these fields through the modal. | | `/rootly assign` | **When do I use it?**
Whenever you want to add, remove, or assign Incident Roles. Rootly allows you to create Incident Roles that can be assigned to specific users. This will help you clearly define ownership in responding to incidents.
**Where can I use this?**
You must be in an incident Slack channel in order to use this command.
**What will I see?**
You'll see a pop-up modal displaying the list of Incident Roles that you've defined for incidents. You will be able to add new Incident Roles, assign users to Incident Roles, and delete Incident Roles through the modal. | | `/rootly statuspage` | **When do I use it?**
Whenever you want to update a specific status page with the status of the incident.
**Where can I use this?**
You must be in an incident Slack channel in order to use this command.
**What will I see?**
You'll see a pop-up modal prompting you to identify the status page to update and what to update it with. | | `/rootly integrations` | **When do I use it?**
Whenever you want to update the links to specific applications that Rootly is integrated to in your tech stack.
**Where can I use this?**
You must be in an incident Slack channel in order to use this command.
**What will I see?**
You'll see a pop-up modal with a list of applications that are eligible for Rootly integration and any existing links to pages within the applications relating to the specific incident. | | `/rootly timestamps` | **When do I use it?**
Whenever you want to manually edit the date and time of each status update.
**Where can I use this?**
You must be in an incident Slack channel in order to use this command.
**What will I see?**
You'll see a modal pop-up displaying all status updates. You will be able to edit timestamps and update the entries. | | `/rootly feedback` | **When do I use it?**
Whenever you want to log any feedback regarding your experience with resolving a specific incident. This is NOT a feedback of the Rootly app. This is a feedback of your incident response experience pertaining to the incident in context.
**Where can I use this?**
You must be in an incident Slack channel in order to use this command.
**What will I see?**
You'll see a pop-up modal prompting you log your feedback of the specific incident. | | `/rootly duplicate` | **When do I use it?**
Whenever you want to mark an incident as a duplicate of another.
**Where can I use this?**
You must be in an incident Slack channel in order to use this command.
**What will I see?**
You'll see a pop-up modal prompting you to select which incident is the current one a duplicate of. | | `/rootly sub` | **When do I use it?**
Whenever you want to declare a sub-incident.
**Where can I use this?**
You must be in a parent incident Slack channel in order to use this command.
**What will I see?**
You'll see a pop-up modal prompting you fill in the information for declaring a sub-incident. | ## Manage Incident Status | Command | Purpose | | ------------------ | --------------------------------------------------------------------------------------------------------------------------------------------------------------------------------------------------------------------------------------------------------------------------------------------------------------------------------------------------------------------------------------------------------------------------------------------------------------- | | `/rootly status` | **When do I use it?**
Whenever you want to update the status of the incident in context.
**Where can I use this?**
You must be in an incident Slack channel in order to use this command.
**What will I see?**
You'll see a pop-up modal prompting you to update the incident status. | | `/rootly mitigate` | **When do I use it?**
Whenever you want to change the incident status to "mitigated".
**Where can I use this?**
You must be in an incident Slack channel in order to use this command.
**What will I see?**
You'll first see a pop-up modal prompting you to comment on how the incident was mitigated.
Once you've logged the comment, you will see a Slack message indicating that the incident has been mitigated. | | `/rootly resolve` | **When do I use it?**
Whenever you want to change the incident status to "resolved".
**Where can I use this?**
You must be in an incident Slack channel in order to use this command.
**What will I see?**
You'll first see a pop-up modal prompting you to comment on how the incident was resolved.
Once you've logged the comment, you will see a Slack message indicating that the incident has been resolved. | ## Trigger Workflows | Command | Purpose | | ------------------- | --------------------------------------------------------------------------------------------------------------------------------------------------------------------------------------------------------------------------------------------------------------------------------------------------------------- | | `/rootly workflows` | **When do I use it?**
Whenever you want to manually trigger a workflow.
**Where can I use this?**
You must be in an incident Slack channel in order to use this command.
**What will I see?**
You'll first see a pop-up modal prompting you to select the workflow to run. | ## Getting Help | Command | Purpose | | ----------------- | --------------------------------------------------------------------------------------------------------------------------------------------------------------------------------------------------------------------------------------------------------------------------------------------------------------------------------------------------------- | | `/rootly help` | **When do I use it?**
Whenever you want to see the list of available Slack commands and a brief description of each.
**Where can I use this?**
You can use this command in any Slack channel.
**What will I see?**
You'll first see a pop-up modal prompting you to select a command that you'd like to learn about. | | `/rootly support` | **When do I use it?**
Whenever you want to report an issue to Rootly.
**Where can I use this?**
You can use this command in any Slack channel.
**What will I see?**
You'll first see a pop-up modal prompting you to input the details of the issue you're trying to report. | # Installation Source: https://docs.rootly.com/integrations/slack/installation ## Slack Account Permissions
 You'll be presented with the following installation page. Double check that you're installing the correct workspace (dropdown in the upper right hand corner) before you confirm the installation by selecting `Allow`.
 ## Installing Slack Enterprise Grid on Rootly
 ## Notifications
There are two categories of settings you can set up Smart Defaults for. The first one being **notifications**.
## Notifications
There are two categories of settings you can set up Smart Defaults for. The first one being **notifications**.
 ### Team Notifications
Team notifications will help notify Slack *users*, *groups*, and/or *channels* of new incidents.
### Team Notifications
Team notifications will help notify Slack *users*, *groups*, and/or *channels* of new incidents.
 #### Set up a default announcement channel
This flag will allow you to announce every new incident in a specified channel. The available channels are pulled from the workspace specified above.
#### Set up a default announcement channel
This flag will allow you to announce every new incident in a specified channel. The available channels are pulled from the workspace specified above.
 #### Reminder if incident role is unassigned
This flag allows you to notify the incident channel if no incident roles are assigned for x amount of time. It is important to assign incident roles to ensure ownership of the incident.
#### Reminder to cancel incident in Triage state
This flag allows you to notify the incident channel if the incident remains in the Triage state for x amount of time. Issues should be triaged as soon as they are detected to ensure prompt response. Click [here](/incidents/incidents) to learn more about different states of an incident.
#### Reminder if incident is inactive
This flag allows you to notify the incident channel if the incident remains inactive for x amount of time. Incident activity is tracked by interactions with the Rootly Slack Bot within the specific incident channel. For example:
* Sending a message in the incident channel does NOT count as an activity as it does not interact with the Rootly Slack Bot
* Setting the incident `summary` DOES count as an activity as it instructs the Rootly Slack Bot to update the incident properties.
* Using the 📌 emoji to log a message in the incident timeline DOES count as an activity as it instructs the Rootly Slack Bot to update the incident timeline.
#### Reminder if incident summary is empty
This flag allows you to notify the incident channel if the incident `summary` field is left empty for x amount of time. It is important to update the incident summary so subscribers added to the incident knows where the incident currently stands.
#### Reminder to update status page
This flag allows you to notify the incident channel every x amount of time to remind users to update the status page. It is good practice to keep status pages up-to-date so your audience knows the status of certain incidents or services.
#### Reminder to leave feedback
This flag allows you to notify the incident channel to log feedback once the incident is resolved. The feedback collected is to help your incident management team identify any opportunities for procedure improvement.
### Updates
Updates will send out notification messages in the specific incident channel when the incident properties change.
#### Reminder if incident role is unassigned
This flag allows you to notify the incident channel if no incident roles are assigned for x amount of time. It is important to assign incident roles to ensure ownership of the incident.
#### Reminder to cancel incident in Triage state
This flag allows you to notify the incident channel if the incident remains in the Triage state for x amount of time. Issues should be triaged as soon as they are detected to ensure prompt response. Click [here](/incidents/incidents) to learn more about different states of an incident.
#### Reminder if incident is inactive
This flag allows you to notify the incident channel if the incident remains inactive for x amount of time. Incident activity is tracked by interactions with the Rootly Slack Bot within the specific incident channel. For example:
* Sending a message in the incident channel does NOT count as an activity as it does not interact with the Rootly Slack Bot
* Setting the incident `summary` DOES count as an activity as it instructs the Rootly Slack Bot to update the incident properties.
* Using the 📌 emoji to log a message in the incident timeline DOES count as an activity as it instructs the Rootly Slack Bot to update the incident timeline.
#### Reminder if incident summary is empty
This flag allows you to notify the incident channel if the incident `summary` field is left empty for x amount of time. It is important to update the incident summary so subscribers added to the incident knows where the incident currently stands.
#### Reminder to update status page
This flag allows you to notify the incident channel every x amount of time to remind users to update the status page. It is good practice to keep status pages up-to-date so your audience knows the status of certain incidents or services.
#### Reminder to leave feedback
This flag allows you to notify the incident channel to log feedback once the incident is resolved. The feedback collected is to help your incident management team identify any opportunities for procedure improvement.
### Updates
Updates will send out notification messages in the specific incident channel when the incident properties change.
 #### Notify incident Slack channel when incident status is updated
This flag allows you to notify the incident channel whenever the incident `status` changes.
#### Notify incident Slack channel when Status Page is updated
This flag allows you to notify the incident channel whenever a publication is made to a status page for the specific incident.
#### Pin added event to Slack channel
🚧 **Under Construction** 🚧
### Advamce settings
Some additional settings can be applied to the notifications so you can further customize the way your team is notified.
#### Notify incident Slack channel when incident status is updated
This flag allows you to notify the incident channel whenever the incident `status` changes.
#### Notify incident Slack channel when Status Page is updated
This flag allows you to notify the incident channel whenever a publication is made to a status page for the specific incident.
#### Pin added event to Slack channel
🚧 **Under Construction** 🚧
### Advamce settings
Some additional settings can be applied to the notifications so you can further customize the way your team is notified.
 #### Broadcast incident events to channel
This flag allows you to announce each timeline update as a broadcasted message. Timeline updates are threaded messages by default. Although it keeps the channel quiet, it has a higher potential to get missed. By broadcasting each update, the incident channel will light up to notify users of a new update.
#### Mention and tag @user in incident Slack channel
This flag allows you to tag each user that is mentioned by Rootly on each timeline update. Teams often like to keep this flag turned off to avoid notification fatigue.
## Incident Channel
The second category of settings you can set up Smart Defaults for is **incident channel** settings.
#### Broadcast incident events to channel
This flag allows you to announce each timeline update as a broadcasted message. Timeline updates are threaded messages by default. Although it keeps the channel quiet, it has a higher potential to get missed. By broadcasting each update, the incident channel will light up to notify users of a new update.
#### Mention and tag @user in incident Slack channel
This flag allows you to tag each user that is mentioned by Rootly on each timeline update. Teams often like to keep this flag turned off to avoid notification fatigue.
## Incident Channel
The second category of settings you can set up Smart Defaults for is **incident channel** settings.
 ### Incident Slack Channel
Incident Slack channel settings will determine how each incident Slack channel will behave in response to an incident.
### Incident Slack Channel
Incident Slack channel settings will determine how each incident Slack channel will behave in response to an incident.
 #### Create incident channel for new incident
This flag allows you to automatically create an incident Slack channel for each new incident declared on Rootly. We highly recommend that you create a designated channel for each declared incident. Working through incidents via a single thread is highly inefficient and difficult to track.
#### Channel naming convention
This setting allows you to select from a list of channel naming formats.
#### Create incident channel for new incident
This flag allows you to automatically create an incident Slack channel for each new incident declared on Rootly. We highly recommend that you create a designated channel for each declared incident. Working through incidents via a single thread is highly inefficient and difficult to track.
#### Channel naming convention
This setting allows you to select from a list of channel naming formats.
 #### Emoji Shortcuts
Rootly supports the following emoji-triggered actions:
* Adding a Slack message to the incident timeline
* Creating a follow-up
* Creating a task
Each action can be triggered by one or more emojis. Please select emojis that are not commonly used in day-to-day Slack conversations (e.g. 👍, 😄, etc.) to avoid mistriggers.
### Archive Channels
Archive channels settings will allow you to define when each incident Slack channel is archived.
#### Emoji Shortcuts
Rootly supports the following emoji-triggered actions:
* Adding a Slack message to the incident timeline
* Creating a follow-up
* Creating a task
Each action can be triggered by one or more emojis. Please select emojis that are not commonly used in day-to-day Slack conversations (e.g. 👍, 😄, etc.) to avoid mistriggers.
### Archive Channels
Archive channels settings will allow you to define when each incident Slack channel is archived.
 #### Auto-archive incident channel
This flag allows you to auto archive an incident channel once the incident resolves. Archiving dormant channels is highly recommended to keep your workspace clean and clutter-free. You might want to set the duration to 1-2 days to allow your team time to clean up any content in the channel before archiving it.
#### Auto-archive tutorial and test
This flag allows you to auto archive any `test` or `tutorial` incidents created during gamedays, trial runs, or learning sessions after 24 hours from creation.
### Members
Members settings are miscellaneous flags relating to how your Slack users are handled by Rootly.
#### Auto-archive incident channel
This flag allows you to auto archive an incident channel once the incident resolves. Archiving dormant channels is highly recommended to keep your workspace clean and clutter-free. You might want to set the duration to 1-2 days to allow your team time to clean up any content in the channel before archiving it.
#### Auto-archive tutorial and test
This flag allows you to auto archive any `test` or `tutorial` incidents created during gamedays, trial runs, or learning sessions after 24 hours from creation.
### Members
Members settings are miscellaneous flags relating to how your Slack users are handled by Rootly.
 #### Require Rootly users to connect Slack accounts
This flag enforces that each member in your Rootly organization must go through the initial step of establishing a connection with their Slack account. In the rare case where users don't need to use Rootly via Slack, you can turn off this flag to allow them to skip the connection step.
#### Track users joining incident Slack channel
This flag allows you to log any user that joins an incident Slack channel as part of the incident timeline. Turn this flag off to reduce your incident timeline to only incident events.
#### Track users leaving incident Slack channel
This flag allows you to log any user that leaves an incident Slack channel as part of the incident timeline. Turn this flag off to reduce your incident timeline to only incident events.
## Support
If you need help or more information about this integration, please contact [support@rootly.com](mailto:support@rootly.com) or start a chat by navigating to **Help > Chat with Us**.
# Add Slack Bookmark
Source: https://docs.rootly.com/integrations/slack/workflows/add-slack-bookmark
## Description
This action adds a bookmark to a specified Slack channel. Bookmarks are particularly useful for keeping track of important links. Links that are bookmarked will appear at the top of your channels.
## Action Attributes
#### Require Rootly users to connect Slack accounts
This flag enforces that each member in your Rootly organization must go through the initial step of establishing a connection with their Slack account. In the rare case where users don't need to use Rootly via Slack, you can turn off this flag to allow them to skip the connection step.
#### Track users joining incident Slack channel
This flag allows you to log any user that joins an incident Slack channel as part of the incident timeline. Turn this flag off to reduce your incident timeline to only incident events.
#### Track users leaving incident Slack channel
This flag allows you to log any user that leaves an incident Slack channel as part of the incident timeline. Turn this flag off to reduce your incident timeline to only incident events.
## Support
If you need help or more information about this integration, please contact [support@rootly.com](mailto:support@rootly.com) or start a chat by navigating to **Help > Chat with Us**.
# Add Slack Bookmark
Source: https://docs.rootly.com/integrations/slack/workflows/add-slack-bookmark
## Description
This action adds a bookmark to a specified Slack channel. Bookmarks are particularly useful for keeping track of important links. Links that are bookmarked will appear at the top of your channels.
## Action Attributes
 ### Name
This field is automatically set for you. You can rename this field to whatever best describes your action. The value in this field does not affect how the workflow action behaves.
### Channel
This field specifies which Slack channel to add the bookmark in.
Some common selections:
* Setting to `{{ incident.slack_channel_id }}` will set the bookmark in the Slack channel of the triggering incident.
* The Liquid snytax `{{ parent_incident.slack_channel_id }}` can be used for sub incidents and it will set the bookmark in the Slack channel of the parent incident.
* You can also set the bookmark in other static channel (e.g. `#gernal`, `#alerts`)
### Playbook
Selecting a playbook in this field will attach the link to the playbook as a bookmark in the sepecified channel.
### Title
This field will be the text that gets displayed in the bookmarkbar of the Slack channel.
### Link
Use this field to specfify the URL for the bookmark. You can either input a hardcoded link or use Liquid variables to dynanmically set a link.
Some common examples:
* `{{ incident.url }}`
* `{{ incident.jira_issue_url }}`
* `{{ incident.pagerduty_incident_url }}`
### Name
This field is automatically set for you. You can rename this field to whatever best describes your action. The value in this field does not affect how the workflow action behaves.
### Channel
This field specifies which Slack channel to add the bookmark in.
Some common selections:
* Setting to `{{ incident.slack_channel_id }}` will set the bookmark in the Slack channel of the triggering incident.
* The Liquid snytax `{{ parent_incident.slack_channel_id }}` can be used for sub incidents and it will set the bookmark in the Slack channel of the parent incident.
* You can also set the bookmark in other static channel (e.g. `#gernal`, `#alerts`)
### Playbook
Selecting a playbook in this field will attach the link to the playbook as a bookmark in the sepecified channel.
### Title
This field will be the text that gets displayed in the bookmarkbar of the Slack channel.
### Link
Use this field to specfify the URL for the bookmark. You can either input a hardcoded link or use Liquid variables to dynanmically set a link.
Some common examples:
* `{{ incident.url }}`
* `{{ incident.jira_issue_url }}`
* `{{ incident.pagerduty_incident_url }}`
 ### Name
This field is automatically set for you. You can rename this field to whatever best describes your action. The value in this field does not affect how the workflow action behaves.
### Channel
This field specifies which Slack channel to archive.
Some common selections:
* Setting to `{{ incident.slack_channel_id }}` will archive the Slack channel of the triggering incident.
* The Liquid syntax `{{ parent_incident.slack_channel_id }}` can be for sub incidents and it will archive the Slack channel of the parent incident.
* You can also archive static channel (e.g. `#general`, `#alerts`)
# Create Slack Channel
Source: https://docs.rootly.com/integrations/slack/workflows/create-slack-channel
## Description
This action creates a designated Slack channel for an incident. Responding to each incident in their designated Slack channel can greatly help teams keep things organized.
## Action Attributes
### Name
This field is automatically set for you. You can rename this field to whatever best describes your action. The value in this field does not affect how the workflow action behaves.
### Channel
This field specifies which Slack channel to archive.
Some common selections:
* Setting to `{{ incident.slack_channel_id }}` will archive the Slack channel of the triggering incident.
* The Liquid syntax `{{ parent_incident.slack_channel_id }}` can be for sub incidents and it will archive the Slack channel of the parent incident.
* You can also archive static channel (e.g. `#general`, `#alerts`)
# Create Slack Channel
Source: https://docs.rootly.com/integrations/slack/workflows/create-slack-channel
## Description
This action creates a designated Slack channel for an incident. Responding to each incident in their designated Slack channel can greatly help teams keep things organized.
## Action Attributes
 ### Name
This field is automatically set for you. You can rename this field to whatever best describes your action. The value in this field does not affect how the workflow action behaves.
### Workspace
Select the workspace from the dropdown. The channel will be created into the specified workspace.
### Title
Speicify a title for the incident channel. This field accepts [Liquid variables](/liquid/incident-variables) to allow you to dynamically name the Slack channel.
**Example**
Setting the field to `incident-{{ incident.created_at | date: '%Y%m%d' }}-{{ incident.title }}` will create a Slack channel with the name `#incident-20231119-
### Name
This field is automatically set for you. You can rename this field to whatever best describes your action. The value in this field does not affect how the workflow action behaves.
### Workspace
Select the workspace from the dropdown. The channel will be created into the specified workspace.
### Title
Speicify a title for the incident channel. This field accepts [Liquid variables](/liquid/incident-variables) to allow you to dynamically name the Slack channel.
**Example**
Setting the field to `incident-{{ incident.created_at | date: '%Y%m%d' }}-{{ incident.title }}` will create a Slack channel with the name `#incident-20231119- ### Name
This field is automatically set for you. You can rename this field to whatever best describes your action. The value in this field does not affect how the workflow action behaves.
### Channel
This field specifies which Slack channel to invite the user(s)/user group(s) to.
Some common selections:
* Setting to `{{ incident.slack_channel_id }}` will invite the user(s)/user group(s) to the Slack channel of the triggering incident.
* The Liquid snytax `{{ parent_incident.slack_channel_id }}` can be used for sub incidents and it will invite the user(s)/user group(s) to the Slack channel of the parent incident.
* You can also invite user(s)/user group(s) to static channel (e.g. `#gernal`, `#alerts`)
### Slack Users
This field sets the user(s) you wish to invite to the specified channel. User(s) can either be hard-coded to specific persons within your team or set dynamically via Liquid variables. For example, you can use the snytax `{{ incident.creator }}` to invite the person who originally declared the incident.
Slack User Groups
This field sets the Slack user group(s) you wish to invite to the specified channel. All users part of the specified user group will be invited. You can read more about Slack user groups [here](https://slack.com/help/articles/212906697-Create-a-user-group).
# Overview
Source: https://docs.rootly.com/integrations/slack/workflows/overview
Our Slack integration unlocks powerful workflows actions that you can leverage to streamline your incident management process. If you are unfamiliar with how Workflows function please visit our [Workflows](/workflows) documentation first.
### Name
This field is automatically set for you. You can rename this field to whatever best describes your action. The value in this field does not affect how the workflow action behaves.
### Channel
This field specifies which Slack channel to invite the user(s)/user group(s) to.
Some common selections:
* Setting to `{{ incident.slack_channel_id }}` will invite the user(s)/user group(s) to the Slack channel of the triggering incident.
* The Liquid snytax `{{ parent_incident.slack_channel_id }}` can be used for sub incidents and it will invite the user(s)/user group(s) to the Slack channel of the parent incident.
* You can also invite user(s)/user group(s) to static channel (e.g. `#gernal`, `#alerts`)
### Slack Users
This field sets the user(s) you wish to invite to the specified channel. User(s) can either be hard-coded to specific persons within your team or set dynamically via Liquid variables. For example, you can use the snytax `{{ incident.creator }}` to invite the person who originally declared the incident.
Slack User Groups
This field sets the Slack user group(s) you wish to invite to the specified channel. All users part of the specified user group will be invited. You can read more about Slack user groups [here](https://slack.com/help/articles/212906697-Create-a-user-group).
# Overview
Source: https://docs.rootly.com/integrations/slack/workflows/overview
Our Slack integration unlocks powerful workflows actions that you can leverage to streamline your incident management process. If you are unfamiliar with how Workflows function please visit our [Workflows](/workflows) documentation first.
 ## Available Workflow Actions
* [Add Slack Bookmark](/integrations/slack/workflows/add-slack-bookmark)
* [Archive Slack Channel](/integrations/slack/workflows/archive-slack-channel)
* [Create Slack Channel](/integrations/slack/workflows/create-slack-channel)
* [Invite to Slack Channel](/integrations/slack/workflows/invite-to-slack-channel)
* [Rename Slack Channel](/integrations/slack/workflows/rename-slack-channel)
* [Send Slack Blocks](/integrations/slack/workflows/send-slack-blocks)
* [Send Slack Message](/integrations/slack/workflows/send-slack-message)
* [Send Slack Reminder](/integrations/slack/workflows/send-slack-reminder)
* [Update Channel Topic](/integrations/slack/workflows/update-slack-channel-topic)
# Rename Slack Channel
Source: https://docs.rootly.com/integrations/slack/workflows/rename-slack-channel
## Description
This action renames the specified channel. This is particularly useful for teams that wish to keep the Slack channel name in-sync with the incident title, issue ticket number, etc.
## Action Attributes
## Available Workflow Actions
* [Add Slack Bookmark](/integrations/slack/workflows/add-slack-bookmark)
* [Archive Slack Channel](/integrations/slack/workflows/archive-slack-channel)
* [Create Slack Channel](/integrations/slack/workflows/create-slack-channel)
* [Invite to Slack Channel](/integrations/slack/workflows/invite-to-slack-channel)
* [Rename Slack Channel](/integrations/slack/workflows/rename-slack-channel)
* [Send Slack Blocks](/integrations/slack/workflows/send-slack-blocks)
* [Send Slack Message](/integrations/slack/workflows/send-slack-message)
* [Send Slack Reminder](/integrations/slack/workflows/send-slack-reminder)
* [Update Channel Topic](/integrations/slack/workflows/update-slack-channel-topic)
# Rename Slack Channel
Source: https://docs.rootly.com/integrations/slack/workflows/rename-slack-channel
## Description
This action renames the specified channel. This is particularly useful for teams that wish to keep the Slack channel name in-sync with the incident title, issue ticket number, etc.
## Action Attributes
 ### Name
This field is automatically set for you. You can rename this field to whatever best describes your action. The value in this field does not affect how the workflow action behave.
### Channel
This field specifies which Slack channel to rename.
Some common selections:
* Setting to `{{ incident.slack_channel_id }}` will rename the Slack channel of the triggering incident.
* The Liquid snytax `{{ parent_incident.slack_channel_id }}` can be used for sub incidents and it will rename the Slack channel of the parent incident.
### New Title
Speicify a new title for the incident channel. This field accepts [Liquid variables](/liquid/incident-variables) to allow you to dynamically rename the Slack channel.
For example, if this action is taken after the incident title changes; setting the field to `incident-{{ incident.started_at | date: '%Y%m%d' }}-{{ incident.title }}` will rename the Slack channel to match the updated incident title. It will still maintain the `#incident-20231119-
### Name
This field is automatically set for you. You can rename this field to whatever best describes your action. The value in this field does not affect how the workflow action behave.
### Channel
This field specifies which Slack channel to rename.
Some common selections:
* Setting to `{{ incident.slack_channel_id }}` will rename the Slack channel of the triggering incident.
* The Liquid snytax `{{ parent_incident.slack_channel_id }}` can be used for sub incidents and it will rename the Slack channel of the parent incident.
### New Title
Speicify a new title for the incident channel. This field accepts [Liquid variables](/liquid/incident-variables) to allow you to dynamically rename the Slack channel.
For example, if this action is taken after the incident title changes; setting the field to `incident-{{ incident.started_at | date: '%Y%m%d' }}-{{ incident.title }}` will rename the Slack channel to match the updated incident title. It will still maintain the `#incident-20231119- ### Name
This field is automatically set for you. You can rename this field to whatever best describes your action. The value in this field does not affect how the workflow action behaves.
### Slack Users
Specify the Slack user(s) you wish to send the custom Slack block to.
### Slack User Groups
Specify which Slack user group(s) you wish to send the custom Slack block to. All users part of the specified user group(s) will be sent the block. You can read more about Slack user groups [here](https://slack.com/help/articles/212906697-Create-a-user-group).
### Channels
This field specifies which Slack channels to send the Slack block to.
Some common selections:
* Setting to `{{ incident.slack_channel_id }}` will send the block to the Slack channel of the triggering incident.
* The Liquid snytax `{{ parent_incident.slack_channel_id }}` can be used for sub incidents and it will send the block to the Slack channel of the parent incident.
* You can also send blocks to static channel (e.g. `#gernal`, `#alerts`)
### Send as Ephemeral
If selected, your message will be sent as a **hidden** message visible only to the specified users.
A value must be set for the `Slack Users` or `Slack User Groups` and `Channels` when this field is selected. Additionally, the selected users need to be in the specified channels.
### Pin to Channel
If selected, your message will pinned to the specified channel(s).
### Message Threading Options
If you want to thread the block under an existing block/message that Rootly has previously sent, you can do so by selecting a parent block/message to be threaded under.
#### Filter Tasks by Workflow
This field is used to filter for the workflow that contains the specific action responsible for sending the parent message. The value in this field will not persist once the workflow is saved, as the `Select a Task` field is what ultimately determines the parent message to thread under.
#### Select a Task
This field is used to select the specific action that's responsible for sending the parent block/message. This field determines which block/message is the parent block/message to thread under.
#### Update Parent Message
If this field is selected, the workflow will update the original parent block/message, instead of threading underneath it.
#### Broadcast Thread Reply to Channel
If this field is selected, the threaded block will also be broadcased as a new block in the specified channels.
### Notification Preview
Content in this field will be displayed in the push notifications. This field supports [Liquid variables](/liquid/incident-variables).
### Blocks
The blocks field consist of the payload that will be send in Slack. Customizing this payload will allow you to build custom messaging. The payload follows the same restrictions as Slack's block elements do. You can preview and check if your payload is valid by clicking the `Preview` button. This button will route you to [Slack's Block Kit builder](https://app.slack.com/block-kit-builder/).
### Name
This field is automatically set for you. You can rename this field to whatever best describes your action. The value in this field does not affect how the workflow action behaves.
### Slack Users
Specify the Slack user(s) you wish to send the custom Slack block to.
### Slack User Groups
Specify which Slack user group(s) you wish to send the custom Slack block to. All users part of the specified user group(s) will be sent the block. You can read more about Slack user groups [here](https://slack.com/help/articles/212906697-Create-a-user-group).
### Channels
This field specifies which Slack channels to send the Slack block to.
Some common selections:
* Setting to `{{ incident.slack_channel_id }}` will send the block to the Slack channel of the triggering incident.
* The Liquid snytax `{{ parent_incident.slack_channel_id }}` can be used for sub incidents and it will send the block to the Slack channel of the parent incident.
* You can also send blocks to static channel (e.g. `#gernal`, `#alerts`)
### Send as Ephemeral
If selected, your message will be sent as a **hidden** message visible only to the specified users.
A value must be set for the `Slack Users` or `Slack User Groups` and `Channels` when this field is selected. Additionally, the selected users need to be in the specified channels.
### Pin to Channel
If selected, your message will pinned to the specified channel(s).
### Message Threading Options
If you want to thread the block under an existing block/message that Rootly has previously sent, you can do so by selecting a parent block/message to be threaded under.
#### Filter Tasks by Workflow
This field is used to filter for the workflow that contains the specific action responsible for sending the parent message. The value in this field will not persist once the workflow is saved, as the `Select a Task` field is what ultimately determines the parent message to thread under.
#### Select a Task
This field is used to select the specific action that's responsible for sending the parent block/message. This field determines which block/message is the parent block/message to thread under.
#### Update Parent Message
If this field is selected, the workflow will update the original parent block/message, instead of threading underneath it.
#### Broadcast Thread Reply to Channel
If this field is selected, the threaded block will also be broadcased as a new block in the specified channels.
### Notification Preview
Content in this field will be displayed in the push notifications. This field supports [Liquid variables](/liquid/incident-variables).
### Blocks
The blocks field consist of the payload that will be send in Slack. Customizing this payload will allow you to build custom messaging. The payload follows the same restrictions as Slack's block elements do. You can preview and check if your payload is valid by clicking the `Preview` button. This button will route you to [Slack's Block Kit builder](https://app.slack.com/block-kit-builder/).
 ### Name
This field is automatically set for you. You can rename this field to whatever best describes your action. The value in this field does not affect how the workflow action behaves.
### Slack Users
Specify the Slack user(s) you wish to send the custom Slack message to.
### Slack User Groups
Specify which Slack user group(s) you wish to send the custom Slack mesage to. All users part of the specified user group will be sent the message. You can read more about Slack user groups [here](https://slack.com/help/articles/212906697-Create-a-user-group "here").
### Channels
This field specifies which Slack channel(s) to send the Slack message to.
Some common selections:
* Setting to `{{ incident.slack_channel_id }}` will send the message to the Slack channel of the triggering incident.
* The Liquid syntax `{{ parent_incident.slack_channel_id }}` can be used for sub incidents and it will send the message to the Slack channel of the parent incident.
* You can also send messages to static channel (e.g. `#gernal`, `#alerts`)
### Actions
Slack messages can also be sent with buttons that are linked to actions. The current available actions are listed below.
| Action | Description |
| --------------------------- | ------------------------------------------------------------------------------------------------------------------------------------------------------------------ |
| `Update Summary` | Surfaces a Slack modal that allows you to update the incident's summary. |
| `Manage Incident Roles` | Surfaces a Slack modal that allows you to manage your incident's role assignments. |
| `Update Incident` | Surfaces a Slack modal that allows you to edit your incident's attributes. |
| `All Commands` | Surfaces the help toolbar. |
| `Leave Feedback` | Surfaces a Slack modal for incident feedback. |
| `Manage Custom Fields` | Surfaces a Slack modal for managing your custom fields. |
| `Manage Action Items` | Surfaces a checklist for managing the incident's action items. |
| `View Tasks` | Surfaces a checklist for managing action items assigned to your user. |
| `Add Pagerduty Responders` | Escalation modal for adding [PagerDuty responders](/integrations/pagerduty). This action requires that the PagerDuty integration is already set up for your team. |
| `Add Opsgenie Responders` | Escalation modal for adding [Opsgenie responders](/integrations/opsgenie). This action requires that the Opsgenie integration is already set up for your team. |
| `Add Victor Ops Responders` | Escalation modal for adding [VictorOps responders](/integrations/victor-ops). This action requires that the VictorOps integration is already set up for your team. |
### Text
This field contains sets content of the message you wish to send. [Incident variables](/liquid/incident-variables), [Liquid syntax](https://shopify.github.io/liquid/ "Liquid syntax"), and [Slack markdown](https://api.slack.com/reference/surfaces/formatting "Slack markdown") are all supported in this field.
### Message Threading Options
If you want to thread the message under an existing block/message that Rootly has sent, you can do so by selecting a parent block/message to be threaded under.
#### Filter Tasks by Workflow
This field is used to filter for the workflow contains the specific action responsible for sending the parent message. The value in this field will not persist once the workflow is saved, as the `Select a Task` field is what ultimately determines the parent message to thread under.
#### Select a Task
This field is used to select the specific action that's responsible for sending the parent message. This field determines which message is the parent message to thread under.
#### Update Parent Message
If this field is selected, the workflow will update the original parent message, instead of thready underneath it.
#### Broadcast Thread Reply to Channel
If this field is selected, the threaded message will also be broadcased as a new message in the specified channels.
### Send as Ephemeral
If selected, your message will be sent as a **hidden** message visible only to the specified users.
A value must be set for the `Slack Users` or `Slack User Groups` and `Channels` when this field is selected. Additionally, the selected users need to be in the specified channels.
### Pin to Channel
If selected, your message will pinned to the specified channels.
# Send Slack Reminder
Source: https://docs.rootly.com/integrations/slack/workflows/send-slack-reminder
## Description
This action sends a message to Slack channels, users, and user groups.
## Action Attributes
### Name
This field is automatically set for you. You can rename this field to whatever best describes your action. The value in this field does not affect how the workflow action behaves.
### Slack Users
Specify the Slack user(s) you wish to send the custom Slack message to.
### Slack User Groups
Specify which Slack user group(s) you wish to send the custom Slack mesage to. All users part of the specified user group will be sent the message. You can read more about Slack user groups [here](https://slack.com/help/articles/212906697-Create-a-user-group "here").
### Channels
This field specifies which Slack channel(s) to send the Slack message to.
Some common selections:
* Setting to `{{ incident.slack_channel_id }}` will send the message to the Slack channel of the triggering incident.
* The Liquid syntax `{{ parent_incident.slack_channel_id }}` can be used for sub incidents and it will send the message to the Slack channel of the parent incident.
* You can also send messages to static channel (e.g. `#gernal`, `#alerts`)
### Actions
Slack messages can also be sent with buttons that are linked to actions. The current available actions are listed below.
| Action | Description |
| --------------------------- | ------------------------------------------------------------------------------------------------------------------------------------------------------------------ |
| `Update Summary` | Surfaces a Slack modal that allows you to update the incident's summary. |
| `Manage Incident Roles` | Surfaces a Slack modal that allows you to manage your incident's role assignments. |
| `Update Incident` | Surfaces a Slack modal that allows you to edit your incident's attributes. |
| `All Commands` | Surfaces the help toolbar. |
| `Leave Feedback` | Surfaces a Slack modal for incident feedback. |
| `Manage Custom Fields` | Surfaces a Slack modal for managing your custom fields. |
| `Manage Action Items` | Surfaces a checklist for managing the incident's action items. |
| `View Tasks` | Surfaces a checklist for managing action items assigned to your user. |
| `Add Pagerduty Responders` | Escalation modal for adding [PagerDuty responders](/integrations/pagerduty). This action requires that the PagerDuty integration is already set up for your team. |
| `Add Opsgenie Responders` | Escalation modal for adding [Opsgenie responders](/integrations/opsgenie). This action requires that the Opsgenie integration is already set up for your team. |
| `Add Victor Ops Responders` | Escalation modal for adding [VictorOps responders](/integrations/victor-ops). This action requires that the VictorOps integration is already set up for your team. |
### Text
This field contains sets content of the message you wish to send. [Incident variables](/liquid/incident-variables), [Liquid syntax](https://shopify.github.io/liquid/ "Liquid syntax"), and [Slack markdown](https://api.slack.com/reference/surfaces/formatting "Slack markdown") are all supported in this field.
### Message Threading Options
If you want to thread the message under an existing block/message that Rootly has sent, you can do so by selecting a parent block/message to be threaded under.
#### Filter Tasks by Workflow
This field is used to filter for the workflow contains the specific action responsible for sending the parent message. The value in this field will not persist once the workflow is saved, as the `Select a Task` field is what ultimately determines the parent message to thread under.
#### Select a Task
This field is used to select the specific action that's responsible for sending the parent message. This field determines which message is the parent message to thread under.
#### Update Parent Message
If this field is selected, the workflow will update the original parent message, instead of thready underneath it.
#### Broadcast Thread Reply to Channel
If this field is selected, the threaded message will also be broadcased as a new message in the specified channels.
### Send as Ephemeral
If selected, your message will be sent as a **hidden** message visible only to the specified users.
A value must be set for the `Slack Users` or `Slack User Groups` and `Channels` when this field is selected. Additionally, the selected users need to be in the specified channels.
### Pin to Channel
If selected, your message will pinned to the specified channels.
# Send Slack Reminder
Source: https://docs.rootly.com/integrations/slack/workflows/send-slack-reminder
## Description
This action sends a message to Slack channels, users, and user groups.
## Action Attributes
 ### Name
This field is automatically set for you. You can rename this field to whatever best describes your action. The value in this field does not affect how the workflow action behaves.
### Slack Users
Specify the Slack users you wish to send the custom Slack reminder to.
### Slack User Groups
Specify which Slack user groups you wish to send the custom Slack reminder to. All users part of the specified user group will be sent the message. You can read more about Slack user groups [here](https://slack.com/help/articles/212906697-Create-a-user-group "here").
### Channels
This field specifies which Slack channels to send the Slack reminder to.
Some common selections:
* Setting to `{{ incident.slack_channel_id }}` will send the reminder to the Slack channel of the triggering incident.
* The Liquid snytax `{{ parent_incident.slack_channel_id }}` can be used for sub incidents and it will send the reminder to the Slack channel of the parent incident.
* You can also send reminders to static channel (e.g. `#gernal`, `#alerts`)
### Actions
### Name
This field is automatically set for you. You can rename this field to whatever best describes your action. The value in this field does not affect how the workflow action behaves.
### Slack Users
Specify the Slack users you wish to send the custom Slack reminder to.
### Slack User Groups
Specify which Slack user groups you wish to send the custom Slack reminder to. All users part of the specified user group will be sent the message. You can read more about Slack user groups [here](https://slack.com/help/articles/212906697-Create-a-user-group "here").
### Channels
This field specifies which Slack channels to send the Slack reminder to.
Some common selections:
* Setting to `{{ incident.slack_channel_id }}` will send the reminder to the Slack channel of the triggering incident.
* The Liquid snytax `{{ parent_incident.slack_channel_id }}` can be used for sub incidents and it will send the reminder to the Slack channel of the parent incident.
* You can also send reminders to static channel (e.g. `#gernal`, `#alerts`)
### Actions
 ## Name
This field is automatically set for you. You can rename this field to whatever best describes your action. The value in this field does not affect how the workflow action behaves.
## Channels
This field specifies which Slack channels to update the topic for.
Some common selections:
* Setting to `{{ incident.slack_channel_id }}` will update topic for the Slack channel of the triggering incident.
* The Liquid snytax `{{ parent_incident.slack_channel_id }}` can be used for sub incidents and it will update the topic for the Slack channel of the parent incident.
* You can also update topics for static channel (e.g. #gernal, #alerts)
## Topic
This field defines what the topic will be. [Incident variables](/configuration/incident-types), [Liquid syntax](https://shopify.github.io/liquid/ "Liquid syntax"), and [Slack markdown](https://api.slack.com/reference/surfaces/formatting "Slack markdown") are all supported in this field.
# SMTP
Source: https://docs.rootly.com/integrations/smtp
## Why
**SMTP** Integration allows you to:
* Send email with a custom domain name
## Installation
You can setup this integration as a **logged in admin user** in the integrations page.
## Name
This field is automatically set for you. You can rename this field to whatever best describes your action. The value in this field does not affect how the workflow action behaves.
## Channels
This field specifies which Slack channels to update the topic for.
Some common selections:
* Setting to `{{ incident.slack_channel_id }}` will update topic for the Slack channel of the triggering incident.
* The Liquid snytax `{{ parent_incident.slack_channel_id }}` can be used for sub incidents and it will update the topic for the Slack channel of the parent incident.
* You can also update topics for static channel (e.g. #gernal, #alerts)
## Topic
This field defines what the topic will be. [Incident variables](/configuration/incident-types), [Liquid syntax](https://shopify.github.io/liquid/ "Liquid syntax"), and [Slack markdown](https://api.slack.com/reference/surfaces/formatting "Slack markdown") are all supported in this field.
# SMTP
Source: https://docs.rootly.com/integrations/smtp
## Why
**SMTP** Integration allows you to:
* Send email with a custom domain name
## Installation
You can setup this integration as a **logged in admin user** in the integrations page.
 **Address**: This would be the SMTP server address for the email server. e.g: smtp.gmail.com **Port**: Port for the SMTP server. **Domain**: The domain of the custom domain name you would like to use. **Username**: The email of the email that will be used to send emails. **Password**: The password of the email that will be used to send emails.
**Port**: Port for the SMTP server.
**Domain**: The domain of the custom domain name you would like to use.
**Username**: The email of the email that will be used to send emails.
**Password**: The password of the email that will be used to send emails.
**Address**: This would be the SMTP server address for the email server. e.g: smtp.gmail.com **Port**: Port for the SMTP server. **Domain**: The domain of the custom domain name you would like to use. **Username**: The email of the email that will be used to send emails. **Password**: The password of the email that will be used to send emails.
**Port**: Port for the SMTP server.
**Domain**: The domain of the custom domain name you would like to use.
**Username**: The email of the email that will be used to send emails.
**Password**: The password of the email that will be used to send emails.
 ## Support
If you need help or more information about this integration, please contact [support@rootly.com](mailto:support@rootly.com) or use the **lower right chat widget** to get connected with an engineer.
# Splunk
Source: https://docs.rootly.com/integrations/splunk
## Splunk App
[https://splunkbase.splunk.com/app/7721](https://splunkbase.splunk.com/app/7721 "https://splunkbase.splunk.com/app/7721")
### App Description
The purpose of this app is to setup custom alert actions that forward to Rootly
### Installation Instructions
* Install via the Splunk Web Admin
* Configure using the full integration url or the integration key supplied after adding the splunk service in the Rootly Admin.
### Dependencies
N/A
### Where to install
The app needs to be installed on the search heads.
### Features
Easily integrates with Rootly's event API to handle oncall alert triggers.
# SSO
Source: https://docs.rootly.com/integrations/sso
## Installation
You can setup this integration as a **logged in admin user** in the integrations page:
## Support
If you need help or more information about this integration, please contact [support@rootly.com](mailto:support@rootly.com) or use the **lower right chat widget** to get connected with an engineer.
# Splunk
Source: https://docs.rootly.com/integrations/splunk
## Splunk App
[https://splunkbase.splunk.com/app/7721](https://splunkbase.splunk.com/app/7721 "https://splunkbase.splunk.com/app/7721")
### App Description
The purpose of this app is to setup custom alert actions that forward to Rootly
### Installation Instructions
* Install via the Splunk Web Admin
* Configure using the full integration url or the integration key supplied after adding the splunk service in the Rootly Admin.
### Dependencies
N/A
### Where to install
The app needs to be installed on the search heads.
### Features
Easily integrates with Rootly's event API to handle oncall alert triggers.
# SSO
Source: https://docs.rootly.com/integrations/sso
## Installation
You can setup this integration as a **logged in admin user** in the integrations page:
 ## Identity Providers
Rootly is compatible with **any identity provider** supporting **SAML 2.0.**
Depending on the identity provider, you might be asked for the following information during your setup process:
**ACS URL**: [https://rootly.com/users/saml/auth](https://rootly.com/users/saml/auth)
## Identity Providers
Rootly is compatible with **any identity provider** supporting **SAML 2.0.**
Depending on the identity provider, you might be asked for the following information during your setup process:
**ACS URL**: [https://rootly.com/users/saml/auth](https://rootly.com/users/saml/auth)**Entity ID**: [https://rootly.com/users/saml/metadata](https://rootly.com/users/saml/metadata) ### Okta Let's go to the **Applications** panel.
 Search for **Rootly**.
 Click on **Add**.
 Select **SAML 2.0**.
Now our app is created let's go back in **Applications > Rootly** and click **View Setup Instructions:**
Select **SAML 2.0**.
Now our app is created let's go back in **Applications > Rootly** and click **View Setup Instructions:**
 Finally copy the fields as shown below into **Rootly**, this information from Okta is unique to your organization.
 You are all set!
### Google
You will need to access the **Google Admin Console:** [https://admin.google.com/ac/home](https://admin.google.com/ac/home "https://admin.google.com/ac/home").
Follow screenshot steps as below:
You are all set!
### Google
You will need to access the **Google Admin Console:** [https://admin.google.com/ac/home](https://admin.google.com/ac/home "https://admin.google.com/ac/home").
Follow screenshot steps as below:


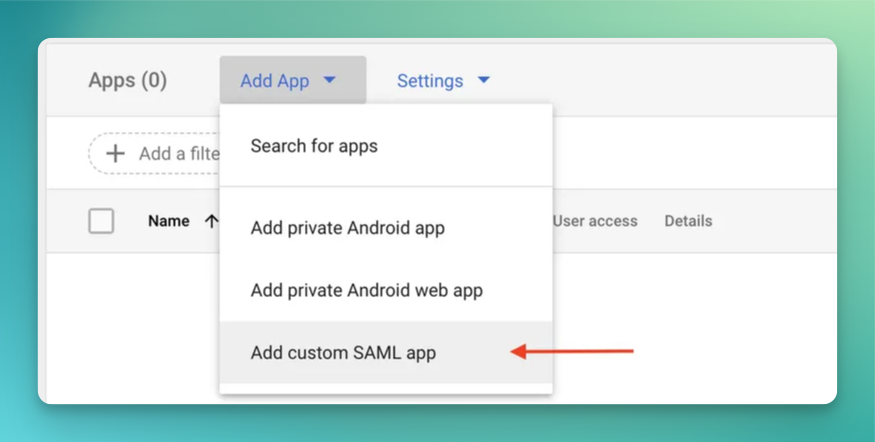

 Make sure `Signed Response` is checked and the app `ON for everyone` is checked in your org unit.
 And finally let's edit the attributes mapping.
 Let's switch to Rootly. You can get the identity login url by clicking on the `TEST SAML LOGIN` button.

 ### OneLogin
Browse the Applications Store page and install Rootly.
### OneLogin
Browse the Applications Store page and install Rootly.
 Copy fields over Rootly like shown below
* Issuer URL **->** Identity Provider ID
* SAML 2.0 endpoint **->** Identity Login Url
* In the certificate section > View Details > X.509 Certificate **->** Idp Cert
Copy fields over Rootly like shown below
* Issuer URL **->** Identity Provider ID
* SAML 2.0 endpoint **->** Identity Login Url
* In the certificate section > View Details > X.509 Certificate **->** Idp Cert
 You are all set!
### Auth0
Docs: [https://marketplace.auth0.com/integrations/rootly-sso-integration](https://marketplace.auth0.com/integrations/rootly-sso-integration "https://marketplace.auth0.com/integrations/rootly-sso-integration")
### Azure
Install SSO integration through the Azure marketplace
* Marketplace: [https://azuremarketplace.microsoft.com/en-US/marketplace/apps/aad.rootly](https://azuremarketplace.microsoft.com/en-US/marketplace/apps/aad.rootly)
* Tutorial: [https://docs.microsoft.com/en-us/azure/active-directory/saas-apps/rootly-tutorial](https://docs.microsoft.com/en-us/azure/active-directory/saas-apps/rootly-tutorial)
### Rippling
Integrate Rippling SSO + SCIM in one click [https://www.rippling.com/app-shop/app/rootly](https://www.rippling.com/app-shop/app/rootly)
You are all set!
### Auth0
Docs: [https://marketplace.auth0.com/integrations/rootly-sso-integration](https://marketplace.auth0.com/integrations/rootly-sso-integration "https://marketplace.auth0.com/integrations/rootly-sso-integration")
### Azure
Install SSO integration through the Azure marketplace
* Marketplace: [https://azuremarketplace.microsoft.com/en-US/marketplace/apps/aad.rootly](https://azuremarketplace.microsoft.com/en-US/marketplace/apps/aad.rootly)
* Tutorial: [https://docs.microsoft.com/en-us/azure/active-directory/saas-apps/rootly-tutorial](https://docs.microsoft.com/en-us/azure/active-directory/saas-apps/rootly-tutorial)
### Rippling
Integrate Rippling SSO + SCIM in one click [https://www.rippling.com/app-shop/app/rootly](https://www.rippling.com/app-shop/app/rootly)
 ### Jumpcloud
Let's begin by navigating to the **SSO Applications** page from the left navigation.
### Jumpcloud
Let's begin by navigating to the **SSO Applications** page from the left navigation.
 Search for and install the **Rootly** application.
 Once installed, select the Rootly application to enter edit mode and navigate to the **SSO** tab.
Update the `IdP Entity ID` from `JumpCloud` to `JumpCloud-
Once installed, select the Rootly application to enter edit mode and navigate to the **SSO** tab.
Update the `IdP Entity ID` from `JumpCloud` to `JumpCloud- Download your **IDP Certificate**. It should download as a `.pem` file.
 Navigate to your **Rootly SSO Integration** modal and fill in the following fields with the corresponding values from JumpCloud.
 | Rootly Field | JumpCloud Field |
| ---------------------- | ---------------------------------------------------------------------------------------------------------------------------- |
| `Identity Provider Id` | `IdP Entity ID ` |
| `Identity Login Url` | `IDP URL` |
| `Identity Logout Url` | Leave blank or choose any page you'd want to navigate your user to when they log out. |
| `Idp Cert` | Open the certificate you downloaded in the previous step with a text editor of your choice. Copy and paste the text content. |
| `Domain Name` | Your domain (e.g. mycompany.com) |
Go ahead `Enable` and `Save` your SSO setup in Rootly.
| Rootly Field | JumpCloud Field |
| ---------------------- | ---------------------------------------------------------------------------------------------------------------------------- |
| `Identity Provider Id` | `IdP Entity ID ` |
| `Identity Login Url` | `IDP URL` |
| `Identity Logout Url` | Leave blank or choose any page you'd want to navigate your user to when they log out. |
| `Idp Cert` | Open the certificate you downloaded in the previous step with a text editor of your choice. Copy and paste the text content. |
| `Domain Name` | Your domain (e.g. mycompany.com) |
Go ahead `Enable` and `Save` your SSO setup in Rootly.
 You're now SSO enabled!
If you want to set up **Just-In-Time (JIT) provisioning**, navigate to the **Identity Management** tab in edit mode and set the following fields according to the mappings below.
You're now SSO enabled!
If you want to set up **Just-In-Time (JIT) provisioning**, navigate to the **Identity Management** tab in edit mode and set the following fields according to the mappings below.
 * `API Type`: `SCIM API`
* `SCIM Version`: `SCIM 2.0`
* `Base URL`: `https://rootly.com/scim`
* `Token Key`: Pick this value up from your SSO Configuration screen in in Rootly
* `API Type`: `SCIM API`
* `SCIM Version`: `SCIM 2.0`
* `Base URL`: `https://rootly.com/scim`
* `Token Key`: Pick this value up from your SSO Configuration screen in in Rootly
 * `Test User Email`: You can use your own email as long as the email domain matches the one set in your Rootly SSO configuration page.
Go ahead and select `Test Connection`. You should see a successful message once a connection is confirmed.
If you'd like to **provision users by JumpCloud Groups**, go ahead and select the following option.This will allow you to provision the users in each JumpCloud Group with a specific Rootly Role.
* `Test User Email`: You can use your own email as long as the email domain matches the one set in your Rootly SSO configuration page.
Go ahead and select `Test Connection`. You should see a successful message once a connection is confirmed.
If you'd like to **provision users by JumpCloud Groups**, go ahead and select the following option.This will allow you to provision the users in each JumpCloud Group with a specific Rootly Role.
 Navigate to your **Rootly SSO Integrations** modal and map the desired JumpCloud Group to the desired Rootly Role.
 Go ahead and `Save` your configuration. You're all set for JIT user provisioning!
## Login Behaviour
If you have SSO enabled, all other login methods such as Google, Slack, Email/Password will automatically redirect users to the SSO method instead.
## Misconfiguration
If you set up SSO incorrectly, you may not be able to sign in anymore. In that case please contact [support@rootly.com](mailto://support@rootly.com "support@rootly.com") or use the lower right chat widget for live assistance.
## Support
If you need help or more information about this integration, please contact [support@rootly.com](mailto:support@rootly.com) or use the **lower right chat widget** to get connected with an engineer.
# Creating A Statuspage Incident
Source: https://docs.rootly.com/integrations/status-page-io/creating-a-statuspage-incident
## Overview
The following guide will walk you through how to create a StatusPage.IO via a Rootly incident. In order to create a status page incident you first need import a status page from StatusPage.io. If you have not done that yet please refer to this guide [here](/integrations/status-page-io/importing-status-pages "here").
## Steps
1. Within any non published incident click the Status Page Timeline tab the click publish
Go ahead and `Save` your configuration. You're all set for JIT user provisioning!
## Login Behaviour
If you have SSO enabled, all other login methods such as Google, Slack, Email/Password will automatically redirect users to the SSO method instead.
## Misconfiguration
If you set up SSO incorrectly, you may not be able to sign in anymore. In that case please contact [support@rootly.com](mailto://support@rootly.com "support@rootly.com") or use the lower right chat widget for live assistance.
## Support
If you need help or more information about this integration, please contact [support@rootly.com](mailto:support@rootly.com) or use the **lower right chat widget** to get connected with an engineer.
# Creating A Statuspage Incident
Source: https://docs.rootly.com/integrations/status-page-io/creating-a-statuspage-incident
## Overview
The following guide will walk you through how to create a StatusPage.IO via a Rootly incident. In order to create a status page incident you first need import a status page from StatusPage.io. If you have not done that yet please refer to this guide [here](/integrations/status-page-io/importing-status-pages "here").
## Steps
1. Within any non published incident click the Status Page Timeline tab the click publish
 2. Within the publish dialog select a status page that you have integrated with StatusPage.IO (these pages will have "(StatusPage.io)" in the title). Fill out the publish form with your desired settings.
 3. After clicking publish your incident should be added to the Rootly timeline. Clicking the hyperlink next to the incident event will take you to the newly created StatusPage.io incident

 # Importing Status Pages
Source: https://docs.rootly.com/integrations/status-page-io/importing-status-pages
## Importing Status Pages
### Overview
You can import your existing status pages from statuspage.io. This requires that StatusPageIO integration has already been set up. If you have not that yet please refer to our guide [here](/integrations/status-page-io "here").
### Steps
1. Within our web experience navigate to *Configuration > Status pages*
# Importing Status Pages
Source: https://docs.rootly.com/integrations/status-page-io/importing-status-pages
## Importing Status Pages
### Overview
You can import your existing status pages from statuspage.io. This requires that StatusPageIO integration has already been set up. If you have not that yet please refer to our guide [here](/integrations/status-page-io "here").
### Steps
1. Within our web experience navigate to *Configuration > Status pages*
 2. On the status pages configuration page click *Import from statuspage.io*
 3. Within the popup modal select the StatusPageIO page you want to import into Rootly. Then click import pages
 4. You should see the newly imported page within the list
 # Importing Templates
Source: https://docs.rootly.com/integrations/status-page-io/importing-templates
## Overview
Rootly supports StatusPage.IO templates. After importing your templates from StatusPage.IO you can utilize them when making status page updates to auto populate fields.
Templates can only be imported for status pages that are linked to StatusPage.IO. If you don't have a status page that is linked to StatusPage.io you can follow steps [here](/integrations/status-page-io/importing-status-pages "here") on importing status pages
## Steps
1. Within the status page configuration page select edit on a status page that has a StatusPage.IO page linked. A StatusPage.IO linked page will have the STATUSPAGE.IO column populated
# Importing Templates
Source: https://docs.rootly.com/integrations/status-page-io/importing-templates
## Overview
Rootly supports StatusPage.IO templates. After importing your templates from StatusPage.IO you can utilize them when making status page updates to auto populate fields.
Templates can only be imported for status pages that are linked to StatusPage.IO. If you don't have a status page that is linked to StatusPage.io you can follow steps [here](/integrations/status-page-io/importing-status-pages "here") on importing status pages
## Steps
1. Within the status page configuration page select edit on a status page that has a StatusPage.IO page linked. A StatusPage.IO linked page will have the STATUSPAGE.IO column populated
 2. Scroll down until you see Import from Statuspage.io for templates
 3. Within the popup modal select which templates you wish to import from StatusPage.IO
 4. The imported template should now be in Rootly under your StatusPage.IO integrated status page
 # Using Status Page Templates
Source: https://docs.rootly.com/integrations/status-page-io/using-status-page-templates
## Overview
Event status updates are often standardized via templates. These are preset values that will auto-populate your event update. This guide will aim to help you use them. Using StatusPage templates requires you to first import them into Rootly. If you have not done that yet please follow this guide [here](/integrations/status-page-io/importing-templates "here").
## Steps
1. Within any incident in Rootly click the Status Page Timeline Tab then the Add to Timeline button
# Using Status Page Templates
Source: https://docs.rootly.com/integrations/status-page-io/using-status-page-templates
## Overview
Event status updates are often standardized via templates. These are preset values that will auto-populate your event update. This guide will aim to help you use them. Using StatusPage templates requires you to first import them into Rootly. If you have not done that yet please follow this guide [here](/integrations/status-page-io/importing-templates "here").
## Steps
1. Within any incident in Rootly click the Status Page Timeline Tab then the Add to Timeline button
 2. Within the publish modal select a status page that has StatusPage.io integrated (These pages will have "(Statuspage.io) in the title")
 3. Within the same publish modal select the template you wish to use for your incident event update
 4. Post selection, the template will populate preset such as the event message, status, and any effected components
 # Terraform
Source: https://docs.rootly.com/integrations/terraform
# Terraform
Our Terraform provider is available at:
[https://registry.terraform.io/providers/rootlyhq/rootly/latest](https://registry.terraform.io/providers/rootlyhq/rootly/latest "https://registry.terraform.io/providers/rootlyhq/rootly/latest")
## Documentation
[https://registry.terraform.io/providers/rootlyhq/rootly/latest/docs](https://registry.terraform.io/providers/rootlyhq/rootly/latest/docs "https://registry.terraform.io/providers/rootlyhq/rootly/latest/docs")
## Example
```tf main.tf
terraform {
required_providers {
rootly = {
source = "rootlyhq/rootly"
}
}
}
# Configure the Rootly provider
provider "rootly" {
# We recommend using the `ROOTLY_API_TOKEN` env var to set the API Token
# when interacting with Rootly's API.
# api_token = "
# Terraform
Source: https://docs.rootly.com/integrations/terraform
# Terraform
Our Terraform provider is available at:
[https://registry.terraform.io/providers/rootlyhq/rootly/latest](https://registry.terraform.io/providers/rootlyhq/rootly/latest "https://registry.terraform.io/providers/rootlyhq/rootly/latest")
## Documentation
[https://registry.terraform.io/providers/rootlyhq/rootly/latest/docs](https://registry.terraform.io/providers/rootlyhq/rootly/latest/docs "https://registry.terraform.io/providers/rootlyhq/rootly/latest/docs")
## Example
```tf main.tf
terraform {
required_providers {
rootly = {
source = "rootlyhq/rootly"
}
}
}
# Configure the Rootly provider
provider "rootly" {
# We recommend using the `ROOTLY_API_TOKEN` env var to set the API Token
# when interacting with Rootly's API.
# api_token = "
 ## Update a Trello card
 # Twitter
Source: https://docs.rootly.com/integrations/twitter
## Why
**Twitter** Integration allows you to:
* **Tweet** an **incident event** to keep your community up to date on any updates.
## Installation
You can setup this integration as a **logged in admin user** in the integrations page:
# Twitter
Source: https://docs.rootly.com/integrations/twitter
## Why
**Twitter** Integration allows you to:
* **Tweet** an **incident event** to keep your community up to date on any updates.
## Installation
You can setup this integration as a **logged in admin user** in the integrations page:
 ## Tweet
You can tweet directly from the incident timeline by changing the visibility to: **incident responders + private status page + twitter**
## Tweet
You can tweet directly from the incident timeline by changing the visibility to: **incident responders + private status page + twitter**
 ## Uninstall
You can **uninstall** this integration in the integrations panel by clicking **Configure > Delete**
## Support
If you need help or more information about this integration, please contact [support@rootly.com](mailto:support@rootly.com) or use the **lower right chat widget** to get connected with an engineer
# VictorOps (Splunk On-Call)
Source: https://docs.rootly.com/integrations/victor-ops
## Why
**VictorOps** Integration allows you to:
* Import **VictorOps** teams into Rootly teams.
* **Create** a Rootly alert when creating an incident in **VictorOps**.
* **Create** a VictorOps incident when creating an incident in Rootly.
* **Resolve** a VictorOps incident right from Rootly.
* Page Directly from Slack ( if Slack Integration enabled ).
**Note:** This integration required an VictorOps account with at least the **Enterprise** plan. [https://portal.victorops.com/dash/rootly-inc#/billing](https://portal.victorops.com/dash/rootly-inc#/billing)
## Installation
You can setup this integration as a **logged in admin user** in the integrations page:
## Uninstall
You can **uninstall** this integration in the integrations panel by clicking **Configure > Delete**
## Support
If you need help or more information about this integration, please contact [support@rootly.com](mailto:support@rootly.com) or use the **lower right chat widget** to get connected with an engineer
# VictorOps (Splunk On-Call)
Source: https://docs.rootly.com/integrations/victor-ops
## Why
**VictorOps** Integration allows you to:
* Import **VictorOps** teams into Rootly teams.
* **Create** a Rootly alert when creating an incident in **VictorOps**.
* **Create** a VictorOps incident when creating an incident in Rootly.
* **Resolve** a VictorOps incident right from Rootly.
* Page Directly from Slack ( if Slack Integration enabled ).
**Note:** This integration required an VictorOps account with at least the **Enterprise** plan. [https://portal.victorops.com/dash/rootly-inc#/billing](https://portal.victorops.com/dash/rootly-inc#/billing)
## Installation
You can setup this integration as a **logged in admin user** in the integrations page:

 You can also optionally configure webhooks so we ingest VictorOps incidents as Rootly alerts.
 Copy the url above and create a webhook:
 ## Paging
You can page VictorOps teams right from Slack using our integration.
## Paging
You can page VictorOps teams right from Slack using our integration.
 ## Support
If you need help or more information about this integration, please contact [support@rootly.com](mailto:support@rootly.com) or use the **lower right chat widget** to get connected with an engineer.
# Installation
Source: https://docs.rootly.com/integrations/webex/installation
## Installing Webex on Rootly
## Support
If you need help or more information about this integration, please contact [support@rootly.com](mailto:support@rootly.com) or use the **lower right chat widget** to get connected with an engineer.
# Installation
Source: https://docs.rootly.com/integrations/webex/installation
## Installing Webex on Rootly
 You'll be prompted to sign in with your Webex account or create a new one. After signing in, you'll be prompted to grant Rootly permission to integrate with your Webex account.
 Once confirmed, you'll be redirected back to Rootly and the installation is considered complete!
 ## Uninstall
You can uninstall this integration in the integrations panel by clicking **Configure > Delete.**
## Support
If you need help or more information about this integration, please contact [support@rootly.com](mailto:support@rootly.com) or start a chat by navigating to **Help > Chat with Us**.
# Webex
Source: https://docs.rootly.com/integrations/webex/webex
## Overview
Rootly's Webex integration enhances incident management experience by streamlining incident communication, providing teams with a robust platform for real-time collaboration and efficient incident resolution.
Some key features of this integration includes::
1. **Real-time Collaboration:**
* Automatically spin up Webex Meeting bridge associated with an incident.
2. **Liquid variable support**
* Dynamically set meeting names via Liquid variables.
3. **Slack-Native Experience:**
* Automatically surface Webex Meeting link within incident Slack channel
## Installation
Please see the [**Installation** page](/integrations/webex/installation "Installation") to get started with your Webex integration.
## Workflows
Rootly relies on workflows to automate interactions with Webex. The [**Workflows** page](/integrations/webex/workflows "Workflows") will walk you through how to set up commonly used workflows involving Webex.
## Support
If you need help or more information about this integration, please contact [support@rootly.com](mailto:support@rootly.com) or start a chat by navigating to **Help > Chat with Us**.
# Workflows
Source: https://docs.rootly.com/integrations/webex/workflows
## Overview
Our Webex integration leverages workflows to automatically create a Webex Meeting link for an incident. If you are unfamiliar with how Workflows function please visit our [Workflows](/workflows "Workflows") documentation first.
## Uninstall
You can uninstall this integration in the integrations panel by clicking **Configure > Delete.**
## Support
If you need help or more information about this integration, please contact [support@rootly.com](mailto:support@rootly.com) or start a chat by navigating to **Help > Chat with Us**.
# Webex
Source: https://docs.rootly.com/integrations/webex/webex
## Overview
Rootly's Webex integration enhances incident management experience by streamlining incident communication, providing teams with a robust platform for real-time collaboration and efficient incident resolution.
Some key features of this integration includes::
1. **Real-time Collaboration:**
* Automatically spin up Webex Meeting bridge associated with an incident.
2. **Liquid variable support**
* Dynamically set meeting names via Liquid variables.
3. **Slack-Native Experience:**
* Automatically surface Webex Meeting link within incident Slack channel
## Installation
Please see the [**Installation** page](/integrations/webex/installation "Installation") to get started with your Webex integration.
## Workflows
Rootly relies on workflows to automate interactions with Webex. The [**Workflows** page](/integrations/webex/workflows "Workflows") will walk you through how to set up commonly used workflows involving Webex.
## Support
If you need help or more information about this integration, please contact [support@rootly.com](mailto:support@rootly.com) or start a chat by navigating to **Help > Chat with Us**.
# Workflows
Source: https://docs.rootly.com/integrations/webex/workflows
## Overview
Our Webex integration leverages workflows to automatically create a Webex Meeting link for an incident. If you are unfamiliar with how Workflows function please visit our [Workflows](/workflows "Workflows") documentation first.
 ## Available Workflow Actions
### Create a Webex Meeting
This action allows you to create a Webex Meeting link for a specific incident.
## Available Workflow Actions
### Create a Webex Meeting
This action allows you to create a Webex Meeting link for a specific incident.
 #### Name
This field is automatically set for you. You can rename this field to whatever best describes your action. The value in this field does not affect how the workflow action behaves.
#### Meeting Name
This field allows you to set the Webex meeting's title. The default is set to `{{ incident.title }}` to match the title of your incident. This field supports Liquid syntax.
#### Name
This field is automatically set for you. You can rename this field to whatever best describes your action. The value in this field does not affect how the workflow action behaves.
#### Meeting Name
This field allows you to set the Webex meeting's title. The default is set to `{{ incident.title }}` to match the title of your incident. This field supports Liquid syntax.
 ## Actions
 ## Support
If you need help or more information about this integration, please contact [support@rootly.com](mailto:support@rootly.com) or use the **lower right chat widget** to get connected with an engineer.
# Zendesk
Source: https://docs.rootly.com/integrations/zendesk
Leverage our popular Zendesk integration for automatic ticket creation and syncing. In addition to the Rootly Zendesk integration, you can bring Rootly right into Zendesk with our new plugin from the [Zendesk Marketplace](https://www.zendesk.com/marketplace/apps/support/995423/rootly/ "Zendesk Marketplace").
## Zendesk Integration Capabilities
Our **Zendesk** Integration allows you to:
* Ability to create a Rootly incident directly in Zendesk.
## Support
If you need help or more information about this integration, please contact [support@rootly.com](mailto:support@rootly.com) or use the **lower right chat widget** to get connected with an engineer.
# Zendesk
Source: https://docs.rootly.com/integrations/zendesk
Leverage our popular Zendesk integration for automatic ticket creation and syncing. In addition to the Rootly Zendesk integration, you can bring Rootly right into Zendesk with our new plugin from the [Zendesk Marketplace](https://www.zendesk.com/marketplace/apps/support/995423/rootly/ "Zendesk Marketplace").
## Zendesk Integration Capabilities
Our **Zendesk** Integration allows you to:
* Ability to create a Rootly incident directly in Zendesk.
 * Updating the incident's title, description, and/or status in Rootly will also update the corresponding Zendesk ticket.
* Ability to create a Rootly action item in Zendesk.
* Updating an action item's title, description, and/or status in Rootly will also update the corresponding Zendesk ticket.
* Ability to view, search, and attach recent Rootly incidents in Zendesk.
* Updating the incident's title, description, and/or status in Rootly will also update the corresponding Zendesk ticket.
* Ability to create a Rootly action item in Zendesk.
* Updating an action item's title, description, and/or status in Rootly will also update the corresponding Zendesk ticket.
* Ability to view, search, and attach recent Rootly incidents in Zendesk.
 * Ability to view active or related Rootly incidents in Zendesk and attach them to the Zendesk ticket.
 Limitations include:
* Changing Zendesk incident ticket attributes will not update incident attributes in Rootly.
* Changing the Zendesk action item ticket status will not update the action item status in Rootly.
## Setting Up
Limitations include:
* Changing Zendesk incident ticket attributes will not update incident attributes in Rootly.
* Changing the Zendesk action item ticket status will not update the action item status in Rootly.
## Setting Up
 ## Permissions
Following oauth2 scopes are required
```ruby
users:read
tickets:write
webhooks:write
triggers:write
```
## Permissions
Following oauth2 scopes are required
```ruby
users:read
tickets:write
webhooks:write
triggers:write
```
 ## Uninstall
You can **uninstall** this integration in the integrations panel by clicking **Configure > Delete**
## Support
If you need help or more information about this integration, please contact [support@rootly.com](mailto:support@rootly.com).
# Installation
Source: https://docs.rootly.com/integrations/zoom/installation
## Installing Zoom on Rootly
## Uninstall
You can **uninstall** this integration in the integrations panel by clicking **Configure > Delete**
## Support
If you need help or more information about this integration, please contact [support@rootly.com](mailto:support@rootly.com).
# Installation
Source: https://docs.rootly.com/integrations/zoom/installation
## Installing Zoom on Rootly
 ## Available Workflow Actions
### Create a Zoom Room
This action allows you to **create a Zoom link for an incident.**
## Available Workflow Actions
### Create a Zoom Room
This action allows you to **create a Zoom link for an incident.**
 #### Name
This field is automatically set for you. You can rename this field to whatever best describes your action. The value in this field does not affect how the workflow action behaves.
#### Meeting Name
This field allows you to set the Zoom meeting's title. The default is set to `{{ incident.title }}` to match the title of your incident. This field supports Liquid syntax.
#### Name
This field is automatically set for you. You can rename this field to whatever best describes your action. The value in this field does not affect how the workflow action behaves.
#### Meeting Name
This field allows you to set the Zoom meeting's title. The default is set to `{{ incident.title }}` to match the title of your incident. This field supports Liquid syntax.
 ## Installation
Please see the [**Installation** page](/integrations/zoom/installation "Installation") to get started with your Zoom integration.
## Workflows
Rootly relies on workflows to automate interactions with Zoom. The [**Workflows** page](/integrations/zoom/workflows "Workflows") will walk you through how to set up commonly used workflows involving Zoom.
## Support
If you need help or more information about this integration, please contact [support@rootly.com](mailto:support@rootly.com) or start a chat by navigating to **Help > Chat with Us**.
# Introduction to Rootly
Source: https://docs.rootly.com/introduction-to-rootly
To learn more about the features available to you in Rootly, see our demo video.
## Watch our Demo Video
# Action Item Liquid Variables
Source: https://docs.rootly.com/liquid/action-item-variables
You can use action items variables with genius workflows:
# Variables[](#nHtHd)
## Installation
Please see the [**Installation** page](/integrations/zoom/installation "Installation") to get started with your Zoom integration.
## Workflows
Rootly relies on workflows to automate interactions with Zoom. The [**Workflows** page](/integrations/zoom/workflows "Workflows") will walk you through how to set up commonly used workflows involving Zoom.
## Support
If you need help or more information about this integration, please contact [support@rootly.com](mailto:support@rootly.com) or start a chat by navigating to **Help > Chat with Us**.
# Introduction to Rootly
Source: https://docs.rootly.com/introduction-to-rootly
To learn more about the features available to you in Rootly, see our demo video.
## Watch our Demo Video
# Action Item Liquid Variables
Source: https://docs.rootly.com/liquid/action-item-variables
You can use action items variables with genius workflows:
# Variables[](#nHtHd)
Hello world
#| Date | #User | #Event | #
|---|---|---|
| December 8 2022 23:04:28 PST | #John D | #Event 1 | #
| December 8 2022 23:04:28 PST | #Dalyte K | #Event 2 | #
Hello world
# #| Creation Date | #Due Date | #Kind | #Priority | #Status | #Assignee | #Summary | #
|---|---|---|---|---|---|---|
| December 7 2022 23:04:28 PST | #December 8 2022 00:00:00 PST | #Task | #Low | #Open | #John D | #Action Item 1 | #
| December 7 2022 23:04:28 PST | #December 8 2022 00:00:00 PST | #Follow Up | #High | #Done | #Dalyte K | #Action Item 2 | #
 ## Incidents / services
**Incidents / services** is a great place to see what \*\*services \*\*are the \*\*most impacted \*\*by your incidents over time.
## Incidents / services
**Incidents / services** is a great place to see what \*\*services \*\*are the \*\*most impacted \*\*by your incidents over time.
 ## Incidents / functionalities
**Incidents / functionalities** is a great place to see what \*\*functionalities \*\*are the most impacted by your incidents over time.
## Incidents / functionalities
**Incidents / functionalities** is a great place to see what \*\*functionalities \*\*are the most impacted by your incidents over time.
 ## Incident Cost
# Getting Started
Source: https://docs.rootly.com/notifications/getting-started
Learn about Rootly's notifications and how to get yourself setup.
To update your notifications:
1. Navigate to **Account Settings --> Notifications**.
2. Select **General** or **On-Call Notifications**.
# General Notifications[](#W-59U)
For general Email Notifications, you have the following options to :
* Weekly summary of all Incidents in the previous week
* When an action item is assigned to me
* When an incident role is assigned to me
* When a postmortem is published
* Rootly product updates, events and news
For general Slack Notifications, you have the following options:
* When an action item is assigned to me
* When an Incident role is assigned to me
* When you are invited to join an Incident
* When your user appears in the initial incident message mention your user (ex. @rootly\_bot)
* When your user appears in Slack incident events mention your user (ex. @rootly\_bot)
# On-Call Notifications[](#Rm2-c)
### On-Call Shift Reminders[](#52dlV)
## Incident Cost
# Getting Started
Source: https://docs.rootly.com/notifications/getting-started
Learn about Rootly's notifications and how to get yourself setup.
To update your notifications:
1. Navigate to **Account Settings --> Notifications**.
2. Select **General** or **On-Call Notifications**.
# General Notifications[](#W-59U)
For general Email Notifications, you have the following options to :
* Weekly summary of all Incidents in the previous week
* When an action item is assigned to me
* When an incident role is assigned to me
* When a postmortem is published
* Rootly product updates, events and news
For general Slack Notifications, you have the following options:
* When an action item is assigned to me
* When an Incident role is assigned to me
* When you are invited to join an Incident
* When your user appears in the initial incident message mention your user (ex. @rootly\_bot)
* When your user appears in Slack incident events mention your user (ex. @rootly\_bot)
# On-Call Notifications[](#Rm2-c)
### On-Call Shift Reminders[](#52dlV)
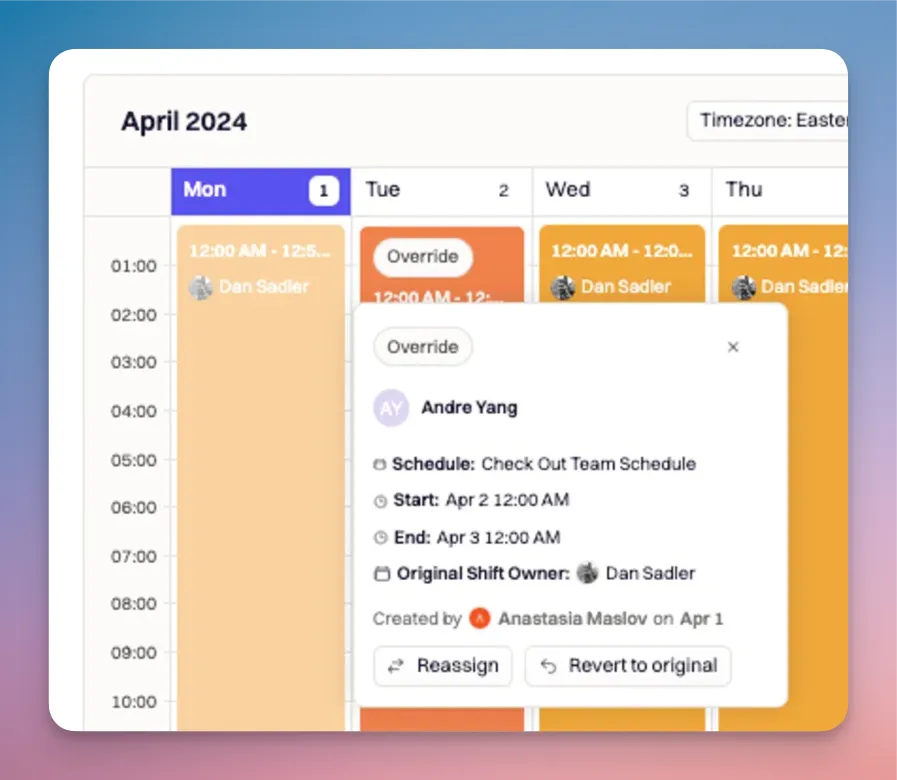

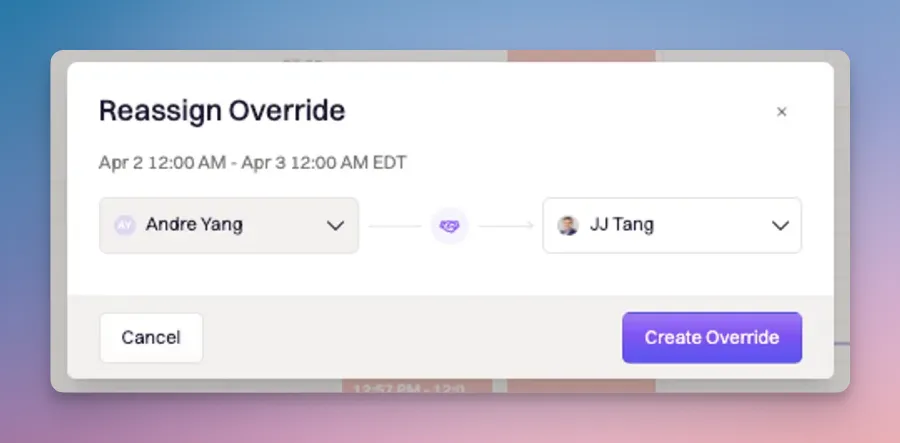 ## Pause a Schedule
In order to pause a Schedule, you will need to select the Escalation Policy from which the Schedule will be removed:
1. Navigate to On-Call --> Escalation Policies
2. Select the Escalation Policy from which you would like to remove the schedule.
3. Click 'Edit Escalation Policy'
4. Remove the User, Team or Channel under 'Who do we notify?'
5. Click 'Save Escalation Policy' to apply changes.
# Overview
Source: https://docs.rootly.com/on-call/escalation-policies
Learn how to get started with escalation policies.
## Create an Escalation Policy
Escalation policies are used to ensure timely and appropriate response by automatically notifying the right personnel when an incident exceeds predefined thresholds.
## Pause a Schedule
In order to pause a Schedule, you will need to select the Escalation Policy from which the Schedule will be removed:
1. Navigate to On-Call --> Escalation Policies
2. Select the Escalation Policy from which you would like to remove the schedule.
3. Click 'Edit Escalation Policy'
4. Remove the User, Team or Channel under 'Who do we notify?'
5. Click 'Save Escalation Policy' to apply changes.
# Overview
Source: https://docs.rootly.com/on-call/escalation-policies
Learn how to get started with escalation policies.
## Create an Escalation Policy
Escalation policies are used to ensure timely and appropriate response by automatically notifying the right personnel when an incident exceeds predefined thresholds.
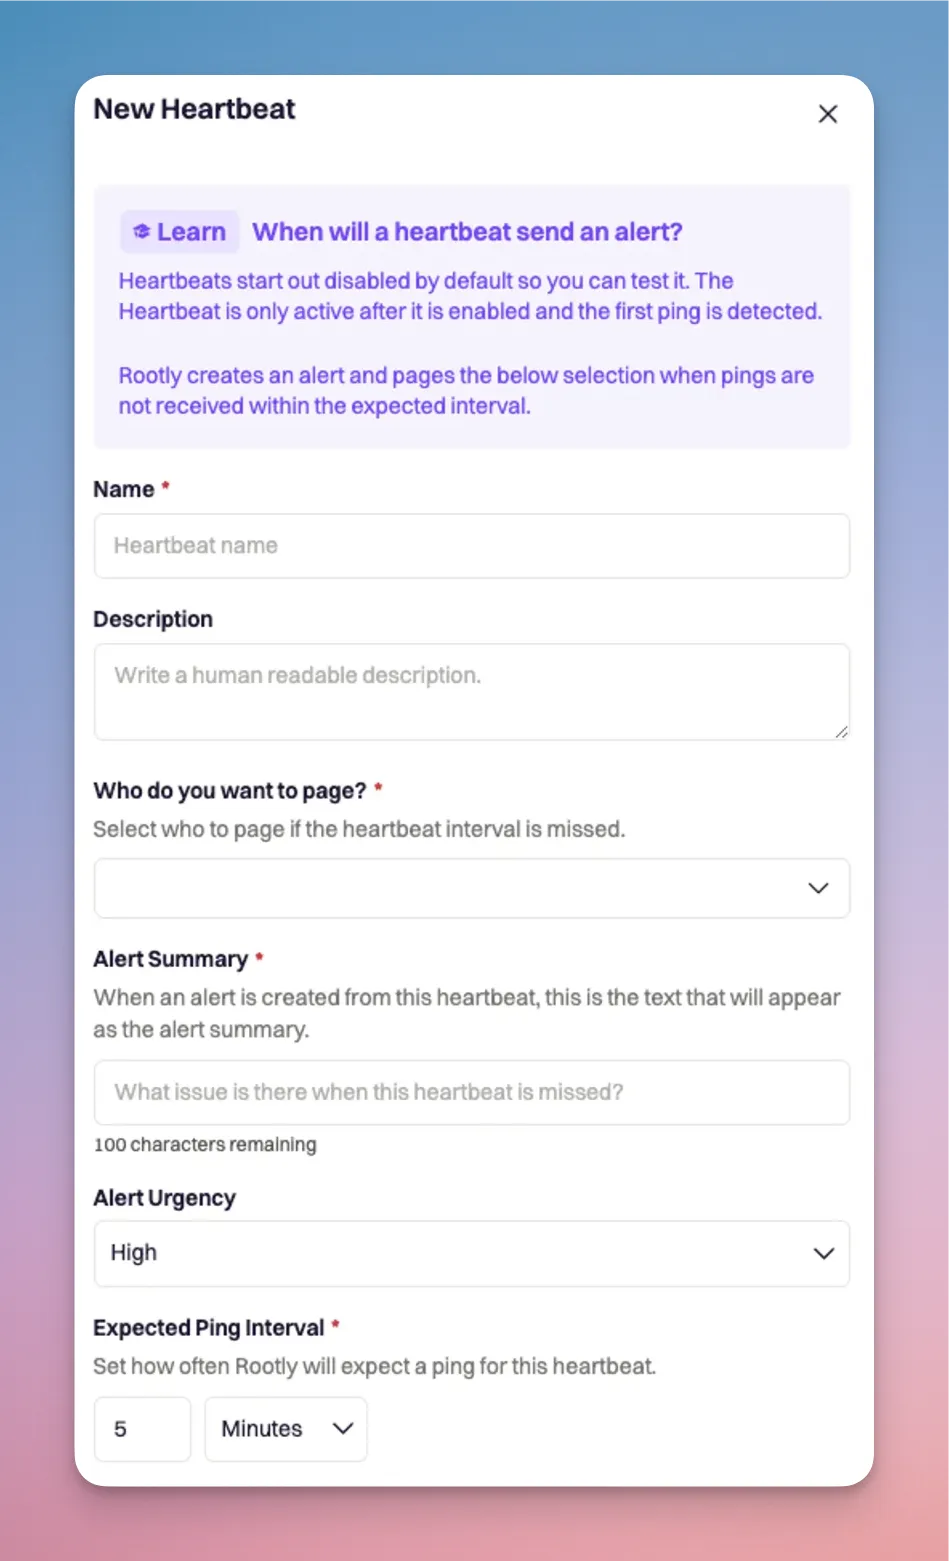 # Adding a holiday calendar
Source: https://docs.rootly.com/on-call/holiday-calendar
Preview team holiday and PTO calendars alongside your Rootly schedules to identify conflicts.
Use Holiday Schedules to preview your team's upcoming holidays and paid-time-off alongside your on-call schedules to quickly identify conflicts and schedule overrides.
## Creating a holiday calendar
To create a new holiday calendar:
1. Navigate to Schedules in the Rootly dashboard.
2. Select the 'Holiday calendars' dropdown in the calendar preview and then 'Add your team's holiday calendar' link.
3. Select 'Add a holiday calendar'.
4. Enter the iCal URL of your team calendar. Add a descriptive name. Select the relevant timezone for the calendar.
5. Finally, click 'Add'.
Back in your Schedule view, you can now select your calendar to preview the events with your on-call schedule.
## Working with holiday calendars
While previewing a holiday calendar, Rootly will highlight on-call shifts that have potential conflicts with your holiday calendar, such as a responder being on vacation.
Check out [Creating Overrides](https://docs.rootly.com/on-call/on-call-shifts#create-overrides-for-on-call-shifts) to learn how to update your schedule to ensure you have coverage when responders are not available to take their shift.
# Live Call Routing
Source: https://docs.rootly.com/on-call/live-call-routing
Learn how to set up live call routing!
## Overview
Live Call Routing offers two options for handling urgent incidents: calls can either be routed instantly to the on-call team member for immediate response, or directed to a voicemail where the message is logged and the team is alerted. This flexibility ensures that critical issues are managed effectively, whether they require immediate attention or can be addressed shortly after.
## Configuring Live Call Routing
To create a new routing number in the web app:
1. Navigate to On-Call tab --> Live Call Routing Tab and click + New Routing Number.
2. Choose between Route to Voicemail or Connect Live
## Route to Voicemail
Selecting route to voicemail will route calls directly to voicemail for message logging and reviewing
### Number Tab
* Give your new routing number a Name (required)
* Select a Country (required)
* Select a Number Type (required)
* Once saved you will see Your Number appear
# Adding a holiday calendar
Source: https://docs.rootly.com/on-call/holiday-calendar
Preview team holiday and PTO calendars alongside your Rootly schedules to identify conflicts.
Use Holiday Schedules to preview your team's upcoming holidays and paid-time-off alongside your on-call schedules to quickly identify conflicts and schedule overrides.
## Creating a holiday calendar
To create a new holiday calendar:
1. Navigate to Schedules in the Rootly dashboard.
2. Select the 'Holiday calendars' dropdown in the calendar preview and then 'Add your team's holiday calendar' link.
3. Select 'Add a holiday calendar'.
4. Enter the iCal URL of your team calendar. Add a descriptive name. Select the relevant timezone for the calendar.
5. Finally, click 'Add'.
Back in your Schedule view, you can now select your calendar to preview the events with your on-call schedule.
## Working with holiday calendars
While previewing a holiday calendar, Rootly will highlight on-call shifts that have potential conflicts with your holiday calendar, such as a responder being on vacation.
Check out [Creating Overrides](https://docs.rootly.com/on-call/on-call-shifts#create-overrides-for-on-call-shifts) to learn how to update your schedule to ensure you have coverage when responders are not available to take their shift.
# Live Call Routing
Source: https://docs.rootly.com/on-call/live-call-routing
Learn how to set up live call routing!
## Overview
Live Call Routing offers two options for handling urgent incidents: calls can either be routed instantly to the on-call team member for immediate response, or directed to a voicemail where the message is logged and the team is alerted. This flexibility ensures that critical issues are managed effectively, whether they require immediate attention or can be addressed shortly after.
## Configuring Live Call Routing
To create a new routing number in the web app:
1. Navigate to On-Call tab --> Live Call Routing Tab and click + New Routing Number.
2. Choose between Route to Voicemail or Connect Live
## Route to Voicemail
Selecting route to voicemail will route calls directly to voicemail for message logging and reviewing
### Number Tab
* Give your new routing number a Name (required)
* Select a Country (required)
* Select a Number Type (required)
* Once saved you will see Your Number appear
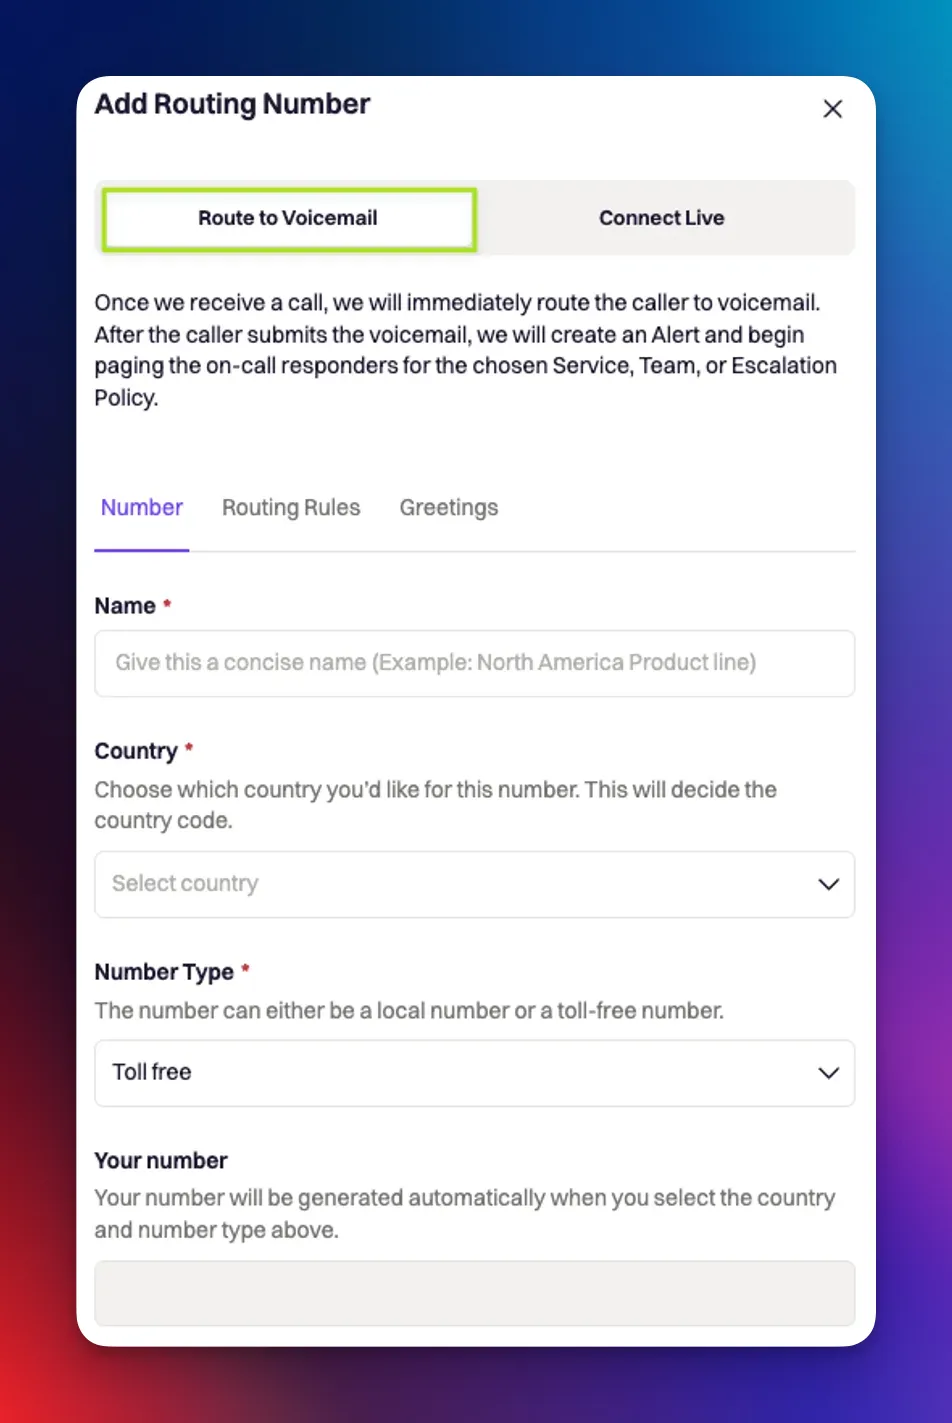 ## Routing Rules Tab
* Define Who do you want to page? (required)
* Sent an Alert Urgency (required)
## Greetings Tab
* Add a greeting message for How would you like to greet your caller?
* Click Create Routing Number
## Routing Rules Tab
* Define Who do you want to page? (required)
* Sent an Alert Urgency (required)
## Greetings Tab
* Add a greeting message for How would you like to greet your caller?
* Click Create Routing Number
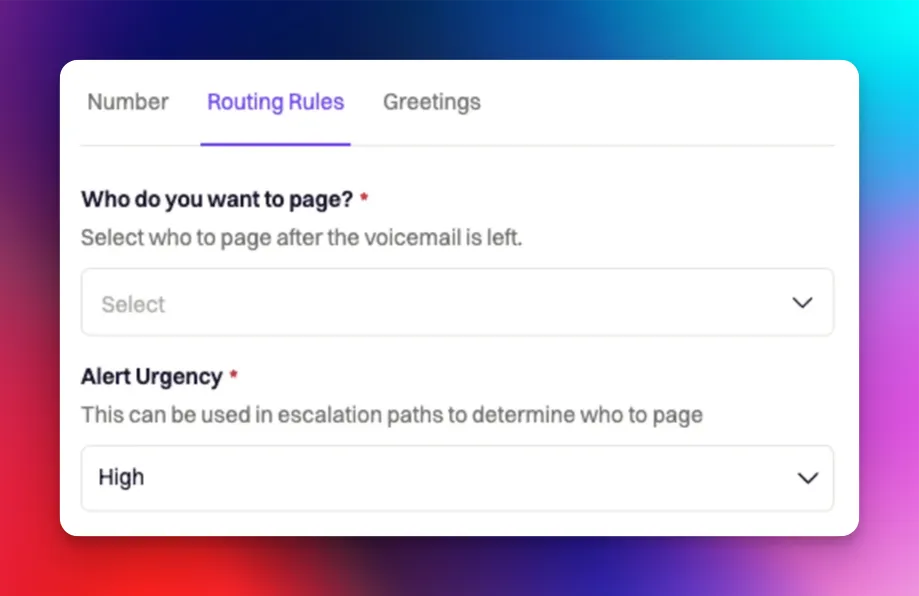 ## Connect Live
Selecting connect live will connect the caller live to an on-call team member for immediate response.
### Number Tab
* Give your new routing number a Name (required)
* Select a Country (required)
* Select a Number Type (required)
* Once saved you will see Your Number appear
## Connect Live
Selecting connect live will connect the caller live to an on-call team member for immediate response.
### Number Tab
* Give your new routing number a Name (required)
* Select a Country (required)
* Select a Number Type (required)
* Once saved you will see Your Number appear
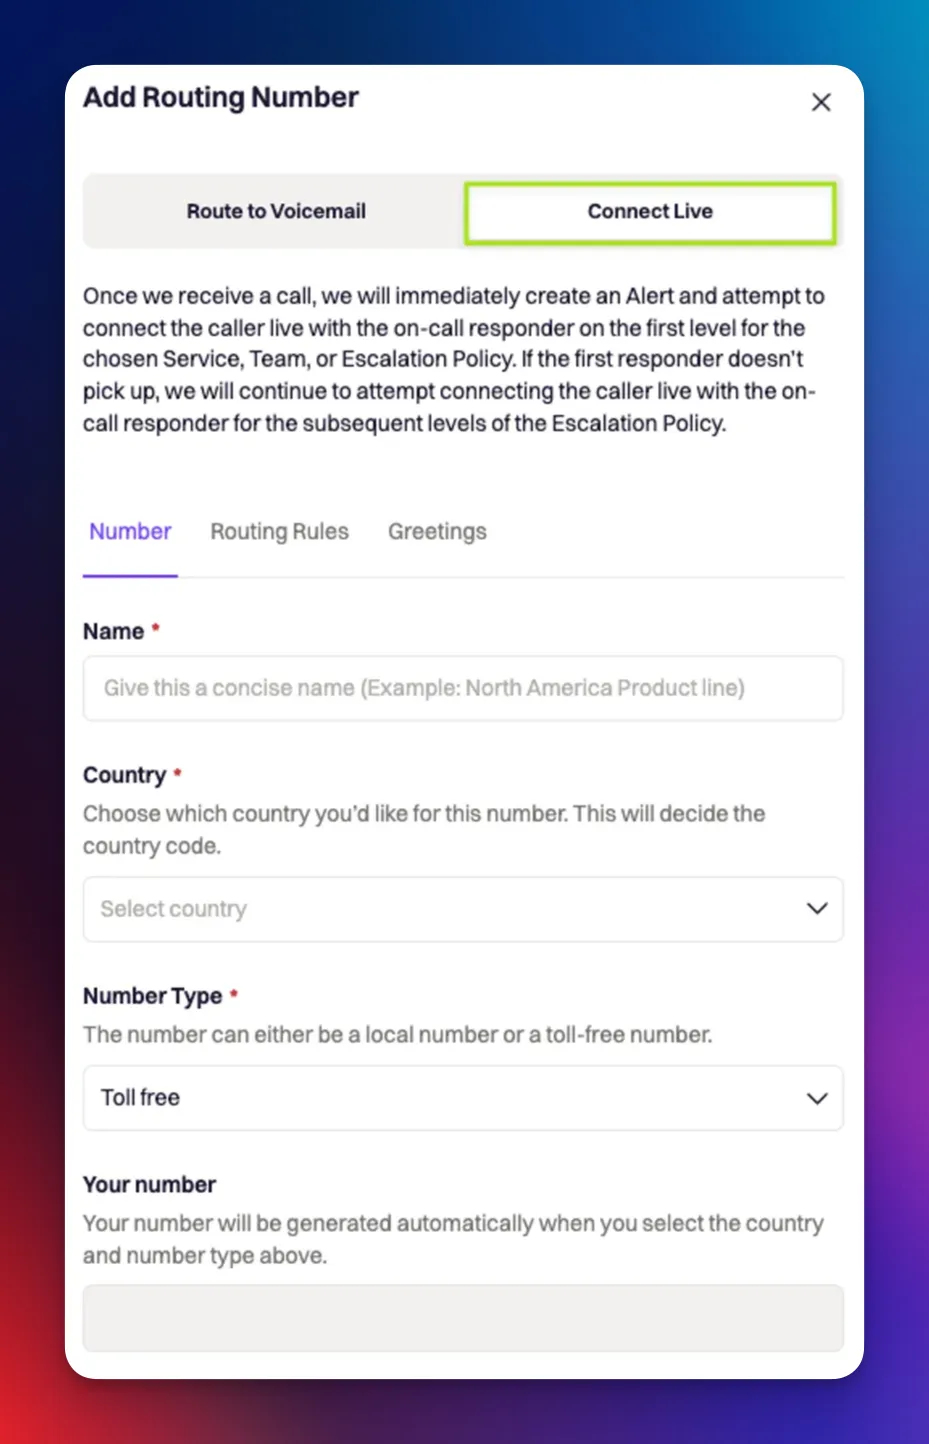 ### Routing Rules Tab
* Define Who do you want to page? (required)
* Sent an Alert Urgency (required)
* Under Advanced Settings
* You can choose to Redirect the caller to voicemail if there has been no answer after X amount of time
* Toggle on Allow the caller to go directly to voicemail to add an additional prompt after the greeting to allow the user to choose to go to voicemail or be connected live.
* Choose how quickly you want to Escalte to the next Escalation Policy after X amount of time
* This will override the length of time between levels on your escalation policy since most users want a faster escalation since it is a live environment.
* Choose to Auto-resolve the alert when the call ends
### Routing Rules Tab
* Define Who do you want to page? (required)
* Sent an Alert Urgency (required)
* Under Advanced Settings
* You can choose to Redirect the caller to voicemail if there has been no answer after X amount of time
* Toggle on Allow the caller to go directly to voicemail to add an additional prompt after the greeting to allow the user to choose to go to voicemail or be connected live.
* Choose how quickly you want to Escalte to the next Escalation Policy after X amount of time
* This will override the length of time between levels on your escalation policy since most users want a faster escalation since it is a live environment.
* Choose to Auto-resolve the alert when the call ends
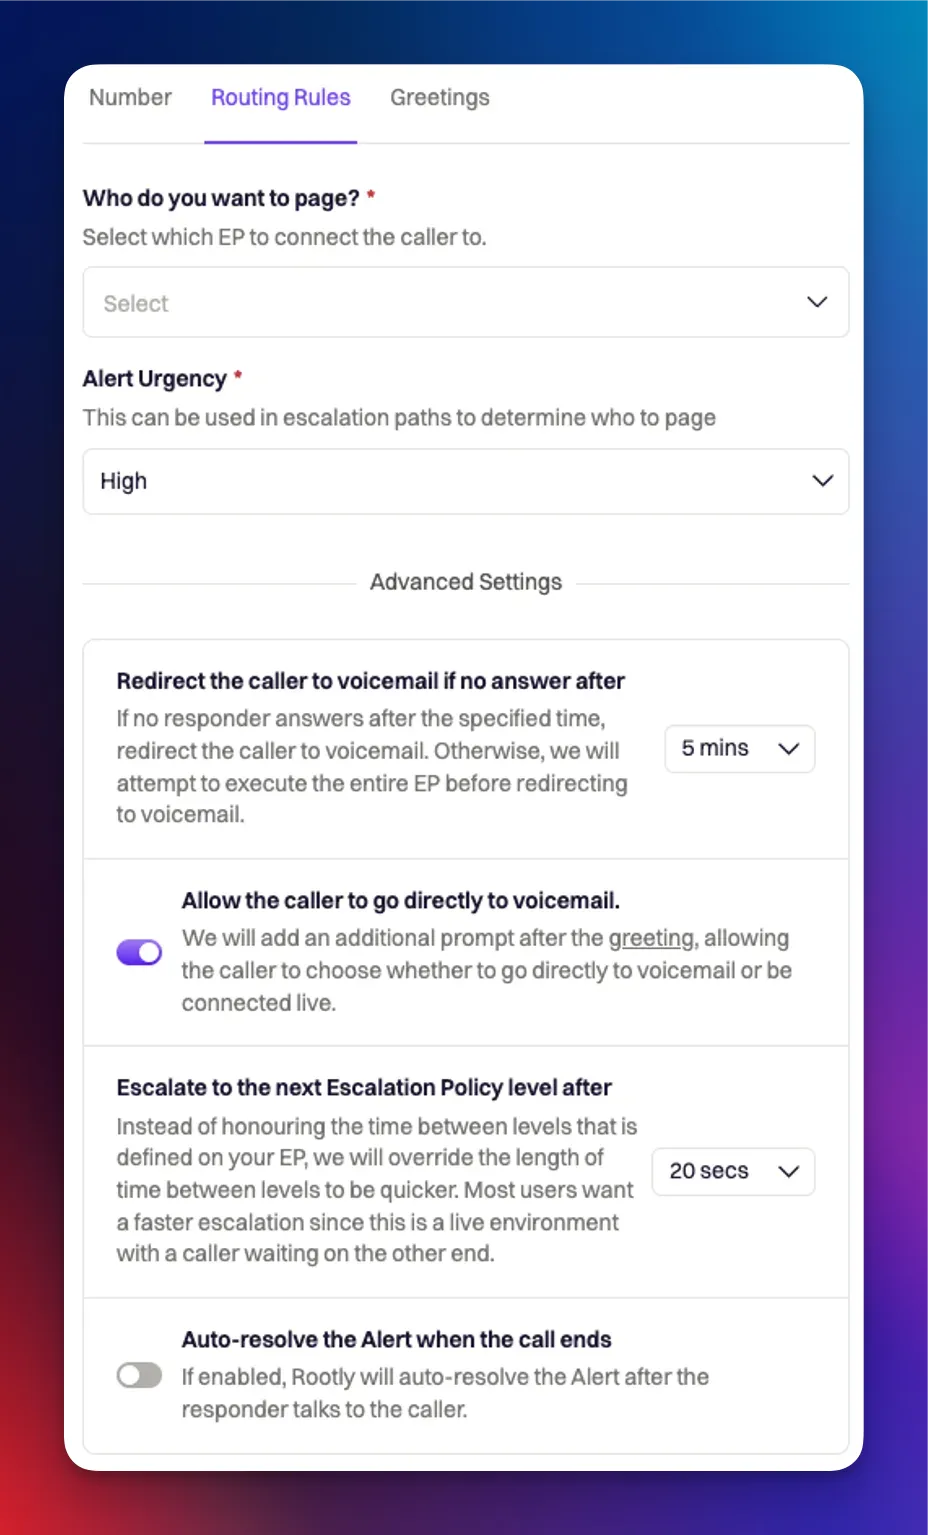 ### Greetings Tab
* Add a greeting message for How would you like to greet your caller?
* Set Waiting music
* Add a Voicemail prompt
* This will be the message that is played when the caller is sent to voicemail
* Click Create Routing Number
### Greetings Tab
* Add a greeting message for How would you like to greet your caller?
* Set Waiting music
* Add a Voicemail prompt
* This will be the message that is played when the caller is sent to voicemail
* Click Create Routing Number
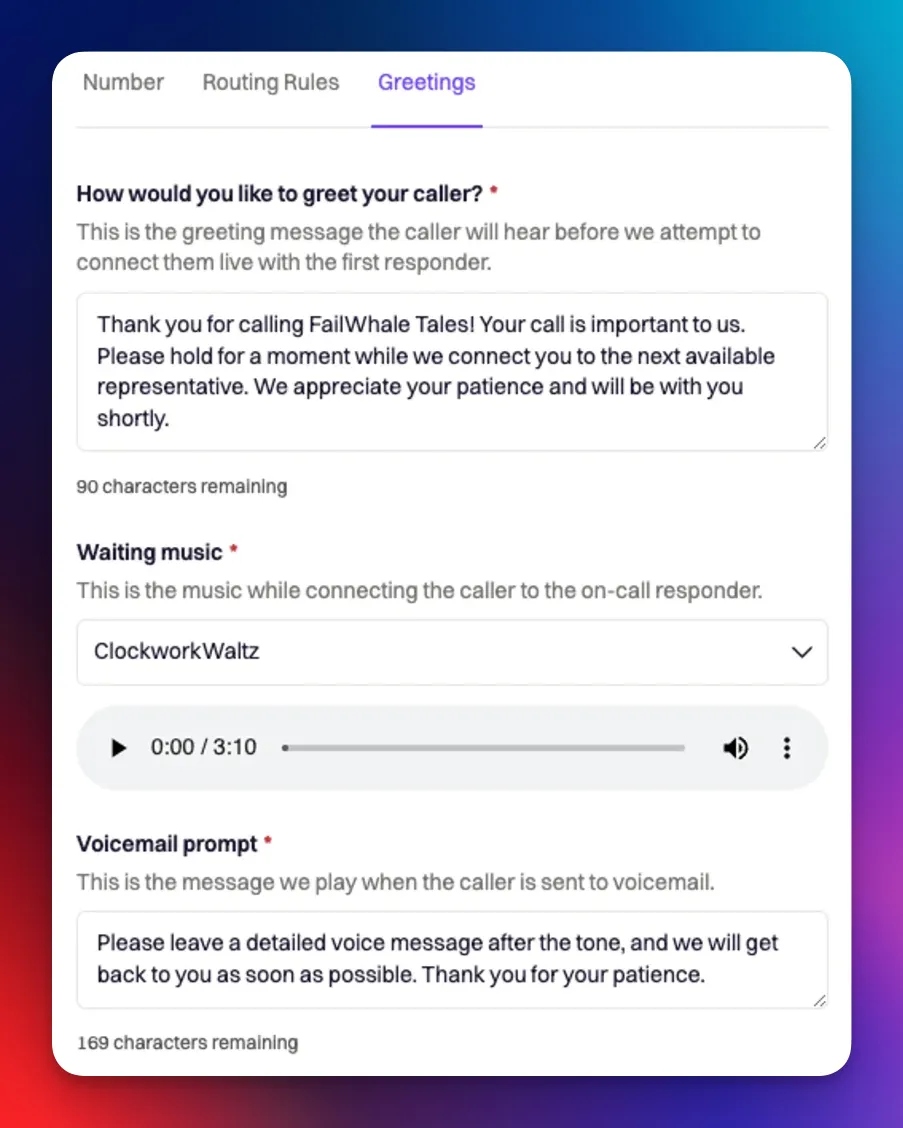 # Mobile App
Source: https://docs.rootly.com/on-call/mobile-app

# Mobile App
Source: https://docs.rootly.com/on-call/mobile-app

 Your On-Call Metrics dashboard includes the following data by default:
* Total Alerts: Total number of alerts triggered in your Rootly instance.
* Mean Time to Acknowledge: Average time between an alert being triggered to it being acknowledged by a responder. This represents how quickly your team is responding to alerts.
* Mean Time to Resolve: Average time between an alert being triggered to it being resolved. This represents how quickly your team is resolving alerts.
* MTTA by Responder: Mean time to acknowledge per responder in your Rootly instance.
* MTTR by Service: Mean time to resolve per impacted service.
* Mean Time between Failure: The average duration of time between alerts being triggered. This represents how often your team is being paged.
* Acknowledge Rate: Percentage of alerts that are acknowledged by a responder.
* Alerts by Source: Total number of alerts per Alert Source.
* Alerts by Responder: Total number of alerts each responder acknowledges and/or resolves.
* Alerts by Urgency: Total number of alerts per urgency.
* Alerts by Escalation Policy: Total number of alerts associated with each escalation policy.
* Alerts by Service: Total number of alerts associated with each service.
* Response Effort: Total amount of time dedicated to incident response, from when each alert is acknowledged to being resolved.
## Customizing your on-call metrics dashboard
Your entire on-call metrics dashboard can be completely customized. Hover over each panel and select Settings to begin customizing the chart. Alternatively, add additional panels to begin tracking other metrics.
## Measuring on-call and incident response
With Rootly, you're able to manage and measure your entire incident response, from the initial alert all the way to the incident's post-mortem. To understand your organization's incident response end-to-end, create a dashboard in Rootly's Metrics that measures key metrics important to your team.
1. Navigate to Rootly's Metrics tab and select 'New Dashboard'.
2. Click 'Add Panel' and begin configuring your chart to represent the metric you want to visualize.
3. Use the 'Alerts' collection to measure your on-call response, and 'Incidents' to measure your incident response.
## Sharing with teams
The entire dashboard, as well as each individual panel can be exported and shared with your team members outside of Rootly. Hover over the triple ellipsis button and select the format you'd like to export the data into.
# On-Call Notifications
Source: https://docs.rootly.com/on-call/on-call-notifications
Learn how to set up shift reminders and notification rules!
To get started naigate to On-Call tab --> On-call Notifications
## Shift Reminders
Shift Reminders allow you to decide if you would like to be notified before your shift starts and ends.
Simply toggle on and off shift reminders and configure how you'd like to be notified. This applies to both the frequency of when you’re notified, as well as which methods will be used (push notification, phone call, SMS, email, and/or Slack).
Your On-Call Metrics dashboard includes the following data by default:
* Total Alerts: Total number of alerts triggered in your Rootly instance.
* Mean Time to Acknowledge: Average time between an alert being triggered to it being acknowledged by a responder. This represents how quickly your team is responding to alerts.
* Mean Time to Resolve: Average time between an alert being triggered to it being resolved. This represents how quickly your team is resolving alerts.
* MTTA by Responder: Mean time to acknowledge per responder in your Rootly instance.
* MTTR by Service: Mean time to resolve per impacted service.
* Mean Time between Failure: The average duration of time between alerts being triggered. This represents how often your team is being paged.
* Acknowledge Rate: Percentage of alerts that are acknowledged by a responder.
* Alerts by Source: Total number of alerts per Alert Source.
* Alerts by Responder: Total number of alerts each responder acknowledges and/or resolves.
* Alerts by Urgency: Total number of alerts per urgency.
* Alerts by Escalation Policy: Total number of alerts associated with each escalation policy.
* Alerts by Service: Total number of alerts associated with each service.
* Response Effort: Total amount of time dedicated to incident response, from when each alert is acknowledged to being resolved.
## Customizing your on-call metrics dashboard
Your entire on-call metrics dashboard can be completely customized. Hover over each panel and select Settings to begin customizing the chart. Alternatively, add additional panels to begin tracking other metrics.
## Measuring on-call and incident response
With Rootly, you're able to manage and measure your entire incident response, from the initial alert all the way to the incident's post-mortem. To understand your organization's incident response end-to-end, create a dashboard in Rootly's Metrics that measures key metrics important to your team.
1. Navigate to Rootly's Metrics tab and select 'New Dashboard'.
2. Click 'Add Panel' and begin configuring your chart to represent the metric you want to visualize.
3. Use the 'Alerts' collection to measure your on-call response, and 'Incidents' to measure your incident response.
## Sharing with teams
The entire dashboard, as well as each individual panel can be exported and shared with your team members outside of Rootly. Hover over the triple ellipsis button and select the format you'd like to export the data into.
# On-Call Notifications
Source: https://docs.rootly.com/on-call/on-call-notifications
Learn how to set up shift reminders and notification rules!
To get started naigate to On-Call tab --> On-call Notifications
## Shift Reminders
Shift Reminders allow you to decide if you would like to be notified before your shift starts and ends.
Simply toggle on and off shift reminders and configure how you'd like to be notified. This applies to both the frequency of when you’re notified, as well as which methods will be used (push notification, phone call, SMS, email, and/or Slack).
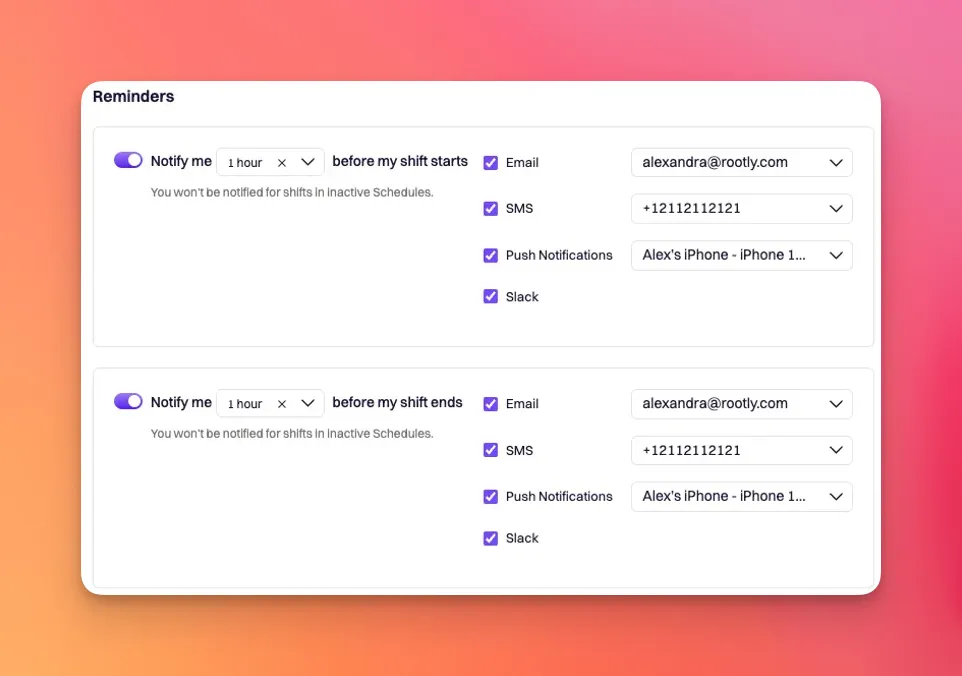 ## Notification Rules
Notification rules determine how you will be notified when an alert is assigned to you. This applies to both the frequency of when you’re notified, as well as which methods will be used (push notification, phone call, SMS, and/or email).
Here you will configure both Audible Notifications and Quiet Notifications.
Add Step(s) for how and when you want to be notified.
Use the Test Notifications button to test out your selected notification methods.
* Audible notifications are critical alerts designed to bypass Do Not Disturb settings, ensuring that on-call responders are reachable through calls and push notifications even during silenced periods.
## Notification Rules
Notification rules determine how you will be notified when an alert is assigned to you. This applies to both the frequency of when you’re notified, as well as which methods will be used (push notification, phone call, SMS, and/or email).
Here you will configure both Audible Notifications and Quiet Notifications.
Add Step(s) for how and when you want to be notified.
Use the Test Notifications button to test out your selected notification methods.
* Audible notifications are critical alerts designed to bypass Do Not Disturb settings, ensuring that on-call responders are reachable through calls and push notifications even during silenced periods.
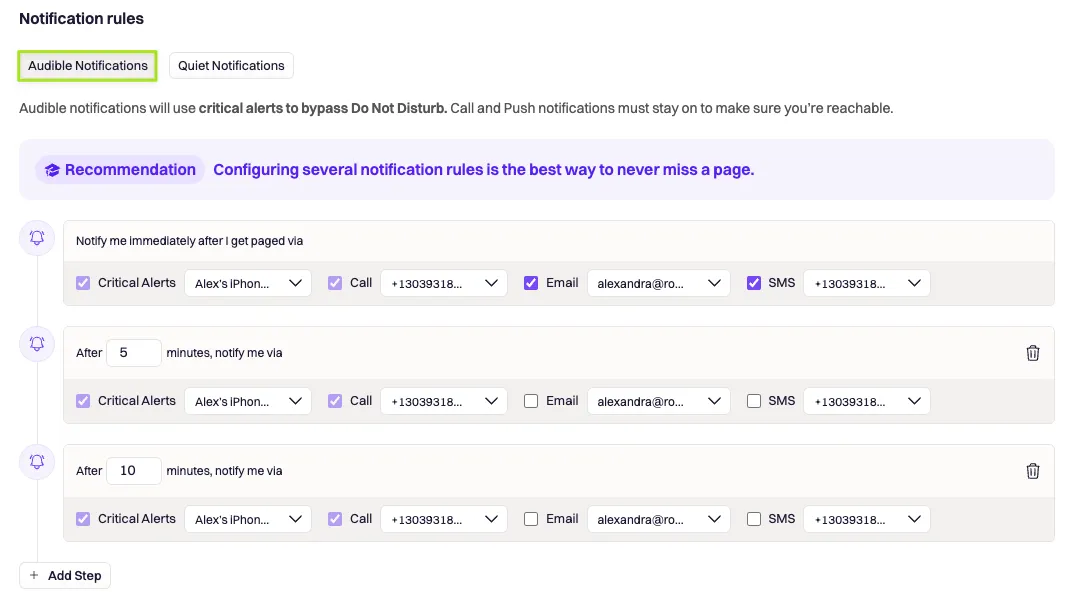 * Quiet notifications are alerts that are delivered with minimal disruption, allowing on-call responders to receive important updates without the urgency of immediate action unless necessary.
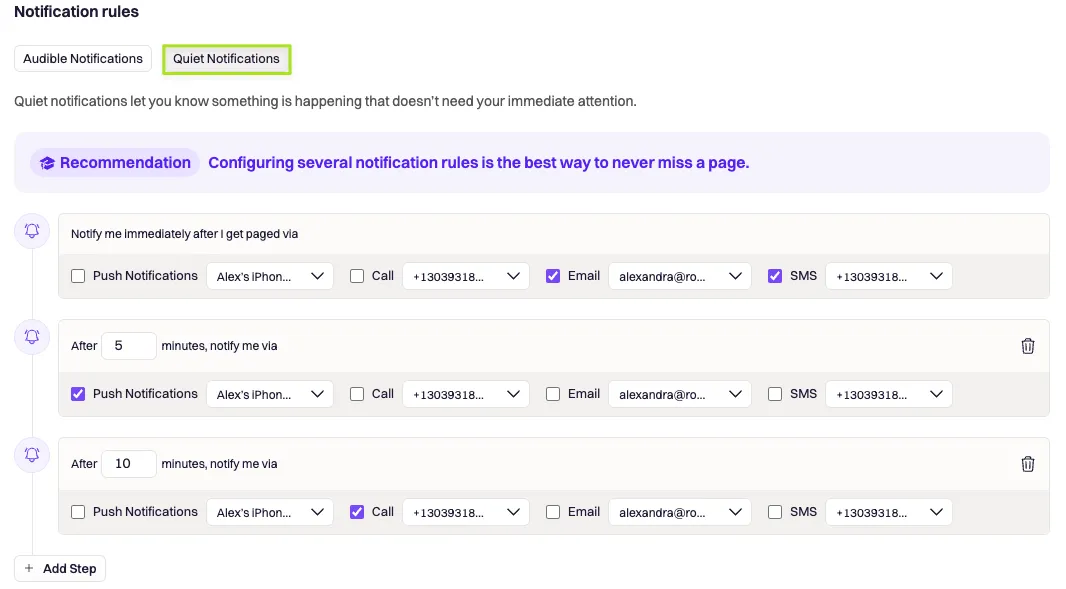 * Lastly, Save Changes.
# On-Call Readiness
Source: https://docs.rootly.com/on-call/on-call-readiness
Ensure your responders are prepared to respond to Rootly Alerts using the On-Call Readiness Report.
This report includes a table of all Rootly users that have been added to a Schedule rotation, along with their On-Call notification preferences. Use this information as a Schedule manager to ensure your responders have a successfully configured their Rootly preferences to receive pages.
* Lastly, Save Changes.
# On-Call Readiness
Source: https://docs.rootly.com/on-call/on-call-readiness
Ensure your responders are prepared to respond to Rootly Alerts using the On-Call Readiness Report.
This report includes a table of all Rootly users that have been added to a Schedule rotation, along with their On-Call notification preferences. Use this information as a Schedule manager to ensure your responders have a successfully configured their Rootly preferences to receive pages.
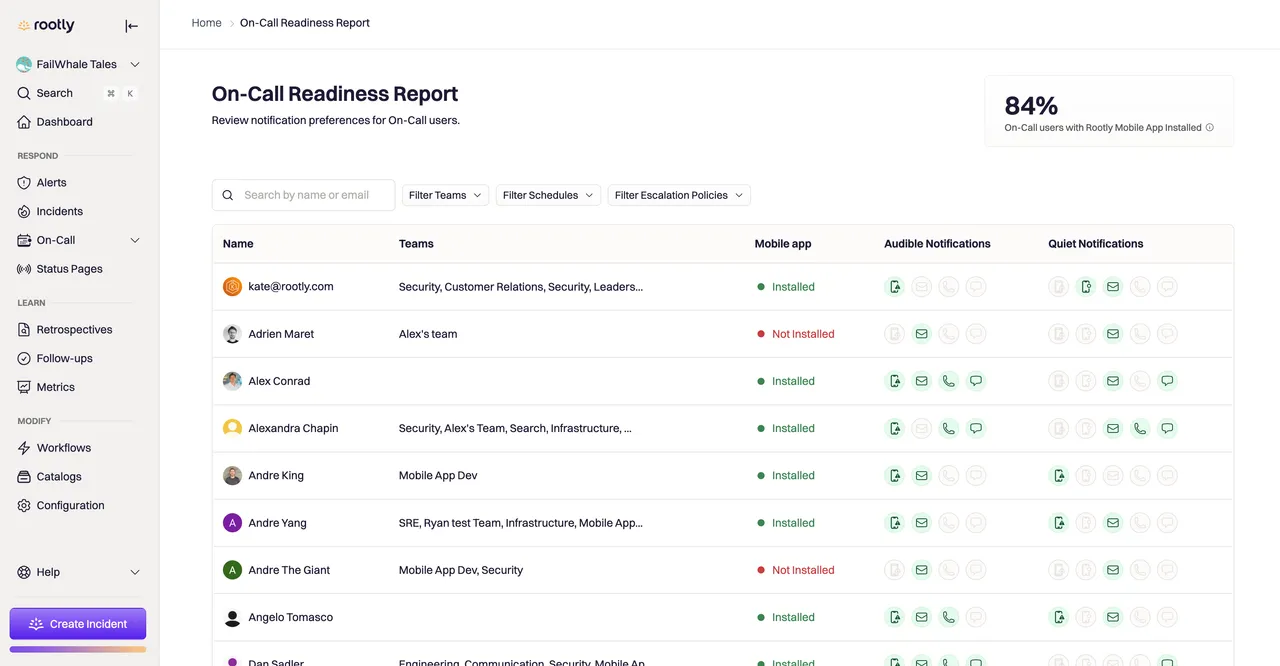 Each icon on the report indicates the methods the responder is able to receive alerts through: green icons indicate the responder has opted in to the notification, whereas grey indicates that it hasn't been configured.
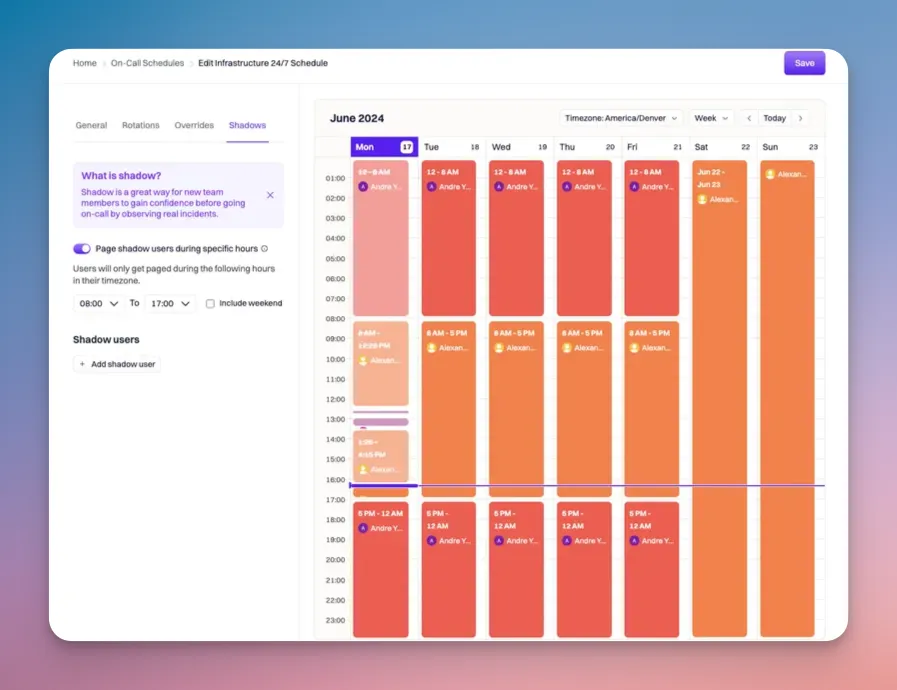 ## Define Active Hours
The Page shadow user during specific hours toggle allows you to set specific hours for which you want the shadow user to be paged. This is great for when you have a 24/7 schedule but you only want the shadow users to be paged during their business hours and not necessarily 24/7. You can also include weekends here if desired by checking the Include weekend check box.
## Define Active Hours
The Page shadow user during specific hours toggle allows you to set specific hours for which you want the shadow user to be paged. This is great for when you have a 24/7 schedule but you only want the shadow users to be paged during their business hours and not necessarily 24/7. You can also include weekends here if desired by checking the Include weekend check box.
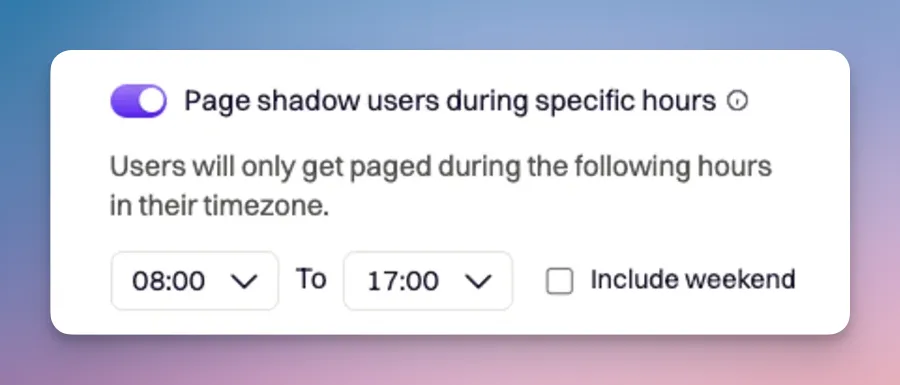 ## Add Shadow Users
A Shadow User can be set up to shadow an entire schedule OR only shadow a specific on-call user that's part of the given schedule.
Once ready to add shadow users, you will click Add shadow user.
### Shadow a User
To have a user shadow a team member, you would select Shadow a user mode. This will allow you to set a specific user to shadow, as well as the duration in which you would like the shadowing to occur.
## Add Shadow Users
A Shadow User can be set up to shadow an entire schedule OR only shadow a specific on-call user that's part of the given schedule.
Once ready to add shadow users, you will click Add shadow user.
### Shadow a User
To have a user shadow a team member, you would select Shadow a user mode. This will allow you to set a specific user to shadow, as well as the duration in which you would like the shadowing to occur.
 ### Shadow a Schedule
To have a user shadow and entire schedule, you would select Shadow a schedule mode.
### Shadow a Schedule
To have a user shadow and entire schedule, you would select Shadow a schedule mode.
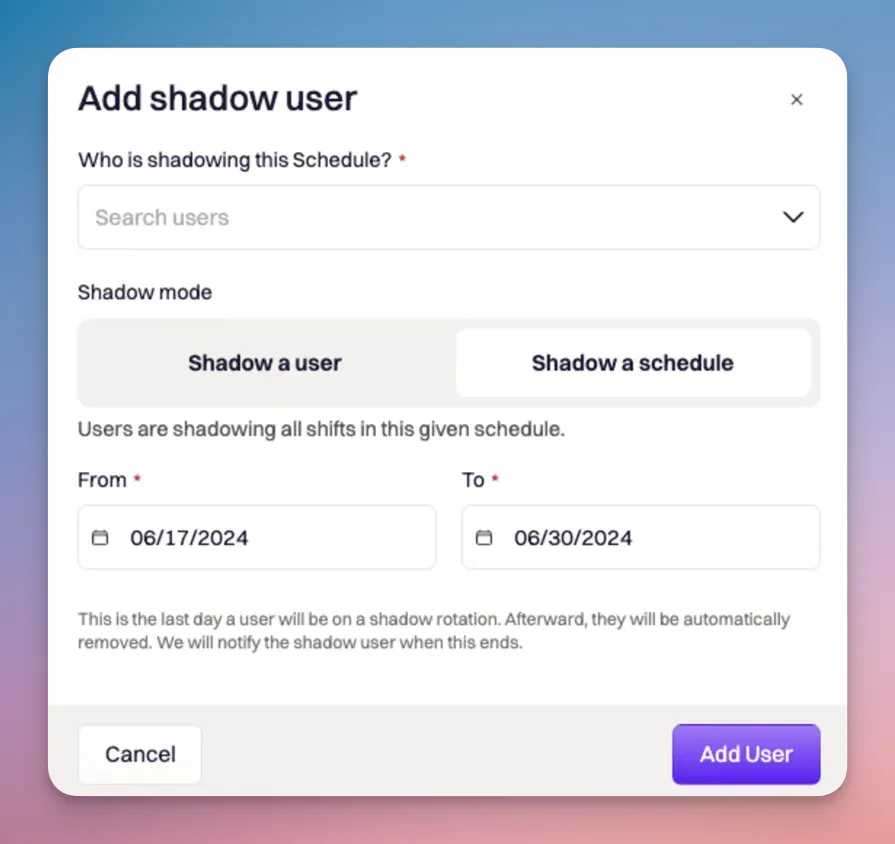 You can have multiple shadow users shadowing at the same time(or different times), while allowing them to shadow specific users or schedules.
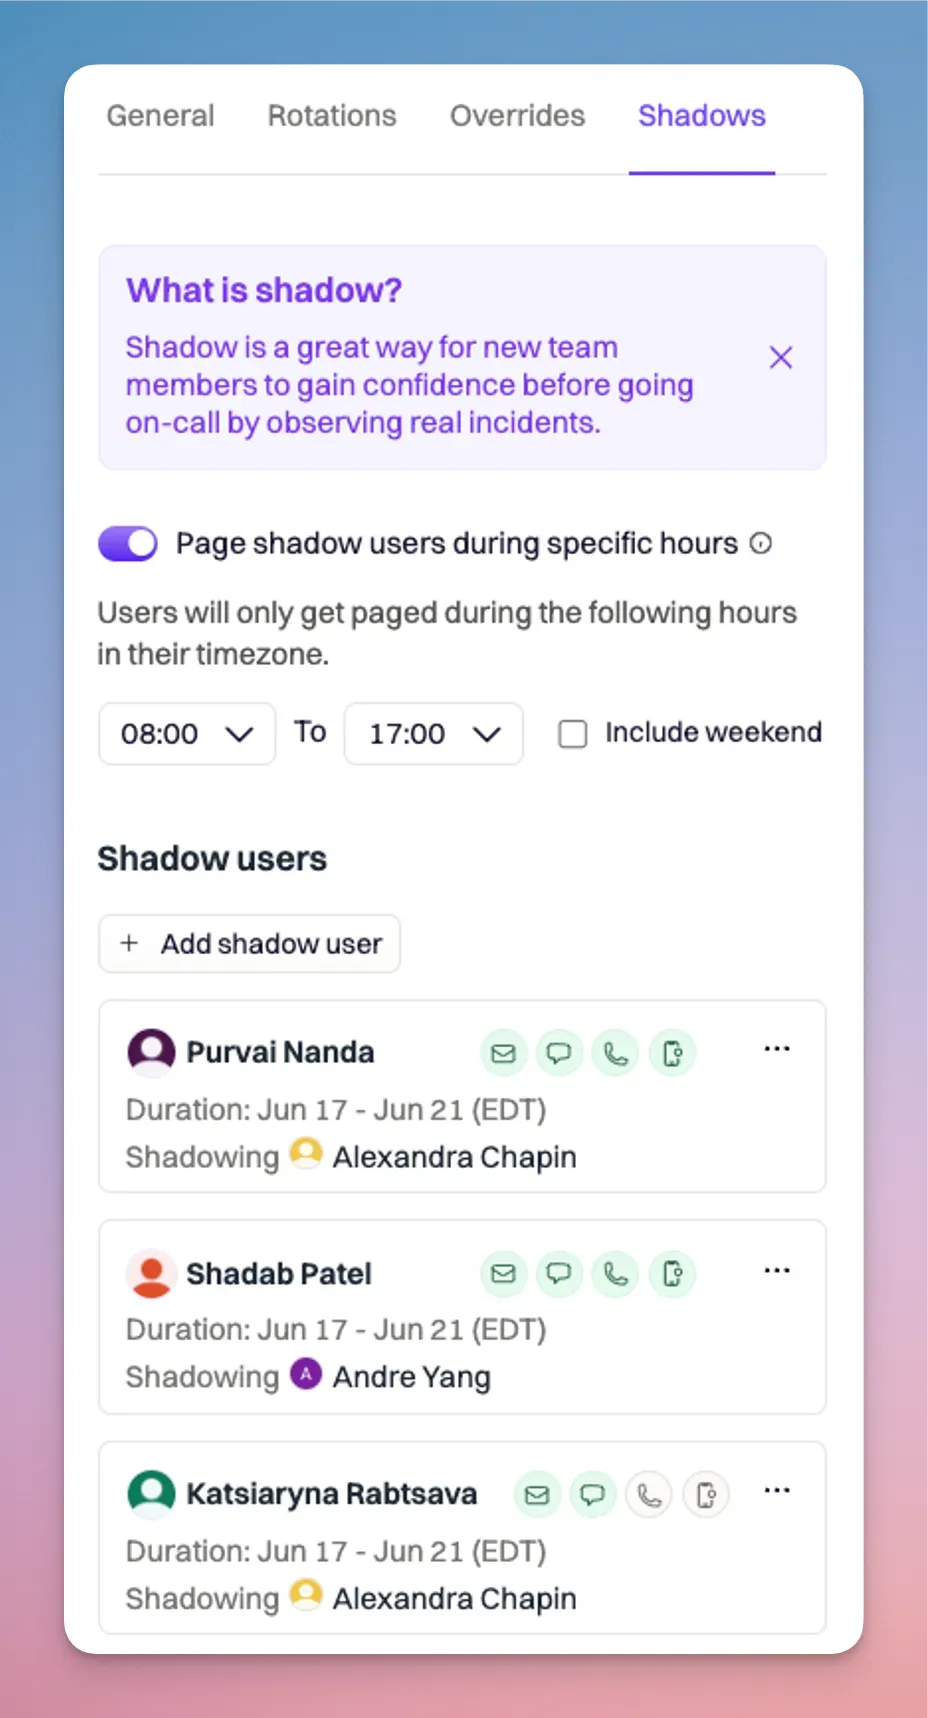 ### View Shadow User on Calendar
You can quickly see who is shadowing by clicking on a shift that has the ghost icon. You will see shadow users listed below the on-call user.
### View Shadow User on Calendar
You can quickly see who is shadowing by clicking on a shift that has the ghost icon. You will see shadow users listed below the on-call user.
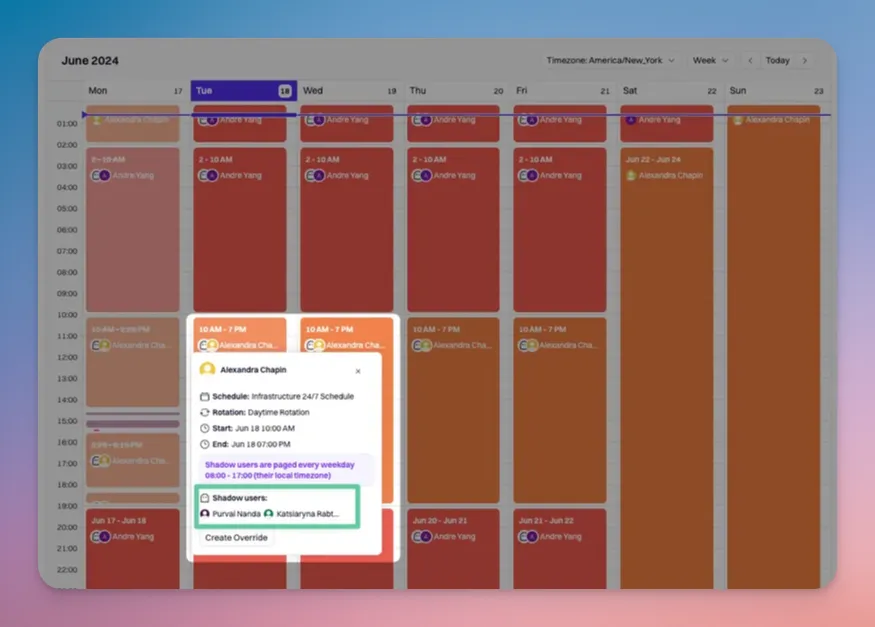 Once shadowing duration has completed, shadow users will automatically be removed from the schedule. There is no need to manually remove them post shadow assignment.
# On-Call Shifts
Source: https://docs.rootly.com/on-call/on-call-shifts
Quickly see when you're on-call next by viewing your shifts.
On-Call Shifts allows users to view their current and upcoming on-call shifts and those of other users in a single, easy-to-use page.
## On-Call Shifts - Web App
To view on-call shifts, navigate to On-Call --> On-Call Shifts page.
Shifts will be grouped based on their status:
* Currently On-Call - User's current on-call shifts.
* Upcoming On-Call - User's upcoming on-call shifts.
* Inactive On-Call - User's inactive on-call shifts due to the schedule not having been assigned to any Escalation Policy.
## Shift Types
### Always on-call shifts
Always on-call shifts will appear under the Currently On-Call section. On the calendar, these will appear as a solid horizontal shift at the top of the calendar.
Once shadowing duration has completed, shadow users will automatically be removed from the schedule. There is no need to manually remove them post shadow assignment.
# On-Call Shifts
Source: https://docs.rootly.com/on-call/on-call-shifts
Quickly see when you're on-call next by viewing your shifts.
On-Call Shifts allows users to view their current and upcoming on-call shifts and those of other users in a single, easy-to-use page.
## On-Call Shifts - Web App
To view on-call shifts, navigate to On-Call --> On-Call Shifts page.
Shifts will be grouped based on their status:
* Currently On-Call - User's current on-call shifts.
* Upcoming On-Call - User's upcoming on-call shifts.
* Inactive On-Call - User's inactive on-call shifts due to the schedule not having been assigned to any Escalation Policy.
## Shift Types
### Always on-call shifts
Always on-call shifts will appear under the Currently On-Call section. On the calendar, these will appear as a solid horizontal shift at the top of the calendar.
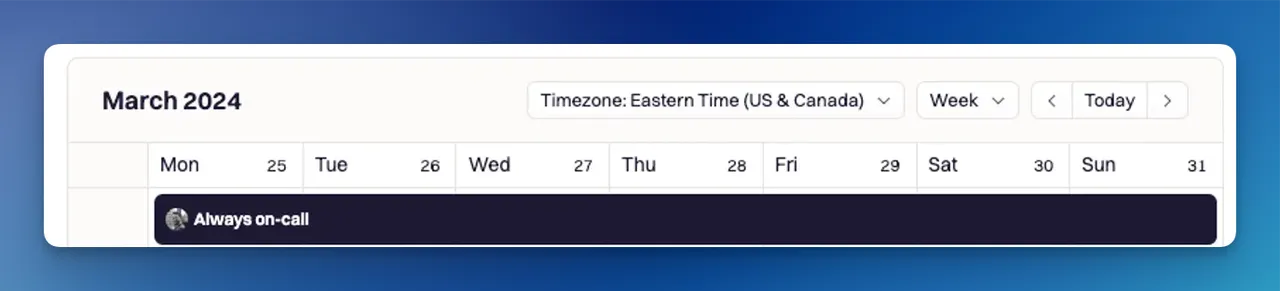 ### Recuring on-call shifts
Recurring on-call shifts will appear under the Currently On-Call and Upcoming On-Call sections. On the calendar, these will appear on the calendar as a solid vertical colour shift
### Recuring on-call shifts
Recurring on-call shifts will appear under the Currently On-Call and Upcoming On-Call sections. On the calendar, these will appear on the calendar as a solid vertical colour shift
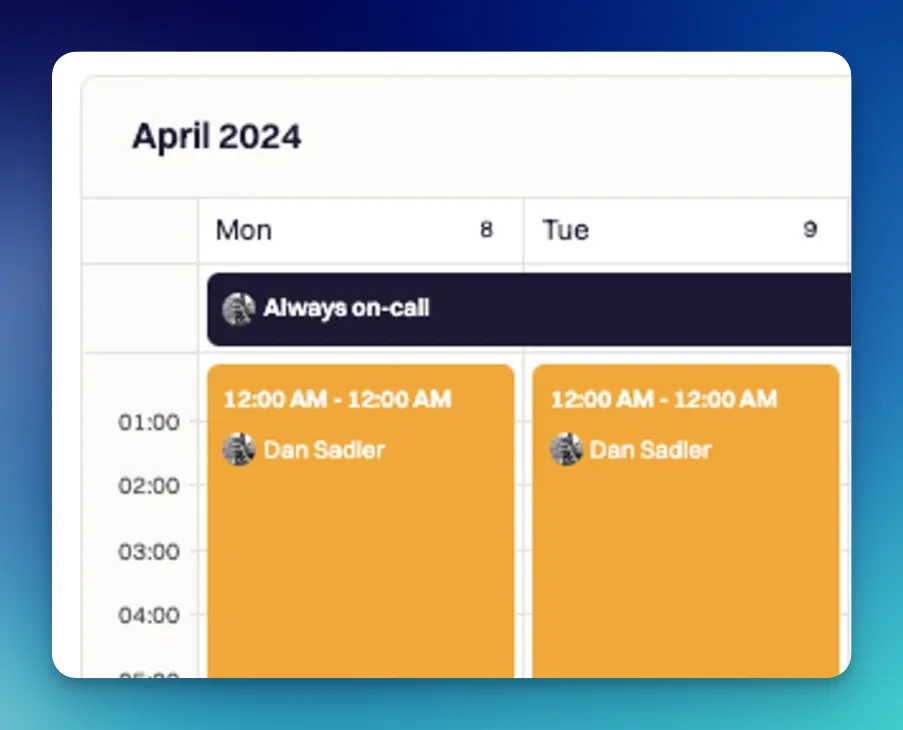 ## View Shifts of Other Users
To view shifts of other users, select the User dropdown and search or scroll for the User.
## Viewing holiday conflicts
Upload a Holiday Calendar to preview your team's vacations and upcoming national holidays within the Rootly shift and schedule view.
While previewing a holiday calendar, Rootly will automatically identify shifts that may have conflicts with your scheduled holidays.
You can quickly create an override to address this conflict either by selecting the holiday event, or the conflicting shift.

## Create Overrides for On-Call Shifts
To create an override for on-call shifts, you can do so by:
1. Navigate to On-Call --> On-Call Shifts
2. Select the User you would like to create an override shift for.
3. Click the 'Create Override' button on the top-right corner or select shift, and in the popover, click the 'Create Override' button.
4. The User whose shifts are filtered in the side draw will appear by default.
5. Select which shifts that will be overridden during your selected timeframe.
6. Select the user who will be assigned to this override shift.
7. Click 'Create Override' to apply changes.
## View Shifts of Other Users
To view shifts of other users, select the User dropdown and search or scroll for the User.
## Viewing holiday conflicts
Upload a Holiday Calendar to preview your team's vacations and upcoming national holidays within the Rootly shift and schedule view.
While previewing a holiday calendar, Rootly will automatically identify shifts that may have conflicts with your scheduled holidays.
You can quickly create an override to address this conflict either by selecting the holiday event, or the conflicting shift.

## Create Overrides for On-Call Shifts
To create an override for on-call shifts, you can do so by:
1. Navigate to On-Call --> On-Call Shifts
2. Select the User you would like to create an override shift for.
3. Click the 'Create Override' button on the top-right corner or select shift, and in the popover, click the 'Create Override' button.
4. The User whose shifts are filtered in the side draw will appear by default.
5. Select which shifts that will be overridden during your selected timeframe.
6. Select the user who will be assigned to this override shift.
7. Click 'Create Override' to apply changes.
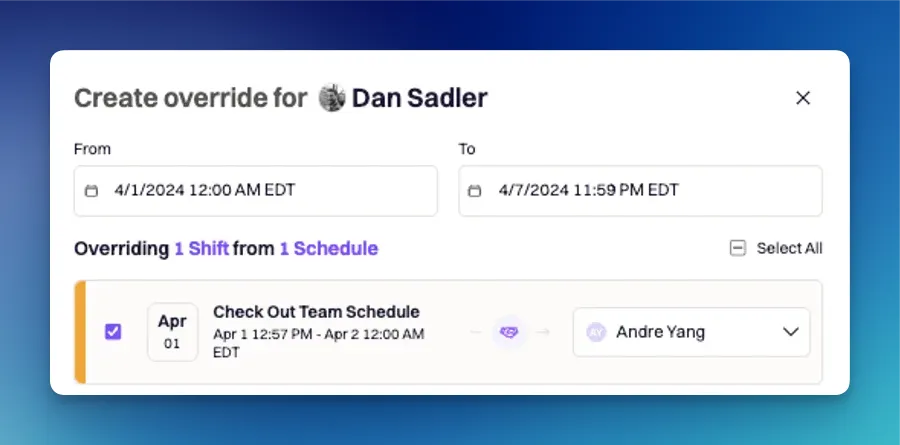 ## Reassign or Revert an Override
1. Navigate to On-Call --> On-Call Shifts
2. Select the User from which you would like to reassign or revert the override shift.
* Shifts that are overrides will have an 'Override' tag on them
### Revert Override
1. Select the override shift you would like to Revert to the original assignee.
2. Click 'Revert to original' to assign the shift back to the original user.
## Reassign or Revert an Override
1. Navigate to On-Call --> On-Call Shifts
2. Select the User from which you would like to reassign or revert the override shift.
* Shifts that are overrides will have an 'Override' tag on them
### Revert Override
1. Select the override shift you would like to Revert to the original assignee.
2. Click 'Revert to original' to assign the shift back to the original user.
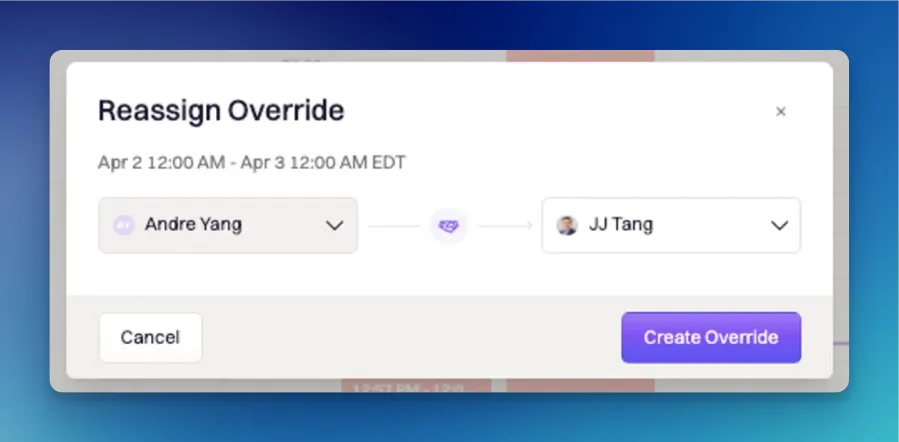 # PagerDuty Migration
Source: https://docs.rootly.com/on-call/pagerduty-migration
## PagerDuty Migration Attributes
The following attributes will be pulled from PagerDuty to Rootly during the migration.
### User
* Match users between PagerDuty and Rootly based on their email address
* if users do not match, new users will be created in Rootly
* Pull-in contact methods
* email address
* phone number
* SMS number
* Match notification rules between PagerDuty and Rootly
* if notification rules do not match, they will not be pulled in
* Contact methods and notification rules will be mapped accordingly
### Schedules
* Pull-on schedules
* Schedules
* Shifts
* Rotations
* Daily
* Weekly
* Custom
### Escalation Policies
* Match escalation policies with schedules from PagerDuty into Rootly
## Migration Instructions
Step 1: As you start your onboarding experience, we will ask if you want to do a PagerDuty migration. If you are interested in doing so, your onboarding representative will ask you the following questions:
* What attributes would you like to migrate from PagerDuty to Rootly?
* When would you like to have this migration performed?
Step 2: To access your PagerDuty API Key required for a migration, we have provided you with instructions on how to do so below:
* In PagerDuty, navigate to Under Integrations > Developer Tools > API Access Keys
* Click 'API Access Keys'
* Name the API and click ‘Create Key,' then check the box for “Read-only API Key”
* Copy the generated API Key
Step 3: Once the Rootly team has your API Key, desired PagerDuty attributes, and the date on which you would like the migration to be performed, we will schedule your migration and provide you confirmation of the migration once it is completed.
If you have any additional questions or concerns, please get in touch with your Rootly onboarding representative or email [support@rootly.com](mailto:support@rootly.com).
# Round Robin Functionality
Source: https://docs.rootly.com/on-call/round-robin-functionality
Learn about the Round Robin functionalities.
## Overview
Rootly's round robin feature introduces a streamlined way to manage escalation policies by automatically rotating the paging responsibilities among on-call team members. This ensures that alerts are distributed evenly and efficiently, reducing the burden on any single individual.
This feature is included out-of the box and is available for use today.
## Key Features
### Paging Methods
#### Alert-Based Paging
This is the most common style of round robin paging. Incoming alerts are cycled through the rotation of users. For example, the first incoming will page User A, if User A doesn't respond, it will escalate to level 2. The next incoming alert will page User B to ensure even distribution of alerts.
# PagerDuty Migration
Source: https://docs.rootly.com/on-call/pagerduty-migration
## PagerDuty Migration Attributes
The following attributes will be pulled from PagerDuty to Rootly during the migration.
### User
* Match users between PagerDuty and Rootly based on their email address
* if users do not match, new users will be created in Rootly
* Pull-in contact methods
* email address
* phone number
* SMS number
* Match notification rules between PagerDuty and Rootly
* if notification rules do not match, they will not be pulled in
* Contact methods and notification rules will be mapped accordingly
### Schedules
* Pull-on schedules
* Schedules
* Shifts
* Rotations
* Daily
* Weekly
* Custom
### Escalation Policies
* Match escalation policies with schedules from PagerDuty into Rootly
## Migration Instructions
Step 1: As you start your onboarding experience, we will ask if you want to do a PagerDuty migration. If you are interested in doing so, your onboarding representative will ask you the following questions:
* What attributes would you like to migrate from PagerDuty to Rootly?
* When would you like to have this migration performed?
Step 2: To access your PagerDuty API Key required for a migration, we have provided you with instructions on how to do so below:
* In PagerDuty, navigate to Under Integrations > Developer Tools > API Access Keys
* Click 'API Access Keys'
* Name the API and click ‘Create Key,' then check the box for “Read-only API Key”
* Copy the generated API Key
Step 3: Once the Rootly team has your API Key, desired PagerDuty attributes, and the date on which you would like the migration to be performed, we will schedule your migration and provide you confirmation of the migration once it is completed.
If you have any additional questions or concerns, please get in touch with your Rootly onboarding representative or email [support@rootly.com](mailto:support@rootly.com).
# Round Robin Functionality
Source: https://docs.rootly.com/on-call/round-robin-functionality
Learn about the Round Robin functionalities.
## Overview
Rootly's round robin feature introduces a streamlined way to manage escalation policies by automatically rotating the paging responsibilities among on-call team members. This ensures that alerts are distributed evenly and efficiently, reducing the burden on any single individual.
This feature is included out-of the box and is available for use today.
## Key Features
### Paging Methods
#### Alert-Based Paging
This is the most common style of round robin paging. Incoming alerts are cycled through the rotation of users. For example, the first incoming will page User A, if User A doesn't respond, it will escalate to level 2. The next incoming alert will page User B to ensure even distribution of alerts.
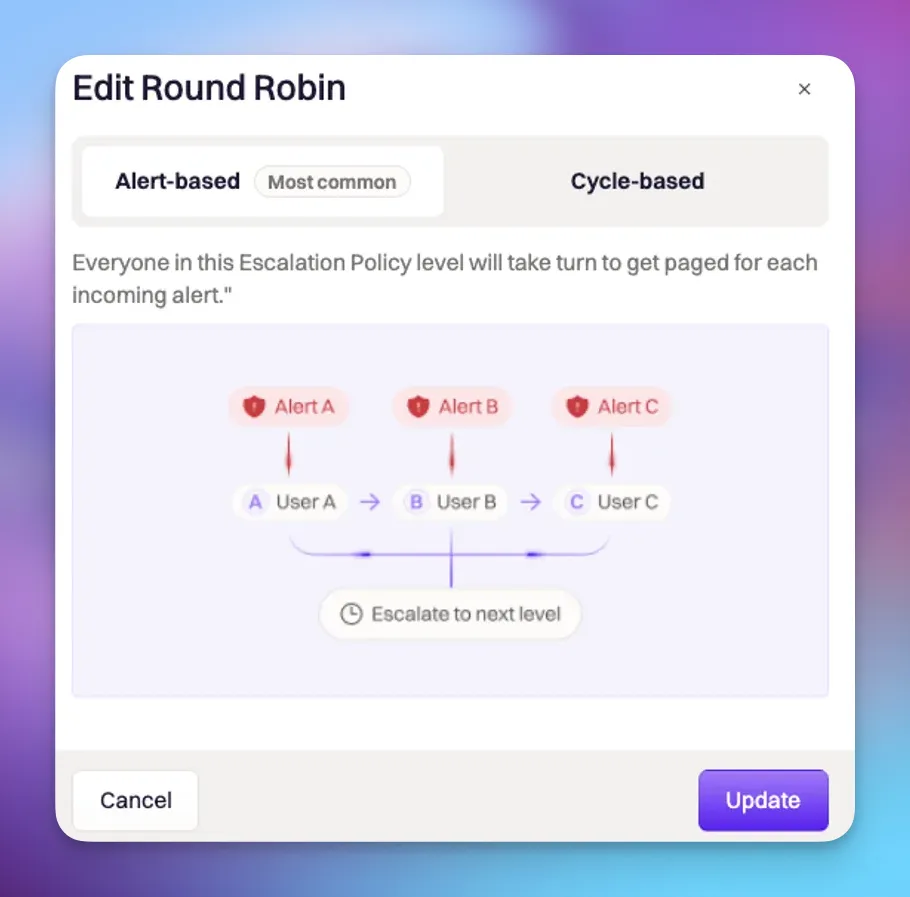 #### Cycle-Based Paging
The cycle-based feature ensures each user in the escalation level is paged in sequential order before escalating to the next level.
#### Cycle-Based Paging
The cycle-based feature ensures each user in the escalation level is paged in sequential order before escalating to the next level.
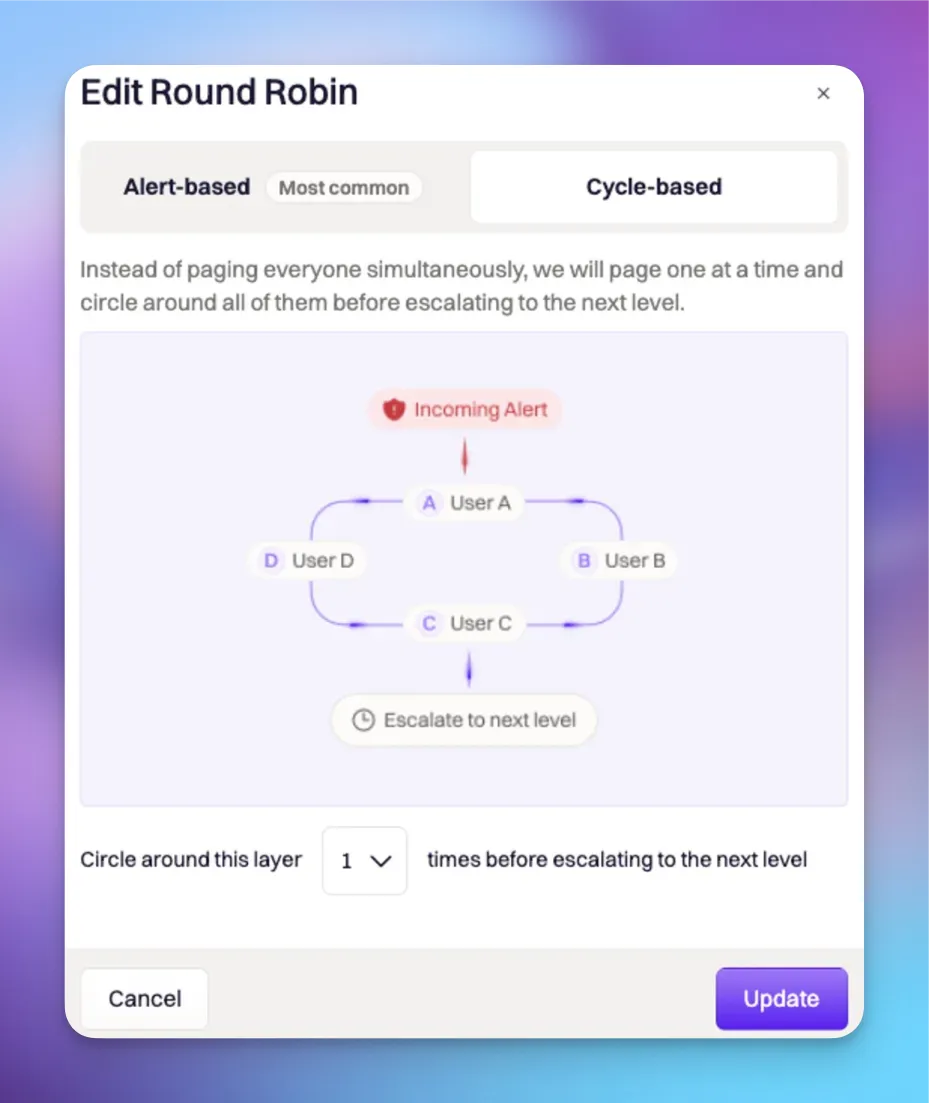 ### Dynamic Updates
Rootly's web UI dynamically updates to show the current pageable person and the order of escalation. Timeline events also indicate the strategy used for each page.
### Configuring Round Robin
1. Navigate to Escalation Policies:
* Go to the escalation policies section in your Rootly dashboard.
* On-Call --> Escalation Policies
2. Create/Select an Escalation Policy:
* Create a new escalation policy or choose an existing policy you want to configure for round robin.
3. Enable Round Robin:
* When the feature flag for round robin is enabled, toggle the round robin option in each escalation policy level.
### Dynamic Updates
Rootly's web UI dynamically updates to show the current pageable person and the order of escalation. Timeline events also indicate the strategy used for each page.
### Configuring Round Robin
1. Navigate to Escalation Policies:
* Go to the escalation policies section in your Rootly dashboard.
* On-Call --> Escalation Policies
2. Create/Select an Escalation Policy:
* Create a new escalation policy or choose an existing policy you want to configure for round robin.
3. Enable Round Robin:
* When the feature flag for round robin is enabled, toggle the round robin option in each escalation policy level.
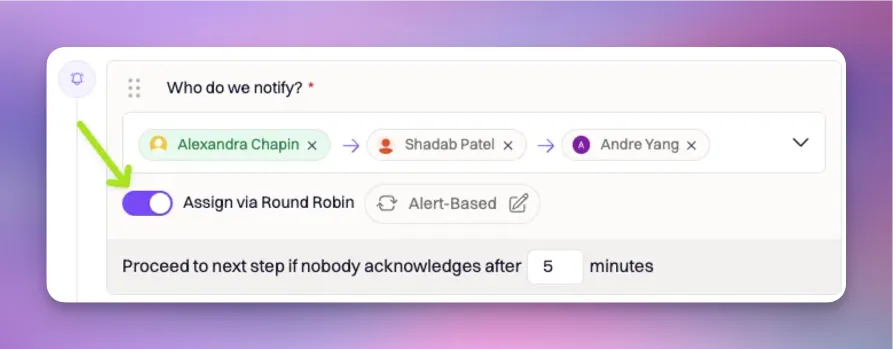 4. Select either Alert-Based or Cycle-Based Paging:
* Set the levels to be alert-based, where each new alert pages the next person in line.
4. Select either Alert-Based or Cycle-Based Paging:
* Set the levels to be alert-based, where each new alert pages the next person in line.
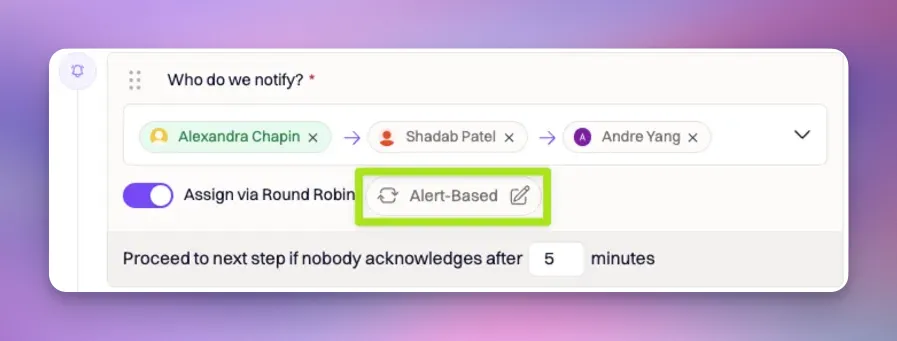 #### Example Scenario (Alert-based)
In this example, we have an escalation policy named "SRE - Round Robin EP" with one round robin alert-based level. The first pageable person is Alexandra. When alert A comes in, if Alexandra doesn't respond within five minutes, the alert moves to Andre, and then to Purvai.
* When alert B comes in, it will then go to Shadab and then escalate to the next level.
* When alert C comes in, it will then go to Andre and then escalate to the next level.
#### Example Scenario (Alert-based)
In this example, we have an escalation policy named "SRE - Round Robin EP" with one round robin alert-based level. The first pageable person is Alexandra. When alert A comes in, if Alexandra doesn't respond within five minutes, the alert moves to Andre, and then to Purvai.
* When alert B comes in, it will then go to Shadab and then escalate to the next level.
* When alert C comes in, it will then go to Andre and then escalate to the next level.
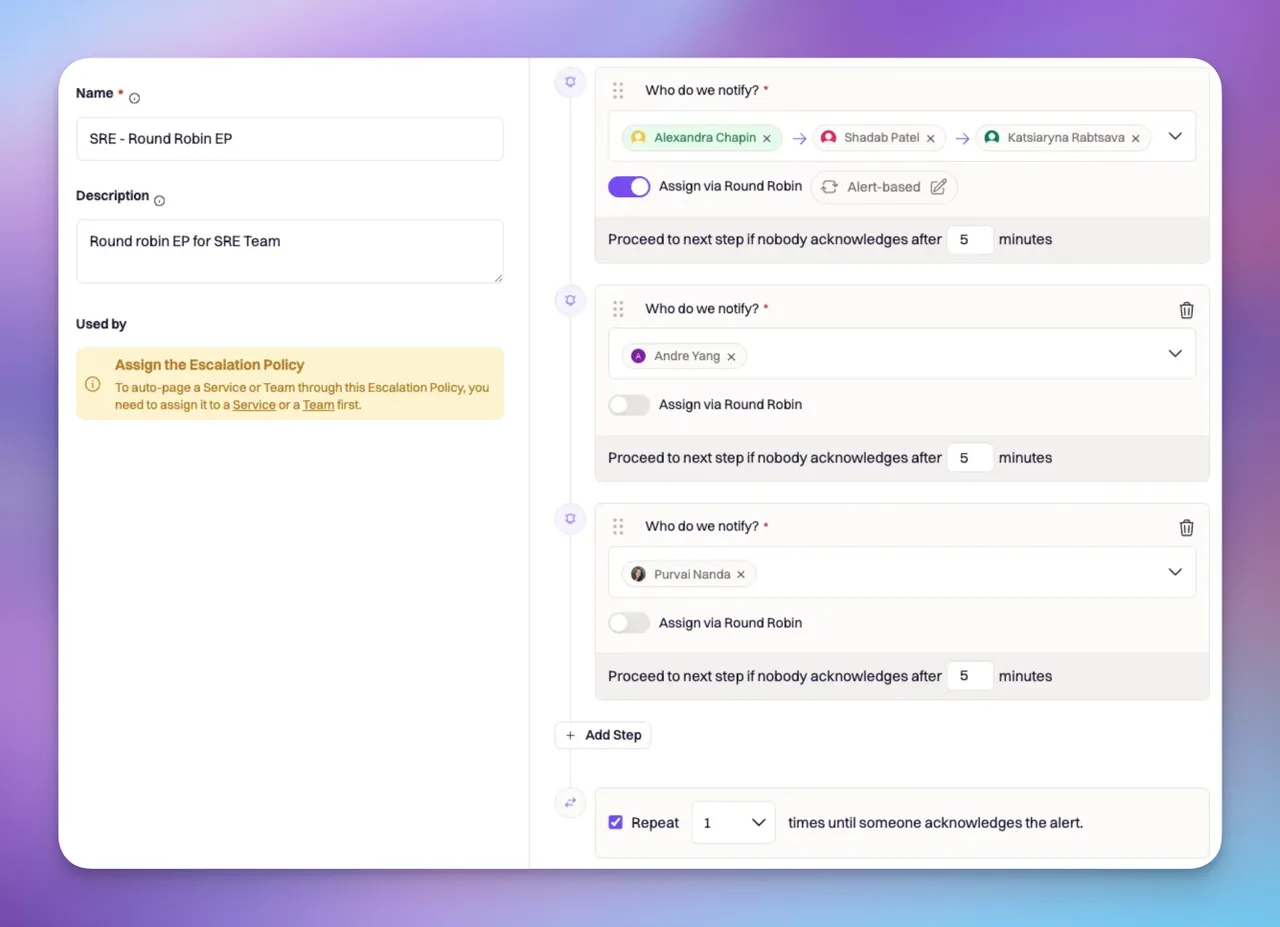 1. Initial Alert:
* Alexandra receives the first alert.
2. Escalation to Next Person:
* After five minutes without a response, the alert escalates to Andre.
3. Further Escalation:
If Andre also doesn’t respond, the alert moves to Purvai.
4. Repeat Cycle:
* The repeat feature cycles the alerts back to Alexandra after Purvai.
#### Example Scenario (Cycle-Based)
In this example, we have an escalation policy named "SRE - Round Robin EP" with one cycle-based level. The first pageable person is Alexandra. When alert A comes in, it will first go to Alexandra and if she does not respond, then the alert moves to Shadab, and then to Andre.
1. Initial Alert:
* Alexandra receives the first alert.
2. Escalation to Next Person:
* After five minutes without a response, the alert escalates to Andre.
3. Further Escalation:
If Andre also doesn’t respond, the alert moves to Purvai.
4. Repeat Cycle:
* The repeat feature cycles the alerts back to Alexandra after Purvai.
#### Example Scenario (Cycle-Based)
In this example, we have an escalation policy named "SRE - Round Robin EP" with one cycle-based level. The first pageable person is Alexandra. When alert A comes in, it will first go to Alexandra and if she does not respond, then the alert moves to Shadab, and then to Andre.
 1. Initial Alert:
* Alexandra receives the first alert.
2. Escalation to Next Person:
* After one minute without a response, the alert escalates to Shadab.
3. Further Escalation:
* If Shadab also doesn’t respond, the alert moves to Andre.
4. Repeat Cycle:
* The repeat feature cycles the alerts back to Alexandra after Andre.
### Timeline Events
Timeline events will now show an indication of the strategy used for each page, providing clarity on how the alert was escalated and which strategy was employed.
# Overview
Source: https://docs.rootly.com/on-call/schedules
Learn how to get started with on-call schedules.
## Create a Schedule
Schedules are used to determine which user or team will be on-call and in what order.
1. Initial Alert:
* Alexandra receives the first alert.
2. Escalation to Next Person:
* After one minute without a response, the alert escalates to Shadab.
3. Further Escalation:
* If Shadab also doesn’t respond, the alert moves to Andre.
4. Repeat Cycle:
* The repeat feature cycles the alerts back to Alexandra after Andre.
### Timeline Events
Timeline events will now show an indication of the strategy used for each page, providing clarity on how the alert was escalated and which strategy was employed.
# Overview
Source: https://docs.rootly.com/on-call/schedules
Learn how to get started with on-call schedules.
## Create a Schedule
Schedules are used to determine which user or team will be on-call and in what order.
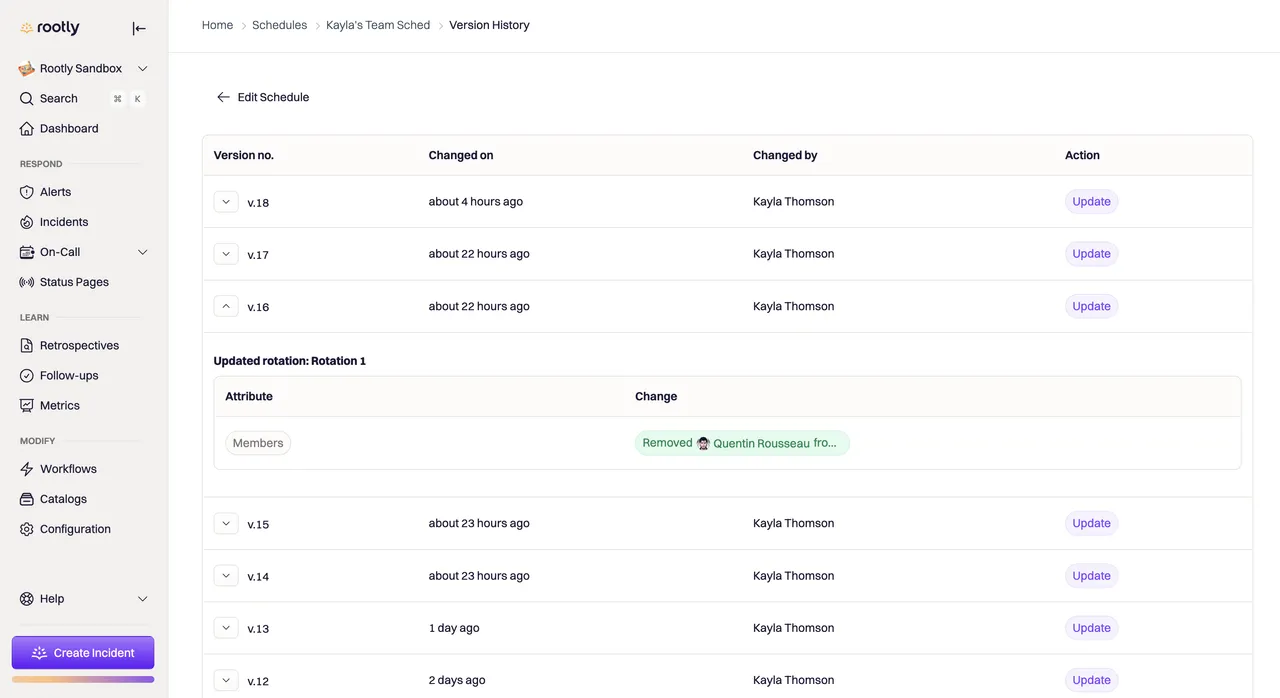 # Sync Schedules To Slack User Group
Source: https://docs.rootly.com/on-call/sync-schedules
Syncing an on-call schedule with a Slack user group allows teams to streamline communication.
## Overview
Syncing an on-call schedule with a Slack user group allows teams to streamline communication, enhances coordination, and improve the overall efficiency of incident response.
In Slack, your team members can tag the person on-call using a Slack user group. When this user group is mentioned in a Slack message, Rootly will automatically notify the person who is on-call for that schedule.
## Set Up Steps
1. Select and begin editing an existing schedule or create a new schedule that you would like to add the slack user group too.
2. Under the Notifications tab, select the desired Slack user group from the dropdown menu.
3. Make sure to save the schedule's changes.
# Sync Schedules To Slack User Group
Source: https://docs.rootly.com/on-call/sync-schedules
Syncing an on-call schedule with a Slack user group allows teams to streamline communication.
## Overview
Syncing an on-call schedule with a Slack user group allows teams to streamline communication, enhances coordination, and improve the overall efficiency of incident response.
In Slack, your team members can tag the person on-call using a Slack user group. When this user group is mentioned in a Slack message, Rootly will automatically notify the person who is on-call for that schedule.
## Set Up Steps
1. Select and begin editing an existing schedule or create a new schedule that you would like to add the slack user group too.
2. Under the Notifications tab, select the desired Slack user group from the dropdown menu.
3. Make sure to save the schedule's changes.
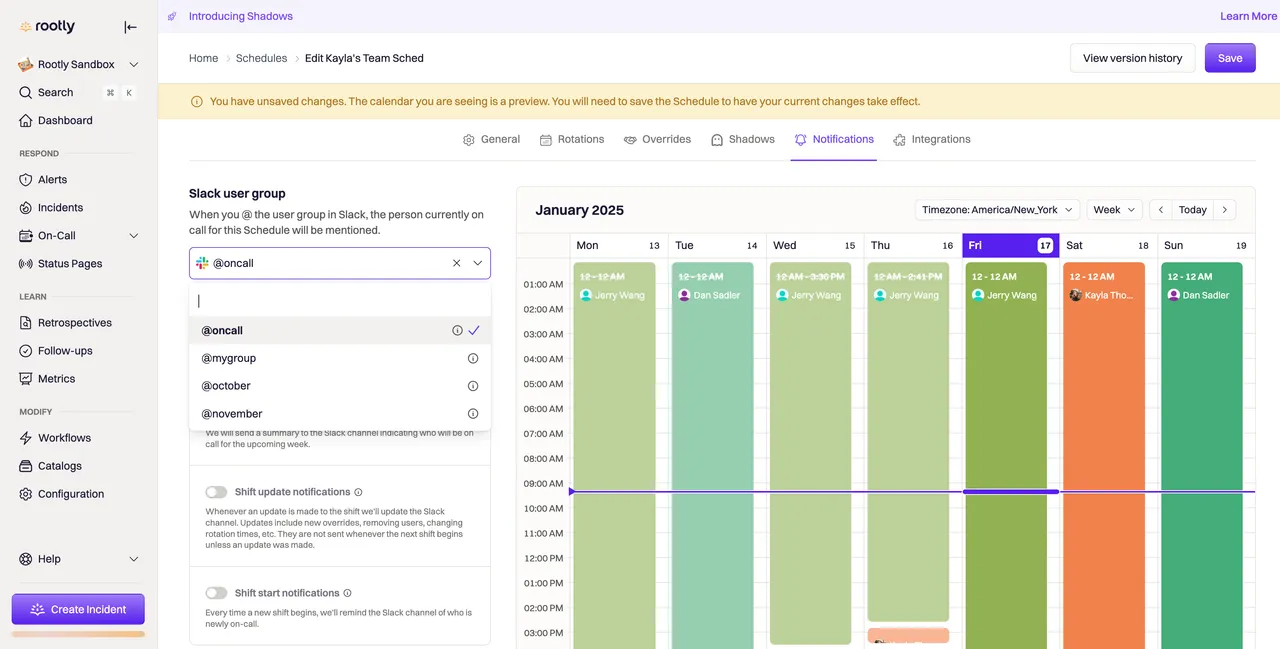 Once configured, anytime this Slack user group is mentioned in a message, the on-call responder will be notified.
You can sync a single Slack user group across multiple schedules. For example, if your team wants to be able to tag all on-call responders across schedules, use the same Slack user group when configuring each schedule. When this user group is mentioned, each responder will be notified.
# Overview
Source: https://docs.rootly.com/quick-start-guide
This quick start guide is meant to get you up and running with Rootly as quickly and easily as possible.
## Up and running in about 15 minutes!
It will take you from signing up for an account, to creating your first incident in about 15 minutes.
Once you've done that, you should check out our full Setup Guide to continue configuring Rootly for an optimal incident management experience.
## Getting Help
See the Rootly [Getting Help](/getting-help) page for more info about Rootly and how to get help when you need it.
# Configuring Process Steps
Source: https://docs.rootly.com/retrospectives/configuring-process-steps
Retrospective process steps compose a retrospective process. These steps can be customized across the following dimensions:
* Title and description of step
* Steps being required or optional
* Pre-assignment of step based on role
* Due dates relative to the resolution of an incident
* Slack and email based reminders for step owners
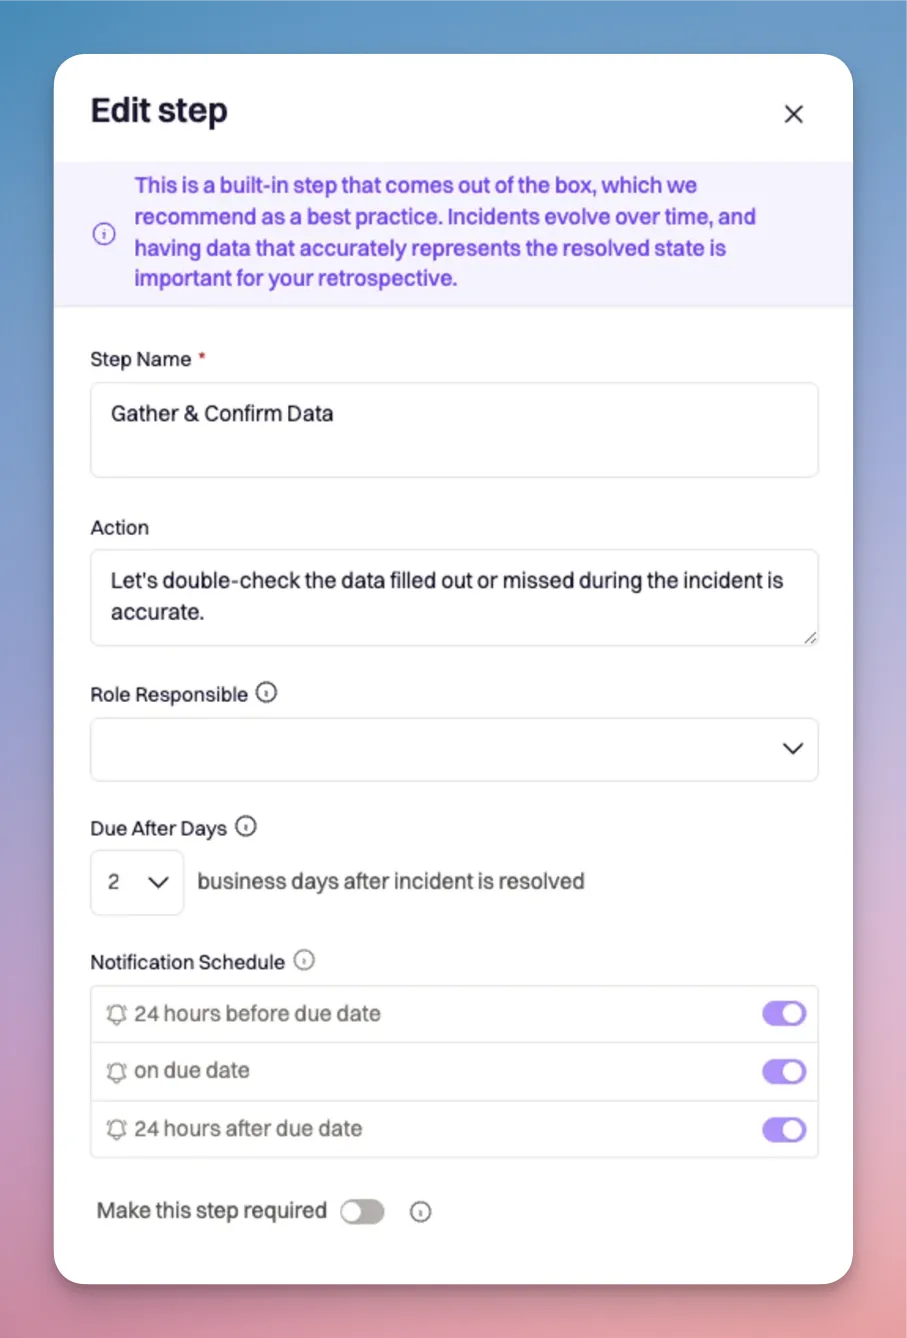
# Legacy Process[](#c5nNn)
For customers that prefer the legacy incident processes, the following configuration will align with the previous retrospective settings.
1. Navigate to the [Retrospective Processes configuration page](https://rootly.com/account/retrospective-processes "Retrospective Processes configuration page").
2. Modify the "When should the Retrospective be mandatory?" multi-select to choose all severities or types.
3. Edit the 'Default Retrospective' process
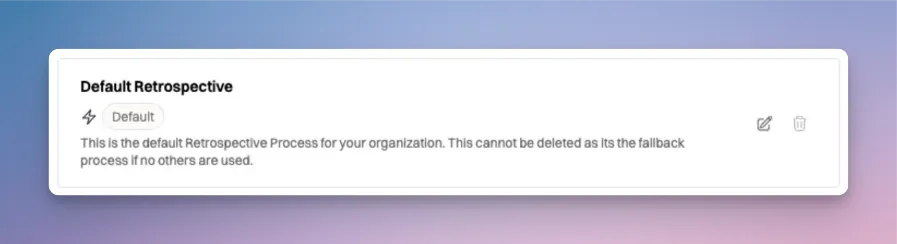
4\. Remove all steps from the default process with the exception of the 'Write The Retrospective Document' and the 'Gather Data' steps.
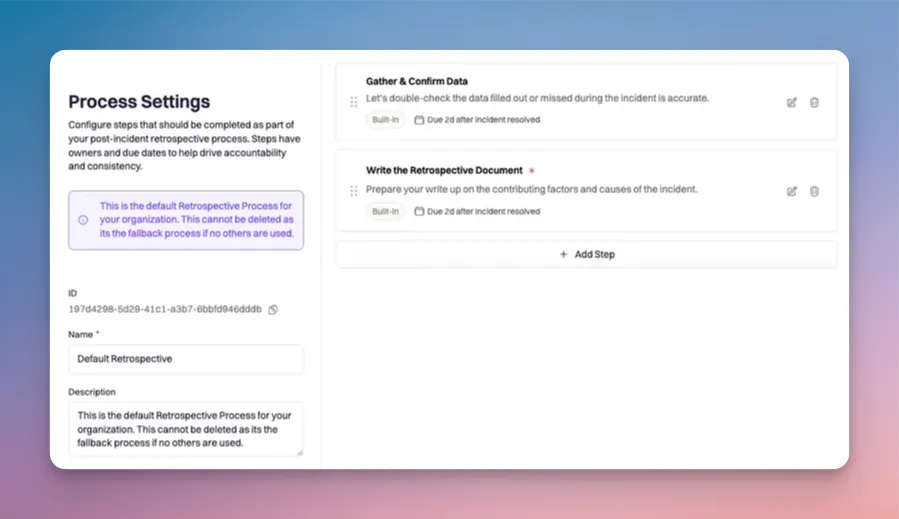
# Configuring Retrospective Processes
Source: https://docs.rootly.com/retrospectives/configuring-retrospective-processes
Retrospectives have configurable, customizable processes, made of up steps, to allow a right sized retrospective based severity, type or teams involved in an incident.
# Process Defaults[](#DwoL5)
A retrospective process is a series of steps that will be applied to an incident and guide responders through a retrospective. Rootly provides a default retrospective process with generalized steps that will work for many use cases. No configuration is required, the [default steps](/retrospectives/configuring-process-steps) will be applied to all incidents.
# Customized Process[](#vmdSt)
For more opinionated incident practices, retrospective processes can be created, customized and applied to incidents meeting specific requirements. The ability to scale retrospective processes based on the severity, team or type of incident allows programs to right size their retrospective process and support responders regardless of what kind of incident occurs.
The following incident attributes can be used to apply custom processes:
* Severity
* Type
* Team
Processes can also be configured to be required or auto skipped based upon the same incident attributes.
* Required retrospective processes are not able to be skipped by responders.
* Auto Skipped processes are not skipped by default, but have the option to be reinstated at responder discretion.
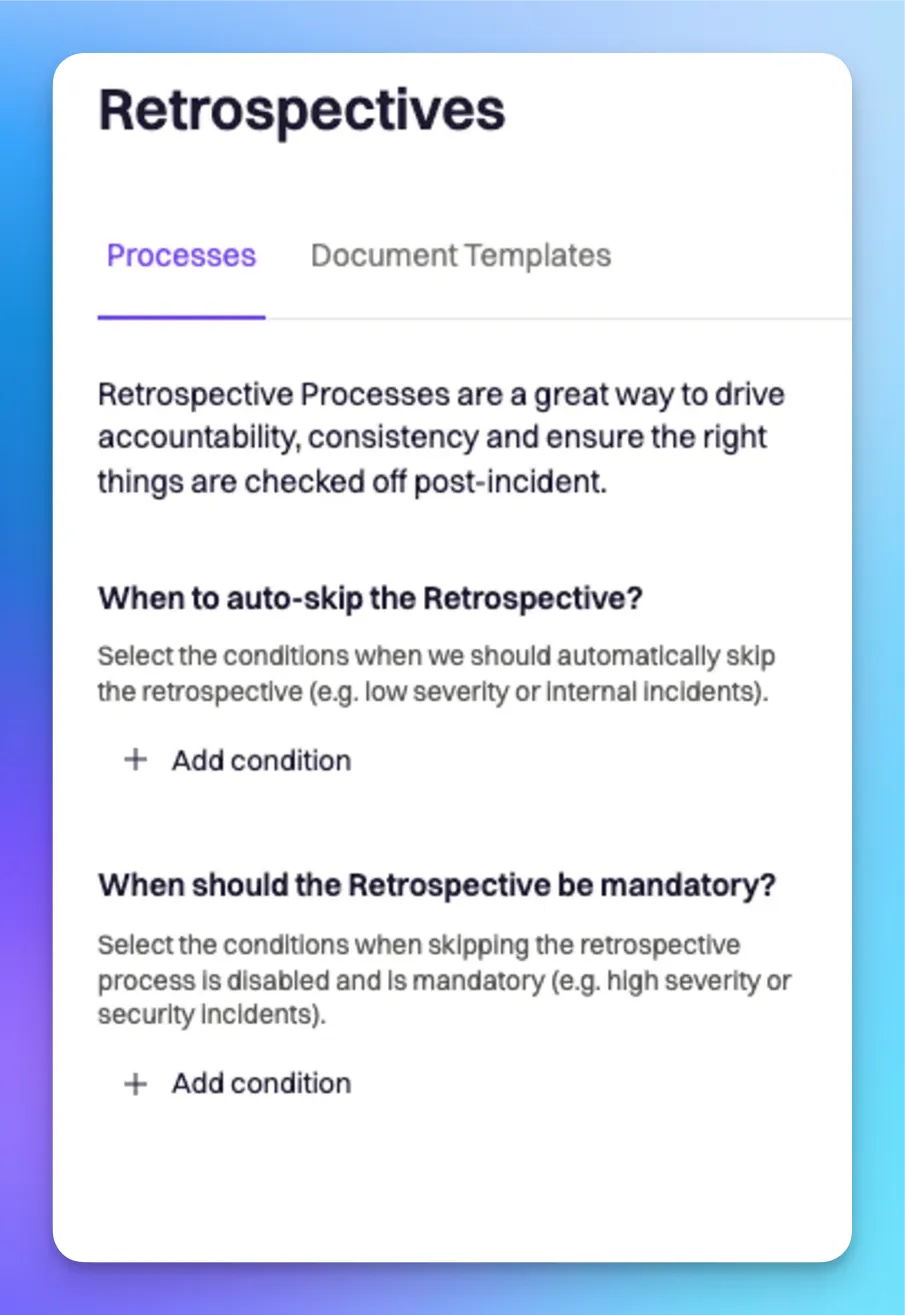
Once configured, anytime this Slack user group is mentioned in a message, the on-call responder will be notified.
You can sync a single Slack user group across multiple schedules. For example, if your team wants to be able to tag all on-call responders across schedules, use the same Slack user group when configuring each schedule. When this user group is mentioned, each responder will be notified.
# Overview
Source: https://docs.rootly.com/quick-start-guide
This quick start guide is meant to get you up and running with Rootly as quickly and easily as possible.
## Up and running in about 15 minutes!
It will take you from signing up for an account, to creating your first incident in about 15 minutes.
Once you've done that, you should check out our full Setup Guide to continue configuring Rootly for an optimal incident management experience.
## Getting Help
See the Rootly [Getting Help](/getting-help) page for more info about Rootly and how to get help when you need it.
# Configuring Process Steps
Source: https://docs.rootly.com/retrospectives/configuring-process-steps
Retrospective process steps compose a retrospective process. These steps can be customized across the following dimensions:
* Title and description of step
* Steps being required or optional
* Pre-assignment of step based on role
* Due dates relative to the resolution of an incident
* Slack and email based reminders for step owners

# Legacy Process[](#c5nNn)
For customers that prefer the legacy incident processes, the following configuration will align with the previous retrospective settings.
1. Navigate to the [Retrospective Processes configuration page](https://rootly.com/account/retrospective-processes "Retrospective Processes configuration page").
2. Modify the "When should the Retrospective be mandatory?" multi-select to choose all severities or types.
3. Edit the 'Default Retrospective' process

4\. Remove all steps from the default process with the exception of the 'Write The Retrospective Document' and the 'Gather Data' steps.

# Configuring Retrospective Processes
Source: https://docs.rootly.com/retrospectives/configuring-retrospective-processes
Retrospectives have configurable, customizable processes, made of up steps, to allow a right sized retrospective based severity, type or teams involved in an incident.
# Process Defaults[](#DwoL5)
A retrospective process is a series of steps that will be applied to an incident and guide responders through a retrospective. Rootly provides a default retrospective process with generalized steps that will work for many use cases. No configuration is required, the [default steps](/retrospectives/configuring-process-steps) will be applied to all incidents.

# Customized Process[](#vmdSt)
For more opinionated incident practices, retrospective processes can be created, customized and applied to incidents meeting specific requirements. The ability to scale retrospective processes based on the severity, team or type of incident allows programs to right size their retrospective process and support responders regardless of what kind of incident occurs.
The following incident attributes can be used to apply custom processes:
* Severity
* Type
* Team
Processes can also be configured to be required or auto skipped based upon the same incident attributes.
* Required retrospective processes are not able to be skipped by responders.
* Auto Skipped processes are not skipped by default, but have the option to be reinstated at responder discretion.

 Check the box to accept the Terms of Service and Privacy Policy, then click **Sign Up**.
That's it! You're ready to start using Rootly to help manage your incidents.
# Action Item Workflows
Source: https://docs.rootly.com/workflows/action-item-workflows
# **Overview**[](#xSZMd)
Action item workflows are triggered on changes to the action item data. Every incident created on the Rootly platform also contains an array of action items. You can leverage the power of workflows to auto create Jira tickets for follow-ups, assign Jira tasks , etc.
Action item workflows are particularly useful for...
* **Auto creating/updating Jira tickets** for follow-ups post incident resolution
* **Auto assigning Jira tickets** based on user/team assigned in Rootly
* **Notify teams** of assigned tasks
# **Configuring an** Action Item **Workflow**[](#9BnZw)
## Getting Started[](#mq2a7)
Follow the navigation below to begin configuring an action item workflow.
**Workflows** > **Create Workflow** > **Action Item**
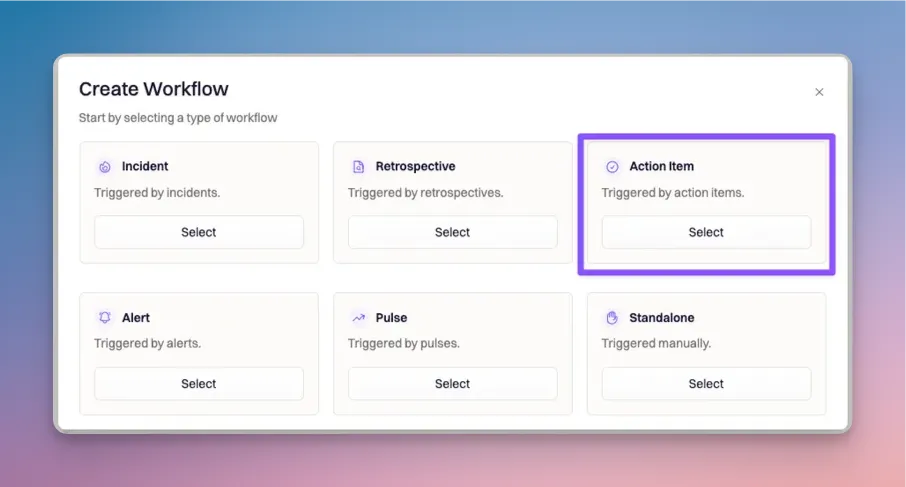
## Set Trigger Event[](#4fJr9)
There are many trigger events to choose from. Check out what's available to you on [this page](/workflows/workflow-types).
In the example below, the workflow will initiate when a new action item is created for an incident.
## Set Run Conditions[](#RT_nK)
Since action items are tied to individual incidents, action item workflows can be configured to **check for both action item** and **incident properties**.
There are four action item conditions available.
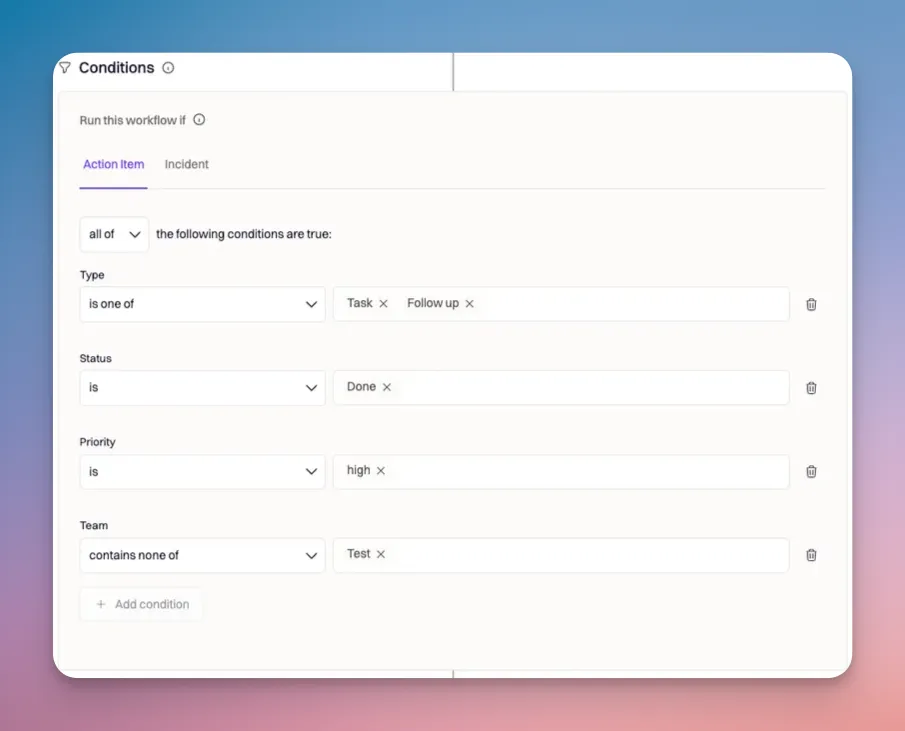
### Type[](#F6ECv)
The type represents the type of action item. It can be either a task or follow up.
In the example above, the type condition will pass if the action item is a task or a follow-up.
### Status[](#9utEW)
The status represents the status of the action item. It can be Open, In Progress, Done, or Cancelled.
Check the box to accept the Terms of Service and Privacy Policy, then click **Sign Up**.
That's it! You're ready to start using Rootly to help manage your incidents.
# Action Item Workflows
Source: https://docs.rootly.com/workflows/action-item-workflows
# **Overview**[](#xSZMd)
Action item workflows are triggered on changes to the action item data. Every incident created on the Rootly platform also contains an array of action items. You can leverage the power of workflows to auto create Jira tickets for follow-ups, assign Jira tasks , etc.
Action item workflows are particularly useful for...
* **Auto creating/updating Jira tickets** for follow-ups post incident resolution
* **Auto assigning Jira tickets** based on user/team assigned in Rootly
* **Notify teams** of assigned tasks
# **Configuring an** Action Item **Workflow**[](#9BnZw)
## Getting Started[](#mq2a7)
Follow the navigation below to begin configuring an action item workflow.
**Workflows** > **Create Workflow** > **Action Item**

## Set Trigger Event[](#4fJr9)
There are many trigger events to choose from. Check out what's available to you on [this page](/workflows/workflow-types).
In the example below, the workflow will initiate when a new action item is created for an incident.

## Set Run Conditions[](#RT_nK)
Since action items are tied to individual incidents, action item workflows can be configured to **check for both action item** and **incident properties**.
There are four action item conditions available.

### Type[](#F6ECv)
The type represents the type of action item. It can be either a task or follow up.
In the example above, the type condition will pass if the action item is a task or a follow-up.
### Status[](#9utEW)
The status represents the status of the action item. It can be Open, In Progress, Done, or Cancelled.
The very first run of the workflow will initiate when the trigger events are met (field 10). However, subsequent runs will initiate once the repeat interval hits - regardless of the trigger events.
Recurring workflows will stop as soon as the run conditions (field 11 & 12) are no longer true. | | **8) Repeat On** | This field must be used alongside the Repeat Every field. When a value is set for the Repeat Every field, use this field to select the days of the week in which the workflow will run repetitively on.
For example, if the following values are set:
- Repeat Every = 5h
- Repeat On = M, W, F
The workflow will run **repetitively every 5 hours on Mondays, Wednesdays, and Fridays**. | | **9) Wait Before Executing** | Each workflow can be configured with a delay. The minimum a delay can be set to is 10 seconds. Condition checks for workflows with delays will follow this pattern:
- Condition Check: Pass → Delay → Condition Check: Pass → Run → End
- Condition Check: Pass → Delay → Condition Check: Fail → End
- Condition Check: Fail → End | | **10) Trigger events** | Trigger events determine when a workflow is initiated. Once initiated, the run conditions (fields 11 & 12) will be checked before executing any of the actions (fields 13). You can find the full list of trigger events on [this page](/workflows/workflow-types). | | **11) Run condition operator** | Once a workflow initiates, the platform will check for the run conditions. The run conditions must be met in order for the workflow to progress to the actions. Each run condition can be joined by the following operators:
- **all of** - every condition must be true
- **any of** - if any condition is true
- **none of** - if every condition is false | | **12) Run conditions** | Run conditions are set based on incident, action item, retrospective, alert, or pulse parameters. The **Workflow Type** determines what parameters are available to condition off of.
Run conditions must be met before a workflow can proceed to take any action. | | **13) Actions** | Workflow actions are what actually execute once the run conditions are met. Available actions are dependent on the [applications that are integrated for the organization](https://rootly.com/account/integrations). | # How Workflows are Executed?[](#V4Qci) Workflows can be broken down to three major phases: **Initiation**, **Condition Check**, and **Execution**. ## Phase 1: Initiation[](#5wZO_) Each workflow can be initiated by a series of trigger conditions. They are considered initiated when one of their trigger events is met. You can find a full list of trigger events [here](/workflows/workflow-types). Selected trigger events are joined by OR conditions. So, as long as one of the events are met, the workflow will be initiated. For example, if you have a workflow that's configured with the following triggers: 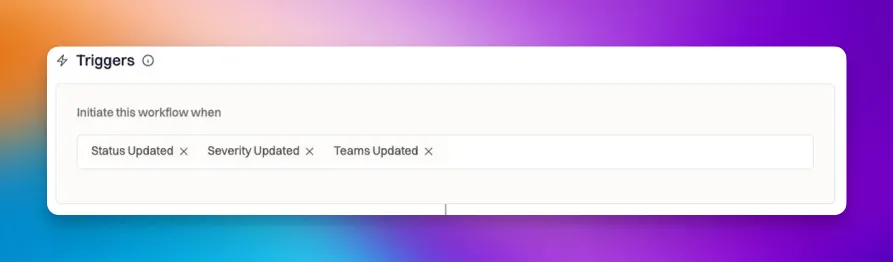 The workflow will initiate... * when the status of the incident is updated, * **OR** when the severity of the incident is updated, * **OR** when the team of the incident is updated ## Phase 2: Condition Check[](#Mj-Fu) Once a workflow is initiated, it must pass conditions before any action takes place. Conditions are dependent on the Workflow Type: Incident workflows will check for conditions on incident properties. While action item workflows will check for conditions on action item properties. **Run conditions can be joined by the following operators:** * `all of` - every condition must be true * `any of` - if any condition is true * `none off` - if every condition is false