> ## Documentation Index
> Fetch the complete documentation index at: https://docs.rootly.com/llms.txt
> Use this file to discover all available pages before exploring further.
# Managing Invitations
> View, resend, and delete pending Rootly invitations from Organization Settings to manage who can join your workspace before they accept their invite.
The **Invitations** page lets you manage pending invitations for users who have not yet joined your Rootly organization. From here, you can review invitation details, resend an invitation email, or remove an invitation that is no longer needed.
Invitation emails are sent automatically when an invitation is created. If a recipient does not receive the email, you can resend it from the Invitations page.
## Access the Invitations Page
In the top-left corner, click the drop-down next to your organization name and select **Organization Settings**.
Select **[Invitations](https://rootly.com/account/invitations)** to view all pending invitations.
The table shows each invitation’s:
* **Email**
* **Incident Response role**
* **On-Call role**
* **Sent date**
* **Invited by**
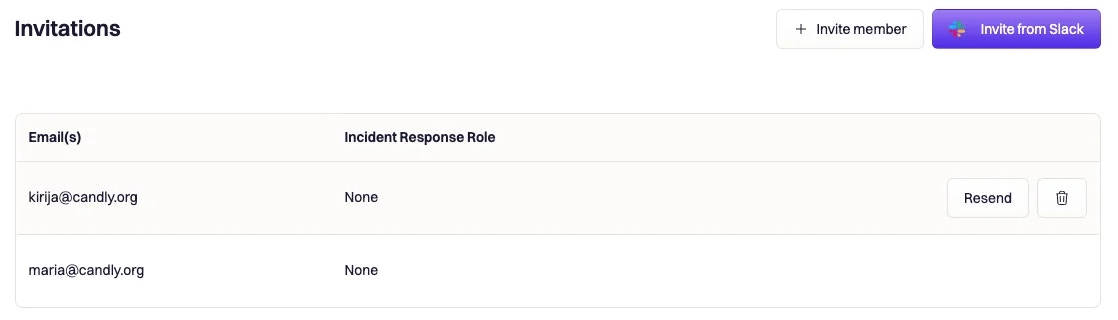 Hover over an invitation row to access available actions:
* **Resend** to send the invitation email again
* **Delete** to remove the invitation
Invitations cannot be edited. To change the email address or assigned roles, delete the invitation and create a new one.
## What You Can Do
From the Invitations page, you can:
See all outstanding invitations and review the roles assigned to each recipient.
Send the invitation email again if the original message was not received.
Remove invitations that are no longer needed.
Confirm which Incident Response and On-Call roles will be assigned when the invitation is accepted.
## How Invitations Work
When you invite a user to Rootly:
1. An invitation email is sent to the specified email address
2. The recipient opens the invitation link
3. After accepting, the user joins the organization with the assigned roles
4. The invitation is removed from the pending list
If no roles are specified when the invitation is created, the team’s default roles are applied.
Invitations are tied to the invited email address. The recipient must accept the invitation using that email.
## Best Practices
* Double-check email addresses before sending invitations
* Assign roles carefully to avoid unnecessary permission changes later
* Resend invitations before creating duplicates
* Periodically remove stale invitations that are no longer needed
## Troubleshooting
Verify the email address is correct, ask the recipient to check their spam or junk folder, and resend the invitation if needed.
Confirm the user is signing in with the same email address that received the invitation. If the invitation was deleted or already accepted, create a new one.
Invitations cannot be edited. Delete the existing invitation and create a new one with the correct details.
## Related Documentation
Learn how to create new invitations.
Learn how to manage existing organization members.
Understand Incident Response and On-Call roles.
Learn how permissions are controlled across teams and products.
Hover over an invitation row to access available actions:
* **Resend** to send the invitation email again
* **Delete** to remove the invitation
Invitations cannot be edited. To change the email address or assigned roles, delete the invitation and create a new one.
## What You Can Do
From the Invitations page, you can:
See all outstanding invitations and review the roles assigned to each recipient.
Send the invitation email again if the original message was not received.
Remove invitations that are no longer needed.
Confirm which Incident Response and On-Call roles will be assigned when the invitation is accepted.
## How Invitations Work
When you invite a user to Rootly:
1. An invitation email is sent to the specified email address
2. The recipient opens the invitation link
3. After accepting, the user joins the organization with the assigned roles
4. The invitation is removed from the pending list
If no roles are specified when the invitation is created, the team’s default roles are applied.
Invitations are tied to the invited email address. The recipient must accept the invitation using that email.
## Best Practices
* Double-check email addresses before sending invitations
* Assign roles carefully to avoid unnecessary permission changes later
* Resend invitations before creating duplicates
* Periodically remove stale invitations that are no longer needed
## Troubleshooting
Verify the email address is correct, ask the recipient to check their spam or junk folder, and resend the invitation if needed.
Confirm the user is signing in with the same email address that received the invitation. If the invitation was deleted or already accepted, create a new one.
Invitations cannot be edited. Delete the existing invitation and create a new one with the correct details.
## Related Documentation
Learn how to create new invitations.
Learn how to manage existing organization members.
Understand Incident Response and On-Call roles.
Learn how permissions are controlled across teams and products.