
Overview
Workflows are Rootly’s automation engine. They let you run structured actions automatically (or manually) based on:- Trigger events (what starts a workflow run)
- Run conditions (what must be true before actions execute)
- Actions (what Rootly and your integrations do when conditions pass)
Common automation patterns
Examples of things teams commonly automate with workflows:- Create or manage an incident communication channel (Slack or Microsoft Teams)
- Post periodic reminders to keep status pages and stakeholders updated
- Notify internal teams (for example, legal, security, or customer support) when high-impact incidents occur
- Create tickets in external systems (for example, Jira or Linear) based on impacted services or teams
- Create a conferencing bridge (for example, Zoom or Google Meet) for high severity incidents
- Page on-call responders via your paging provider when specific services are impacted
- Create or update retrospective documents and templates after resolution
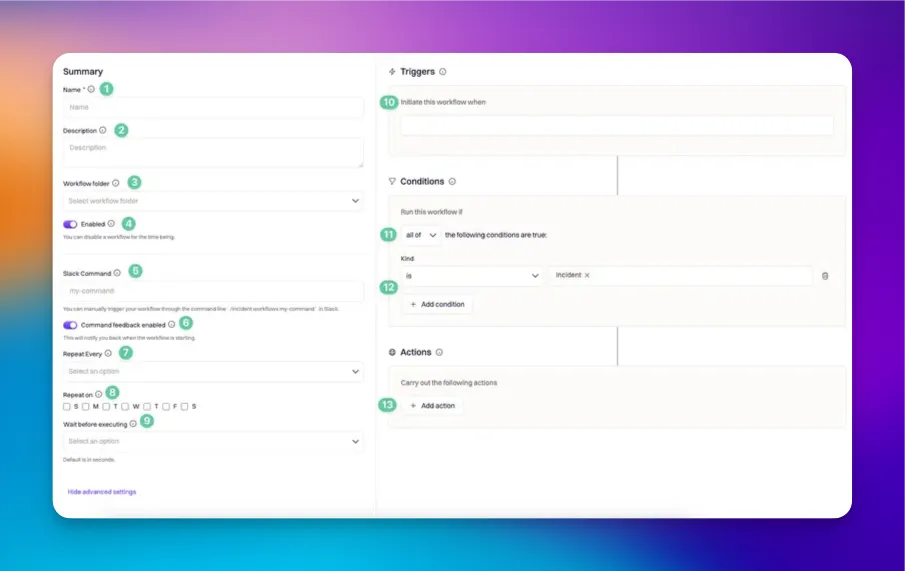
Workflows at a Glance
| Field | What it controls |
|---|---|
| Name | A human-readable identifier for the workflow. |
| Description | A detailed explanation of what the workflow does and when it should be used. |
| Workflow folder | Optional grouping used for organization and filtering. Folders do not affect execution behavior. |
| Enabled | When disabled, the workflow does not run automatically from events. Manual Slack command runs may still be possible if the workflow is discoverable by command and permissions allow it. |
| Slack command | The command value used to trigger a workflow manually through Slack. If you do not set one at creation time, Rootly generates a default command. |
| Command feedback enabled | When enabled, Rootly posts an ephemeral Slack confirmation to the requesting user when the workflow is triggered via Slack command (including indicating the configured wait delay when applicable). |
| Repeat every / Repeat on | Scheduling controls used to run a workflow repeatedly after the initial trigger. Repeat behavior continues only while run conditions remain true. |
| Wait before executing | A delay before actions begin. Rootly enforces a minimum delay of 10 seconds. Rootly re-checks run conditions after the wait period before executing actions. |
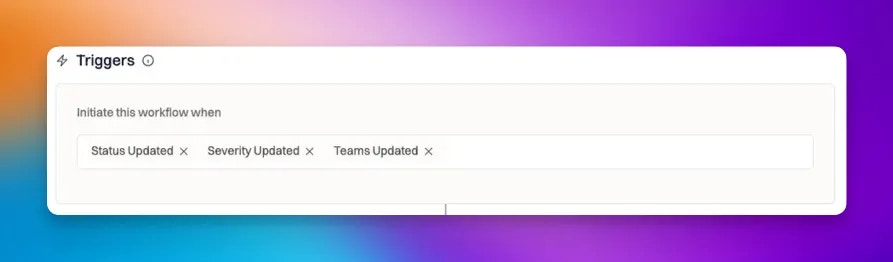
| Trigger events | Events that initiate a workflow run. Trigger events are OR-joined (any selected event can initiate a run). |
| Run condition operator | How Rootly joins multiple run conditions: all of, any of, or none of. |
| Run conditions | The rule set that must be satisfied before actions execute. Available condition fields depend on workflow type. |
| Actions | The steps executed when run conditions pass. Actions are ordered and run in sequence. Available actions depend on workflow type and your enabled integrations. |
Slack command defaults and uniqueness
If you do not define a Slack command explicitly, Rootly generates a default command derived from:- The workflow kind and the workflow name (not just the name)
Slack commands must be unique within a team and must follow strict formatting rules (letters, numbers, dashes, underscores, and periods with restrictions on placement).
How Workflows Execute
Workflow execution has three major phases:- Initiation
- Condition check
- Execution
Phase 1: Initiation
A workflow run begins when one of its configured trigger events is met.Trigger events are OR-joined
When you select multiple trigger events, Rootly evaluates them using OR logic:- If any selected trigger event occurs, the workflow run initiates.
Trigger overlap rules
Some triggers are intentionally considered “catch-all” triggers and overlap with more specific triggers. Rootly enforces rules to prevent redundant or confusing configurations. Common examples:- A catch-all “updated” trigger covers all attribute updates and should not be combined with field-specific update triggers.
- Some channel creation triggers overlap with incident creation triggers and cannot be selected together.
If you see an error while saving triggers, check whether you selected both a catch-all update trigger and one or more specific update triggers.
Phase 2: Condition Check
After initiation, Rootly evaluates run conditions against the incident (or alert, action item, pulse, retrospective) to decide whether the workflow’s actions should execute. Conditions combine under a join operator (all of, any of, none of), and each individual condition uses a per-condition operator (is, is one of, contains any of, is set, etc.) appropriate to the field type.
The default join operator is all of — if a workflow is running more often than expected, that’s usually the first thing to check.
For the full conditions reference — every operator, common condition recipes, field-type-by-operator guidance, and troubleshooting workflows that fire wrong — see Workflow Conditions.
Phase 3: Execution
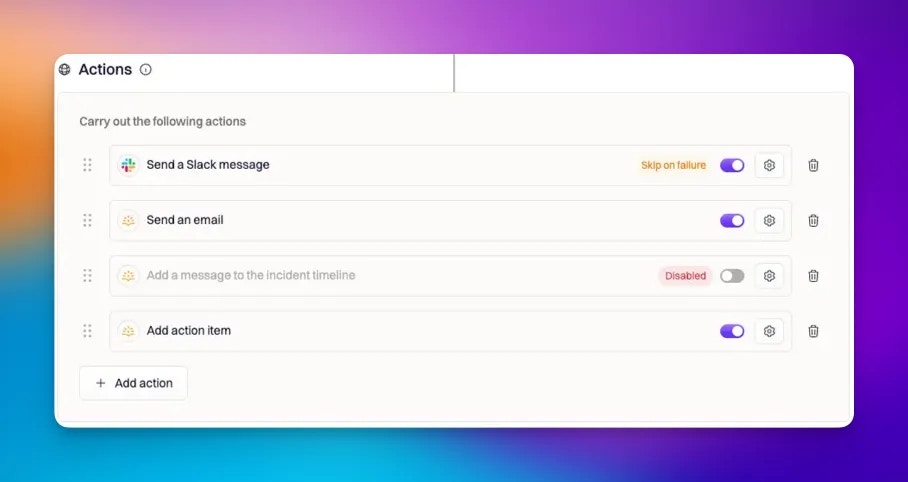
If run conditions pass, Rootly executes actions in order.Action ordering
Actions run sequentially in the order they are listed in the workflow editor.- If the workflow has multiple actions, the earlier actions run first.
- Actions can be individually disabled.
- Each action’s output is available to subsequent actions via Liquid template variables. See Task Output Variables for syntax and examples.
Failure behavior and Skip on Failure
By default:- If an action fails, the workflow run halts and later actions do not execute.
- Rootly records the failure for that action
- Rootly continues executing subsequent actions

Scheduling Behavior
Workflows support delays and repeating schedules using the Wait before executing and Repeat every / Repeat on controls. These are most commonly used for reminder workflows, periodic status updates, and escalation nudges. Key behaviors:- Rootly re-evaluates run conditions after a wait period and before every repeat cycle. If conditions are no longer true, the workflow stops.
- Stop repeat conditions (maximum number of repeats, time since first run) give explicit control over when a repeat loop ends.
Manual Runs (Slack and Web)
Workflows can also be triggered manually, which is useful for ad-hoc operational tasks.- Slack command runs require the workflow to include Slack Command as a trigger.
- Incident workflows have additional context requirements and permission checks.
- Web UI triggering from an incident runs the workflow immediately for that specific incident and only lists enabled incident workflows.
Organizing Workflows
Workflows are easier to maintain when they are organized consistently.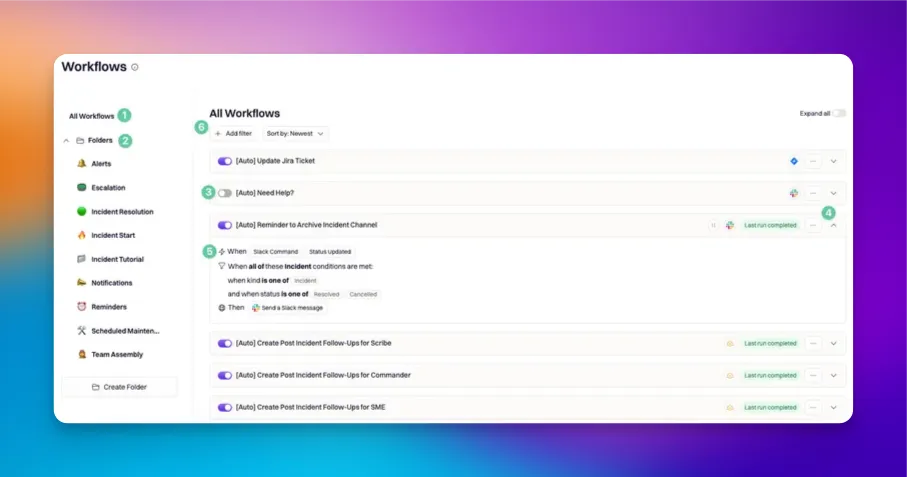
| Area | What it’s used for |
|---|---|
| All workflows | A global view of workflows in your organization. |
| Folders | Optional organization structure for grouping workflows. |
| Enabled / Disabled | Quick control for automatic execution. |
| Expand / Collapse | Quickly view trigger and condition summaries without editing. |
| Workflow summary | Displays configured triggers, conditions, and actions for fast auditing. |
| Filter and sort | Locate workflows by folder, enabled status, and other attributes. |
Best Practices
- Use descriptive names and descriptions. Treat workflows like operational code: explain intent, scope, and expected behavior.
- Avoid trigger overlap. Do not combine catch-all update triggers with field-specific update triggers unless you are intentionally broadening behavior.
- Start with conservative conditions. Begin with strict conditions, validate behavior, then widen scope intentionally.
- Validate failure behavior. Decide which actions should halt the run versus which can be skipped safely.
- Use wait and repeat carefully. When repeating workflows, confirm the run conditions stay true long enough for your reminder cadence.
- Document ownership. Use folders and naming conventions so teams know which workflows are actively maintained versus legacy.
Troubleshooting
A workflow runs when not all conditions are met
Most commonly:- The run condition operator is set to any of rather than all of.
- A catch-all update trigger is firing more frequently than expected.
A Slack command cannot find the workflow
Most commonly:- The Slack command value does not match the workflow’s configured command.
- The workflow does not include Slack Command as a trigger.
A workflow does not run automatically
Most commonly:- The workflow is disabled.
- The trigger event selected is not the event that is actually occurring.
- Run conditions are too restrictive.
Frequently Asked Questions
Are trigger events evaluated in a specific order?
Are trigger events evaluated in a specific order?
No. Workflows are initiated when their trigger events occur. There is no global ordering across workflows, and multiple workflows may initiate independently as events happen.
What happens if a workflow action fails?
What happens if a workflow action fails?
By default, the workflow run halts when an action fails. If you enable Skip on Failure for an action, Rootly records the failure and continues to the next action.
Can disabled workflows still be triggered manually?
Can disabled workflows still be triggered manually?
Disabled workflows do not run automatically from trigger events. Depending on configuration and permissions, some manual Slack command runs may still be possible. If you want to prevent all manual execution, remove Slack Command as a trigger and/or restrict permissions.
How do repeating workflows stop?
How do repeating workflows stop?
Repeating workflows stop when run conditions no longer evaluate as true, or when a stop repeat condition is met — such as a maximum number of repeats or a time-since-first-run limit. See Wait and Repeat for full details.
How can I be notified on workflow failures?
How can I be notified on workflow failures?
Go to Settings > Organization and select a Slack channel under Notify workflow failures channel. When a workflow fails, Rootly will post a message to that channel with the workflow name, the failed task, and any error output.
Will a workflow fire on incidents that already existed when I created it?
Will a workflow fire on incidents that already existed when I created it?
No. Workflows only trigger on new state transitions that happen after the workflow exists. If you publish a workflow that archives Slack channels 24 hours after an incident reaches Closed, the workflow won’t fire on incidents already in Closed status — it watches for new transitions to Closed going forward. The same applies to every trigger event: workflows don’t backfill against historical state.To act on existing incidents, run the workflow manually on each affected one — see Manually Running Workflows.