Overview
Escalation Policies define how Rootly notifies responders when an alert requires attention and what happens if that alert is not acknowledged in time. They are the backbone of on-call reliability—ensuring alerts reach a human, escalate predictably, and never fall through the cracks. An escalation policy answers three core questions:- Who should be notified first?
- What should happen if no one responds?
- How long should Rootly keep escalating before stopping?
Create an Escalation Policy
Escalation policies are created from the On-Call section of the web app. To create a new escalation policy:- Navigate to On-Call → Escalation Policies
- Click + Add Escalation Policy
- Enter an Escalation Policy Name (required) and an optional description
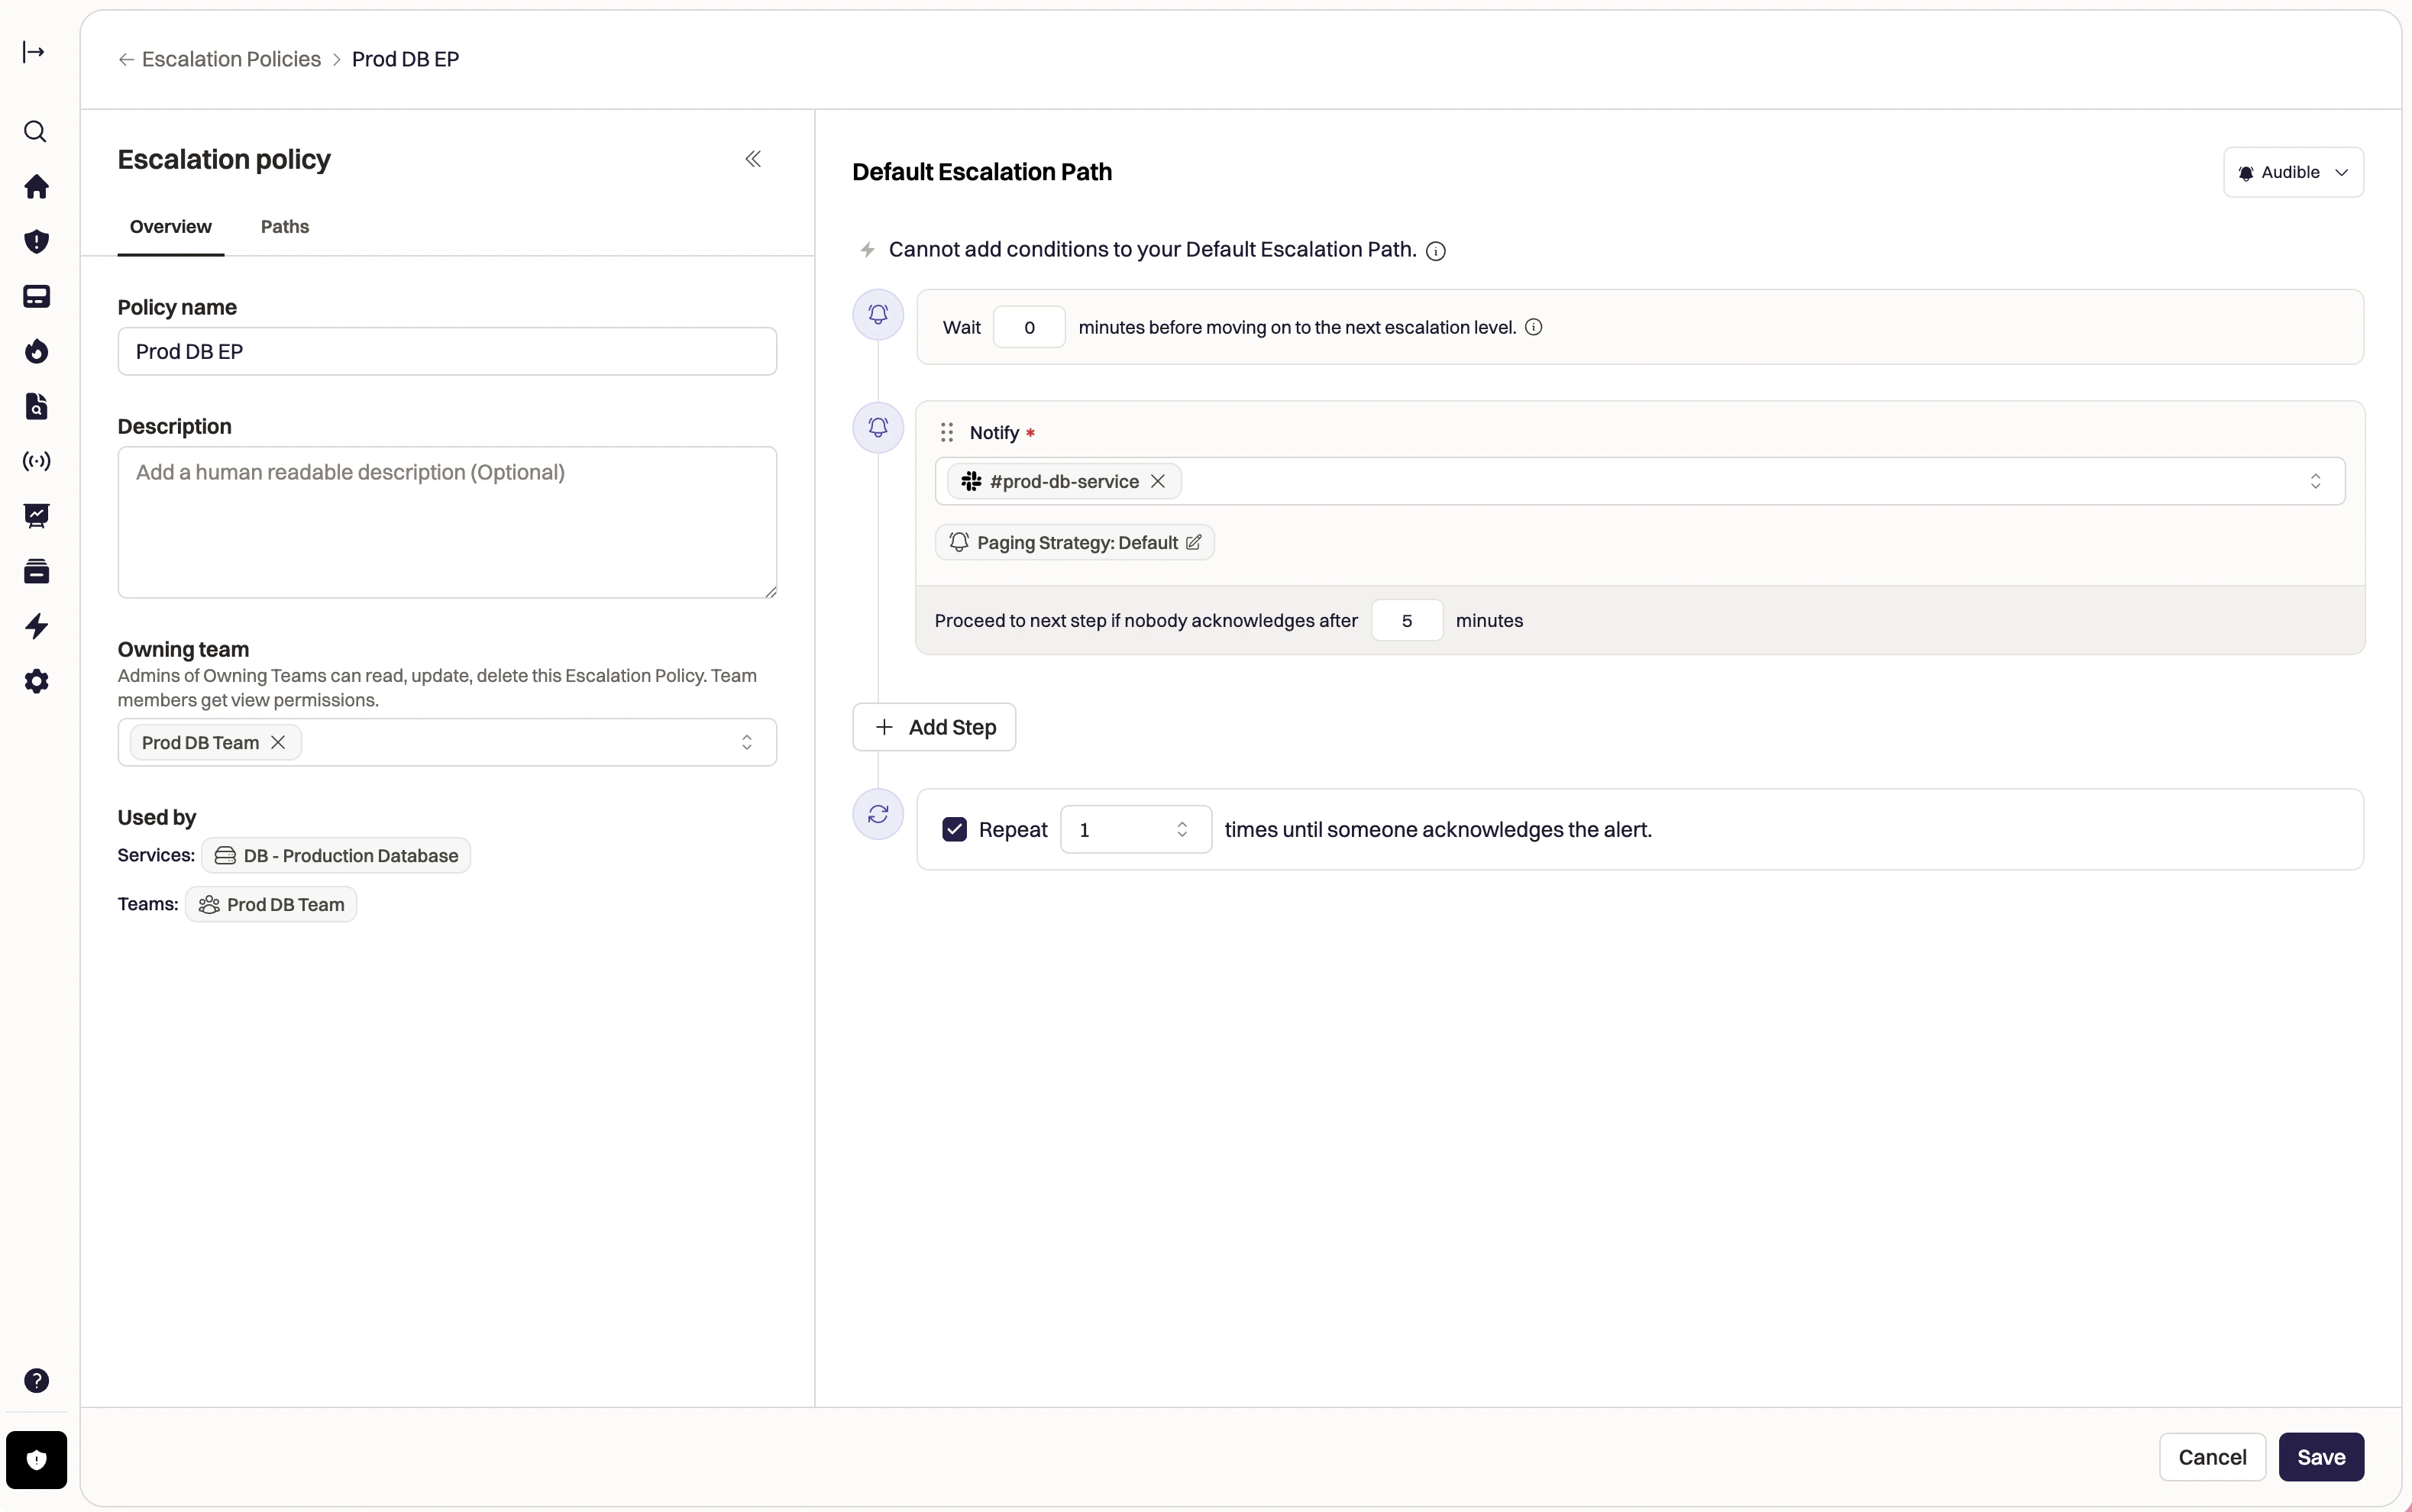
When you create an escalation policy, a Default Escalation Path is automatically created with Audible notifications enabled. This default path cannot be deleted and acts as a fallback if no other escalation paths match.
Step 1: Who Do We Notify?
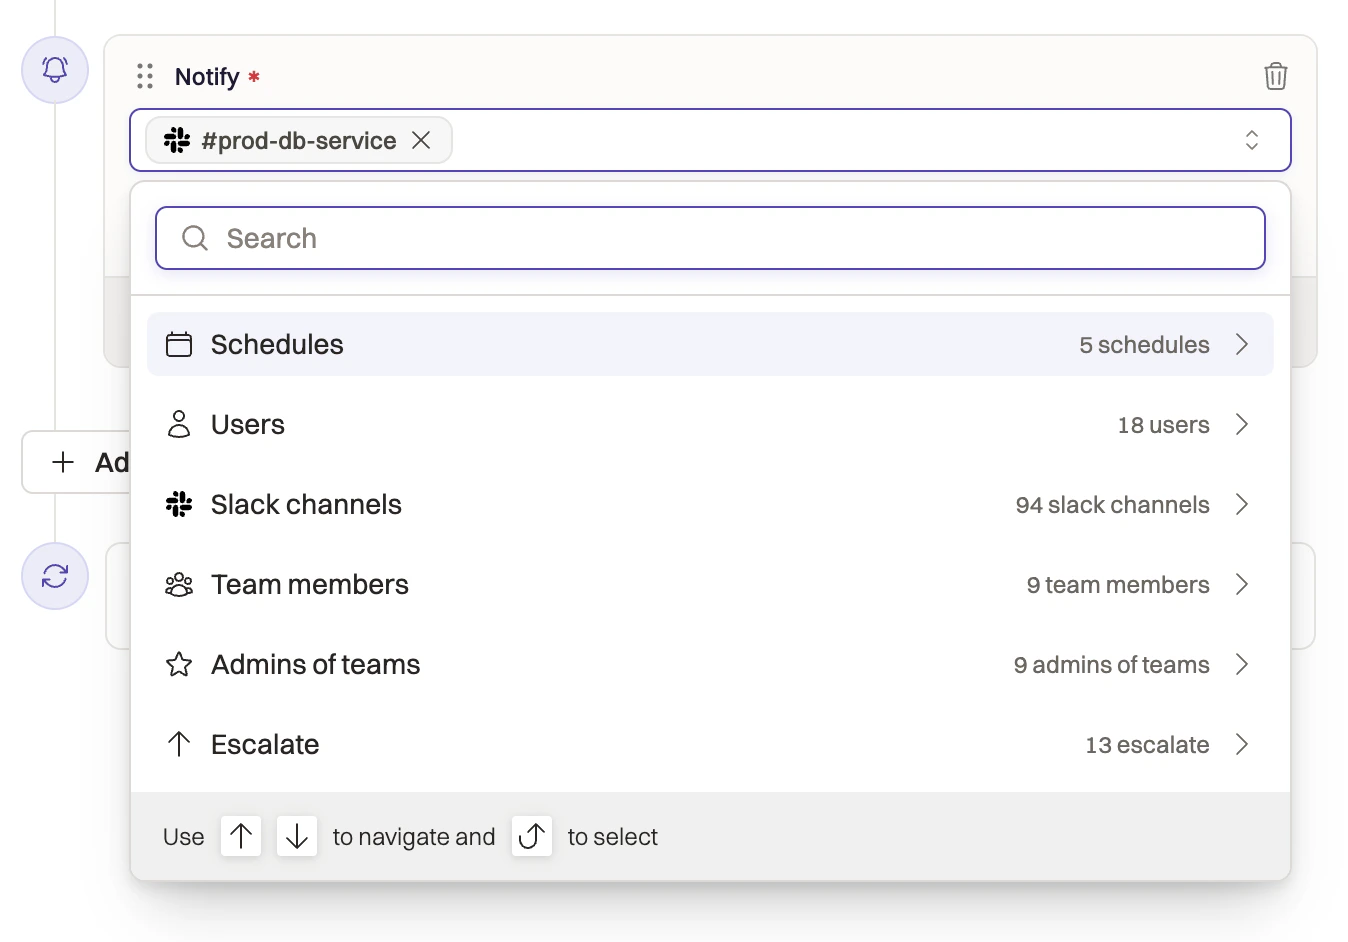
This step defines who is initially responsible for responding when an alert is triggered. Rootly supports notifying:- Individual users
- On-call schedules
- Team members or team admins
- Slack channels (for visibility)
- Escalating to other Teams or Services
Paging Strategies
Each escalation level has a paging strategy that controls which pageable responders are notified and in what order when the level triggers. You can configure the strategy when adding targets to a level.Paging strategies apply only to pageable targets — users, schedules, and team responders. Slack channel targets (added for visibility) and Escalate targets always fire regardless of the strategy selected.
Pages the person currently on-call for any schedule targets in the level. Individual user targets are always paged directly. This is the standard strategy and the right choice for most escalation levels.
Everyone Simultaneously
Pages all members of every schedule in the level at once, regardless of who is currently on-call. Use this for critical escalation levels where broad coverage matters more than targeted paging.
Random
Randomly selects one pageable responder from the level and pages only them. Useful when any responder in the group is equally qualified and you want to avoid alerting everyone at once.
Round Robin (Alert-Based)
Rotates the first-paged responder across incoming alerts — Alert A pages User 1, Alert B pages User 2, and so on. Distributes alert load evenly over time. Learn more in the Round Robin documentation.
Round Robin (Cycle-Based)
Pages each pageable target in the level sequentially within a single alert, cycling through all members before escalating to the next step. Learn more in the Round Robin documentation.
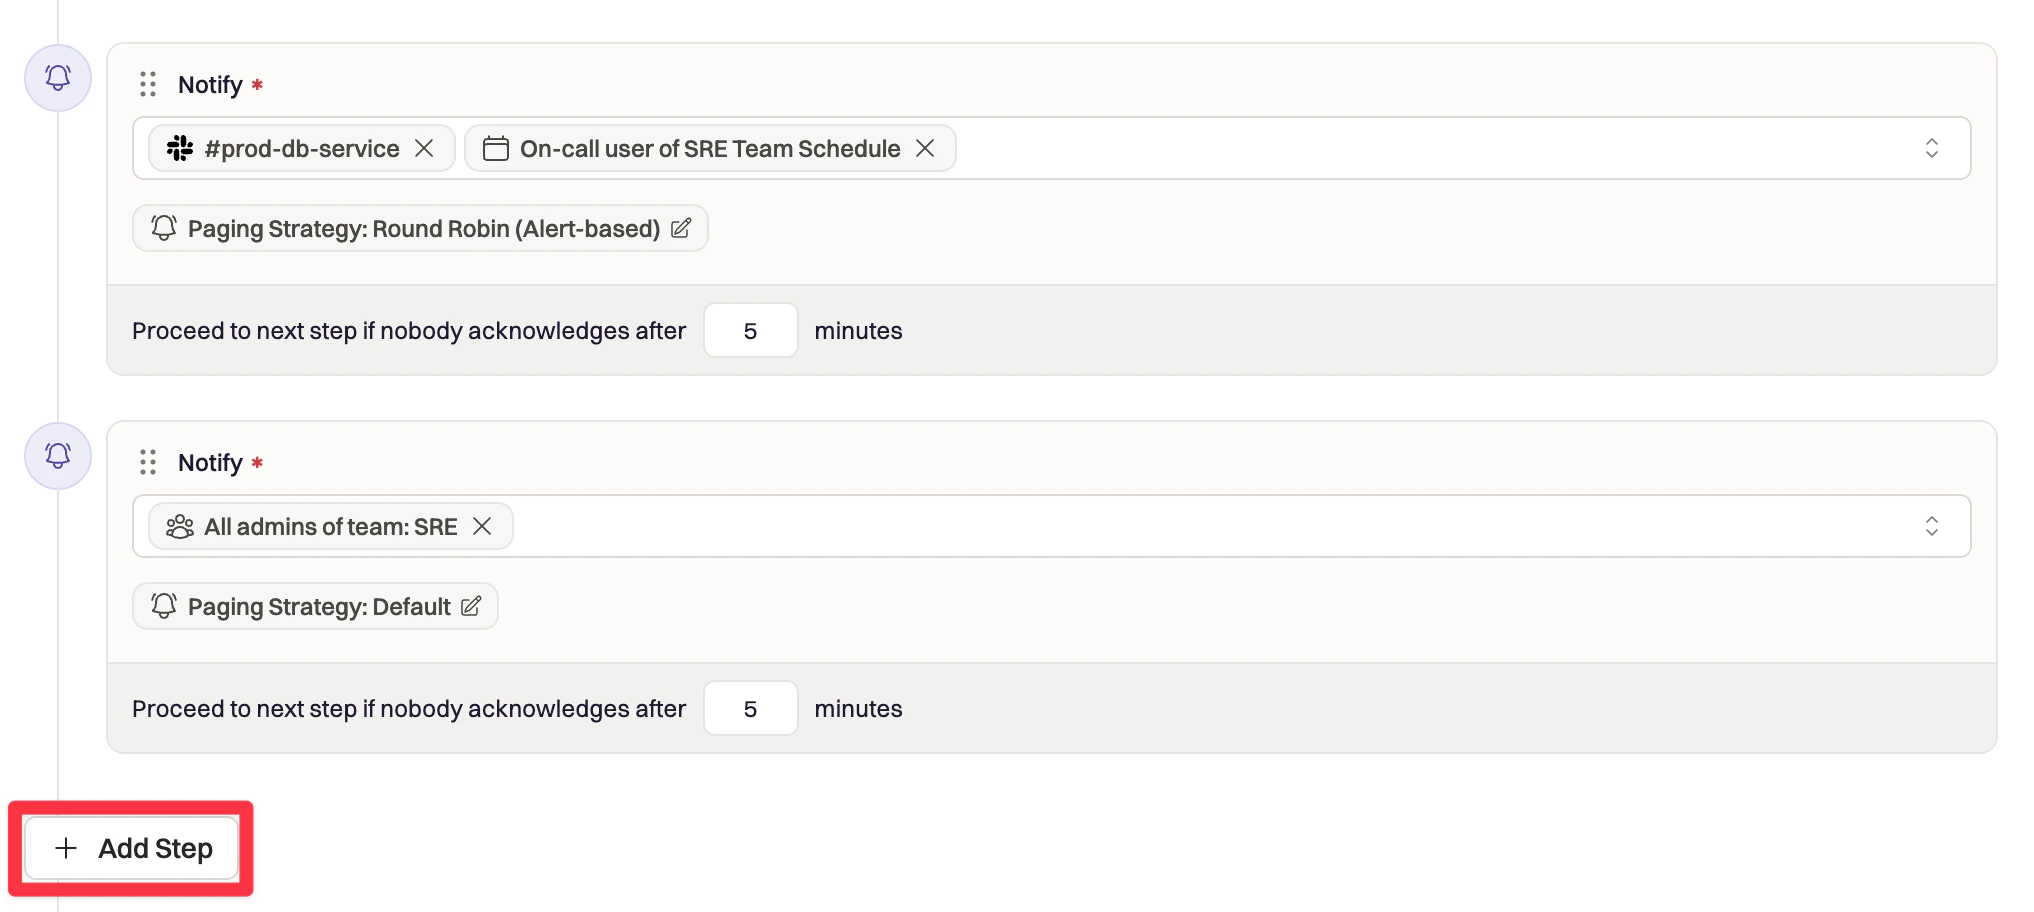
Step 2: Add Escalation Steps
Escalation steps define what happens next if an alert is not acknowledged. Each step includes:- A delay (in minutes)
- One or more notification targets
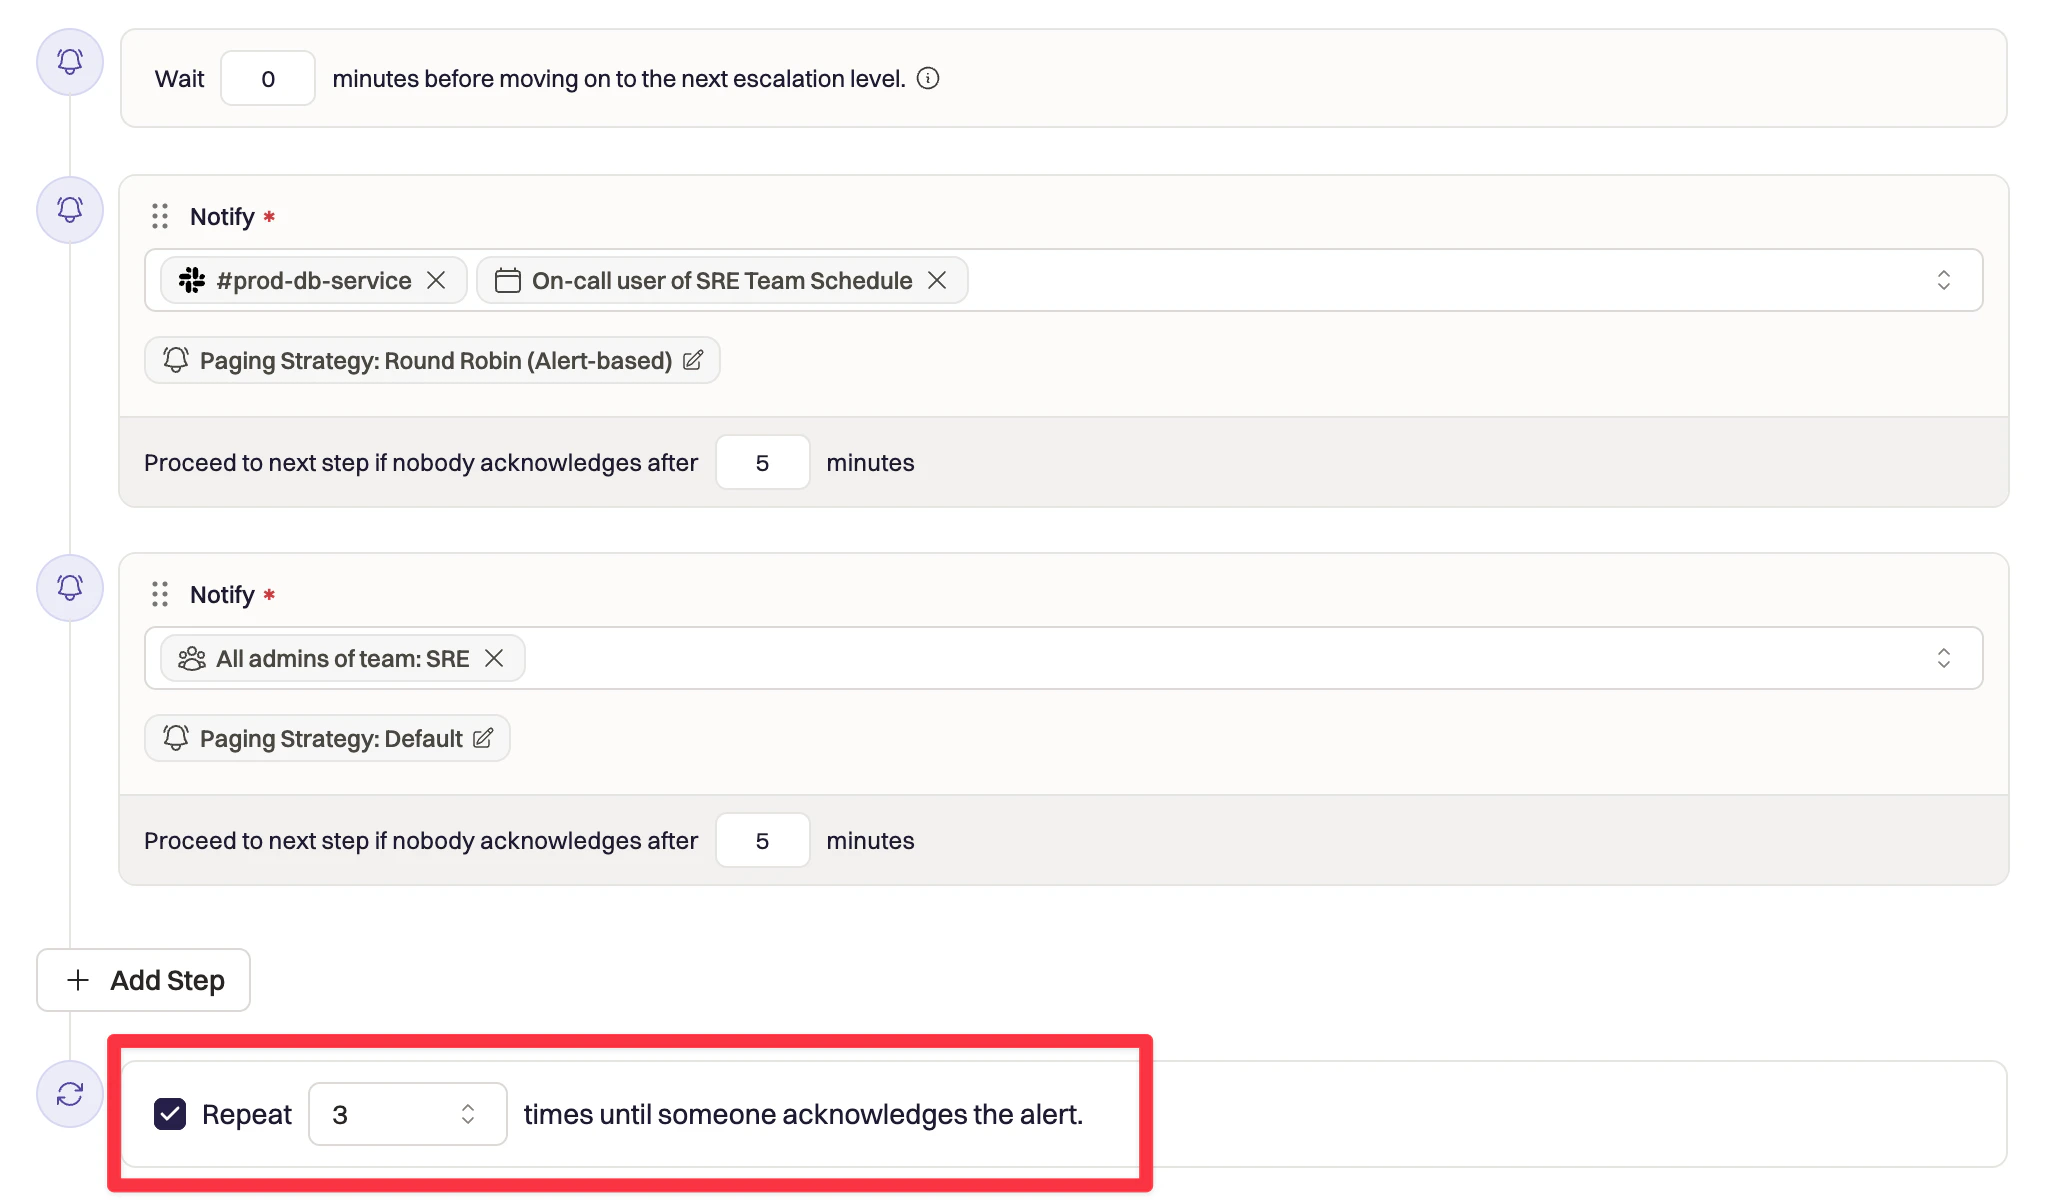
Step 3: Configure Repeat Behavior
If an alert remains unacknowledged after all steps complete, you can choose to repeat the escalation policy. When enabled, Rootly restarts escalation from the beginning and continues until:- The alert is acknowledged, or
- The repeat limit is reached
Step 4: Save and Assign the Policy
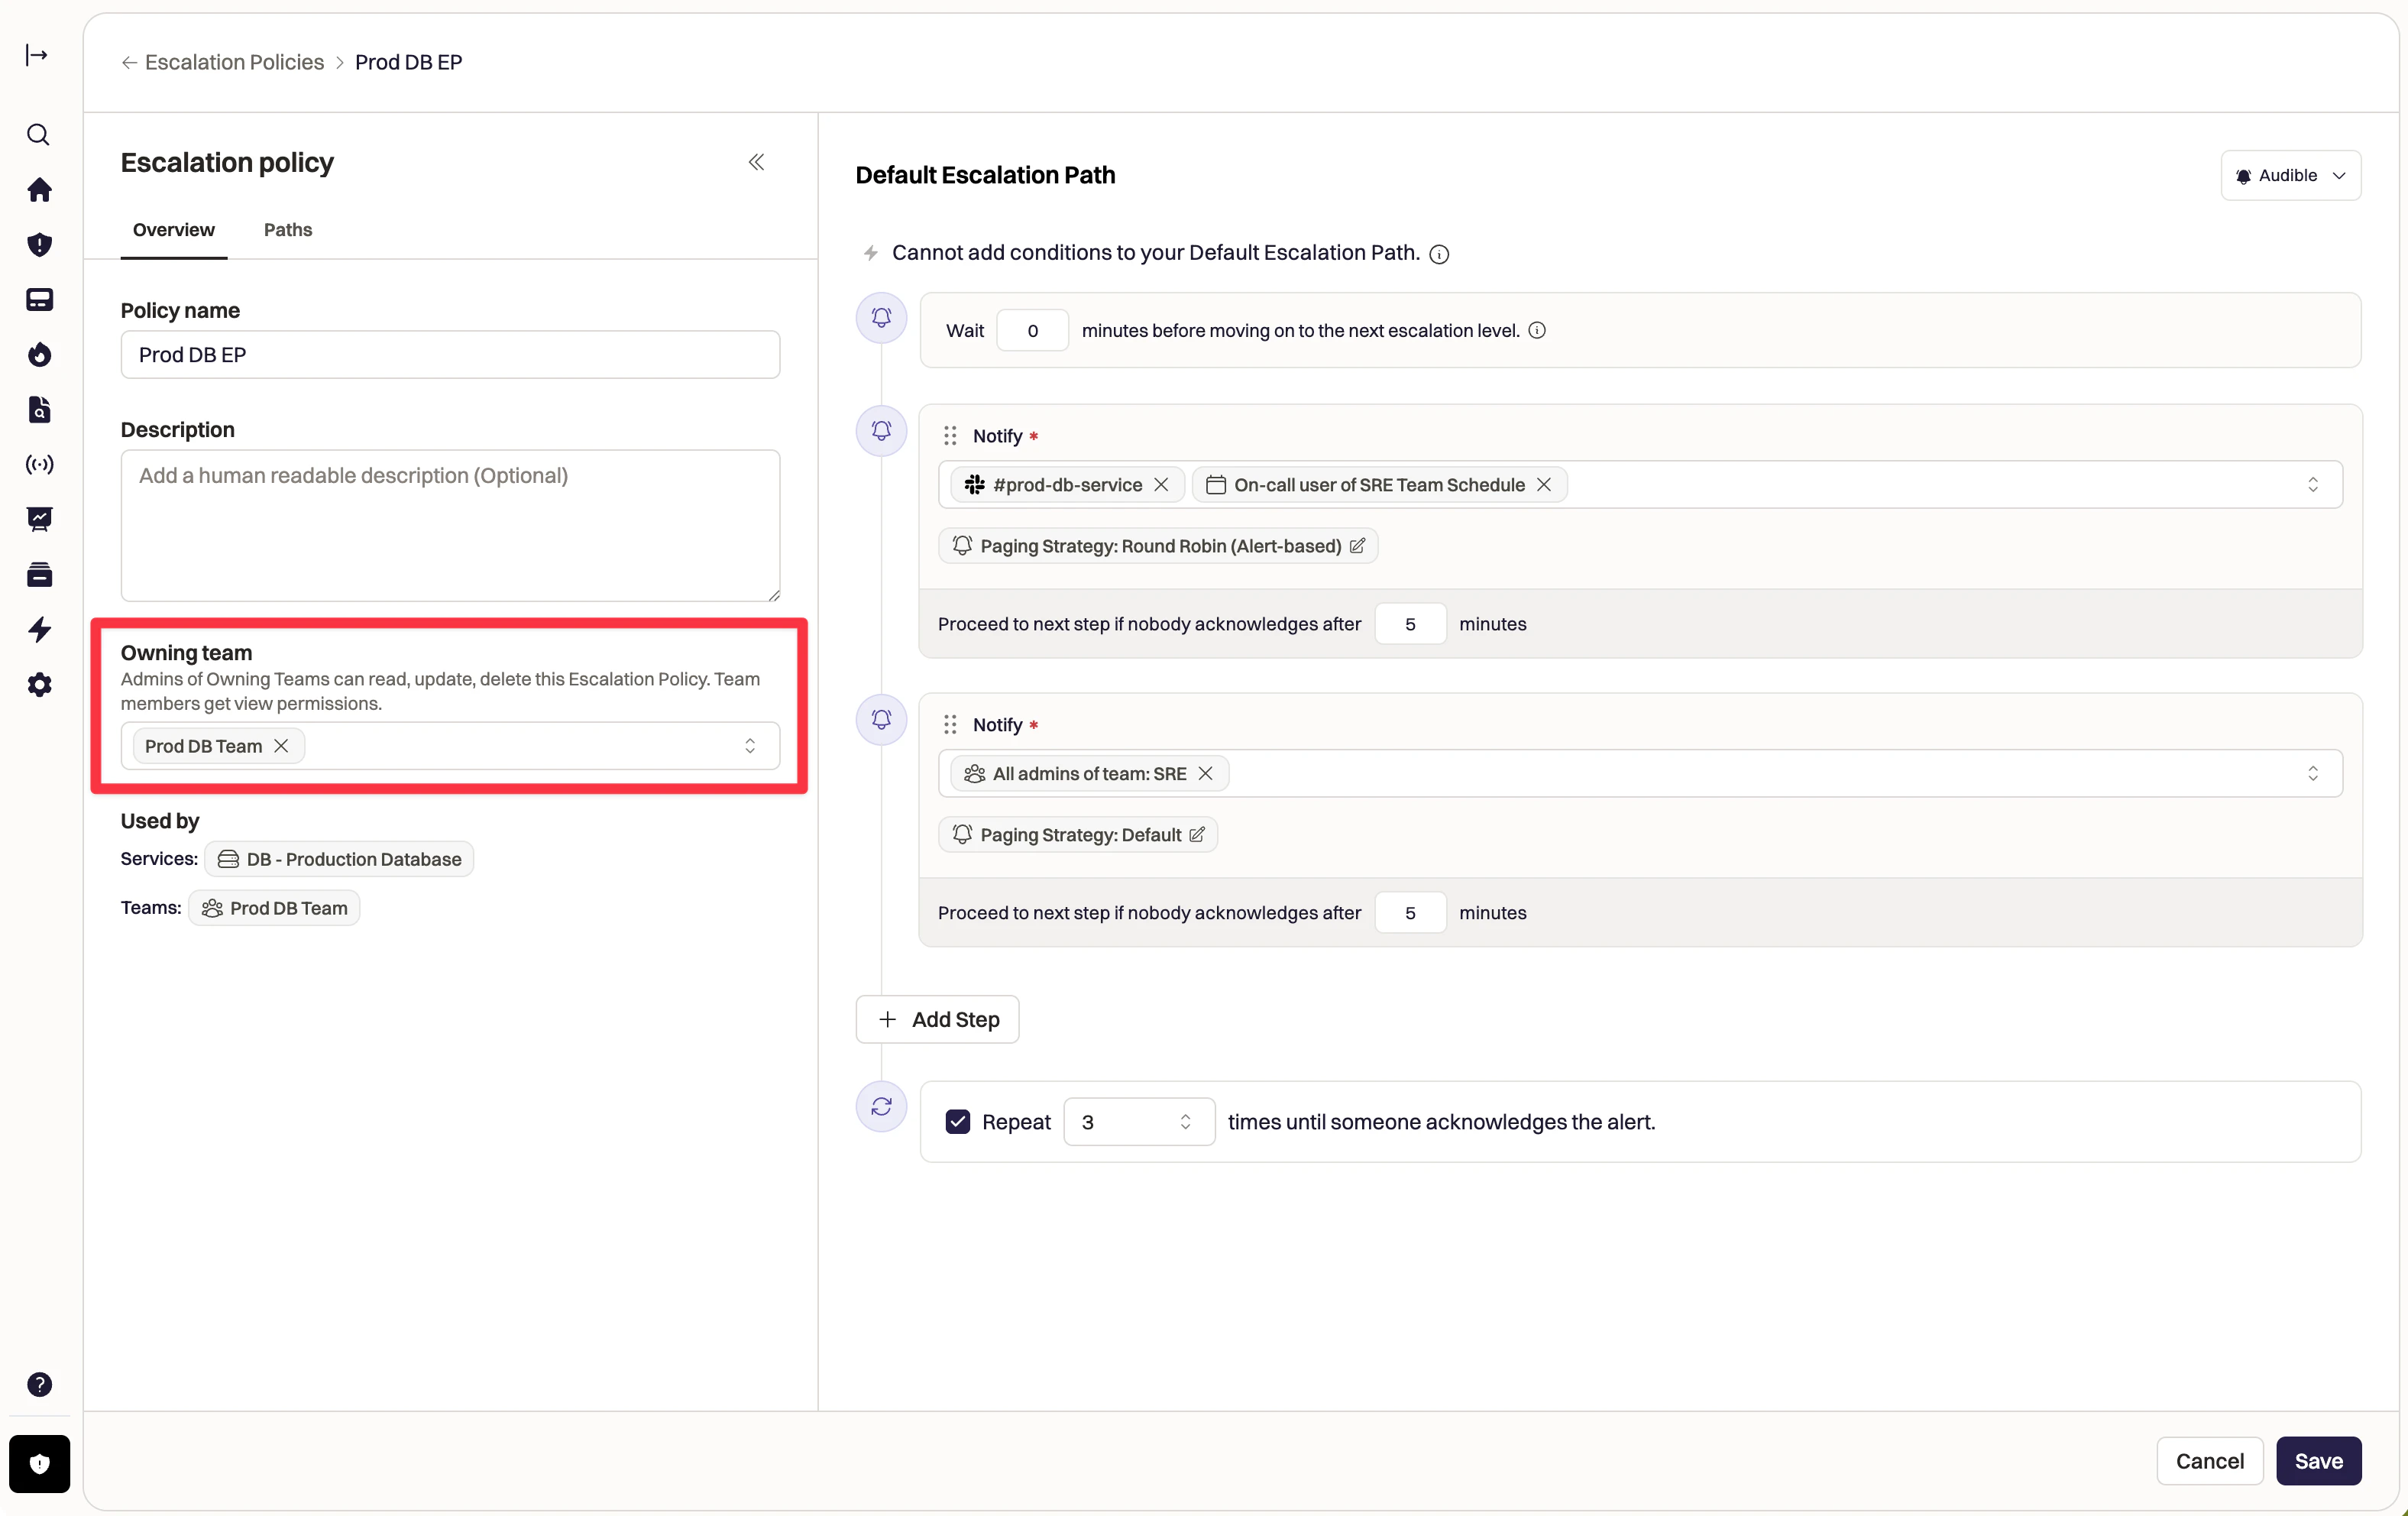
Saving the policy does not activate it. Escalation policies only run once they are assigned to a Service or Team: when the Service or Team are paged, their assigned escalation policy will trigger.- Assign the escalation policy to a Team using the Owning team field.
- Note: Any admin of an Owning Team of an Escalation Policy will also inherit edit permissions for that Escalation Policy.
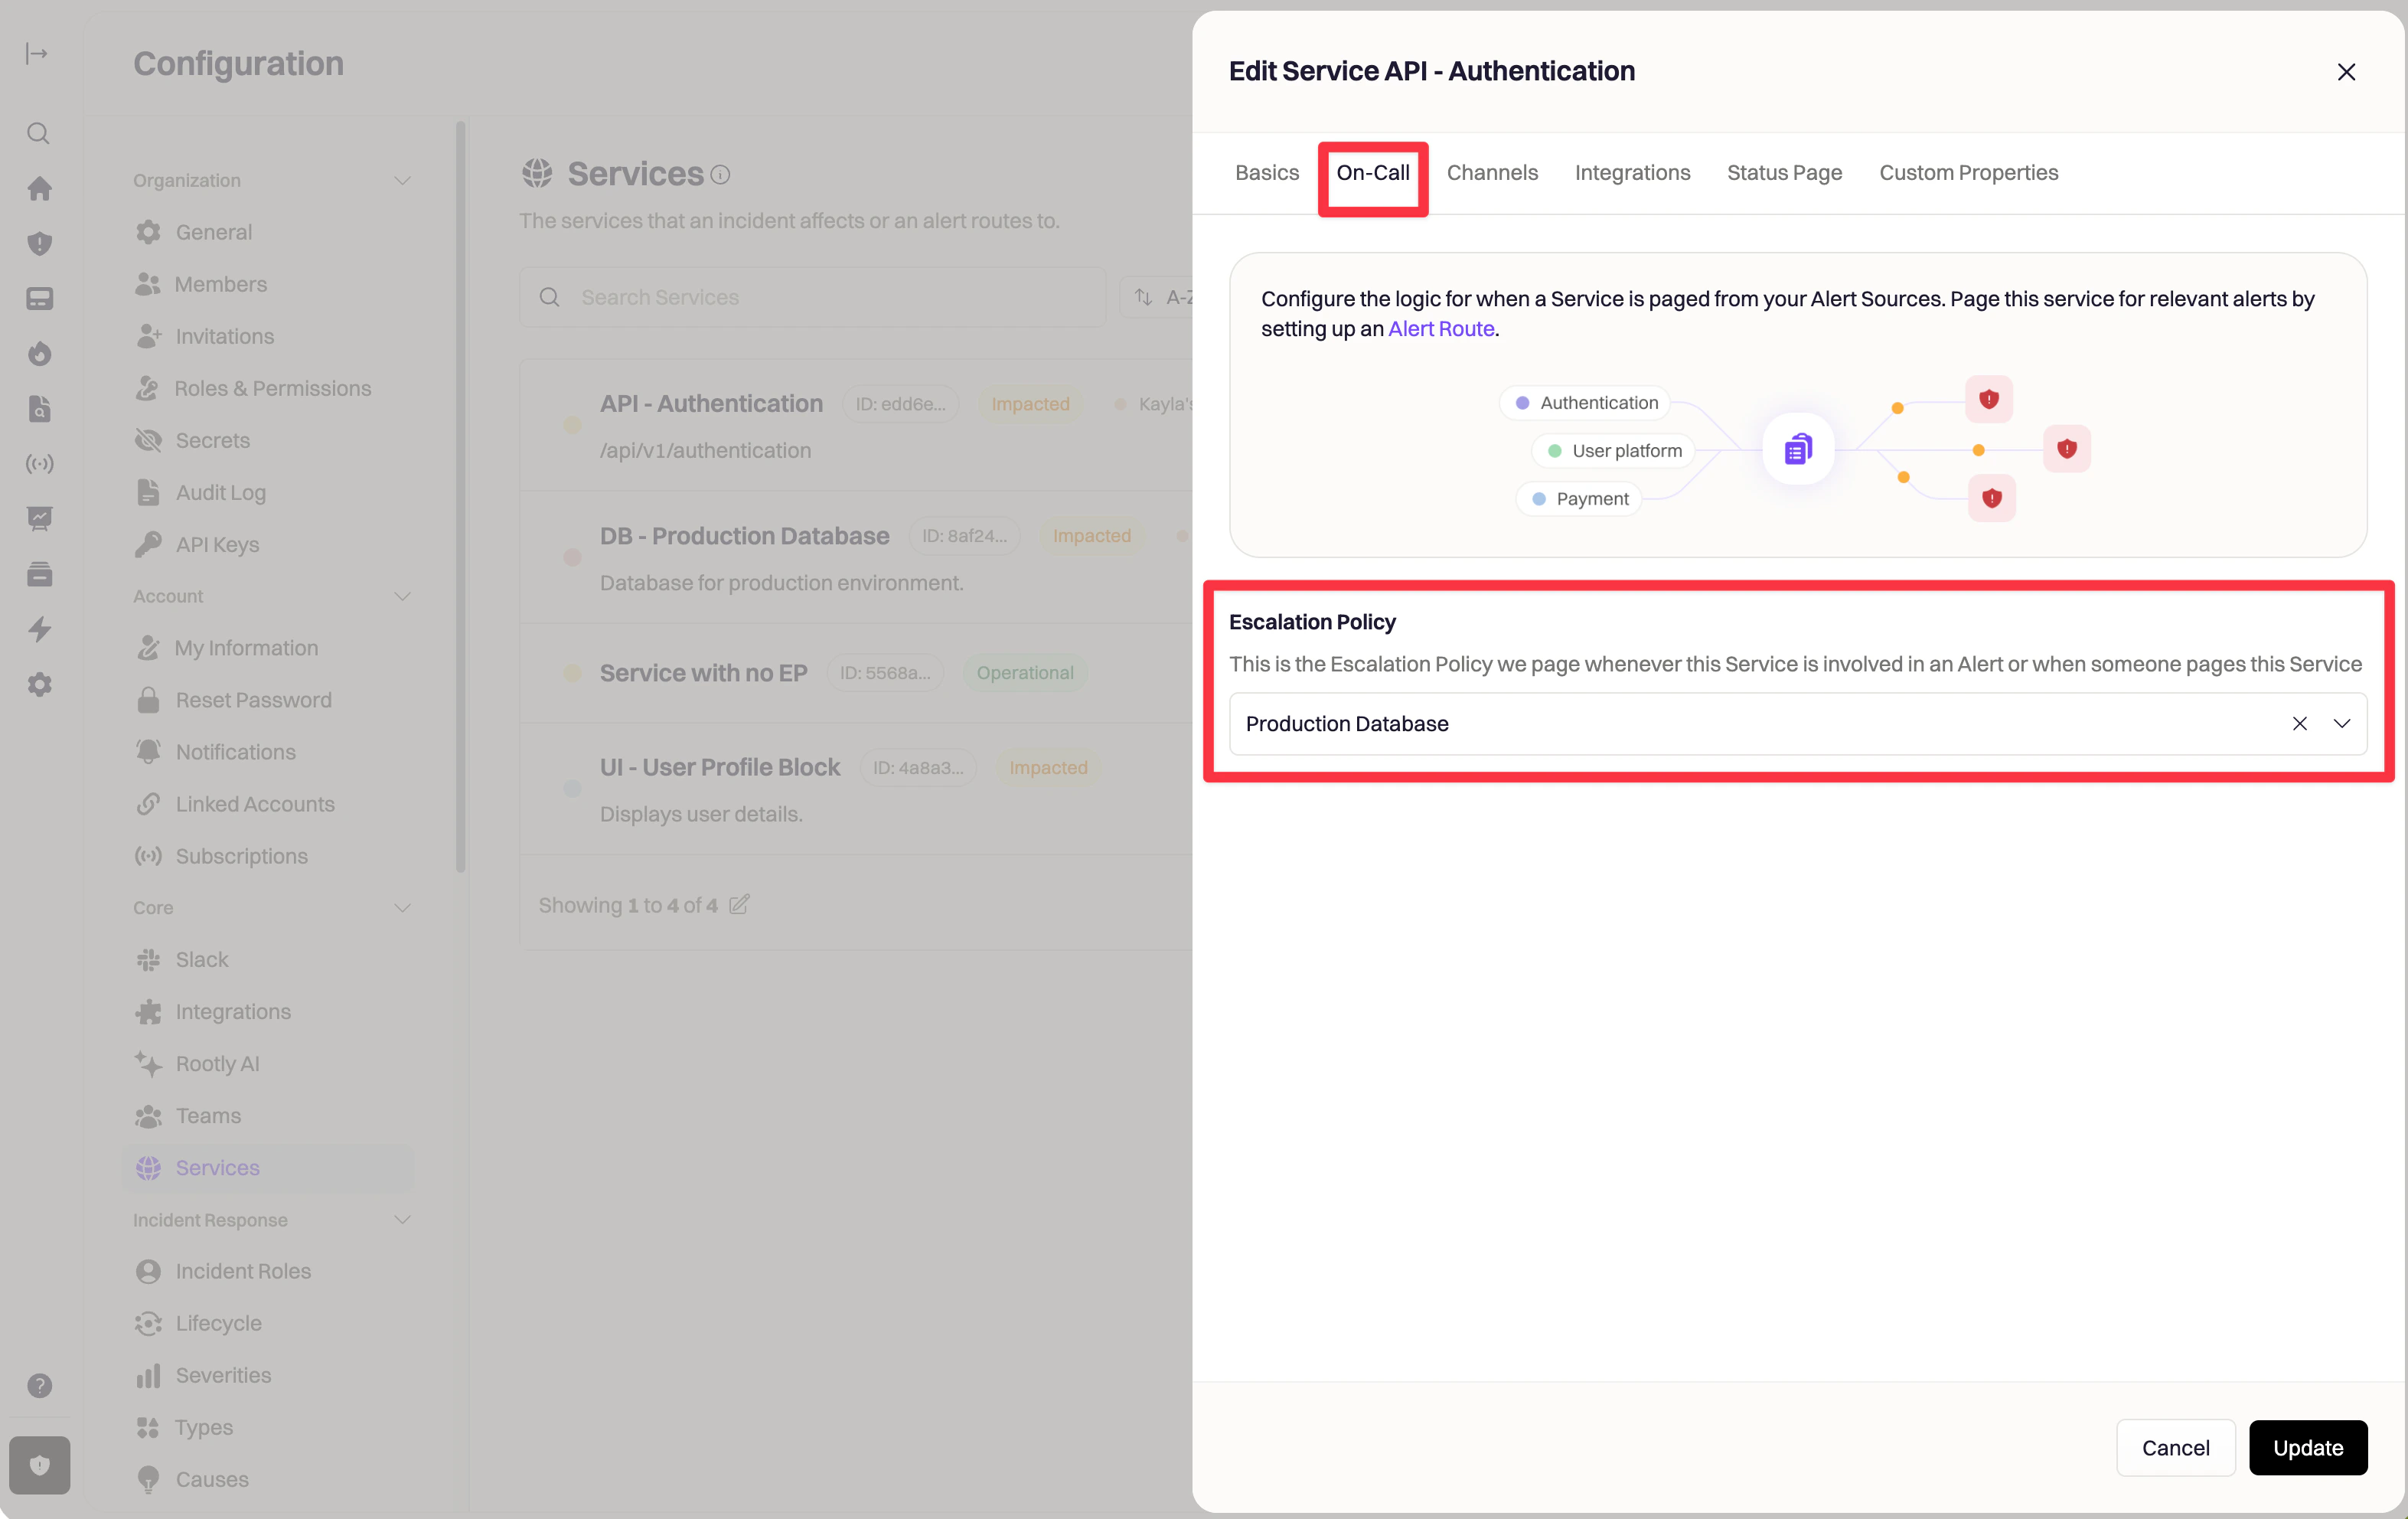
- Assign the escalation policy to a Service from the Service Configuration section of the dashboard.
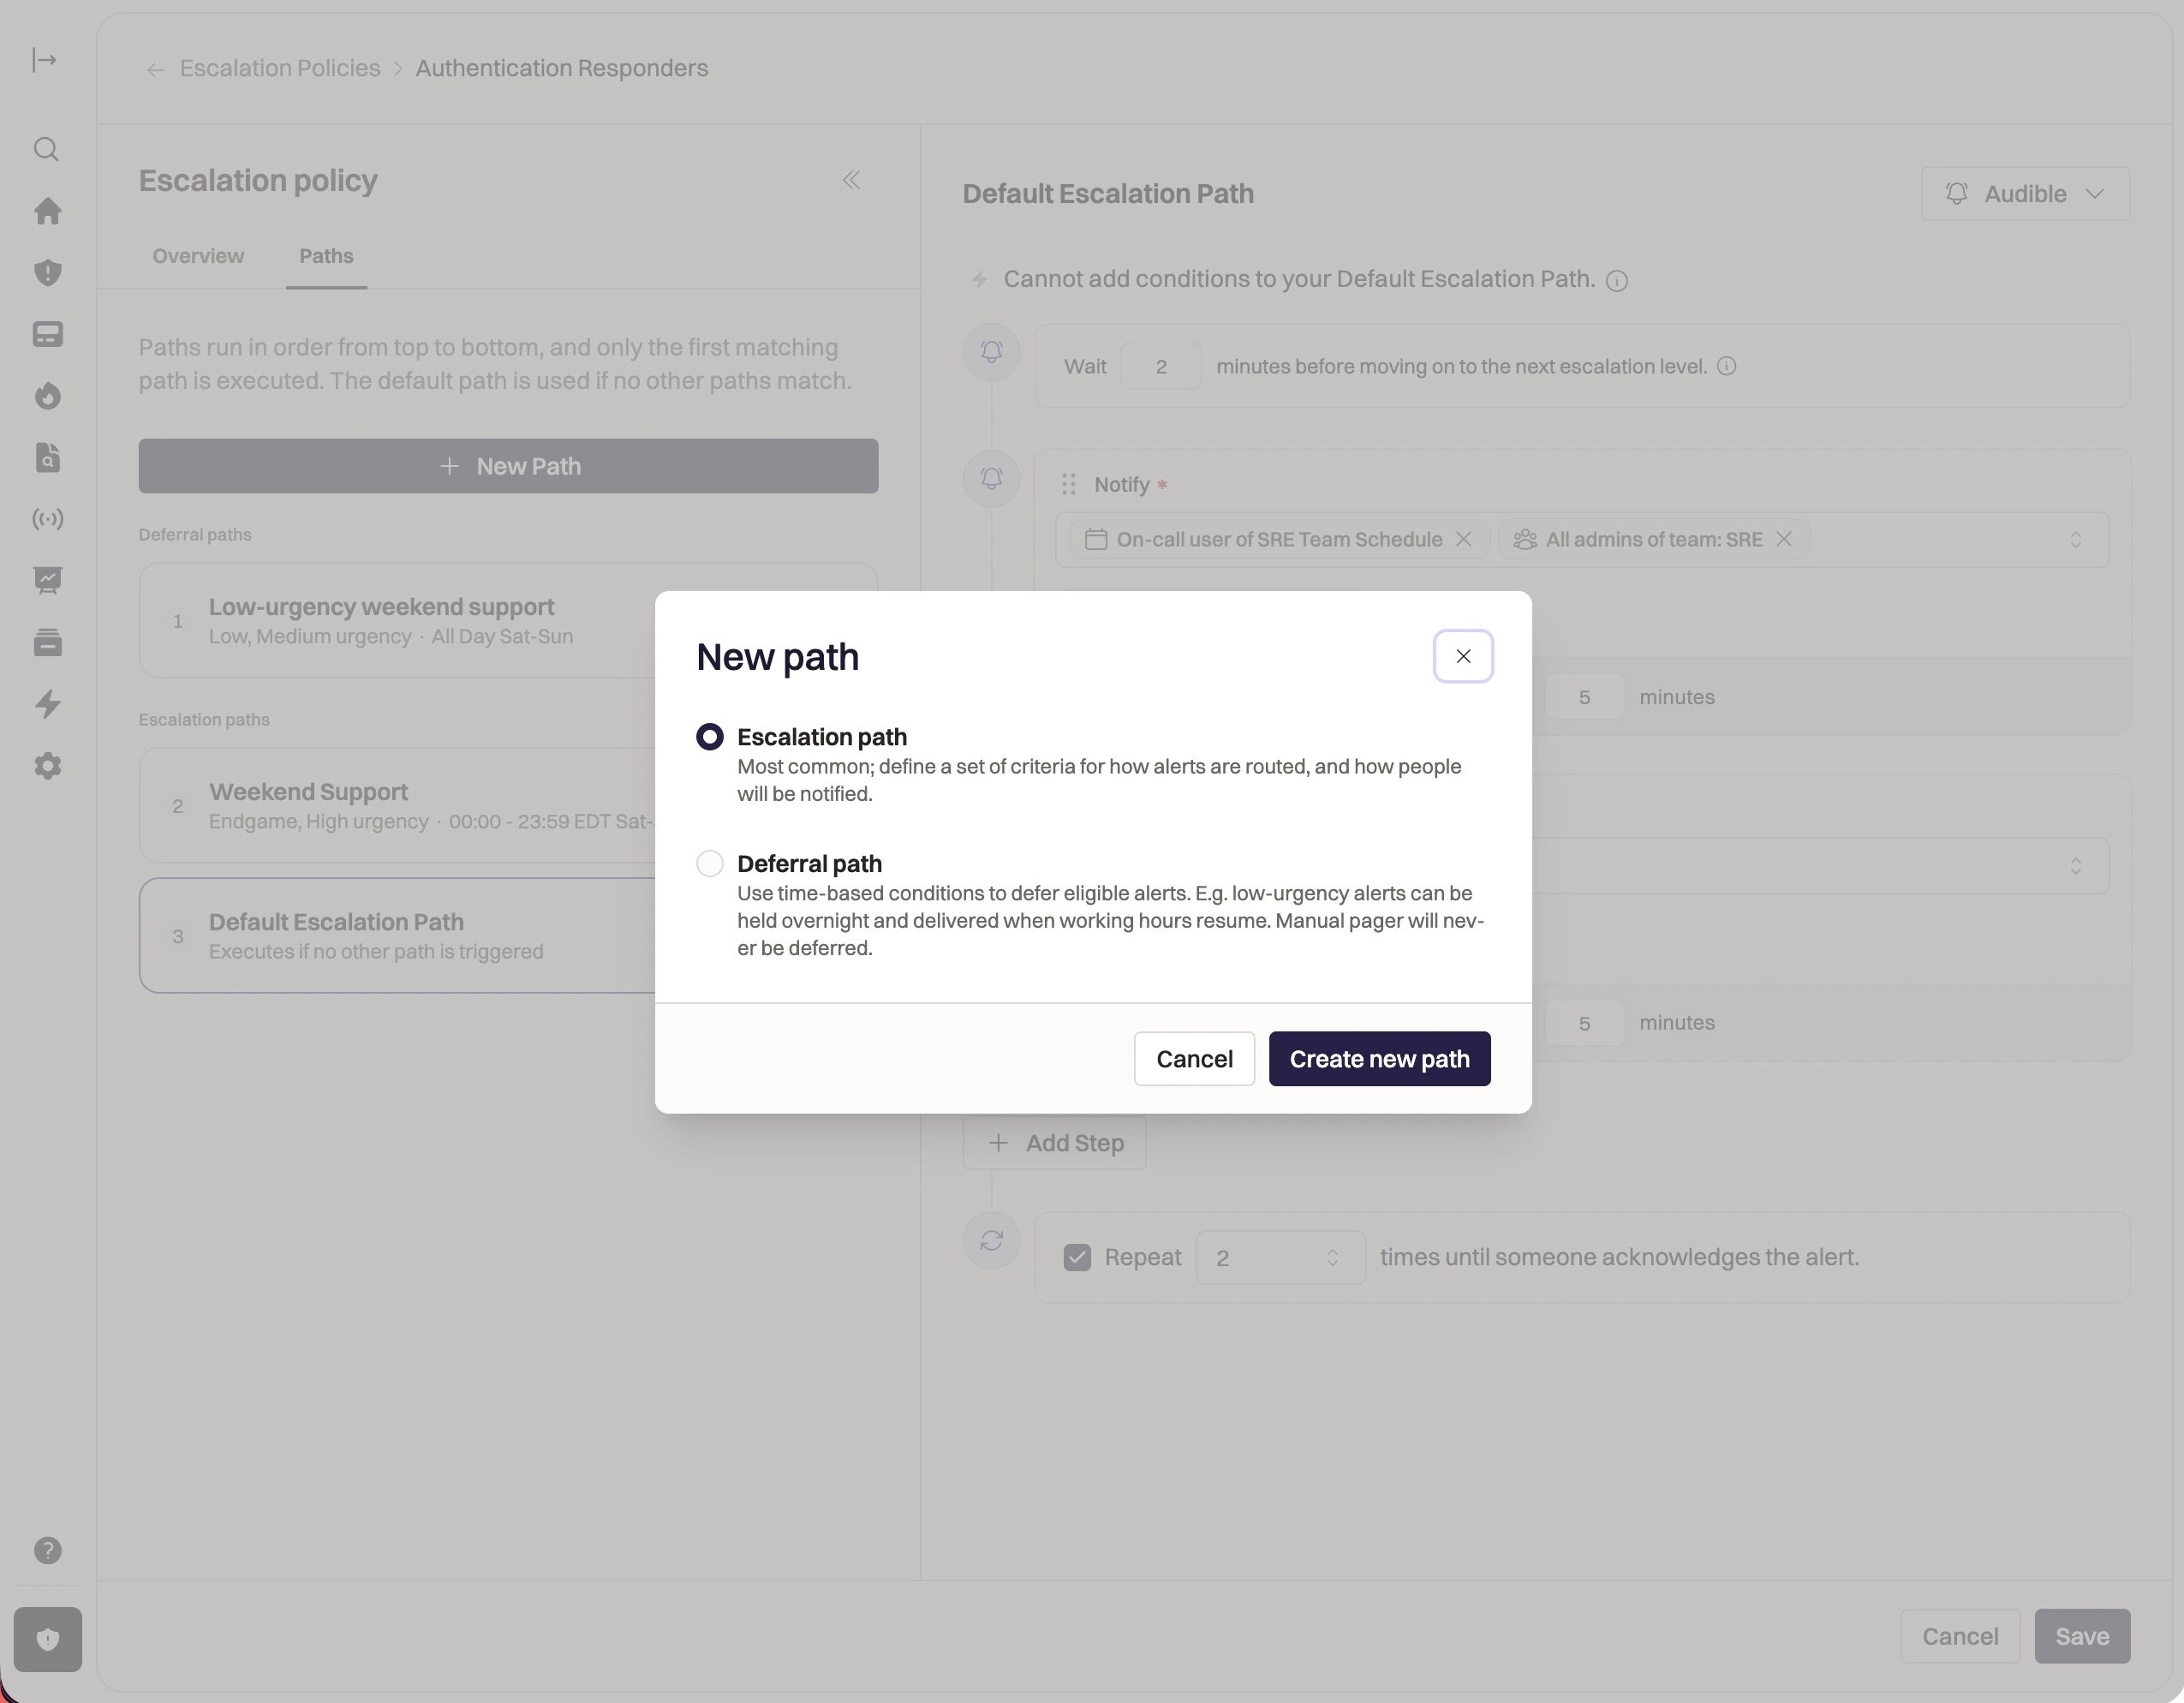
Dynamic paths
Escalation policies can contain multiple paths, each with its own rules and steps, allowing you to set up unique paging logic for different scenarios. Dynamic Paths allow you to model scenarios such as:- Business hours vs after hours
- High vs low urgency alerts
- Deferring pages on weekends vs. weekdays
Escalation Paths
Build Dynamic Escalation Paths when you want to have different paging logic for different types of alerts: for example, you may want to page different schedules depending on the time of day, or different users depending on the alert’s urgency. Set up your Escalation Path by:- Give your path a detailed Name. Make sure to use a descriptive name: when the path is executed for an alert, the path name will show on the alert’s timeline.
- Add conditions for when the path should be executed. You can build conditions around alert details:
- Alert Urgency
- Alert Fields
- Services on the Alert
- Alert’s Payload (represented as a JSONPath).
- Add any time restrictions: time restrictions limit the times of day for when the path can execute.
- Select if the path will be executed if
AnyorAllof the conditions are true: note that this logic applies to both the Conditions and Time Restrictions. - Set the notification type for the Path. See Audible vs. Quiet Notifications below to learn more about notification types.
- Click Done, and begin adding the paging logic following the same process as your Default Path.
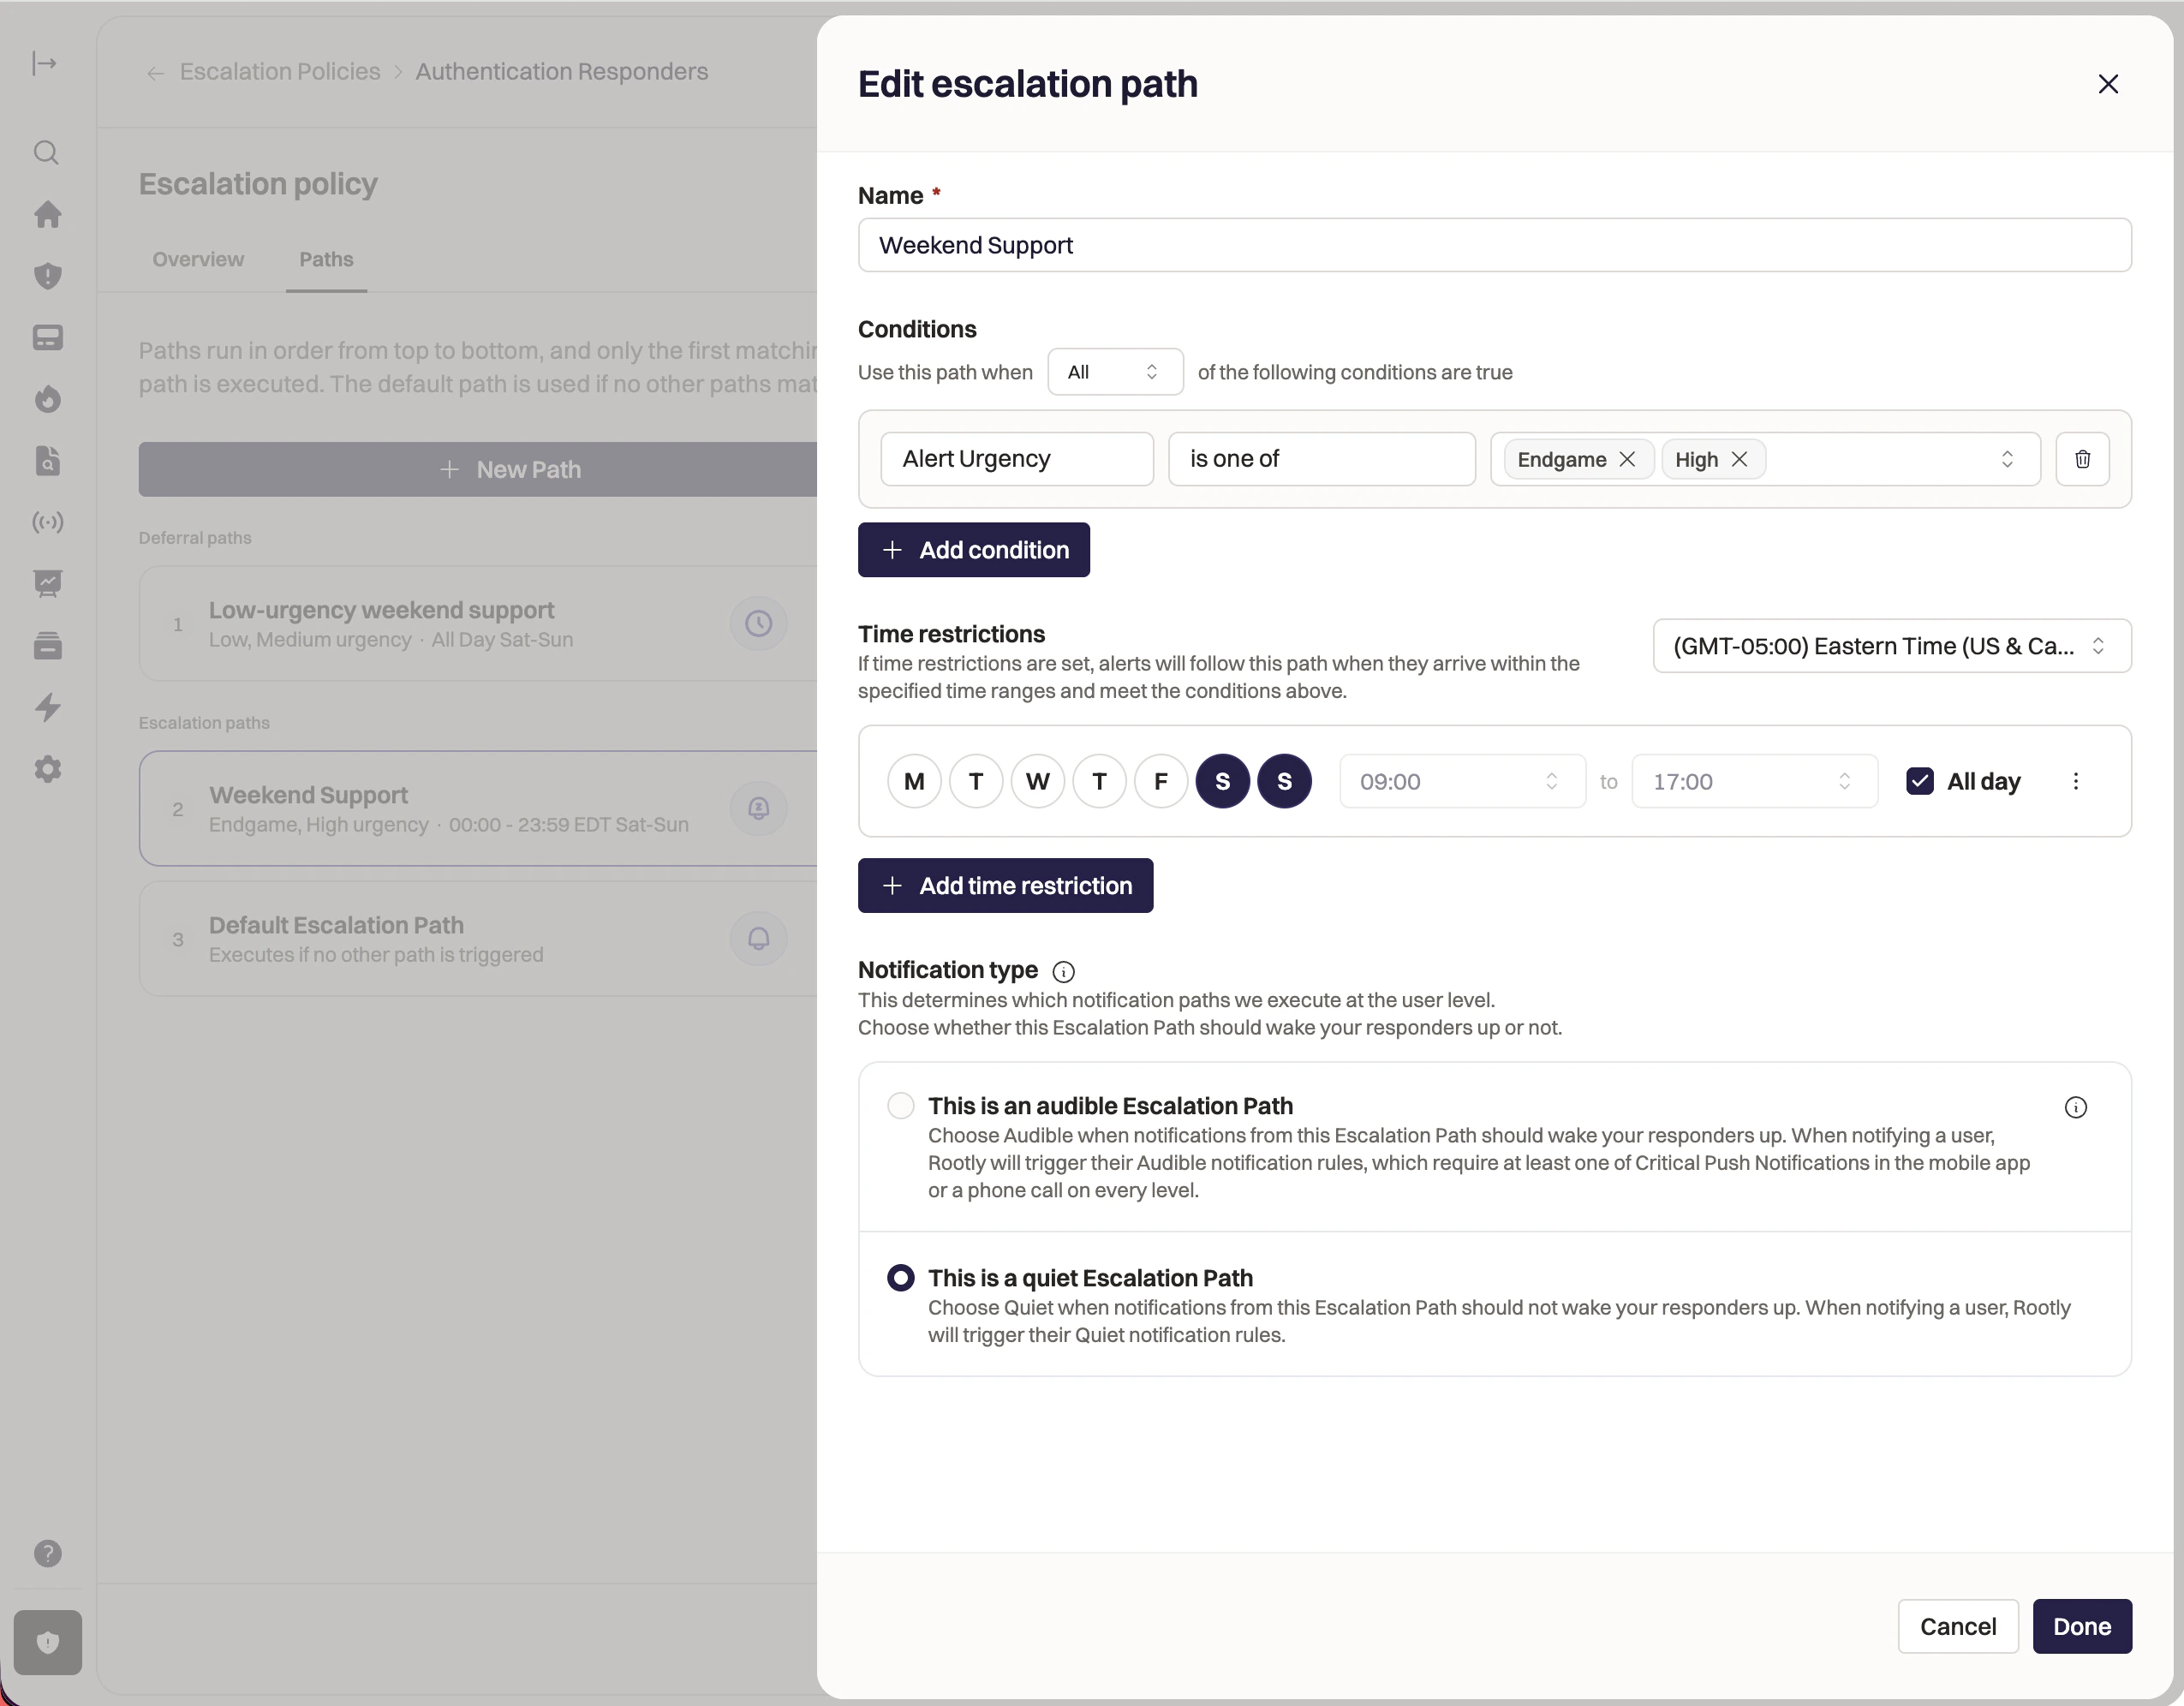
Audible vs Quiet Notifications
Each Escalation Path is either Audible or Quiet:- Audible paths are designed to wake responders and trigger critical notifications
- Quiet paths respect Do Not Disturb and are used for lower-urgency alerts
Limits and Constraints
Escalation Paths have a few important limits:- Maximum escalation levels: 20 per path
- Maximum targets per level: 25
- Repeat count: 1–9 cycles
- Maximum delay per step: 10,080 minutes (1 week)
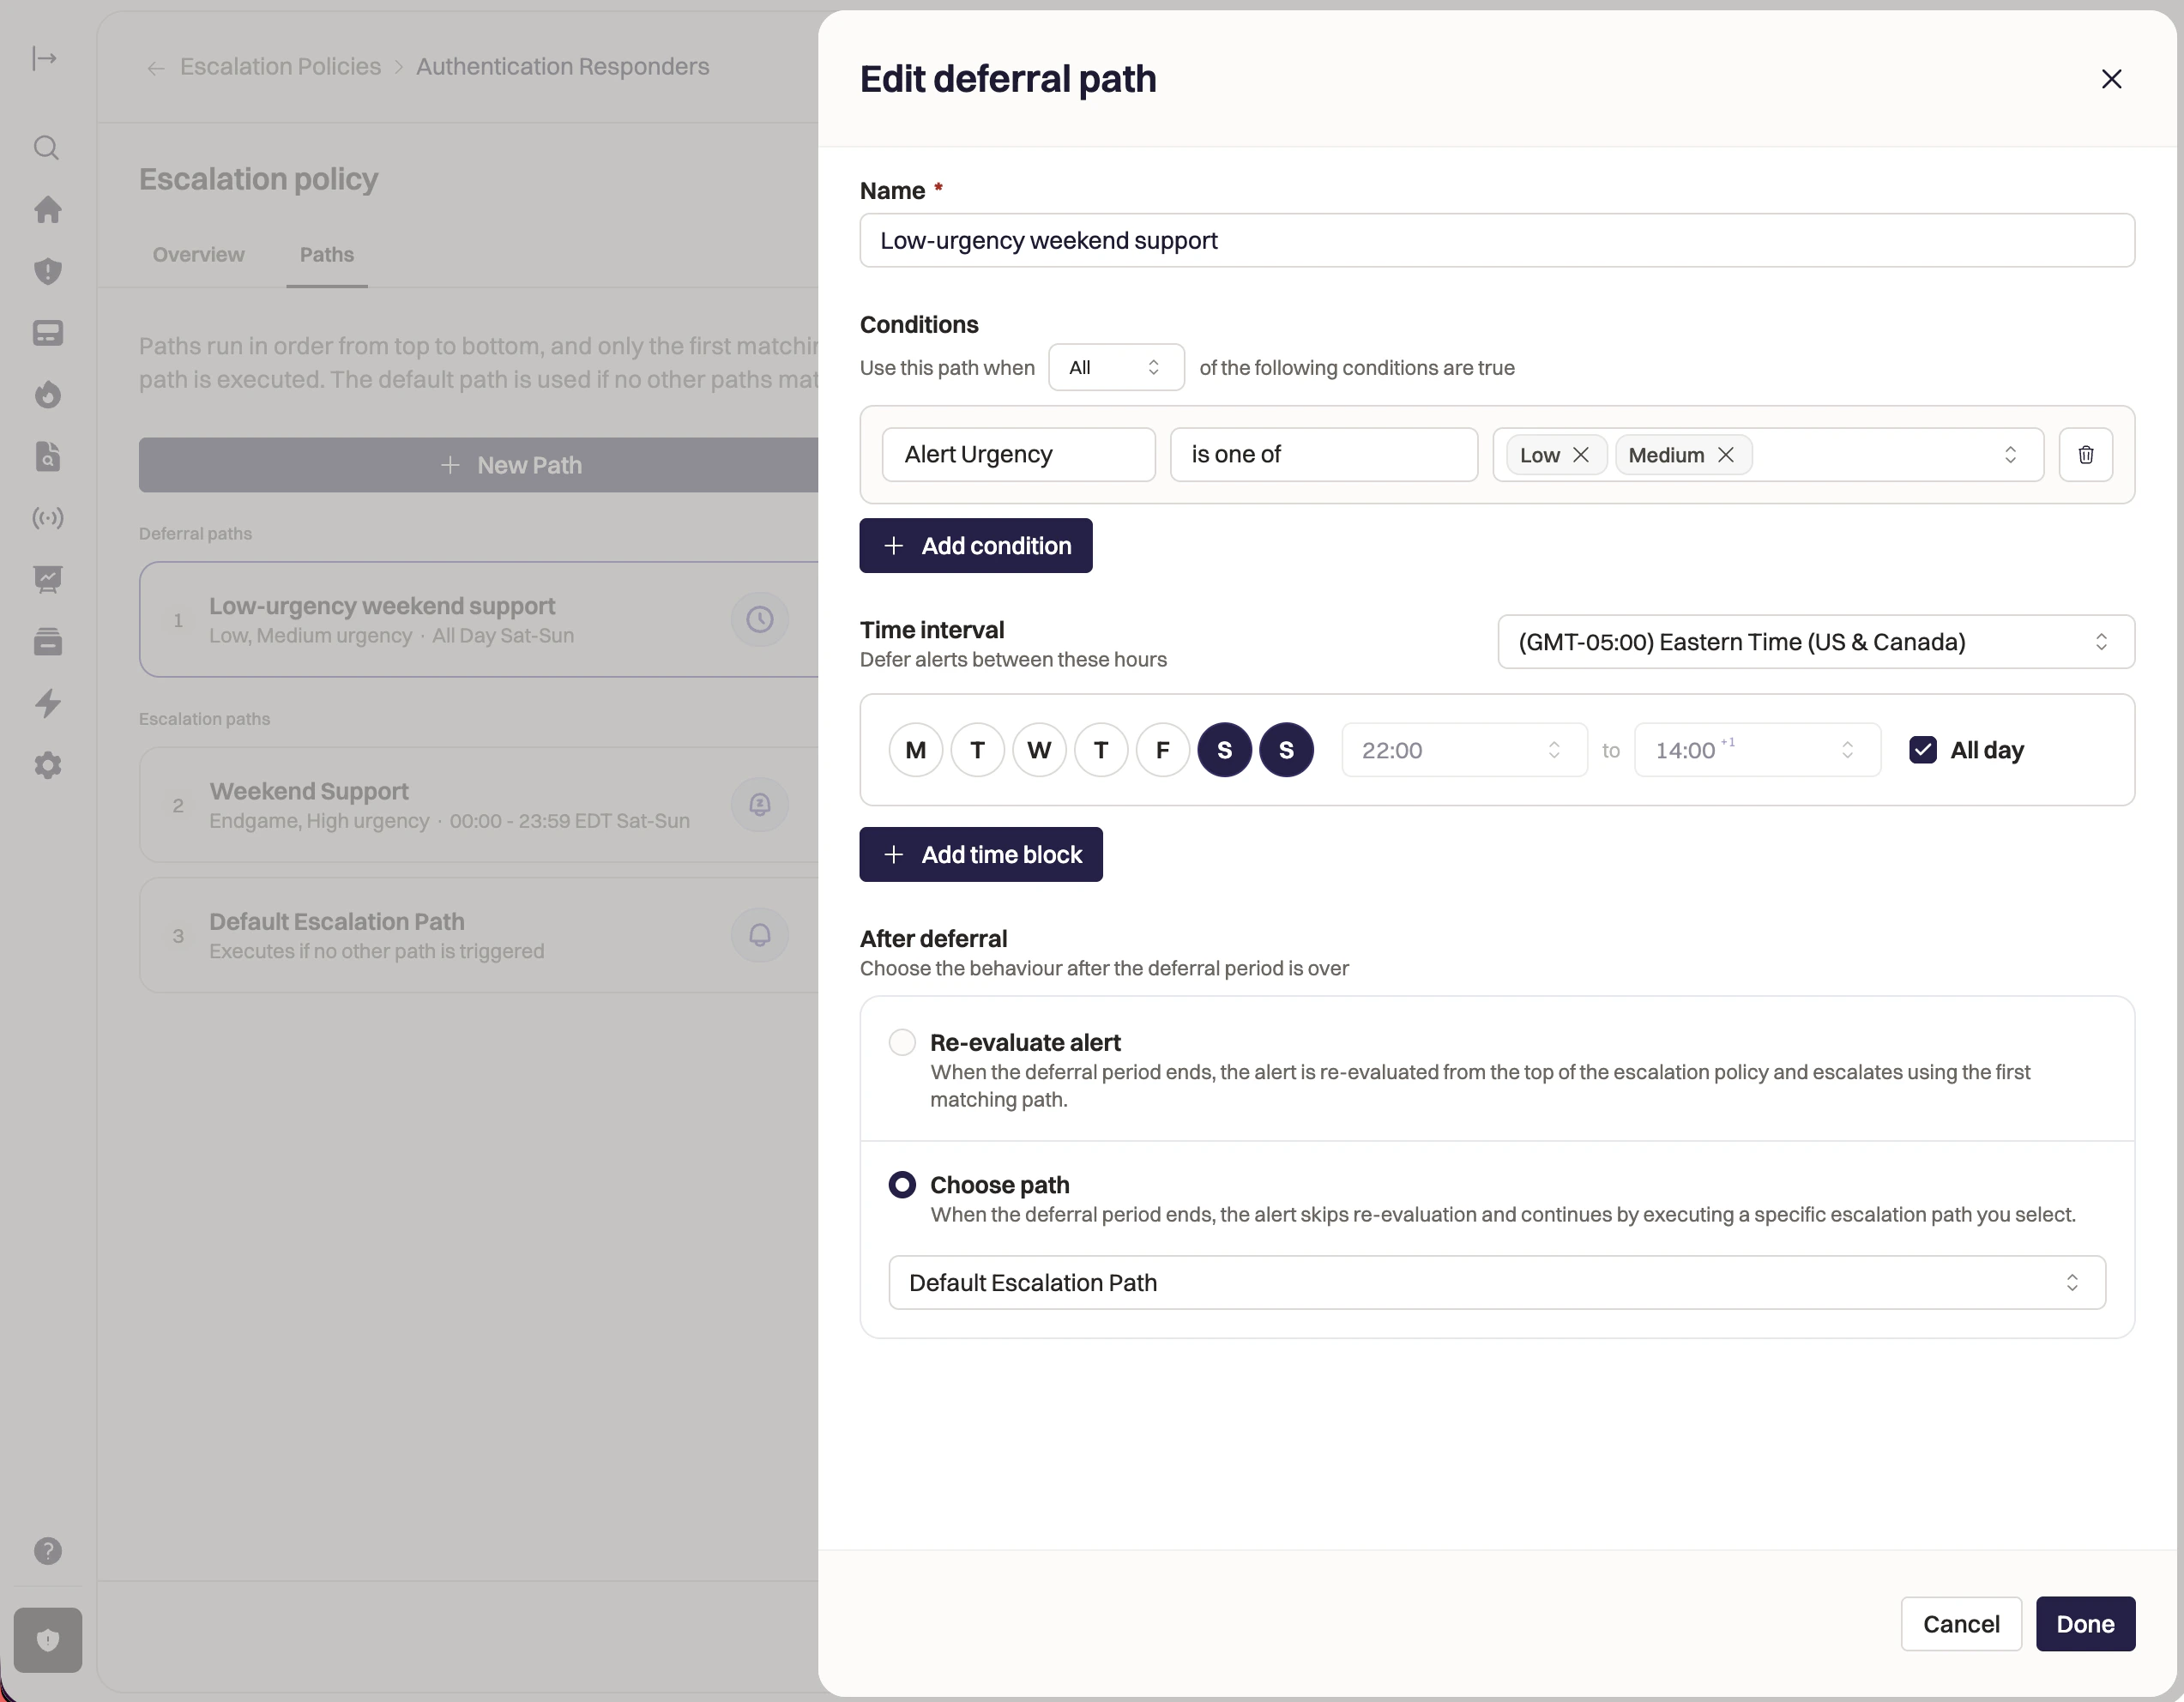
Deferral Paths
Build Deferral Paths when you want to hold off on paging until a later time. We recommend using Deferral Paths for low-urgency alerts only, so your responders never miss an urgent page. When a Deferral Path is executed, it will hold off on triggering the Alert until the time window closes: once it closes, Rootly will trigger the alert and begin paging based on a matching Escalation Path. Set up your Deferral Path by:- Give your path a detailed Name. Make sure to use a descriptive name: when the path is executed for an alert, the path name will show on the alert’s timeline.
- Add conditions for the types of Alerts that the path can map to. You can build conditions around alert details:
- Alert Urgency
- Alert Fields
- Services on the Alert
- Alert’s Payload (represented as a JSONPath).
- Add a time interval: this is the window of time the path can match to an alert. Once the interval concludes, Rootly will trigger the alert.
- Note: All Deferral Paths must have a time interval.
- Define the ‘After Deferral’ logic. Once the time interval lapses, this determines which Escalation Path gets triggered:
- Re-evaluate the alert: Rootly will review all Escalation Paths (in the priority order) and execute the first matching path.
- Choose path: Rootly will execute the defined path.
- We recommend choosing a specific path if you do not want to follow your standard paging logic like the alert came in during regular hours. For example, you may want to defer low-urgency alerts on weekends, and then come Monday start paging on the alert as if it was high-urgency.
- Click Done. You can edit the path’s details at any time.
Frequently Asked Questions
Are all alerts deferred?
Are all alerts deferred?
No, only alerts from Alert Sources, Live Call Routing, and Rootly’s API are deferred. This means that any manual pages (i.e. alerts created by a user either directly in the web app or on Slack), alerts created through workflows, and any alerts from Heartbeats will not be deferred.Note: Rootly will only defer up to 50 Alerts at a time per escalation policy.
Can deferred alerts be grouped?
Can deferred alerts be grouped?
Deferred alerts can be grouped. However, we will only group deferred alerts together: paging alerts will never be grouped with deferred alerts. This ensures that any urgent alerts that should page never get deferred until a later date.
Edit or Delete an Escalation Policy
To edit or delete a policy:- Navigate to On-Call → Escalation Policies
- Click the
…menu next to the policy - Select Edit or Delete
Best Practices
- Use short delays for high-severity alerts
- Assign policies to services whenever ownership is clear
- Avoid overly complex escalation trees
- Test policies with non-critical alerts before production use
- Use escalation paths to model time-based or urgency-based behavior
FAQs
What happens if no one acknowledges an alert?
What happens if no one acknowledges an alert?
Escalation continues through all steps and repeat cycles until the alert is acknowledged or the policy completes.
Can escalation continue after acknowledgment?
Can escalation continue after acknowledgment?
Yes. If an acknowledgment timeout is configured and expires without resolution, escalation may resume.
Can one alert trigger multiple escalation policies?
Can one alert trigger multiple escalation policies?
Yes. Using an Escalate target triggers the destination policy while the original policy continues in parallel.
Can I use the same Slack channel across multiple escalation policies?
Can I use the same Slack channel across multiple escalation policies?
Yes. A Slack channel isn’t tied to a single policy — add it as a notification target on a level in each escalation policy where you want it to post. The same channel can appear on as many policies, and as many levels within them, as you need.Slack channels are added for visibility, so the channel is notified whenever a level it’s attached to fires, regardless of that level’s paging strategy.
Do escalation policies create incidents automatically?
Do escalation policies create incidents automatically?
No. Escalation policies page responders. Incident creation is controlled separately through alert routing and workflows.
What happens if no one is on call when an alert reaches a step?
What happens if no one is on call when an alert reaches a step?
The step still runs and waits its full delay before escalating. Rootly does not auto-skip a step that has no one on call — if you build a step that points at a schedule with a coverage gap (e.g., a business-hours schedule outside business hours), the alert sits there for the configured delay, pages no one, then moves to the next step.To get “skip the layer if nobody is on call” behavior, model it with Dynamic Paths instead of relying on the order of steps in a single path:
- Build one Escalation Path with a working-hour rule (or a time restriction) that matches your business-hours coverage. Put the business-hours schedule as Step 1 and the 24/7 fallback schedule as Step 2.
- Build a second Escalation Path for the inverse window (no working-hour match) that goes straight to the 24/7 fallback as Step 1.
Can I export my escalation policies for backup or audit?
Can I export my escalation policies for backup or audit?
There’s no in-product “Download” or “Export” button for escalation policies today — bulk export is programmatic. Two paths cover the common needs:
- API.
GET /v1/escalation_policiesreturns every policy on your account. Walk into each policy withGET /v1/escalation_policies/{id}/escalation_pathsandGET /v1/escalation_paths/{id}/escalation_levelsto capture the full structure including paths and per-step targets. JSON output is the most flexible source for backups, audits, or feeding into other tools. - Terraform. Use the Terraform provider with the
rootly_escalation_policy,rootly_escalation_path, androotly_escalation_levelresources. The Importing Existing Resources workflow pulls existing policies into Terraform state so they live in source control going forward.