

What is Cortex?
Cortex is the Engineering Operations Platform that enables organizations to continuously improve their operational maturity and reduce developer friction. With centralized visibility, clear ownership, automated Scorecards, and golden paths, Cortex helps engineering organizations operate as one.Integration Overview
The Rootly + Cortex integration is bidirectional, meaning data flows in both directions to create a seamless experience:Cortex to Rootly
Rootly to Cortex
How It Works
Cortex → Rootly (Catalog Sync)
Rootly imports your Cortex catalogs, making Cortex the source of truth for your Catalog data in Rootly. What gets synced:- Cortex entities become Rootly entities, including all properties
- Changes made in Cortex are synced in Rootly
Rootly → Cortex (Incident Display)
Cortex pulls incident data from Rootly and displays it within your Internal Developer Portal. What you can do:- View active incidents on service pages in Cortex
- Create Rootly incidents directly from Cortex
- Build scorecards based on Rootly incident metrics
- Track service reliability using incident data
Key Benefits
Unified Catalog
Use Cortex as your single source of truth for your Rootly Catalog. When you update an entity in Cortex, the changes automatically flow to Rootly, ensuring consistency across your incident management workflow.Reduced Context Switching
Developers and on-call engineers can stay in Cortex while accessing incident information. Create incidents, check incident history, and view operational metrics without switching tools.Automated Service Ownership
Use Cortex’s ownership data to automatically route incidents to the right teams. For example, when an incident affects a service, Rootly knows exactly who owns it based on Cortex’s catalog.Data-Driven Reliability
Build Cortex scorecards using Rootly incident data to measure and improve service reliability. Track MTTR, incident frequency, and operational maturity across all your entities.Which Integration Do I Need?
Both! The integrations work together to provide the complete experience:The Cortex → Rootly integration is configured in Rootly. The Rootly → Cortex integration is configured in Cortex and maintained by the Cortex team.
Using Both Directions Together
With entity sync and incident display both configured:- Entities in Rootly stay in sync with Cortex
- Incidents in Rootly appear on entity pages in Cortex
- Teams can work from either tool
Before You Begin
- Cortex account with API access
- Rootly admin or owner permissions
- Cortex API key (you’ll generate this below)
Sync Entities from Cortex to Rootly
Step 1: Generate a Cortex Access Token
- Log into your Cortex account
- Navigate to Settings > My access tokens
- Click Create new token
- Give it a descriptive name like “Rootly Integration”
- Copy the generated API key
Rootly recommends using a service account token to ensure uninterrupted access if team members change roles.
Step 2: Connect Cortex to Rootly
- Log into your Rootly account as an Admin
- Navigate to Configurations > Integrations > Cortex
- Click Setup to open the configuration modal
- Enter your Access Token from Step 1 into the Access Token field
- Click Connect
Step 3: Enable Catalog Sync (Optional)
By default, the integration connects to Cortex but doesn’t automatically sync your Cortex Catalogs with Rootly’s Catalog.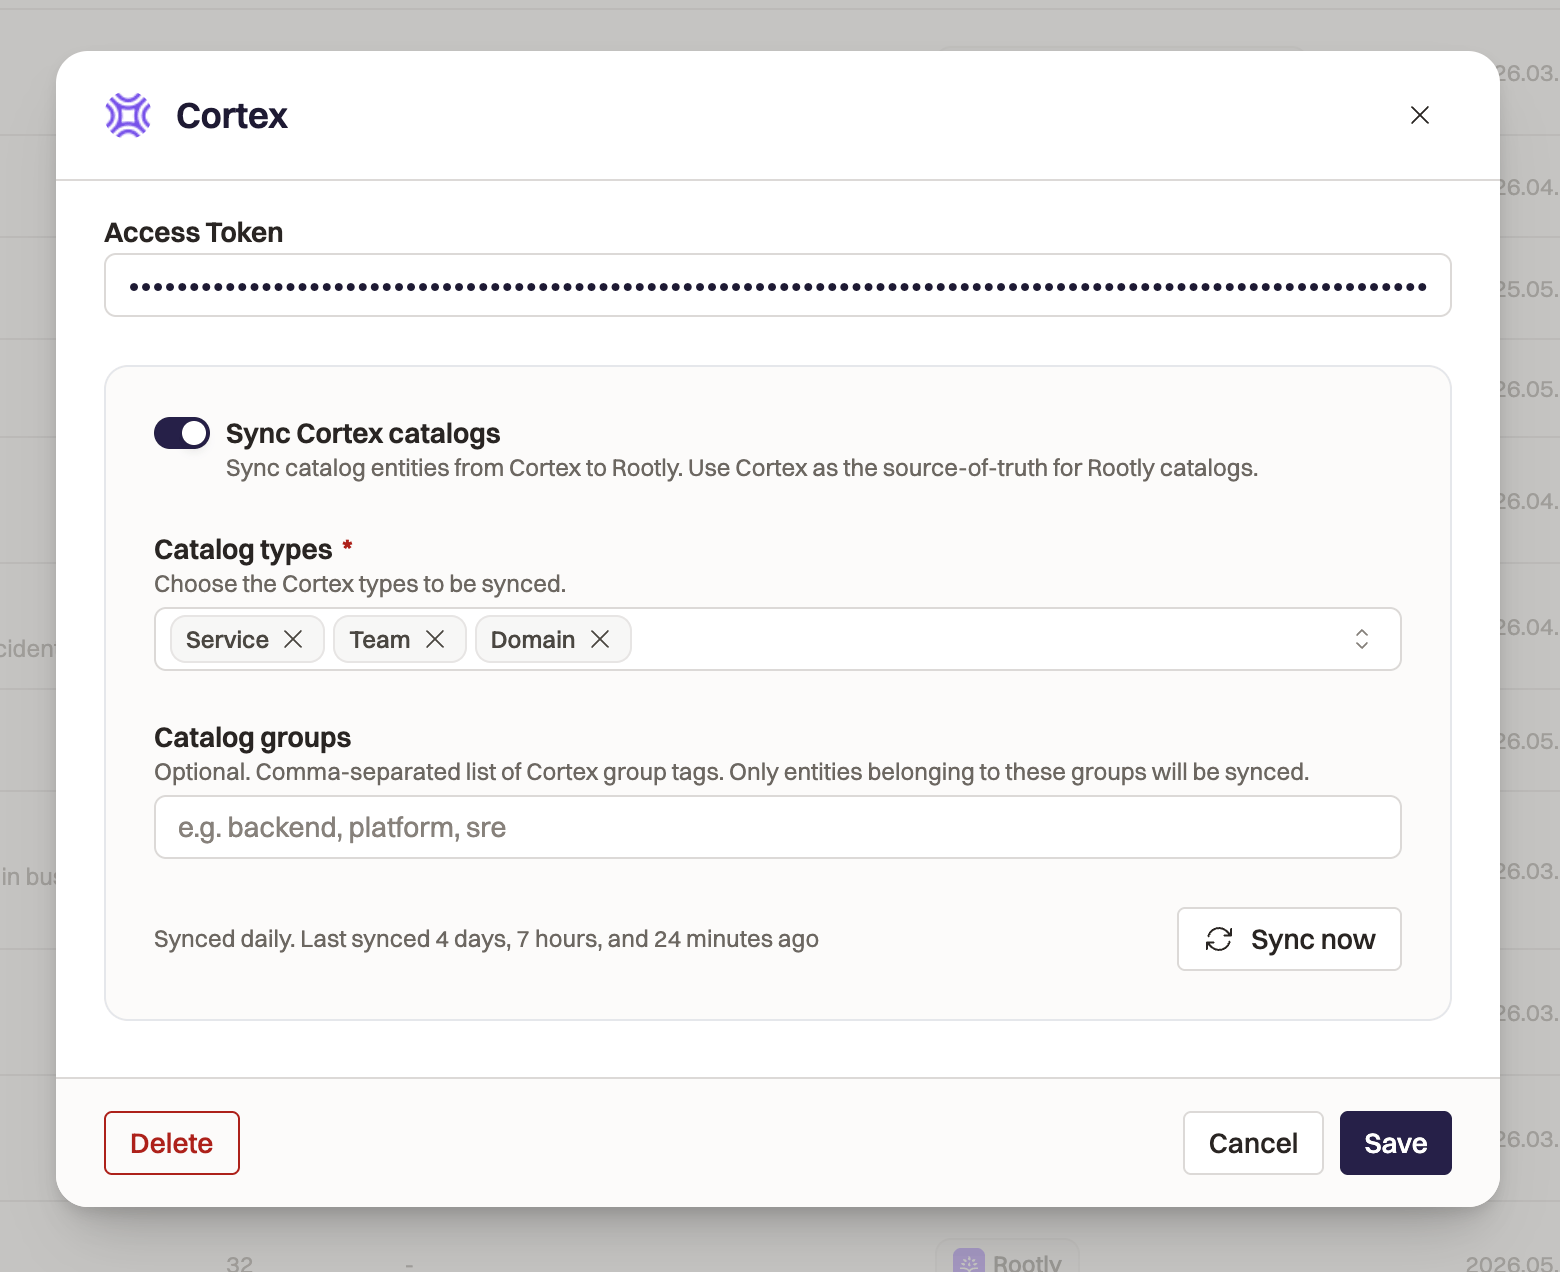
- Navigate to your Cortex integration settings in Rootly.
- Toggle Sync Cortex Catalogs on.
- Select the Cortex Catalogs you want to pull into Rootly in the Cortex types field.
- Add any Catalog Groups filters. This is optional: if the field is left blank, all entities in the defined Catalogs will be pulled into Rootly. Filter in specific Groups with this field.
- Click Save.
Rootly automatically syncs with Cortex every 24 hours to keep your data accurate and up-to-date. You can manually run a sync at any time.
What Gets Synced
When Cortex sync is enabled in step 3, Rootly will:- Map Cortex Types to Rootly Catalogs by name. If you’ve already defined a Catalog in Rootly called “Domain”, Rootly will map your Cortex “Domain” to the Rootly “Domain” Catalog.
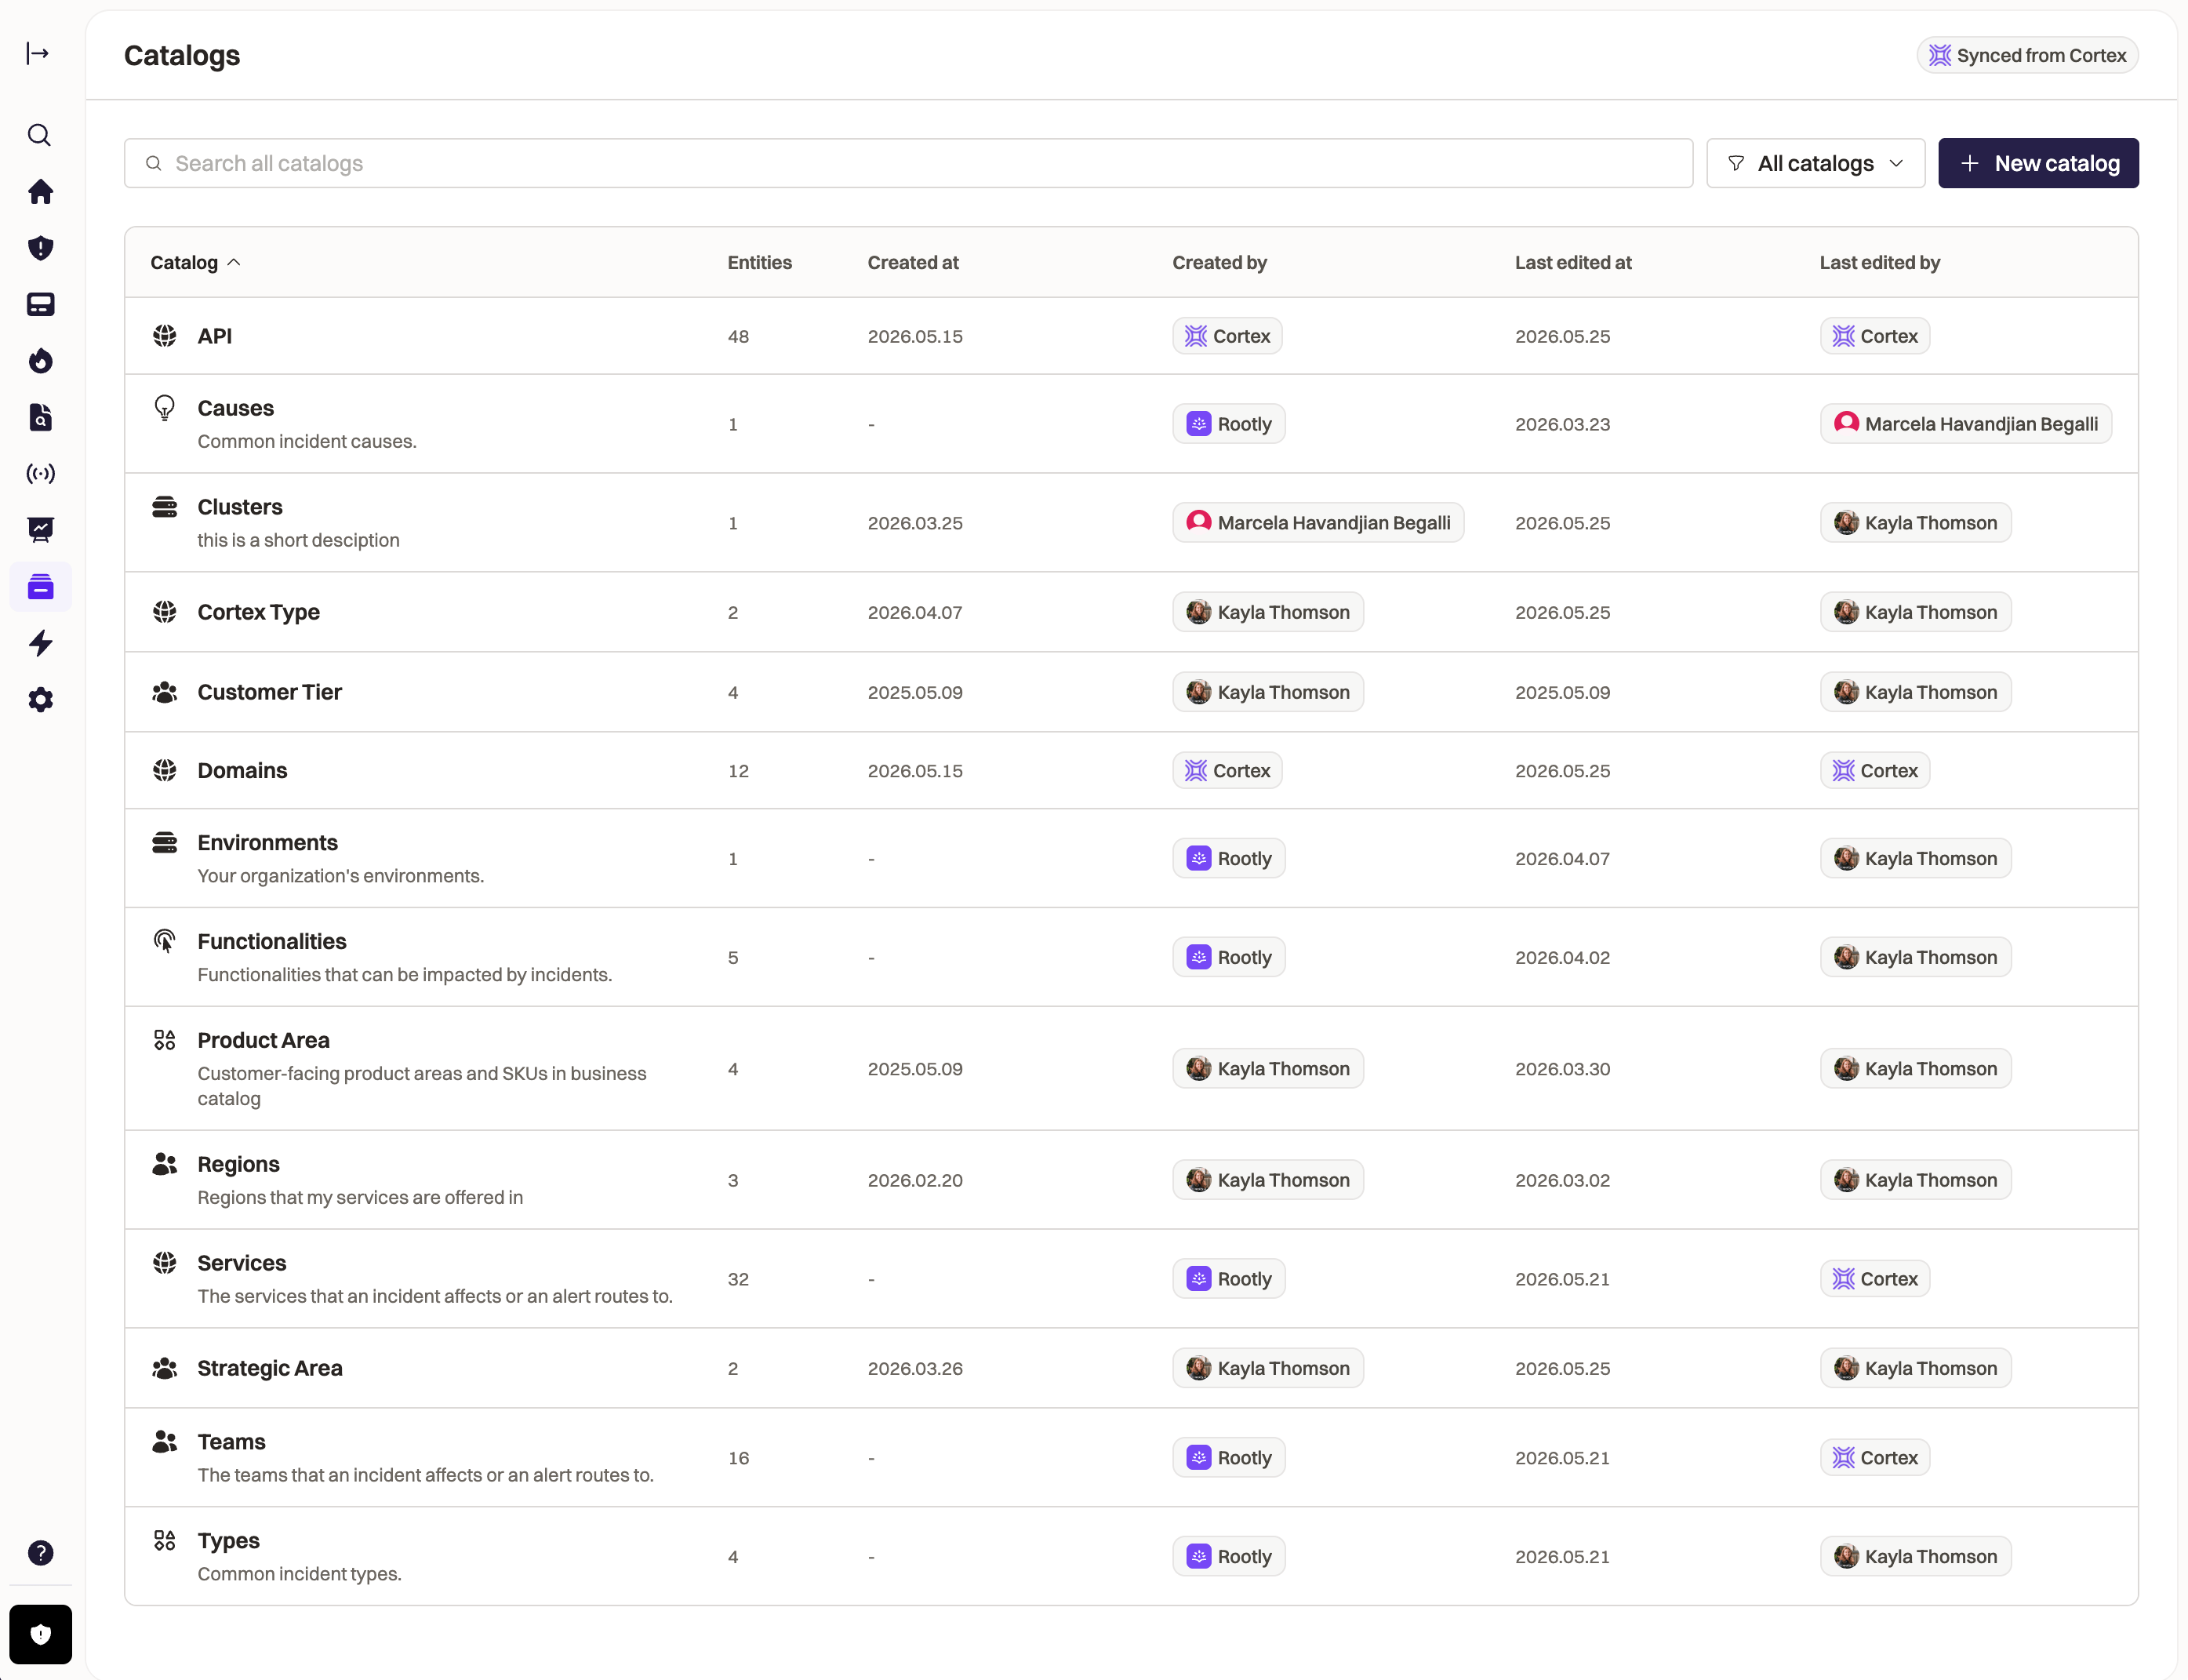
- Create new Catalogs in Rootly for any Cortex Types that don’t have existing matching Rootly Catalogs.
- Add new properties to Rootly Catalogs to store all entity data in Rootly for your teams to use.
- Create new entities in Rootly in the corresponding Catalogs. Rootly will ingest all property data from Cortex.
- Update any existing entities in Rootly that were previously synced with Cortex with new data.
- Archive existing entities that have been removed from Cortex.
Using Synced Entities
Once entities are synced from Cortex:- They appear in your Rootly catalogs with a Cortex badge
- You can track the impact of incidents against your entities with incident fields
- Build workflows to automate your incident response process around your business entities
Display Rootly Incidents in Cortex
This integration is configured entirely within Cortex. Visit the Cortex integration setup guide for detailed installation instructions. You’ll need:- Cortex admin permissions
- Rootly admin or owner permissions
- A Rootly API key (generated during Cortex setup)
Features
Trigger Incidents from Cortex
Create Rootly incidents directly from service pages in Cortex without switching tools. How it works: From any service page in Cortex, click the Rootly action to create a new incident. The incident is created in Rootly with the service context already attached.View Incident Data in Cortex
See real-time incident information directly on service entity pages in your Cortex catalog. What you can see:- Active incidents affecting the service
- Recent incident history
- Incident severity and status
- Links to detailed incident pages in Rootly
Build Scorecards with Incident Data
Create custom scorecards and write CQL queries using Rootly incident data to measure service reliability. Example use cases:- Track MTTR (Mean Time to Resolution) per service
- Measure incident frequency and severity trends
- Score services based on operational maturity
- Set goals for reducing critical incidents
Incident Catalog View
Rootly is the only incident management platform that appears in Cortex’s catalog list view, giving you a unified perspective of both services and active incidents.Use Cases
Platform Engineering Teams
Your platform team maintains dozens of internal services. When checking service health in Cortex, you want to immediately see if there are any active incidents. Solution: Incident status appears directly on service pages. If an issue arises, you can create a Rootly incident without leaving Cortex.SRE Teams
You’re conducting a service reliability review and need to understand incident patterns across services. Solution: Use Cortex scorecards powered by Rootly data to visualize MTTR, incident frequency, and severity trends. Create CQL queries to track improvement over time.On-Call Engineers
You’re paged about a service issue and need to quickly understand service dependencies and recent incident history. Solution: Open the service in Cortex to see ownership, dependencies, and recent Rootly incidents all in one place. Create follow-up incidents directly from the context you’re already in.Best Practices
Keep Service Mappings Accurate
Ensure services in Cortex are properly mapped to services in Rootly for accurate incident association. Consistent naming helps maintain the connection.Use Scorecards
Create scorecards that track operational metrics like:- Incidents per service per week
- Mean time to resolution
- Percentage of incidents with retrospectives
- Critical incident frequency
Use Incident Context
When creating incidents from Cortex, include relevant service context in the incident description to help responders quickly understand the situation.Review Historical Trends
Regularly review incident data in Cortex to identify services that may need architectural improvements or additional monitoring.Uninstall
To disconnect the Cortex integration:- Navigate to Configurations > Integrations > Cortex
- Click Delete
- Confirm the removal
Support
For Entity Sync (Cortex → Rootly)
This integration is built and maintained by Rootly.- Contact Rootly support through your account
- Visit Rootly documentation
For Incident Display (Rootly → Cortex)
This integration is built and maintained by Cortex.- Email: help@cortex.io
- Visit Cortex integration docs