

How the Pieces Fit Together
📌 Note: Rootly is highly customizable — forms, fields, severities, and automations are all configured per organization, so what your team sees may look different from any demo or default setup. The incident form is designed to guide responders through what they need to fill out regardless of configuration.
1. Configure Incident Declaration
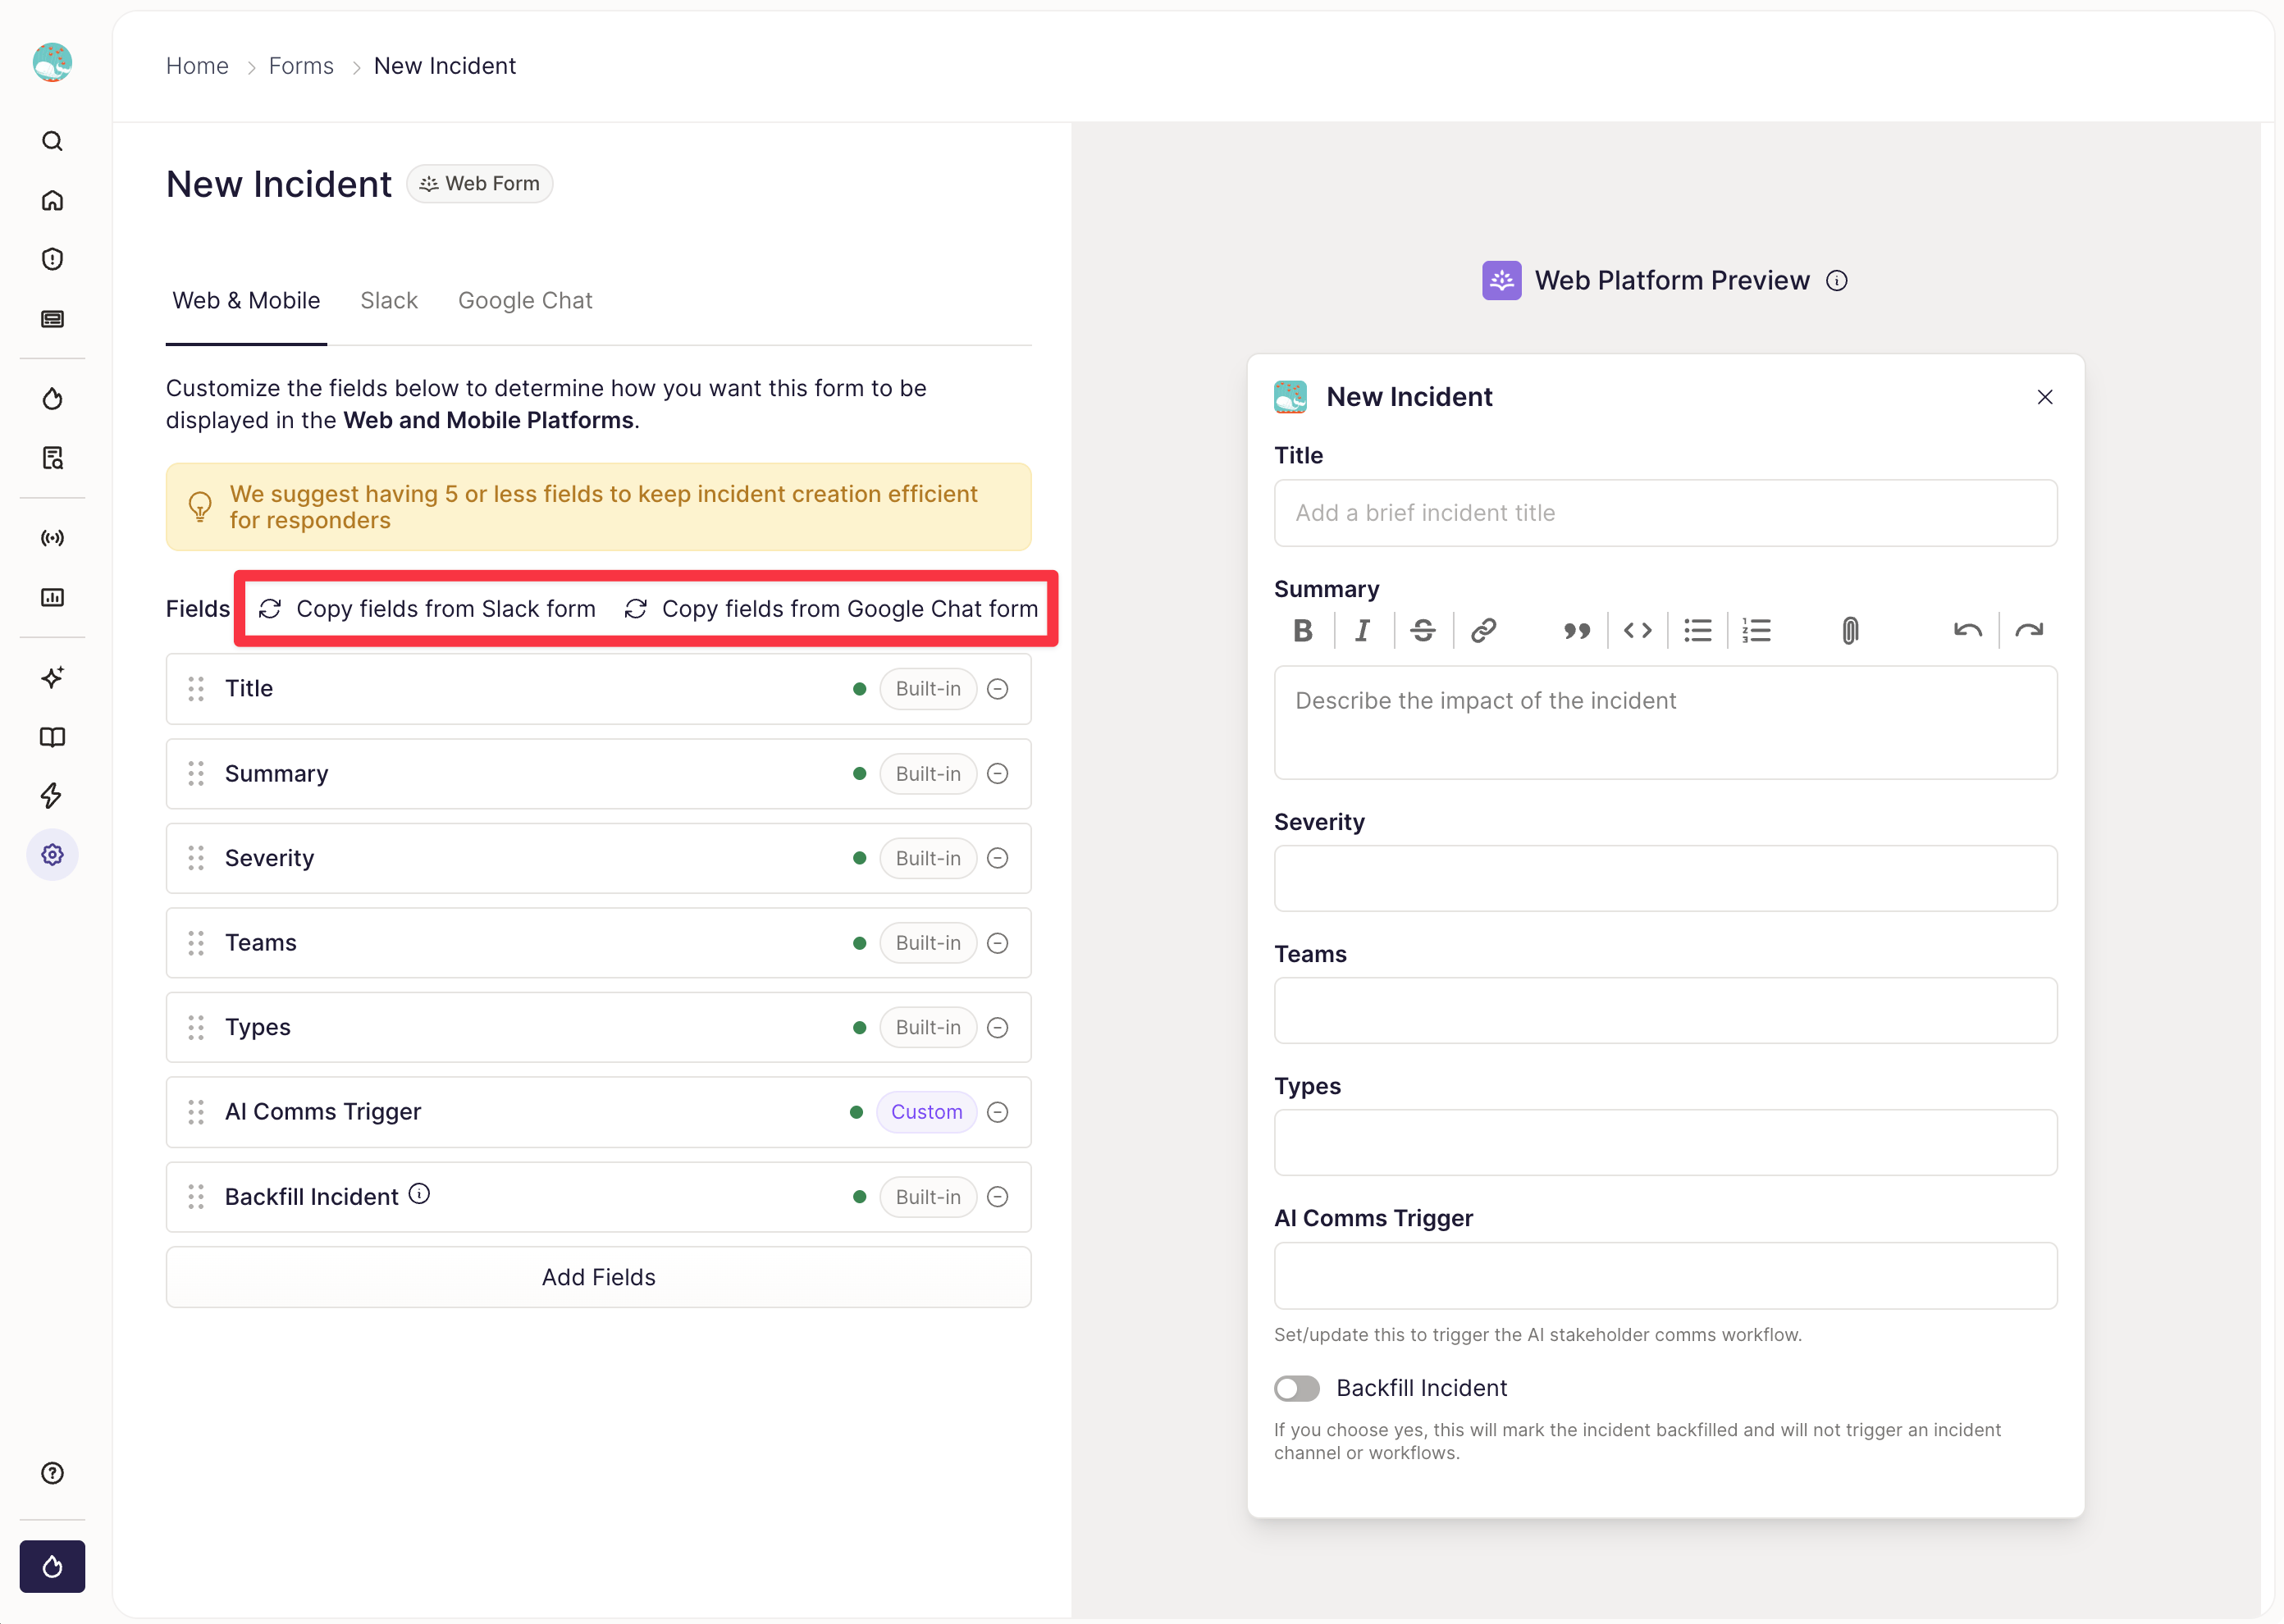
Decide how an incident gets started, and what the form asks for.- Set up the New Incident form — Most fields are customizable in Settings → Forms. Decide what’s required (title, summary, severity, type) before responders ever see it. (Creating incidents via Slack)
- Align your forms across channels — You can create different forms per channel, but Rootly recommends keeping them in sync so responders have a consistent experience no matter where an incident originates.
-
- Configure your severities — Severity isn’t just a label — it’s what triggers automations and workflows behind the scenes, so map out what each severity level should kick off before you go live. (Incident lifecycle)
- Decide on Triage vs. Started — Choose whether incidents can be declared directly into Started, or must pass through an In Triage state first. (Incidents)
- Set up private incidents — For security, legal, or customer-sensitive situations. Rootly’s AI features (catchup, summaries) still work inside private incidents, so teams don’t have to trade confidentiality for speed. (Managing private incident access)
- Learn every command —
/rootly helpin Slack surfaces every available command, so responders never need to memorize the list.
2. Set Up the Incident Channel & Command Center
Make sure the auto-created Slack channel gives responders everything they need at a glance.- Confirm automatic channel creation — Rootly should spin up a dedicated channel per incident, with the severity in the name and a link out to the web view.
- Link your team’s own tools — Add links to your bridge, ticketing system, and any other tools your responders reach for mid-incident.
- Customize the command center block — This is the pinned message at the top of the channel — walk through what buttons and links show up for your org by configuring your Integration settings (e.g. conferencing tool, Jira, runbooks, etc.).
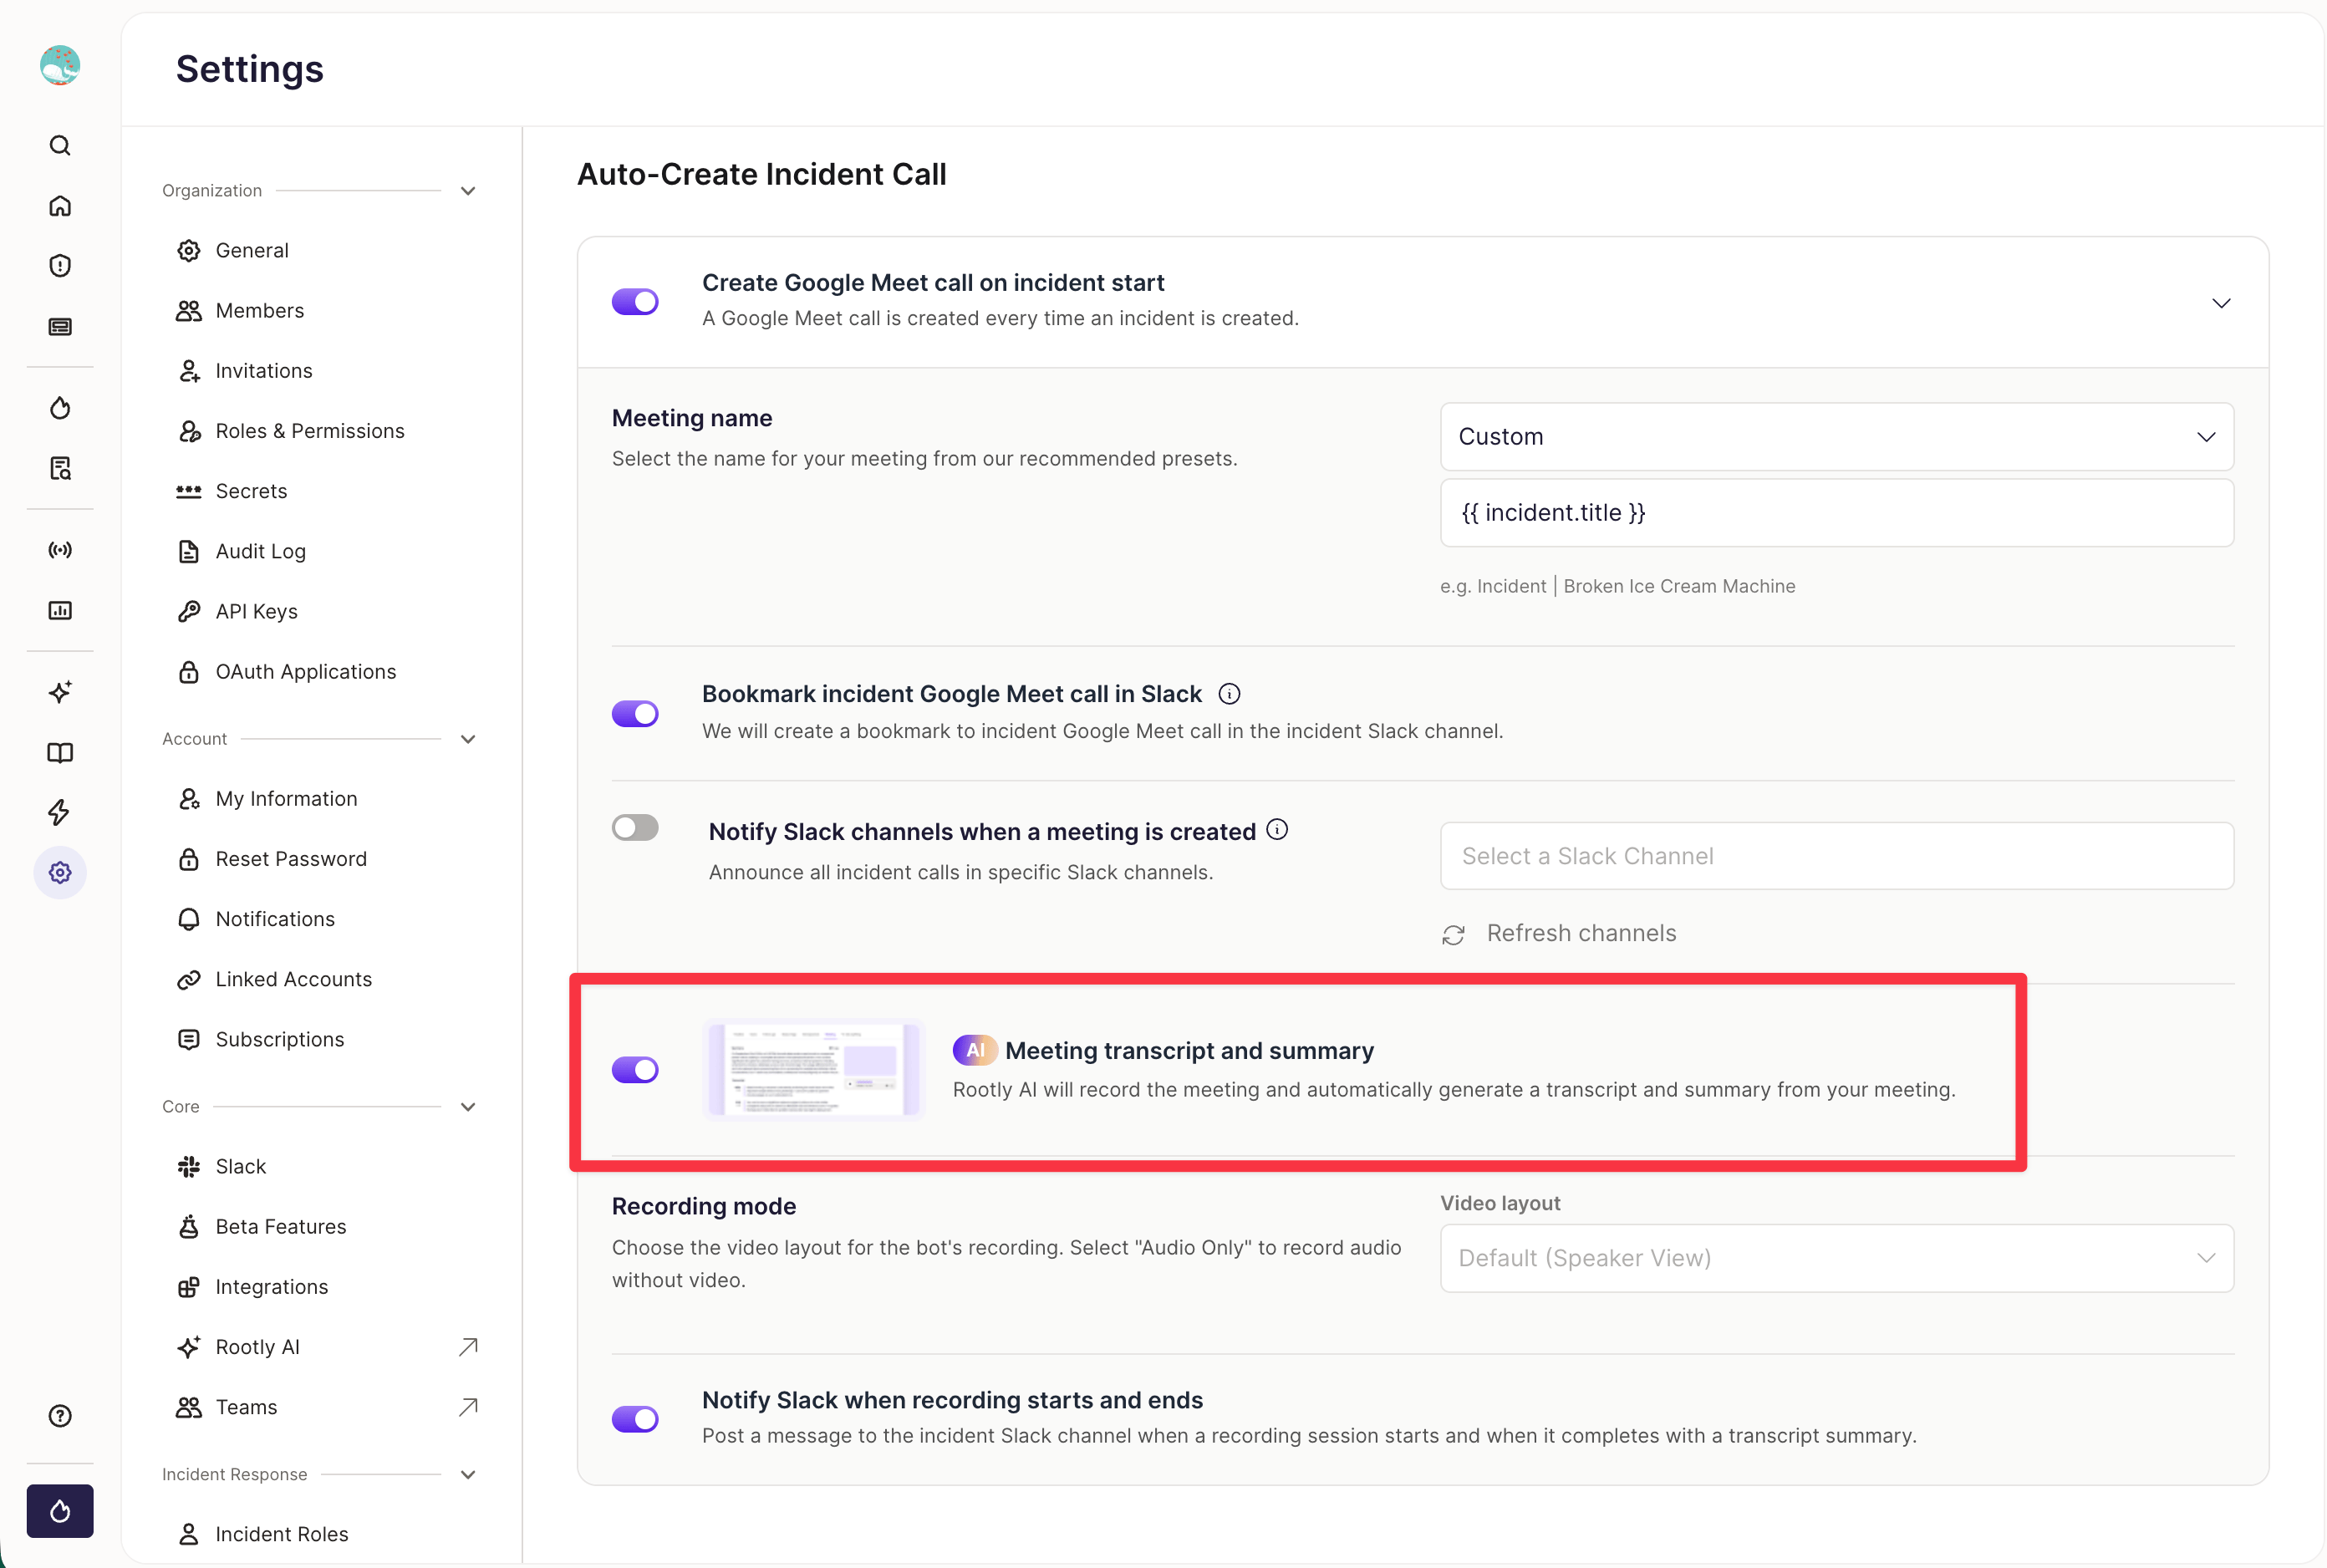
- Add the bridge transcript / recording — Enable Meeting Scribe so incident bridge calls (Zoom, Meet, Webex, Teams, GoToMeeting) get recorded, transcribed, and summarized automatically (Meeting Scribe). You can do this from the settings of your bridge integration.
-
3. Configure Incident Roles & Tasks
Make sure the right responsibilities — and the right follow-up work — get assigned automatically.- Define your Incident Roles — e.g. Incident Commander, Comms Lead, Scribe. Configure these in advance so people aren’t assigned ad hoc mid-incident. (Incident roles)
- Attach Default Tasks to each role — When a role is assigned, its default tasks are automatically created for that person — no one has to remember the checklist.
- Use roles as a training tool — Once roles are assigned, anyone joining the incident can immediately see who’s doing what, which doubles as on-the-job training for newer responders.
- Test it — Create a test incident, attach a team, and confirm role assignment and task creation behave the way you configured them.
4. Enable AI Catch-Up & Summaries
Let responders get up to speed instantly, without scrolling the whole channel.- Turn on Incident Summarization — Generates a concise, single-paragraph summary of the incident using metadata, alerts, timeline events, and communications. (AI Summaries)
- Use the catchup command —
/rootly catchupuses the same summarization technology, aimed at helping a late joiner understand a long-running incident without reading the full history. - Feed it good context — Summary quality depends on what’s in the incident: timeline events, action items, alerts, and Slack communication all improve it. Encourage responders to keep the timeline updated as they go.
- Know the private-incident caveat — For private incidents, confirm Slack channel message visibility settings allow AI access, or summarization won’t have enough to work with.
5. Connect Playbooks to Your Services
Make sure the right checklist shows up the moment an incident touches a given service.- Build out your Catalog — Services, and teams live in the Catalog, and it’s what powers automatic playbook attachment. (Catalogs)
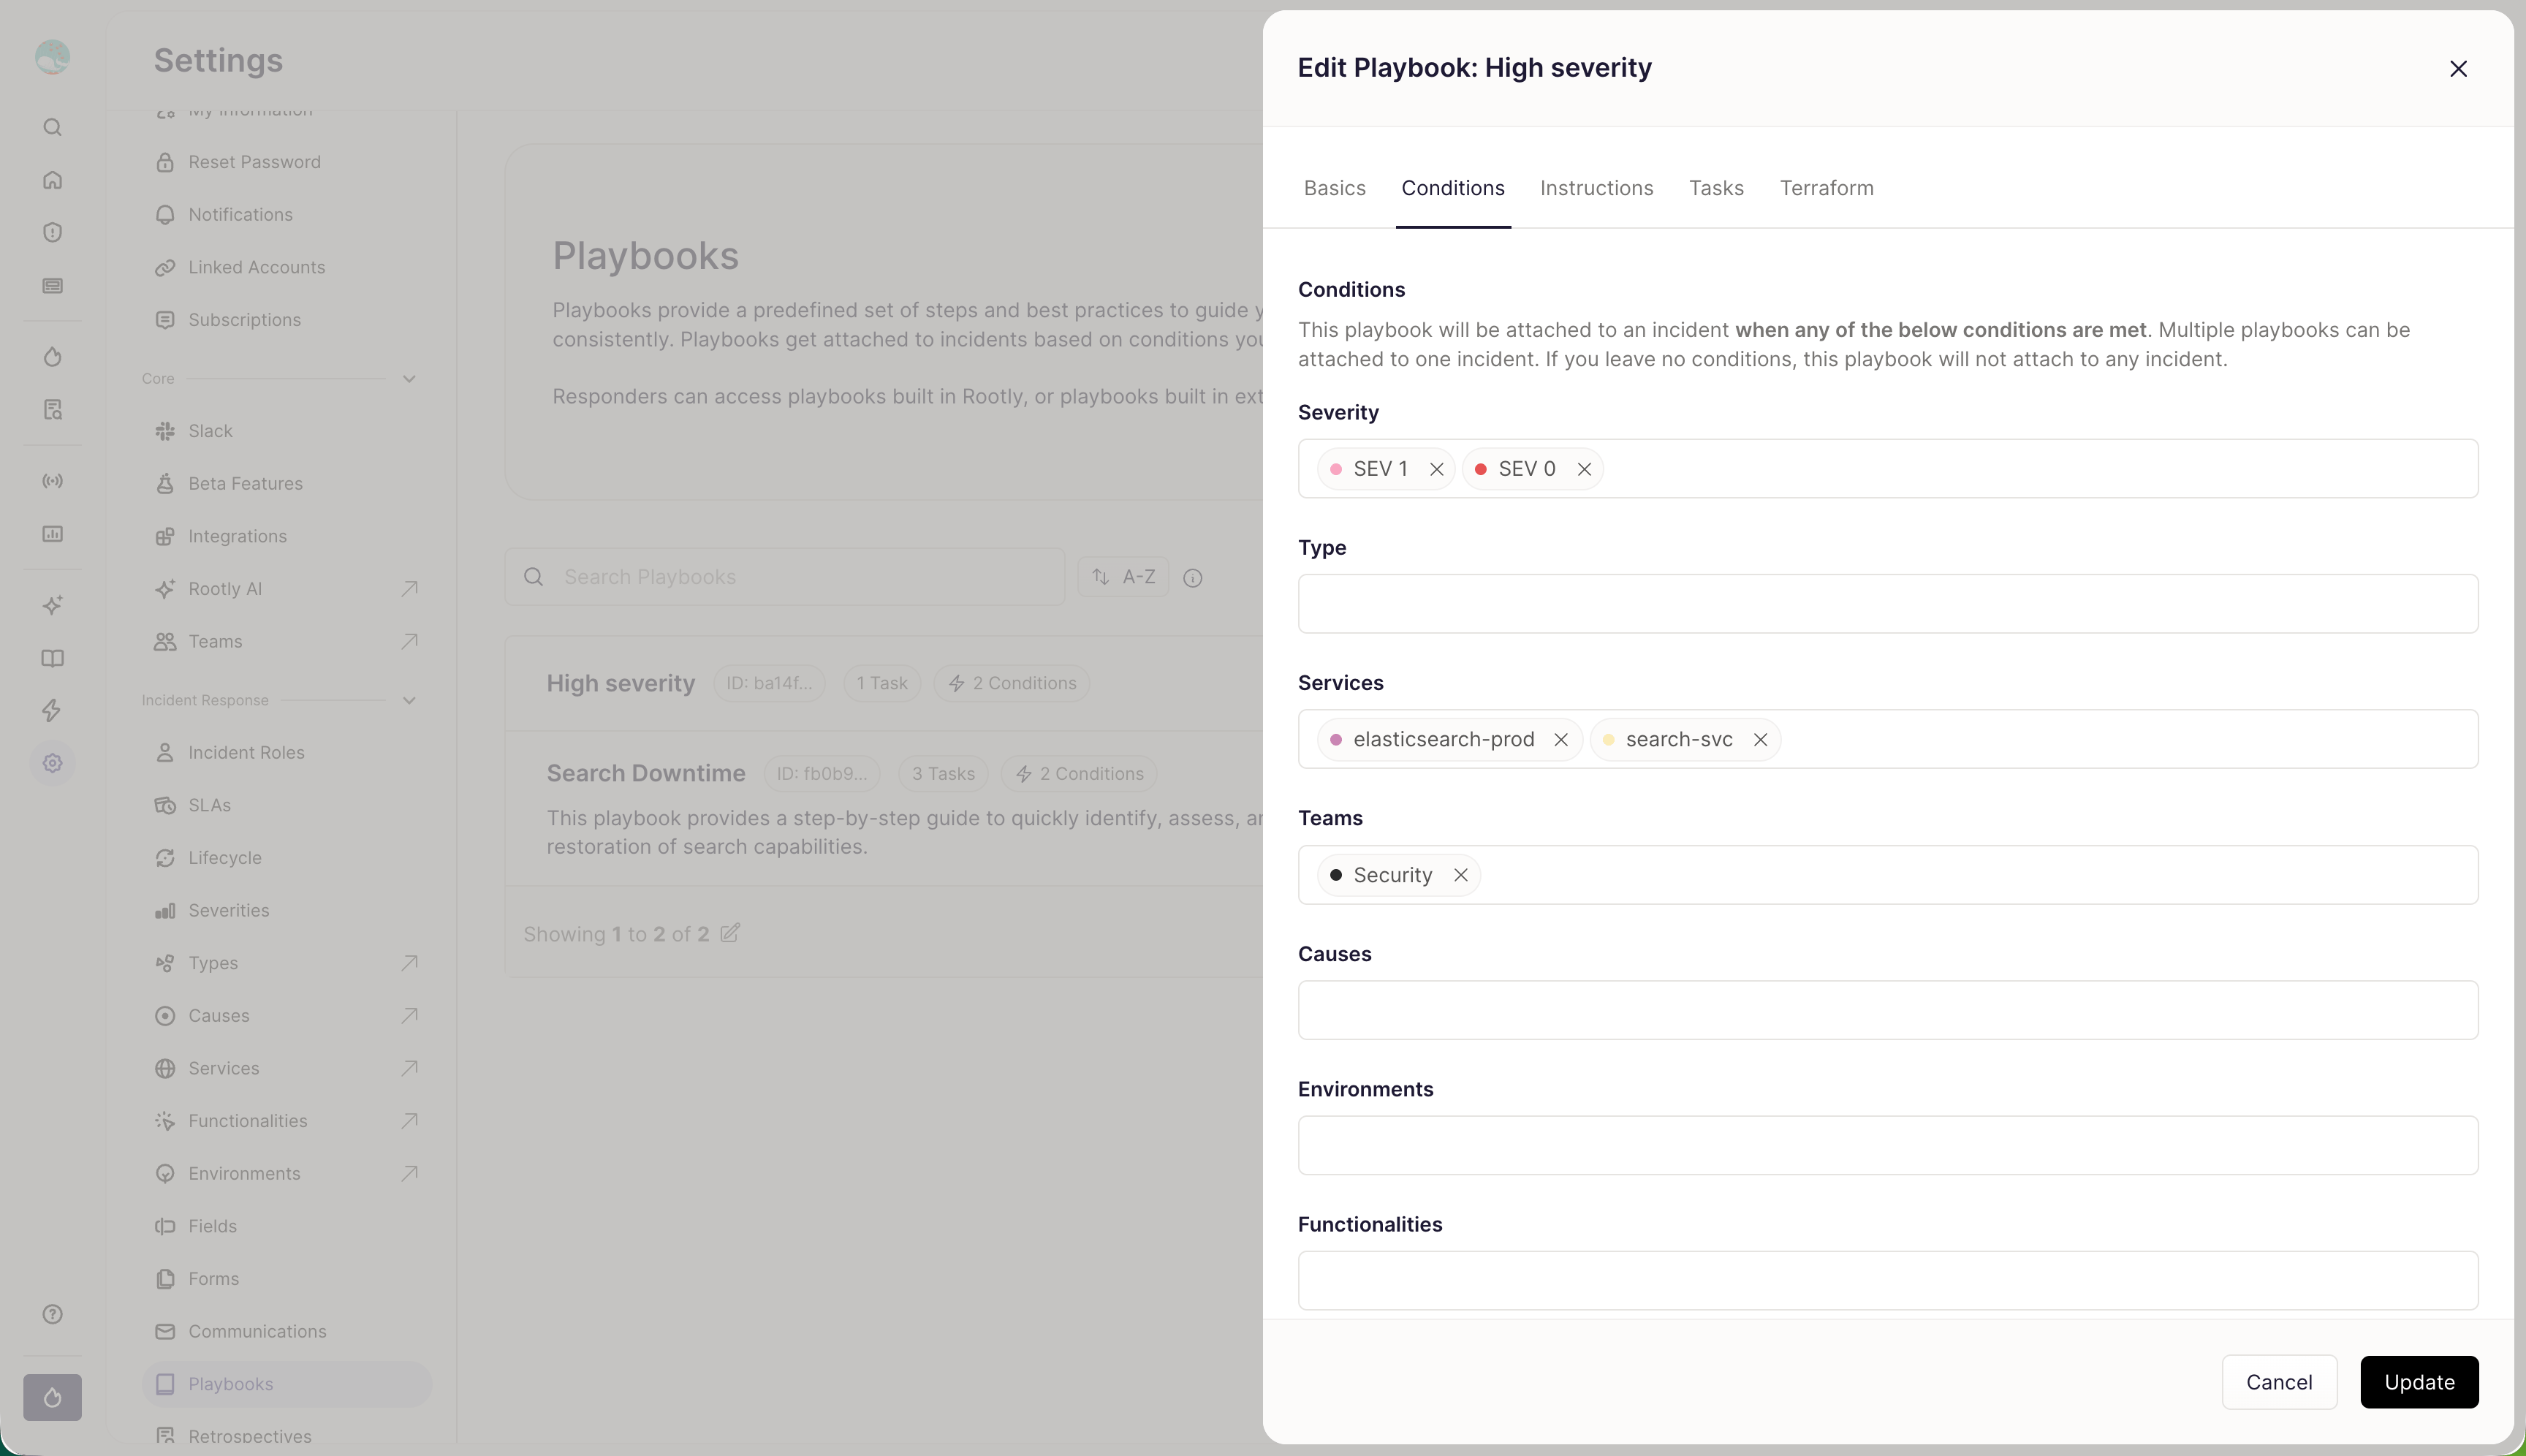
- Attach playbooks to services and incident types — When a service or type (e.g. “Security”) is added to an incident, its associated playbook — and the tasks in it — attach automatically. (Example usage with incidents)
-
- Verify the auto-attach behavior — Add a service to a test incident and confirm the runbook’s tasks appear without anyone manually adding them.
6. Set Up Emoji Reactions & the Timeline
Turn a Slack reaction into a task, a follow-up, or a retrospective note — automatically.- Configure your event emoji — Choose which emoji create timeline events, tasks, or follow-ups when reacted to a message. Emoji lists for each purpose are separate and can’t overlap. (Adding events to timeline via Slack)
- Set your “pin to retrospective” emoji — This is the most important one to get right: pinned messages build your retrospective as you go, and can always be edited or pruned later.
- Set your “task” and “follow-up” emoji — So a reaction like ⭐ can create a task, and 📝 can create a follow-up, without anyone leaving the conversation.
7. Set Up Paging & Escalation
Make sure responders never have to leave the incident channel to bring in the right people.- Confirm the paging paths all work — Responders should be able to page via natural-language AI request,
/rootly page, or the Escalate button in the command center — all three should reach the same on-call rotations. - Tie escalation policies to schedules — Paging only works end-to-end if your On-Call schedules and escalation policies are already configured. (Escalation policies)
- Confirm the leadership channel gets notified — Severity changes (e.g. escalating to Sev 2) should automatically post an update to your leadership channel — verify this workflow is wired up.
8. Connect Status Pages
Keep external stakeholders informed without pulling responders out of the incident.- Create your status page(s) — Public for customers, private for internal stakeholders, each with its own components. (Creating a status page)
- Know it’s not automatic — Status pages are not 1:1 with incident status by default; someone needs to publish each update. Decide who owns that during an incident. (Incident status pages)
- Consider a workflow to prompt updates — e.g. remind the channel to publish a status page update every 30 minutes during a live Sev 1/Sev 2.
9. Set Up Follow-Ups & Ticketing Sync
Make sure action items land somewhere engineers already work.- Connect Jira, Linear, or Asana — Follow-ups created in Rootly can auto-create tickets in your team’s actual backlog instead of getting lost in a doc. (Jira integration)
- Confirm two-way sync — When a ticket status changes in Jira, the corresponding Rootly follow-up should update automatically, and vice versa.
- Map custom fields — If your Jira project uses custom fields, map them so incident data lands in the right place instead of a generic description box.
10. Configure Retrospectives
Decide what “done” looks like after an incident resolves.- Set your retrospective process & template — Define the steps, required fields, and Liquid-templated content responders will see. One template can be marked default. (Retrospectives)
- Decide when a retrospective is required vs. optional vs. skipped — Not every incident needs a full retro; set thresholds (severity, service, commander discretion) so the process scales.
- Set up retrospective-specific workflows — Trigger actions when a retrospective is created or updated, separate from your incident-level workflows.
- Confirm the resolution AI assistance is on — The resolution form includes AI-suggested resolution summaries — verify this is enabled so responders aren’t writing from scratch.
11. Build Supporting Workflows
Automate the repetitive parts once the manual process is proven with Workflows.- Map out triggers → conditions → actions for your top 2–3 repeated manual steps (e.g. leadership notifications, status page reminders, Jira creation). (Workflows)
- Start narrow, then expand — A single reliable workflow (e.g. “post to leadership channel when severity ≥ Sev 2”) beats a dozen half-configured ones.
- Review workflows periodically — As services, teams, and tools change, workflows can silently stop matching conditions correctly — put a recurring check on the calendar.
Congratulations! You’ve successfully configured your Incident Response process in Rootly. Next up, when things go wrong, learn how Rootly pulls it all together to help you respond in an incident: review the Incident Responder Checklist.