Overview
Alert Grouping reduces noise and alert fatigue by consolidating related alerts into a single leader alert with associated member alerts.Responders are paged for the leader, while subsequent matching alerts join its group silently. This helps you:
- Avoid duplicate pages from multiple monitors on the same issue
- Keep alert timelines focused on one “source of truth”
- Improve prioritization and reduce cognitive load for on-call responders
Grouping vs. Deduplication. Both features reduce noise, but they’re built for different problems. Use Alert Grouping when different monitors all fire on the same underlying incident (latency + error rate + DB health). Use Alert Deduplication when the same monitor keeps re-firing while the issue is unresolved. See Deduplication vs. Alert Grouping for the full side-by-side comparison.
How Alert Grouping Works
Each Alert Group defines which alerts belong together based on:- Destinations – what the alert was routed to (team, service, escalation policy)
- Time Window – how long alerts are considered part of the same episode
- Content Matching – which alert attributes or payload fields must match
- Rootly finds any active group whose rules and time window match.
- If a match is found:
- The existing alert becomes (or remains) the group leader
- The new alert is added as a member, and does not re-page
- If no group matches:
- A new leader alert and group are created (and the responder is paged according to routing rules)
Group Leaders vs. Members
Within a group:- The leader alert:
- Is the alert that originally caused the page
- Acts as the source of truth for the group
- Drives status and noise updates (e.g., acknowledged, resolved)
- Member alerts:
- Join silently (no additional pages)
- Inherit status changes from the leader
- Appear on the group timeline for context
When to Enable Alert Grouping
Alert Grouping is especially useful when:- A single service has many monitors (error rate, latency, CPU, DB health, etc.)
- A failure in one component triggers multiple alarms across:
- APM, logging, metrics, and infrastructure tools
- You want to treat a burst of related alerts as one incident episode rather than many independent pages
“Service A has 5 monitors. When it goes down, all 5 fire at once. With grouping, responders get one page and then see all related alerts attached to that leader.”
Creating an Alert Group
To create a new Alert Group in the web app:1
Step 1: Open Alert Grouping
- Go to Alerts → Grouping
- Click + New Alert Group
- Enter a Name (required) and a Description (optional)
2
Step 2: Configure Destination conditions
Destinations define which routed alerts are candidates for this group.Under Destinations, choose one of:
- All services, teams, and escalation policies
- All services
- All teams
- All escalation policies
- Select routes – only alerts routed to specific:
- Services
- Teams
- Escalation policies
- Choose Select routes
- Pick the services, teams, or escalation policies you want to include
Destination scoping ensures you don’t accidentally group unrelated alerts
(for example, SRE and Security alerts) into the same cluster.
(for example, SRE and Security alerts) into the same cluster.
3
Step 3: Choose route grouping logic
Next, decide how strictly routing must match inside a group.You can choose:
- Groups should only contain alerts for the same route
- Alerts must be routed to the exact same service, team, or escalation policy
- Example: alerts routed to Service A group only with other Service A alerts
- Groups can contain alerts for any selected route
- Alerts routed to any of the selected targets are allowed in the same group
- Example: all alerts routed to any SRE team are grouped together
same– route must match exactlyany– any eligible route can join the group
4
Step 4: Set the Time Window (required)
The Time Window defines how long alerts should be considered part of the same group.
- Specify the window in minutes
- Rootly supports values between:
- 5 minutes (minimum)
- 7 days (maximum)
With a 10-minute window, the group remains open as long as new alerts keep arriving within 10 minutes of the last one.
Once 10 minutes pass with no new alerts, a new group will be created next time a matching alert arrives.
Once 10 minutes pass with no new alerts, a new group will be created next time a matching alert arrives.
5
Step 5: Configure Content Matching
Content Matching defines what must be similar between grouped alerts.You can group on: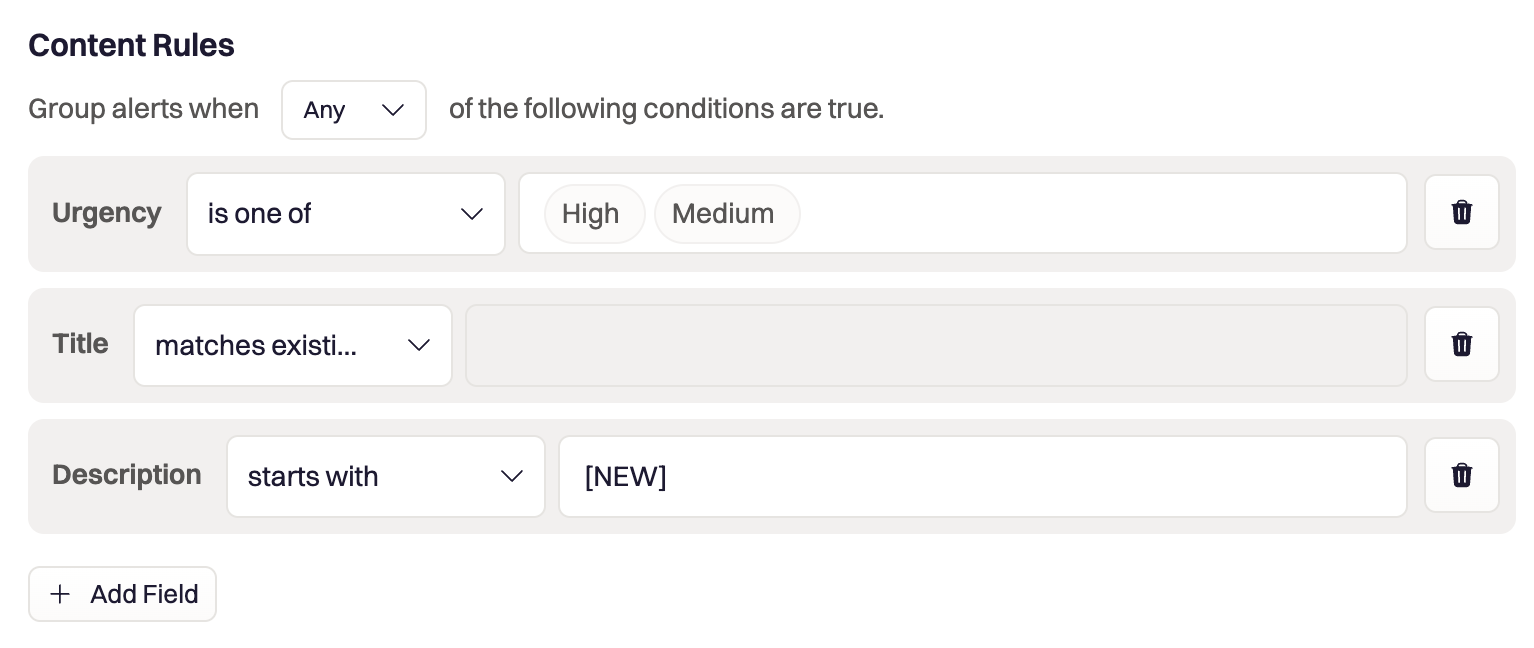
- Alert Title – matches the alert’s
summary - Alert Description – the alert’s
description - Alert Urgency – e.g., High, Medium, Low
- Source Link – the
external_url(e.g., link to Datadog, PagerDuty, etc.) - Payload – any field within the incoming alert payload (via JSONPath)
- Alert Fields – normalized fields you’ve configured on the Alert Source
is one of/is not one ofcontains/does not containstarts with/ends withmatches regexis empty
To group by a payload field, choose Payload and provide a JSONPath
(for example
(for example
$.alert.feature).For convenience, Rootly provides quick toggles such as Group by Title and Group by Urgency, which automatically create the appropriate underlying conditions.
Working with Alert Groups
Once your Alert Groups are configured and active:- The first alert that matches a group becomes the leader and triggers paging
- Subsequent alerts that match:
- Are added as members
- Do not re-page responders
- Update the group’s timeline with additional context
- All member alerts’ statuses are updated to match (e.g., resolving the leader resolves its members)
- Noise controls on the leader (e.g., marking as noise) propagate to members as they join
- Opening an alert in the web UI
- Navigating to the Alert Group tab
Example: Grouping Multiple Monitors for One Service
Suppose you have the following monitors forcheckout-service:
- Error rate > threshold
- P95 latency > threshold
- CPU saturation
- Database connection errors
- The on-call may receive 4 pages
- Each alert appears as independent noise
- Destination condition: Select routes → Service: checkout-service
- Route logic: Groups should only contain alerts for the same route
- Time window: 10 minutes
- Content matching: Group by Service + Urgency (or only by destination)
- First alert pages and becomes the leader
- Remaining alerts join silently as members
- The responder sees one alert with a rich history of related signals
Best Practices
- Start narrow
- Group by route + short time window first; broaden later if needed
- Use content carefully
- Combining Title + Urgency + Payload can create very precise groupings
- Avoid overly broad conditions that might lump unrelated incidents together
- Align with incident semantics
- Think of an Alert Group as “all signals about the same episode,” not “all alerts about the same service forever”
- Regularly review grouped alerts
- Use the Alert Group tab and alert timelines to validate whether groupings still make sense as your monitoring evolves
Troubleshooting
Alerts I expected to group are separate
Alerts I expected to group are separate
- Verify the Destination condition includes those routes
- Check whether the route logic is set to “same route” vs “any selected route”
- Confirm the Time Window hasn’t expired between alerts
- Make sure content matching conditions (Title, Urgency, Payload, etc.) actually match
Too many alerts are being grouped together
Too many alerts are being grouped together
- Narrow the Destination scope (e.g., from “all teams” to “specific teams/services”)
- Switch from “any selected route” to “same route”
- Add or tighten Content Matching conditions (e.g., require matching Title and Urgency)
- Reduce the Time Window duration
An alert didn’t group and created a new leader
An alert didn’t group and created a new leader
- The previous group’s time window may have expired
- Conditions may have changed (e.g., different title or urgency)
- Destination may differ (e.g., different service or team)
Non-paging alerts aren’t grouping
Non-paging alerts aren’t grouping
- This is expected: only alerts that route to a team, service, or escalation policy can group
- Convert important non-paging alerts into routed alerts via Alert Routes if you want them to participate in grouping