

Automation Options
Smart Defaults
Setup fast and effortlessAutomatically create and manage Jira issues at incident start using pre-configured settings
Custom Workflow
Use workflows for conditional or advanced Jira issue automation
Smart Defaults
Smart Defaults let you automatically generate a Jira issue whenever an incident begins — without building a workflow. New Rootly accounts have Smart Defaults enabled automatically. Existing accounts have it off by default to avoid conflicting with existing workflows. To configure Smart Defaults, go to Integrations → Jira → Configure.Webhook
Webhook
Configure webhooks in your Jira Admin using this endpoint to allow updates made in Jira to reflect back in Rootly.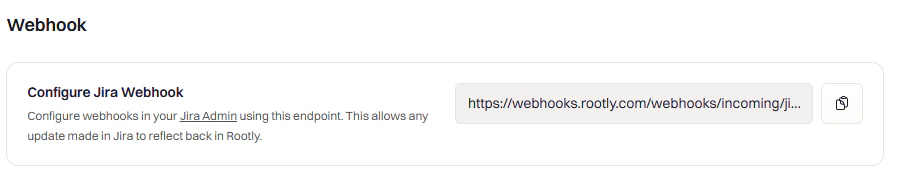
See Setting Up Jira Webhook for detailed steps.
Jira Ticket for Incidents
Jira Ticket for Incidents
This section controls how Jira tickets are created from Rootly incidents.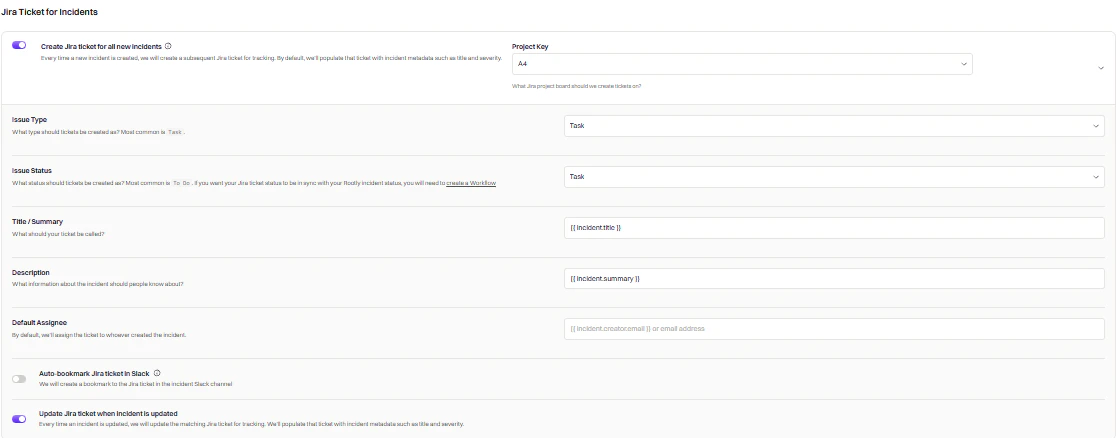
Automatically create a Jira ticket in the specified project as soon as an incident is declared in Rootly.
The Jira project where tickets will be created. If you need to route tickets to different projects based on conditions, disable this and use custom workflows instead.
The type of Jira issue to create. Options are pulled from the project specified in Project Key.
The initial status of the new ticket. Options are pulled from the selected project and issue type.
The Summary field of the Jira ticket. Defaults to
{{ incident.title }}. Supports Liquid syntax.The Description field of the Jira ticket. Defaults to
{{ incident.summary }}. Supports Liquid syntax.Assign the Jira ticket to a user by email address. If blank, the ticket is assigned to the incident creator. Supports Liquid syntax.
Automatically create a bookmark to the Jira ticket in the incident’s Slack channel for quick access.
Automatically update the matching Jira ticket whenever the incident is updated. This is one-way: changes flow from Rootly to Jira only.
Jira Ticket for Action Items
Jira Ticket for Action Items
This section controls how Jira subtasks are created from Rootly action items.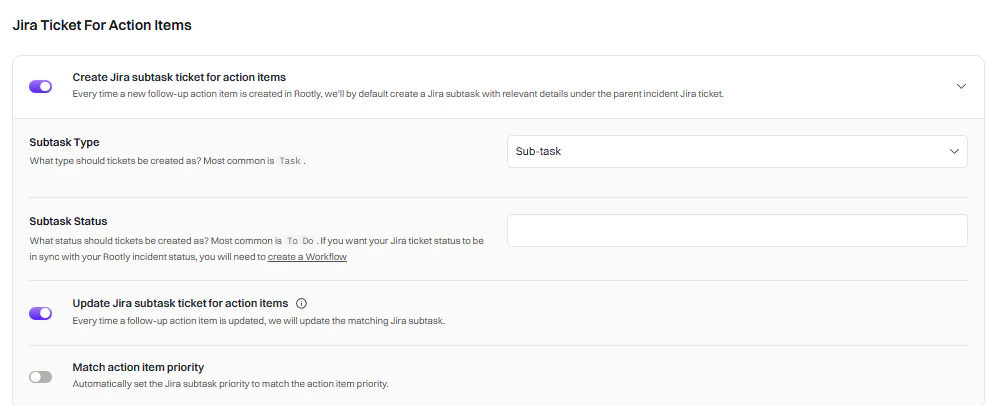
Automatically create a Jira subtask under the parent Jira ticket every time a new action item is created in Rootly.
Leave this field blank. Jira subtasks can only be one type. This field will be expanded in a future release.
The initial status of the new subtask. Options are pulled from the project specified in Project Key.
Automatically update the matching Jira subtask whenever an action item is updated. This is one-way: changes flow from Rootly to Jira only.
Automatically set the Jira subtask priority to match the action item priority in Rootly.
Use Smart Defaults when you want instant, built-in Jira issue automation without touching workflows. Build a workflow when you need conditions, custom triggers, multiple actions, or more advanced issue routing.
Custom Workflows
Custom workflows give you full control over when and how Jira issues are created or updated. You can filter by severity, service, environment, and more — or chain multiple Jira actions together in a single workflow.1
Create a new workflow
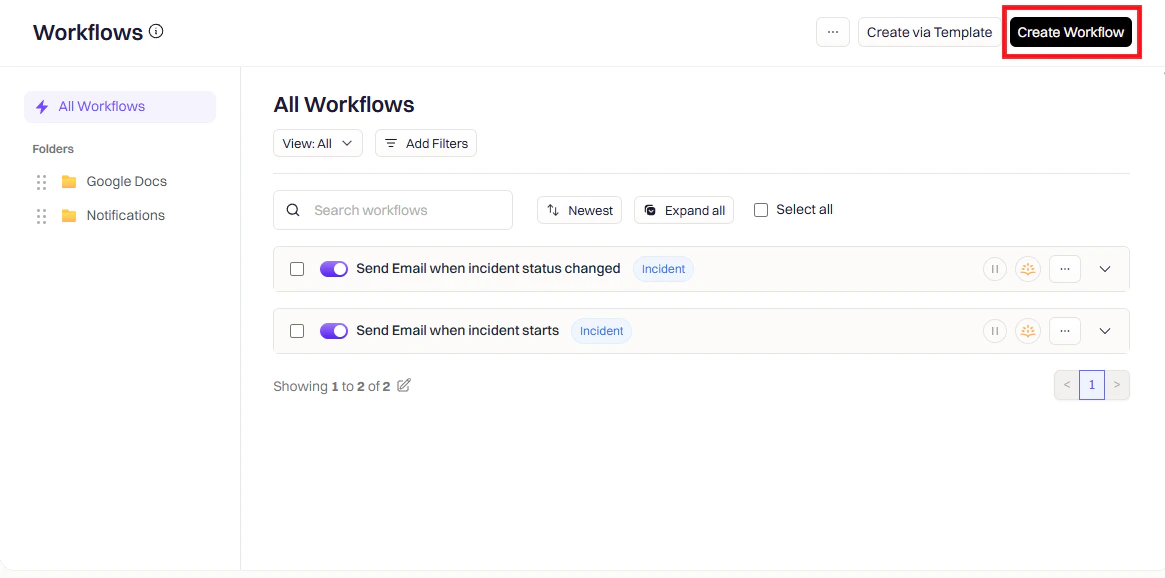
Open Rootly → Workflows → Create Workflow and choose the workflow type that matches your use case.
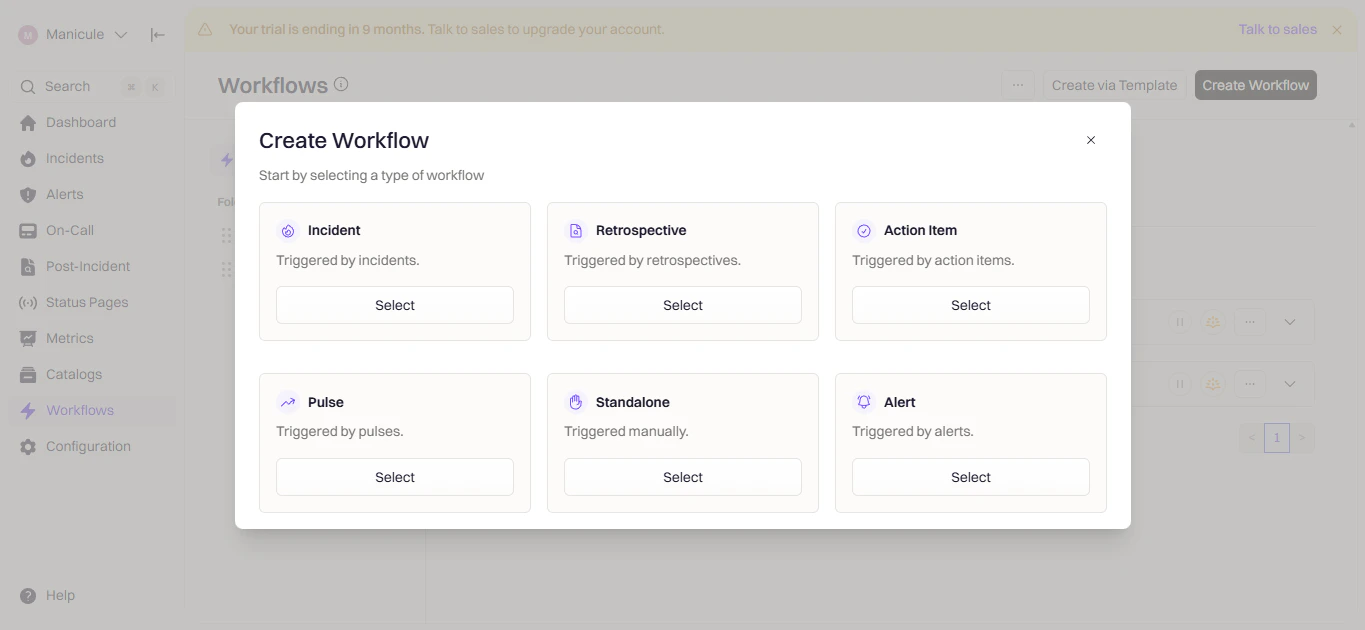
2
Configure triggers
Triggers define when the workflow runs. Choose the event that should create or update a Jira issue.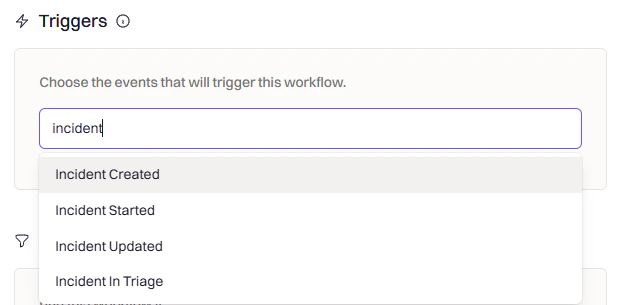
3
Add conditions
Conditions let you control when the workflow should run after it’s been triggered. This keeps your Jira project clean by limiting automation to the incidents that matter.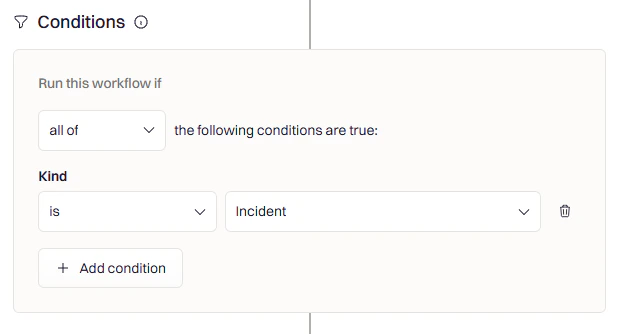
- Severity-based — Only create Jira issues for SEV-1 or SEV-2 incidents
- Team or service filters — Only fire for incidents impacting specific teams or services
- Incident type — Ensure the workflow only runs when the Kind is set to Incident
- Environment — Trigger only for customer-facing or production-impacting incidents
4
Add a Jira action
Actions are the steps that run when the workflow fires. Click Add Action, then search for Jira to see the available actions.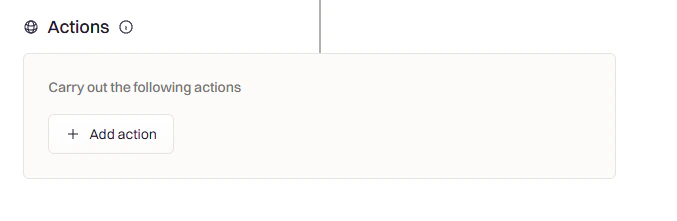
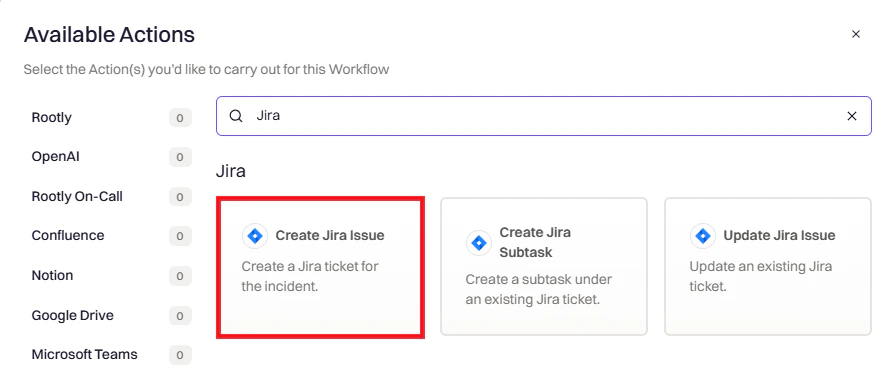
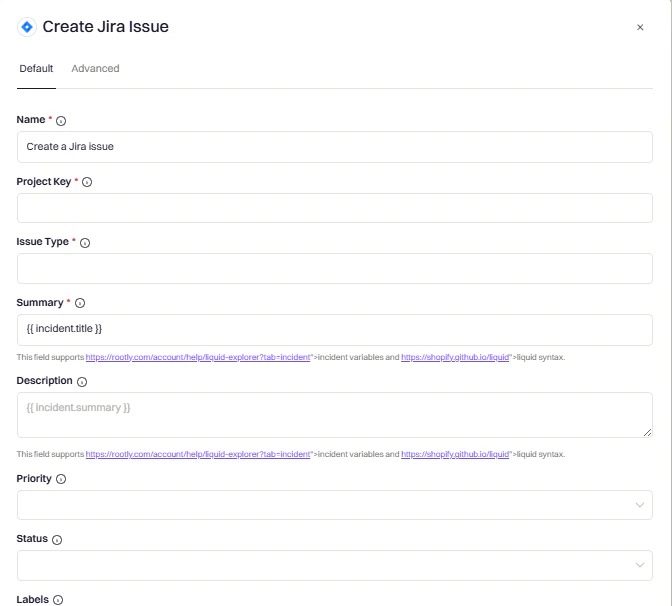
Create Jira Issue
Creates a new Jira issue for an incident or retrospective.Optional label for this action. Does not affect behavior.
The Jira project where the issue will be created.
The type of Jira issue to create (e.g., Bug, Task, Story). Options are pulled from the selected project.
Title of the Jira issue. Supports Liquid syntax (e.g.,
{{ incident.title }}).Detailed description. Supports Liquid syntax (e.g.,
{{ incident.summary }}).Priority of the Jira issue (e.g., High, Medium, Low).
Initial status of the issue. Options are pulled from the selected project and issue type.
Jira labels to categorize the issue. Supports multiple values.
Optional due date. Supports Liquid syntax or fixed dates.
The reporter for the Jira issue. Defaults to the incident creator. Supports Liquid syntax.
The assignee for the Jira issue. Supports Liquid syntax.
Prevents the workflow from stopping if this action fails.
Toggle this action on or off, useful when testing.
Use Rootly’s Liquid Variable Explorer to test variables before using them in your workflow.
Update Jira Issue
Updates an existing Jira issue. You must reference the issue using{{ incident.jira_issue_id }} in the Jira Issue to Update field.The Update Jira Issue action also works inside Action Item Workflows. When paired with the
Action Item Updated trigger, it’s the canonical way to enrich Jira tickets created via Export to ticketing with incident context (Rootly URL, severity, services, etc.) — see Linking Exported Tasks Back to the Incident. In an action item workflow, use {{ action_item.jira_issue_id }} instead of the incident-side variable.Create Jira Subtask
Creates a subtask under an existing Jira issue. Reference the parent issue using{{ incident.jira_issue_id }} in the Parent Jira Issue field. The Project Key must match the one used to create the parent issue.This action is intended for action items or sub-incidents.
5
Name and save the workflow
Give your workflow a descriptive name (e.g., “Create Jira Issue on SEV-1 Incident”), then click Create Workflow.
Jira Native Field Mapping
Some Jira fields behave differently than standard custom fields. This section explains how to correctly map Rootly fields to Jira’s native fields.Labels (Native Jira Field)
Labels (Native Jira Field)
Jira’s native Labels field uses a different syntax than custom label-type fields.Map Rootly services to Jira Labels:Map a Rootly custom multi-select to Jira Labels:
Replace
customfield_12345 with your actual Jira field ID. Find field IDs in Jira Settings → Issues → Custom Fields.Team (Native Jira Field)
Team (Native Jira Field)
Jira’s native Team field is stored as a custom field but only allows a single team selection.Map a static Jira Team ID:Map Rootly’s first team dynamically:
This example assumes you store the corresponding Jira Team ID in the Rootly team’s description field. Adjust based on how your teams are configured.
Custom Fields Mapping
The Custom Fields Mapping section lets you map Rootly incident data to Jira custom fields dynamically.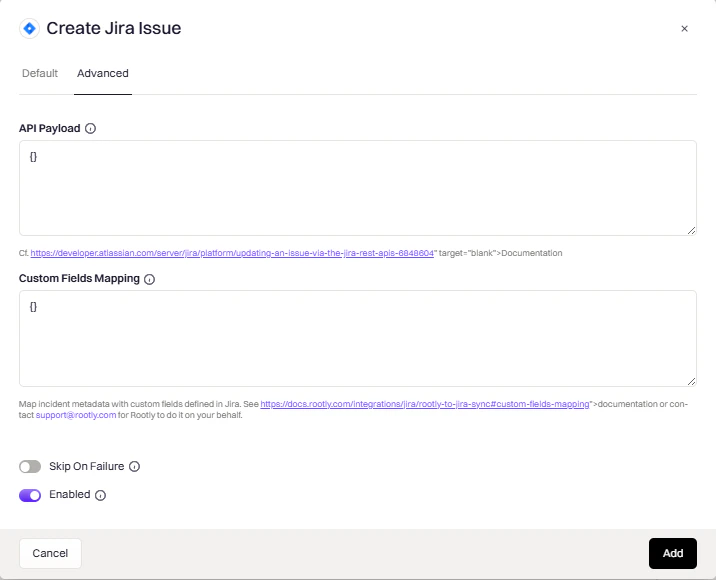
What You Need
For detailed instructions on finding Jira field IDs, see Atlassian’s documentation.
Field Type Mappings
Text and Paragraph Fields
Text and Paragraph Fields
Single Select Fields
Single Select Fields
Note the
{ "value": ... } wrapper required by Jira:Multi-Select Fields
Multi-Select Fields
Simple approach (Rootly custom multi-select):Manual array building (Rootly native fields):
Labels Fields (Custom)
Labels Fields (Custom)
For Jira custom fields of type “Labels” (different from the native Labels field):
Number Fields
Number Fields
Date/Time Fields
Date/Time Fields
Must use ISO 8601 format:
User Fields
User Fields
Single user:Multiple users:
How to Test Your Mapping
- Create a test incident in Rootly
- Run your workflow manually
- Check the Jira issue to verify fields are populated correctly
- If errors occur, go to Workflows → Your Workflow → … → View Runs to see the error details
API Payload
The API Payload section provides direct access to Jira’s REST API for advanced field updates not available through Custom Fields Mapping.API Payload uses Jira’s update issue REST API. Fields use verb-based operations:
set, add, and remove.When to Use API Payload
API Payload Examples
Set Priority Based on Severity
Set Priority Based on Severity
Add Comments
Add Comments
Add a comment to an existing Jira issue. Only works with the Update Jira Issue action.
Link Issues Together
Link Issues Together
“Relates to” link:Custom “Action item for” link:
Set Native Labels Field
Set Native Labels Field
Set Components Field
Set Components Field
API Payload Verbs
Debugging
To view error details, locate the workflow in Rootly, then select … → View Runs → View.Best Practices
- Name workflows clearly. Use names like
Create Bug on High-Priority IncidentorUpdate Jira Issue on Resolutionso the intent is obvious. - Keep logic simple. Avoid overly complex conditions or chained automations — simpler workflows are easier to debug.
- Test in a sandbox project. Before applying to production, trigger test incidents to verify issues are created and updated as expected.